Fortinet FortiGate-7000E Series User manual

FPM-7620E Processing Module Guide
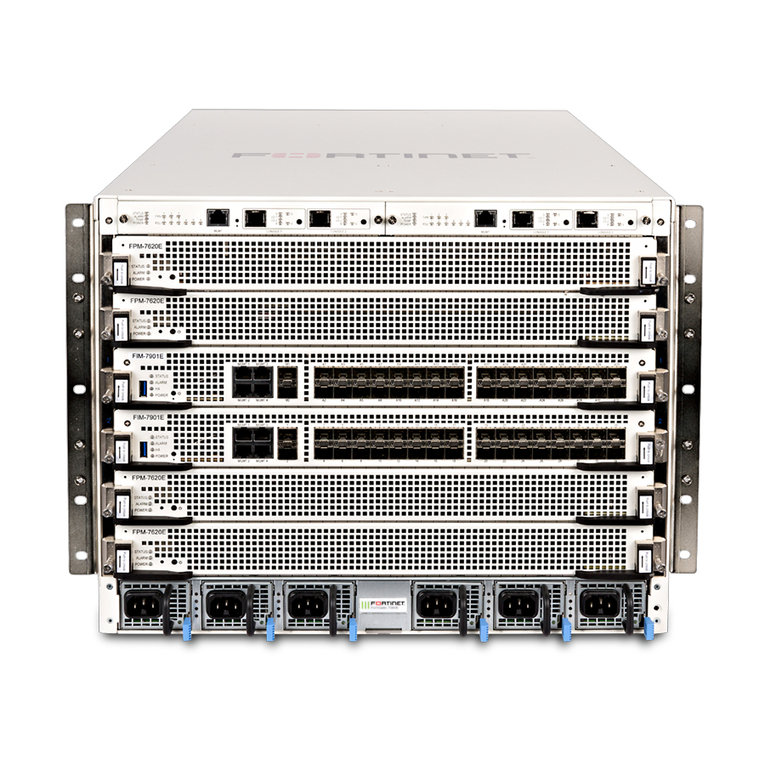
FortiGate-7000E Series

FORTINET DOCUMENT LIBRARY
https://docs.fortinet.com
FORTINET VIDEO GUIDE
https://video.fortinet.com
FORTINET BLOG
https://blog.fortinet.com
CUSTOMER SERVICE & SUPPORT
https://support.fortinet.com
FORTINET TRAINING & CERTIFICATION PROGRAM
https://www.fortinet.com/support-and-training/training.html
NSE INSTITUTE
https://training.fortinet.com
FORTIGUARD CENTER
https://fortiguard.com/
END USER LICENSE AGREEMENT
https://www.fortinet.com/doc/legal/EULA.pdf
FEEDBACK
Email: techdoc@fortinet.com
October 28, 2019
FPM-7620E Processing Module Guide
01-606-374568-20191028

TABLEOFCONTENTS
Change log 4
FPM-7620E processing module 5
Mounting hardware 5
Module levers 5
Power sliders 6
Secure screws 6
Physical description 6
Front panel LEDs 7
Turning the module on and off 7
NMI switch 7
NP6 network processors - offloading data traffic 7
Accelerated IPS, SSL VPN, and IPsec VPN (CP9 content processors) 8
Hardware installation 10
FPM-7620E mounting hardware 10
Inserting a FPM-7620E module into a chassis 11
Shutting down and removing a FPM-7620E module from a chassis 15
Troubleshooting 20
FPM-7620E does not startup 20
FPM-7620E status LED is flashing during system operation 20
Cautions and warnings 21
Environmental specifications 21
Safety 22
Regulatory notices 23
Federal Communication Commission (FCC) – USA 23
Industry Canada Equipment Standard for Digital Equipment (ICES) – Canada 23
European Conformity (CE) - EU 23
Voluntary Control Council for Interference (VCCI) – Japan 24
Bureau of Standards Metrology and Inspection (BSMI) – Taiwan 24
China 24
FPM-7620E Processing Module Guide Fortinet Technologies Inc.

Change log
Date Change description
October 28, 2019 Restructuring and bug fixing.
FPM-7620E Processing Module Guide Fortinet Technologies Inc.

FPM-7620E processing module
The FPM-7620E processing module is a high-performance worker module that processes sessions load balanced to it
by FortiGate-7000 series interface (FIM) modules over the chassis fabric backplane. The FPM-7620E can be installed in
any FortiGate-7000 series chassis in slots 3 and up.
The FPM-7620E includes two 80Gbps connections to the chassis fabric backplane and two 1Gbps connections to the
base backplane. The FPM-7620E processes sessions using a dual CPU configuration, accelerates network traffic
processing with four NP6 processors, and accelerates content processing with eight CP9 processors. The NP6 network
processors are connected by the FIM switch fabric so all supported traffic types can be fast path accelerated by the NP6
processors.
FPM-7620E front panel
Power
Slider
Module
Lever
Secure
Screw
Module
Lever
Power
Slider
Secure
Screw
Status, Alarm,
and Power LEDS
Power
Button
NMI
Button
Mounting hardware
Use the module levers, power sliders, and secure screws to insert, secure and remove the module from the chassis.
Module levers
Carefully slide the module all of the way into the chassis slot and fully close the module levers to seat the module into
the chassis slot and to connect the module to the chassis backplane connectors. When both module levers are fully
closed, the power sliders can be lowered to their bottom position, locking the module levers and turning on power to the
module.
Raise the power sliders to unlock the module levers and turn off module power. Then open the module levers to eject
the module from the backplane connectors; allowing the module to be removed from the chassis.
The module lever mechanism helps reduce the engagement force required to insert or eject the module from the
backplane connectors.
FPM-7620E Processing Module Guide Fortinet Technologies Inc.

FPM-7620E processing module 6
The module levers do not fully secure the module in the chassis. The secure screws must be tightened to reliably secure
the module in the chassis and to make sure the module remains securely connected to the backplane for power and
network connectivity.
Power sliders
Close the module levers and move the power sliders to their bottom position to lock the module levers and turn the
module power switch on.
Move the power sliders to the top position to unlock the module levers and turn the module power switch off.
Gently push the power sliders down to make sure they are in their bottom position. If the module LEDs do not light the
module is not receiving power. If this happens check the power sliders to make sure they are in their bottom position.
Secure screws
Fully tighten the secure screws to lock the module in the chassis providing a secure and reliable connection with the
backplane.
Loosen the secure screws before ejecting the module from the chassis.
Physical description
Dimensions 1.69 x 17.11 x 18.49 in. (43 x 435 x 470 mm) (Height x Width x Length)
Weight 14.0 lb. (6.4 kg)
Operating Temperature 32 to 104°F (0 to 40°C)
Storage Temperature -31 to 158°F (-35 to 70°C)
Relative Humidity 10% to 90% (Non-condensing)
Power consumption Max: 410W; Average: 320W
Max Current 34A
Heat Dissipation 1395BTU/h
Joules/h 1466KJ/h
FPM-7620E Processing Module Guide Fortinet Technologies Inc.

FPM-7620E processing module 7
Front panel LEDs
LED State Description
STATUS Off The FPM-7620E is powered off.
Green The FPM-7620E is powered on and operating normally.
Flashing Green The FPM-7620E is starting up.
ALARM Red Major alarm.
Amber Minor alarm
Off No alarms
POWER Green The FPM-7620E is powered on and operating normally.
Off The FPM-7620E is powered off.
Turning the module on and off
You can use the front panel power button to turn the FPM-7620E power on or off. If the FPM-7620E is powered on,
press the power switch to turn it off. If the FPM-7620E is turned off and installed in a chassis slot, press the power
button to turn it on.
NMI switch
When working with Fortinet Support to troubleshoot problems with the FPM-7620E you can use the front panel non-
maskable interrupt (NMI) switch to assist with troubleshooting. Pressing this switch causes the software to dump
registers/backtraces to the console. After the data is dumped the FPM-7620E reboots. While the FPM-7620E is
rebooting, traffic is temporarily blocked. The FPM-7620E should restart normally and traffic can resume once the it is up
and running.
NP6 network processors - offloading data traffic
The four FPM-7620E NP6 network processors, eight CP9 processors, and FIM module integrated switch fabric (ISF)
provide hardware acceleration by offloading data traffic from the FPM-7620E CPUs. The result is enhanced network
performance provided by the NP6 processors plus the network processing load is removed from the CPU. The NP6
processor can also handle some CPU intensive tasks, like IPsec VPN encryption/decryption. Because of the integrated
switch fabric, all sessions are fast-pathed and accelerated.
FPM-7620E Processing Module Guide Fortinet Technologies Inc.
FPM-7620E processing module 8
FPM-7620E hardware architecture
Chassis Base Backplane
Chassis Fabric Backplane
CPU
CPU
1G
1G
80G 80G
CP9
CP9
CP9
CP9
CP9
CP9
CP9
CP9
NP6
np6_0
NP6
np6_1
NP6
np6_2
NP6
np6_3
System Bus
Accelerated IPS, SSL VPN, and IPsec VPN (CP9 content processors)
The FPM-7620E includes eight CP9 processors that provide the following performance enhancements:
lFlow-based inspection (IPS, application control etc.) pattern matching acceleration with over 10Gbps throughput
lIPS pre-scan
lIPS signature correlation
lFull match processors
lHigh performance VPN bulk data engine
lIPsec and SSL/TLS protocol processor
lDES/3DES/AES128/192/256 in accordance with FIPS46-3/FIPS81/FIPS197
lMD5/SHA-1/SHA256/384/512-96/128/192/256 with RFC1321 and FIPS180
lHMAC in accordance with RFC2104/2403/2404 and FIPS198
lESN mode
lGCM support for NSA "Suite B" (RFC6379/RFC6460) including GCM-128/256; GMAC-128/256
lKey Exchange Processor that supports high performance IKE and RSA computation
lPublic key exponentiation engine with hardware CRT support
lPrimary checking for RSA key generation
lHandshake accelerator with automatic key material generation
lTrue Random Number generator
lElliptic Curve support for NSA "Suite B"
FPM-7620E Processing Module Guide Fortinet Technologies Inc.
FPM-7620E processing module 9
lSub public key engine (PKCE) to support up to 4096 bit operation directly (4k for DH and 8k for RSA with CRT)
lDLP fingerprint support
lTTTD (Two-Thresholds-Two-Divisors) content chunking
lTwo thresholds and two divisors are configurable
FPM-7620E Processing Module Guide Fortinet Technologies Inc.
Hardware installation
This chapter describes installing a FPM-7620E processing module into a FortiGate-7000 chassis.
FPM-7620E mounting hardware
To install a FPM-7620E you slide the module into slot 3 or up in the front of an FortiGate-7000 series chassis and then
use the mounting hardware, described in Mounting hardware on page 5, to lock the module into place in the slot. When
locked into place and positioned correctly, the module front panel is flush with the chassis front panel and connected to
the chassis backplane.
To position the module correctly, you must use the mounting hardware shown below for the right of the FPM-7620E
front panel. The mounting hardware on the left of the front panel is the same but reversed. The FPM-7620E mounting
hardware aligns the module in the chassis slot and is used to insert and eject the module from the slot.
Open Closed
Secure Screw
Module lever
Power Slider
(to open move the power slider up about 2 mm)
Power Slider
Alignment Pin Module Lever
Secure Screw
Alignment Pin
The FPM-7620E module levers align the module in the chassis slot and insert and eject the module from the slot. The
power sliders activate micro switches that turn on or turn off power to the module. When both power sliders are raised,
the module cannot receive power. When the sliders are fully closed, the module can receive power if it is fully inserted
into a chassis slot.
FPM-7620E Processing Module Guide Fortinet Technologies Inc.
Hardware installation 11
Inserting a FPM-7620E module into a chassis
This section describes how to install a FPM-7620E module into a FortiGate-7000 series chassis slot 3 or up. The
procedure includes photographs to illustrate the procedure steps. The photos were taken in one of Fortinet's hardware
labs using a generic module and FortiGate-7000 chassis.
You must carefully slide the module all the way into the chassis slot, close the module levers
to seat the module into the slot, and tighten the secure screws to make sure the module is
fully engaged with the backplane and secured. You must also make sure that the power
sliders are fully closed by gently pushing them down.
Installation Highlights:
1. Module levers must be closed.
2. Secure screws must be tightened.
3. Power sliders must be fully closed for the module to get power and start up.
If the module is not receiving power all LEDs remain off.
FPM-7620E modules are hot swappable. This procedure is the same whether or not the chassis is powered on.
Do not carry the FPM-7620E module by holding the module levers or secure screws. When
inserting or removing the FPM-7620E from a chassis slot, handle the module by the front
panel. The levers are not designed for carrying the module. If the levers become bent or
damaged, the FPM-7620E may not align correctly in the chassis slot.
To complete this procedure, you need the following equipment and tools:
la FPM-7620E
la FortiGate-7000 chassis with an empty slot
lan electrostatic discharge (ESD) preventive wrist strap with connection cord
la Phillips screwdriver
FPM-7620Es must be protected from static discharge and physical shock. Only handle or work
with FPM-7620Es at a static-free workstation. Always wear a grounded electrostatic discharge
(ESD) preventive wrist strap when handling FPM-7620Es. Attach the ESD wrist strap to your
wrist and to an ESD socket or to a bare metal surface on the chassis or frame. (An ESD wrist
strap is not visible in the photographs below because they were taken in an ESD safe lab
environment.)
1. Remove the FPM-7620E module from its packaging.
The module levers are closed when you first remove a new module from its packaging.
FPM-7620E Processing Module Guide Fortinet Technologies Inc.

Hardware installation 12
2. Align the module with the chassis slot, slowly slide the module into the slot, stop at
about 1-2 inches from fully inserting it.
Module levers Module levers
Slide in slowly
Stop position
3. Unlock the left and right module levers by pushing the power sliders up until the
levers pop open.
Before sliding the final portion of the module into the chassis fully open both levers by pushing the power sliders up.
Fully open both levers to avoid damaging the lever mechanism. Damaging the levers can prevent the module from
connecting to power.
Levers pop open
Power
slider
up
Power
slider
up
FPM-7620E Processing Module Guide Fortinet Technologies Inc.
Hardware installation 13
4. Continue pushing the module into the slot until the levers engage with the sides of
the chassis slot.
Insert the module by applying moderate force to the front faceplate (not the levers) to slide the module into the slot. The
module should glide smoothly. If you encounter any resistance, the module could be aligned incorrectly. Pull the module
back out and try inserting it again.
Module alignment pin
inserted into chassis
Apply moderate force to
push the module slowly
into the slot. Stop Position
Levers engage with chassis
5. Close both levers by pushing them into contact with the module front panel.
Closing the levers draws the module into the chassis slot and connects the module rear connectors to the chassis
backplane. The design of the levers leaves gaps to compensate for tolerances. So even when the levers are fully closed,
the module may not be fully into position and in contact with the chassis backplane.
Levers closed
Rotate to close
Small gap between the
module and the chassis
when levers are closed.
FPM-7620E Processing Module Guide Fortinet Technologies Inc.
Hardware installation 14
6. Tighten both secure screws to close the gap between the module and the chassis.
Begin by engaging the secure screws into the chassis tapped hole by hand and roughly tighten them. Then use a Phillips
screwdriver to fully tighten the two secure screws. Do not use a power screwdriver, because the high torque and speed
can damage the chassis or screw thread. After tightening both secure screws, the module is fully seated in the chassis
slot and the module connectors are fully in contact with the chassis backplane.
After tightening both secure
screws, the module is fully
engaged with the chassis.
Tighten by hand
Fully tighten with a
screwdriver
FPM-7620E Processing Module Guide Fortinet Technologies Inc.

Hardware installation 15
7. Push down both power sliders to make sure the module power switch is on.
When the module is fully in position, the power sliders should drop down, lock the levers, and turn module power on.
Gently push both power sliders down to their bottom position to make sure they are fully closed.
Levers locked
Power slider
down to bottom
Power slider
down to bottom
8. If the chassis is powered on, check the modle LEDs to verify that the module is
operating correctly
LED Normal operation state
Status Green
Alarm Off
HA Off
Power Green
Shutting down and removing a FPM-7620E module from a chassis
This procedure describes how to shut down and remove a FPM-7620E module from FortiGate-7000 chassis. The
procedure includes photographs to illustrate the procedure steps. The photos were taken in one of Fortinet's hardware
labs using a generic module and FortiGate-7000 chassis.
FPM-7620Es are hot swappable. This procedure is the same whether or not the chassis is powered on.
FPM-7620E Processing Module Guide Fortinet Technologies Inc.

Hardware installation 16
Do not carry the FPM-7620E by holding the module levers or secure screws. When inserting or
removing the FPM-7620E from a chassis slot, handle the module by the front panel. The
levers are not designed for carrying the module. If the levers become bent or damaged, the
FPM-7620E may not align correctly in the chassis slot.
To complete this procedure, you need the following equipment and tools:
la FortiGate-7000 chassis with a FPM-7620E module installed
lan electrostatic discharge (ESD) preventive wrist strap with connection cord
la Phillips screwdriver
FPM-7620Es must be protected from static discharge and physical shock. Only handle or work
with FPM-7620Es at a static-free workstation. Always wear a grounded electrostatic discharge
(ESD) preventive wrist strap when handling FPM-7620Es. (An ESD wrist strap is not visible in
the photographs below because they were taken in an ESD safe lab environment.)
1. Shut down the module operating system properly.
To avoid potential hardware problems, always shut down the module operating system properly before removing the
module from a chassis slot or before powering down the chassis. To shutdown the module, connect to the module GUI
and select Shutdown from the administrator menu. Or, from the module CLI,enter the execute shutdown
command.
2. Disconnect all cables from the module, including all network cables and USB cables
or keys.
FPM-7620E Processing Module Guide Fortinet Technologies Inc.

Hardware installation 17
3. Use a Phillips screwdriver to loosen both secure screws and then fully loosen them
by hand.
Fully loosen the secure screws, otherwise the levers may be damaged when used to eject the module from the chassis
slot. Do not use a power screwdriver, because the high torque and speed can damage the chassis or screw thread.
Use a Phillips screwdriver to
loosen both screws.
Fully loosen both
screws by hand.
FPM-7620E Processing Module Guide Fortinet Technologies Inc.

Hardware installation 18
4. Unlock the left and right levers by pushing the power sliders up until the levers pop
open.
Push the power sliders up to fully open both levers. If the chassis is powered on, this step turns off the module’s power.
Levers pop open
Power
slider
up
Power
slider
up
FPM-7620E Processing Module Guide Fortinet Technologies Inc.

Hardware installation 19
5. Use moderate force to fully open the levers and eject the module from the chassis.
Levers opened
Rotate to open
Module ejects
Module ejected
6. Hold the levers to slide the module part way out of the chassis slot. Then grasp the
module by the sides and carefully slide it out of the slot.
FPM-7620E Processing Module Guide Fortinet Technologies Inc.

Hardware installation 20
Troubleshooting
This section describes some common troubleshooting topics:
FPM-7620E does not startup
Positioning of FPM-7620E mounting hardware and a few other causes may prevent a FPM-7620E from starting up
correctly.
Power sliders and module levers not fully closed
If the power sliders or module levers are damaged or positioned incorrectly, the FPM-7620E may not start up. Make
sure the sliders are fully closed and the levers are correctly aligned, fully inserted, and locked and the secure screws are
tightened.
Firmware problem
If the FPM-7620E is receiving power and the sliders and levers are fully closed, and you have restarted the chassis and
the FPM-7620E still does not start up, the problem could be with FortiOS. Connect to the FPM-7620E console and try
cycling the power to the board. If the BIOS starts up, interrupt the BIOS startup and install a new firmware image. See
your FortiGate-7000 chassis system guide for information about accessing and installing firmware on individual
modules.
If this does not solve the problem, contact Fortinet Technical Support.
FPM-7620E status LED is flashing during system operation
Normally, the FPM-7620E Status LED is off when the FPM-7620E is operating normally. If this LED starts flashing while
the module is operating, a fault condition may exist. At the same time the FPM-7620E may stop processing traffic.
To resolve the problem you can try removing and reinserting the FPM-7620E in the chassis slot. Reloading the firmware
may also help.
If this does not solve the problem there may have been a hardware failure or other problem. Contact Fortinet Technical
Support for assistance.
FPM-7620E Processing Module Guide Fortinet Technologies Inc.
Other manuals for FortiGate-7000E Series
3
This manual suits for next models
1
Table of contents
Other Fortinet Control Unit manuals

Fortinet
Fortinet FIM-7920E User manual

Fortinet
Fortinet FPM-7620F User manual

Fortinet
Fortinet FIM-7910E User manual

Fortinet
Fortinet TalkSwitch 8plus Instruction Manual

Fortinet
Fortinet FortiGate-7000E Series User manual

Fortinet
Fortinet FIM-7941F User manual

Fortinet
Fortinet FortiFone FF-60b User manual

Fortinet
Fortinet FIM-7904E User manual