Fortis FS2N1KB12WA User manual

12" 2-IN-1 BALANCE
& PEDAL BIKE
FS2N1KB12WA

2
Contents
2
Safety & warnings
3
Safety checklist
8
Overview
10
Assembly
11
2-in-1 conversion (balance bike)
22
Cleaning & care
25
Specifications
28
Troubleshooting
29
Notes
31
Note:
The illustrations in this manual are for reference only; the components of your bicycle
might differ.

3
This user guide was written to help you get the most performance, comfort, enjoyment and
safety when riding your new bicycle. It is important for you to understand your new bike.
By reading this user guide before you go out on your first ride, you’ll know how to get the
most from your new bicycle. It is also important that your first ride on your new bicycle is
taken in a controlled environment, away from cars, obstacles, and other cyclists.
Before First Ride
•Before first use, please double-check the function of all the parts of your bike. If you
have any doubts or if you detect a problem, please contact Kogan.com for support.
•Respect local and national road traffic regulations.
•For your safety, it is highly recommended that you wear a certified helmet.
•When used during heavy rain, snow, in slippery conditions or in the case of low visibility,
be careful and adjust your speed.
•The illustrations in this user guide are used simply to provide examples; the
components of your bicycle might differ. In addition, some of the parts shown might be
optional and not part of your bicycle's standard equipment.
•The following user guide is only a guide to assist you and is not a complete or
comprehensive manual of all aspects of maintaining and repairing your bicycle. If you
are not comfortable, or lack the skills or tools to assemble the bicycle yourself, you
should take it to a qualified mechanic at a bicycle shop. Additionally, you can contact
Kogan.com for support.
Helmet Use
Always wear a properly fitted, Australian standard approved helmet while riding your bike.
Correct
Helmet fits snug
and covers forehead
Incorrect
Forehead is exposed and
vulnerable to serious injury
SAFETY & WARNINGS
WARNING: Always wear a properly fitted helmet when you ride your bicycle. Do not
ride at night. Avoid riding in wet conditions.

4
General Warning
Bicycle riding can be a hazardous activity even under the best of circumstances. Proper
maintenance of your bicycle is your responsibility as it helps reduce the risk of injury. This
user guide contains many WARNINGS and CAUTIONS concerning the consequences of
failure to maintain or inspect your bicycle. Many of the warnings and cautions say, “you may
lose control and fall”. Because any fall can result in serious injury or even death, we do not
repeat the warning of possible injury or death whenever the risk of falling is mentioned.
Kogan.com does not encourage: trick riding, ramp riding, jumping, aggressive riding, riding
on severe terrain, riding in severe climates, riding with heavy loads, riding double,
commercial activities; such use is inherently dangerous and can cause serious injury to the
rider.
Note to Parents
It is a tragic fact that most bicycle accidents involve children. As a parent or guardian, you
bear the responsibility for the activities and safety of your child. Among these responsibilities
are to ensure;
•That the bicycle that your child is riding is properly fitted to the child
•That it is in good repair and safe operating condition
•That the play of young children is supervised by an adult
•That you and your child have learned, understand and obey not only the applicable
local motor vehicle, bicycle and traffic laws, but also the common sense rules of safe
and responsible bicycling
As a parent, you should read this user guide before letting your child ride the bicycle. Please
ensure that your child always wears an approved bicycle helmet when riding.
Note: The following manual is only a guide to assist you and is not a complete or
comprehensive manual of all aspects of maintaining and repairing your bicycle. Fortis
recommend that you consult a bicycle specialist if you have doubts or concerns regarding
your experience or ability to properly assemble, repair or maintain your bicycle.
Weight Limit
The maximum structural weight recommendations for our bicycles are:
12” bicycles: 30 kg 14” bicycles: 40 kg 18” bicycles: 50 kg
CAUTION: For safe and comfortable riding there should be a clearance of
no less than 1 inch between the inseam area of the intended rider and the
top tube of the bicycle frame, while the rider straddles the bicycle with both
feet flat on the ground.
WARNING: If the bicycle is too large the rider cannot reach the pedals easily
or the ground when stopping which may result in loss of control and/or
injury.

5
Road Safety
Like any sport, bicycling involves risk of injury and damage. You need to know and practice
the rules of safe and responsible riding.
•In the interest of safer cycling, make sure you read and understand this user guide. Note
and perform pre-ride safety checks.
•Some states and local laws may require that your bicycle be equipped with a warning
device such as a horn or bell and a front and rear light if the bicycle is to be ridden after
dark.
•Always wear shoes when riding a bicycle and avoid loose fitting clothes.
•Check your brakes frequently. The ability to stop your bicycle is critical. Roads are
slippery when wet so avoid sharp turns and allow more distance for stopping. Caliper
brakes may become less efficient when wet. Leaves, loose gravel, and other debris can
also affect stopping.
•Always ride in the same direction as traffic. Never ride against traffic.
•Stop and look before you leave an alley, driveway, or parking lot. Ride only when it is
clear.
•Follow the traffic flow in a straight line and stay close to the curb or in the bike lane,
when available. Watch for cars moving in and out of traffic.
•Obey all traffic regulations. Most traffic regulations apply to bike riders as well as
automobile operators.
•One rider per bike. Never carry other riders. This is dangerous and makes the bike harder
to control.
•Always be alert. Pedestrians have the right of way. Be alert when riding near parked
cars and ride far enough away from cars so that you won’t get hit if someone opens the
car door.
•Use caution at all intersections and stop signs. Stop and look both ways before
proceeding.
•Use hand signals. Communicate by using hand signals to tell other drivers what you are
going to do. Signal before turning unless your hand is needed to control the bike.
•Proper lights are recommended if you ride at night. Be sure to have a strong head-light,
a tail light, and a full set of reflectors. Check that reflectors are clean, straight,
unbroken, and securely mounted.
•Never carry packages or objects which obstruct vision.
•Never hold onto a moving vehicle while riding.
•The kick-stand is designed to support the bicycle only, not the bicycle and the rider.
•Avoid the following hazards: drain grates, potholes, soft road edges, gravel, sand, wet
leaves, and/or any obstruction in the road. Failure to do so could cause wheel(s) to
buckle and result in personal injury to the rider.
•Wet weather riding - riding your bicycle in wet conditions is not recommended. In wet
conditions traction and braking power is reduced. Riding in such conditions could result
in personal injury.
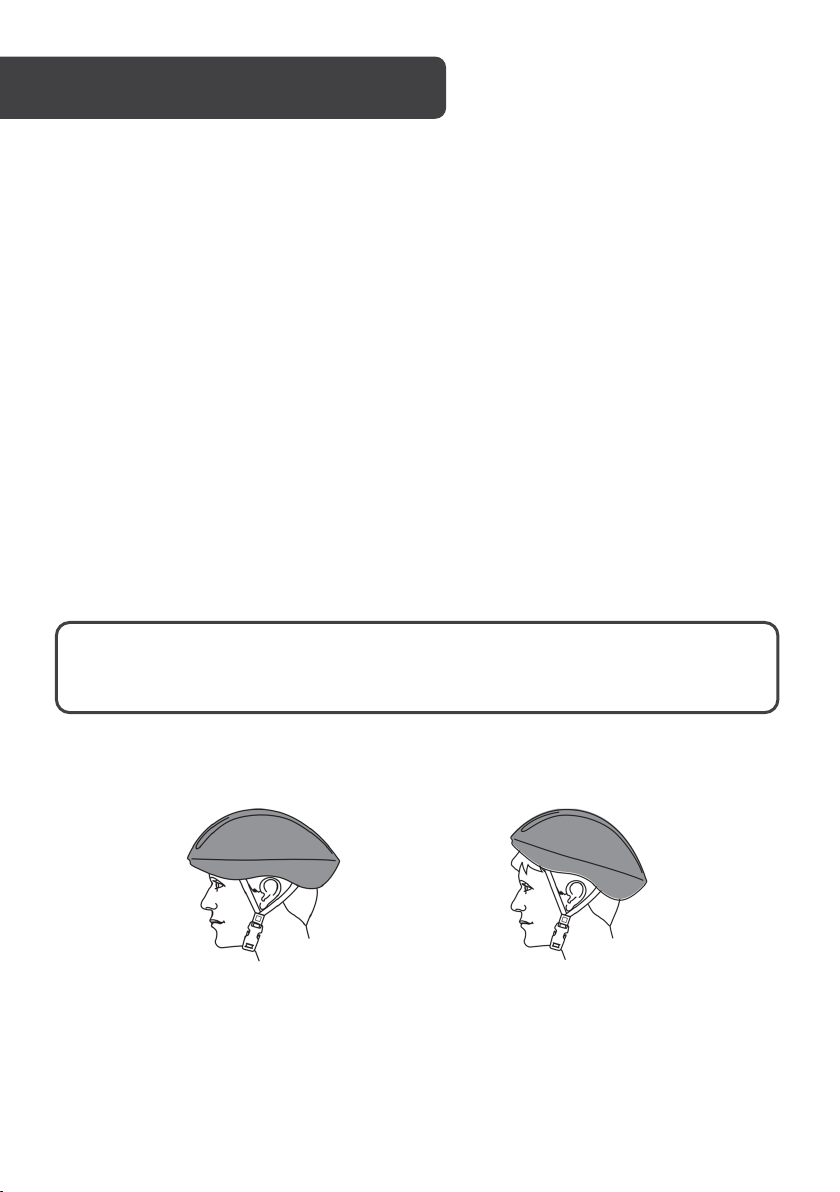
•Proper helmet use. A helmet that meets Australian standards should always be worn
when riding a bicycle. The helmet should fit properly and be worn on the crown of the

6
head, not tipped back. Ensure to replace your helmet at least every three years to
ensure the structural integrity of the foam. Replace after impact, regardless of lack of
visible damage to helmet.
•Use bike lanes when available. Also note that in certain states, cars may use bike lanes
when turning.
•Respect “bicycles are prohibited” signs.
Night Riding
Riding a bicycle at night is much more dangerous than riding during the day. A cyclist is very
difficult for motorists and pedestrians to see. Therefore, children should never ride at dawn,
dusk or at night.
WARNING: Reflectors are not a substitute for required lights. Riding at
dawn, at dusk, at night or at other times of poor visibility without an
adequate bicycle lighting system and without reflectors is dangerous and
may result in serious injury or death
WARNING: Do not remove the front or rear reflectors or reflector brackets
from your bicycle. They are an integral part of the bicycle’s safety system.
Removing the reflectors reduces your visibility to others using the roadway.
Being struck by other vehicles may result in serious injury or death.
Child Safety Rules
To avoid an accident, teach children good riding skills with an emphasis on safety.
•Always wear a properly fitted helmet.
•Do not play in driveways or on the road.
•Do not ride on busy streets.
•Do not ride at night.
•Obey all traffic laws, especially stop signs and red lights.
•Be aware of other road vehicles behind and nearby.
•Before entering a street: Stop, look for traffic, enter only when safe.
•If riding downhill, be extra careful. Slow down using the brakes and maintain control of
steering.
•Never take your hands off the handlebars, or your feet off the pedals when riding
downhill.

7
Frame Sizing
When selecting a new bicycle, the correct choice of frame size is a very important safety
consideration. To determine the correct size bicycle for the rider:
•Straddle the assembled bicycle with feet
shoulder width apart and flat on the ground.
•There must be at least one inch (2.5cm) of
clearance between the highest part of the top
tube of the bicycle and the crotch of the rider
with the tires properly inflated.
•To measure the inseam, use measuring tape to
measure from the ground (with shoes on) to the
inseam of your pants.
•Subtract the standover height from the inseam measurement to ensure that you have
the recommended amount of clearance. If you have less than one inch or more than
three inches (2.5 to 7.5cm), you may need to move up or down a frame size.
Top Tube
Height
Clearance
Inseam

8
Before every ride, it is important to carry out the following safety checks:
Brakes:
•Ensure front and rear brakes work properly.
•Ensure brake pads are not over worn and are correctly
positioned in relation to the rims.
•Ensure brake control cables are properly lubricated, correctly
adjusted, and display no obvious wear.
•Ensure brake control levers are properly lubricated and tightly
secured to the handlebar.
Cranks & Pedals:
•Ensure pedals are securely tightened to the cranks.
•Ensure cranks are securely tightened to the bottom bracket
and are not bent.
Frame & Fork:
•Check that the frame and fork are not bent, broken, or
cracked.
•If either are found to be bent, broken, or cracked, they should
be replaced.
Wheels & Tires:
•Ensure tires are inflated to within the recommended range as
displayed on the tire sidewall.
•Ensure tires have tread and have no bulges or excessive wear.
•Ensure rims run true and have no obvious wobbles or kinks.
•Ensure all wheel spokes are tight and not broken.
•Check that axle nuts are tight.
•Do not over inflate.
SAFETY CHECKLIST

9
Chain:
•Ensure chain is oiled, clean and runs smoothly.
•Extra care is required in wet or dusty conditions.
•On bicycles equipped with coaster brakes, check for proper
chain tension.
•Check to make sure your chain guard is tight and not touching
the crank or chain.
Bearings:
•Ensure all bearings are lubricated, run freely and display no
excess movement, grinding or rattling.
•Check headset, wheel bearings, pedal bearings and bottom
bracket bearings.
Handlebars:
•Ensure handlebar and stem are correctly adjusted and
tightened, and allow proper steering.
•Ensure that the handlebars are set correctly in relation to the
forks and the direction of travel.

10
1 Saddle 7 Handlebar 13 Brake lever
2 Seat post 8 Frame 14 Front reflector
3 Clamp 9 Chainguard and chain 15 Brake cable
4 Tyre 10 Crankset 16 Brake
5 Rim 11 Pedal 17 Brake pad
6 Training wheel 12 Bell 18 Front fork
OVERVIEW

11
Tools Required (Included)
Phillips head screwdriver Multi-function wrench Allen keys (5-6mm)
Getting Started
Open the box and check that all parts are present.
We strongly recommend reading this full user guide before beginning assembly. If you
aren’t comfortable with the assembly, we recommend bringing your new ride to your local
bike shop to have a qualified mechanic put it together for you.
CAUTION: As you assemble the bike, it may help to place a small amount of
white grease or anti-seize compound on the seat post, stem and threads of
the bolts to prevent rusting.
In the packaging, the frame, handlebars, front wheel and other components are attached
with zip ties. Lift everything out in one piece and set it down, with the chain facing upwards.
Cut the zip ties and remove any padding or packaging.
The following parts will required assembly:
1
Frame
6
Front & rear reflectors
2
Front wheel
7
Bell
3
Handlebar
8
Side wheel
4
Pedals
9
Front brake
5
Saddle
10
Front brake cable
ASSEMBLY

12
Step 1: Front wheel assembly
•Place wheel into fork dropouts. Install retaining washers with raised lip pointed towards
the fork and insert into the small hole of the fork blade (refer to Figure 1b & 1b).
•Install axle nut and securely tighten. Make sure the wheel is centred between the fork
blades.
•Spin the wheel to make sure that it is centred and clears the brake shoes. Tighten the
brakes if necessary.
•If the wheel is out of alignment you will need to “true” the wheel; when spinning the
wheel and notice the gaps between the brake pads are not consistently the same, the
wheel needs truing. See a qualified bike technician for assistance trueing wheels.
WARNING:Put the wheel in the centre of the fork and tighten both nuts.
WARNING: Failure to obey these steps can allow the front wheel to loosen
or dislodge while riding. This can cause injury or death to the rider or to
others.
WARNING: Replacement forks must have the same rake and same tube
inner diameter as those originally fitted to the bicycle.
Figure 1a Figure 1b
Axle nut Axle Hub
Retaining
Washer
Fork drop
out
Cone nuts

13
Step 2: Handlebar / stem assembly
Insert the stem and handlebar assembly into the bicycle frame, making sure the stem
wedge is loose (figure 2b). Make sure the cables are not tangled and track smoothly on
either side of the stem.
The stem should be pointing towards the front of the bike, aligned with the front wheel
(figure 2c). Tighten the stem bolt with 13mm wrench (figure 2d).
Figure 2b
Figure 2c
Figure 2d
WARNING:To prevent steering system damage and possible loss of control,
the stem must be inserted enough so that the minimum insertion marks are
completely covered (refer to figure 2a).
Figure 2a
Minimum insertion mark

14
Testing Handlebar and Stem Tightness
To test the tightness of the stem, straddle the front
wheel between your legs tightly (see figure 2e). Try to
turn the handlebar back and forth. The handlebar
should not slip or move independently of the front
wheel at all. If the handlebar does move, re-align the
stem with the front wheel and tighten the stem bolt.
Re-test to make sure the stem is secure with the
same process.
To test the tightness of the handlebar, hold the bike
stationary and try to rotate the ends of the handlebar
up and down or move the bar forward and back. If
the handlebar moves, loosen the handlebar clamp
nut or bolts evenly to re-position and then re-tighten.
Repeat the test until the bars will not move.
WARNING:To prevent steering system damage and possible loss of control,
the stem and handlebars must be properly adjusted and tightened. DO
NOT OVERTIGHTEN.
Figure 2e

15
Step 3: Brakes assembly
This bike is fitted with cantilever type brakes. The front brake needs to be installed (Refer to
figure 3a).
•Insert the brake cable into the link wire lead and notch the cable end into the slot of the
left brake arm.
•Loosen the anchor bolt on the right brake arm and slide the brake cable under the
tabbed washer.
•Squeeze both brake arms together so the brake shoes hit the rim, pull all slack out of
the brake cable, tighten the anchor bolt.
•With the cable fitted, the straddle holder should sit 10 - 20mm above the reflector
bracket. Adjust the brake shoes using a 10mm wrench so that they are parallel with the
rim and are positioned 1 - 2mm away from the rim. Several adjustments may be
necessary to achieve the correct brake position.
•Refer to figures 3b - 3g.
WARNING:When assembling or adjusting the brakes, make sure the cable
anchor nut is tight. Failure to securely tighten the nut could result in brake
failure and personal injury.
Side pull
Cable
Pull the cable
Nut
Figure 3a

16
Testing Brake Functions
To test the function of the front hand brake, lift the front of the bike and spin the wheel. The
wheel should not rub on the brake pads. Next, squeeze the brake lever and take note of the
brake pads contacting the side of the wheel. The pads should contact the rim on both sides
at the same time. Finally, hold the brake lever firm and try to move the bike forward. The
brake should hold well enough to keep the wheel from moving. Repeat these steps for the
rear wheel.
Figure 3b Figure 3d
Figure 3c
Figure 3e Figure 3f Figure 3g

17
Step 4: Pedal assembly
Before your first ride, please check to ensure your pedals are attached correctly.
•There is a right-side pedal marked “R” and a left side pedal marked “L”
•The right (R) pedal has a RED sticker, the left (L) pedal has a GREEN sticker.
•Pedal marked “R” has right hand threads. Tighten in a clockwise direction.
•Pedal marked “L” has left hand threads. Tighten in a counter-clockwise direction (refer
to figure 4a).
Place the pedal into the crank and use fingers to begin screwing into place. Threading it in
can be tricky, so make sure to do it correctly. Regardless of which side you’re working on, the
top of the thread will rotate towards the front of the bike to tighten the pedals. Once you’ve
tightened the pedals by hand, use a 15mm open-ended wrench to continue screwing. They
are properly tightened when the pedal spindle, which is the axle that the pedal platform
spins around, begins to bite into the metal on the crank.
WARNING:Attachment of an incorrect pedal into a crank arm will cause
irreparable damage. Unless the shoulder of the pedal spindle is tight to the
face of the crank arm, the pedal may back out causing serious injury or
death. Make it tight so the shoulder is in complete contact with the surface
of the crank arm.
WARNING:Never ride your bike if the cranks are loose. This could damage
the crank arms beyond repair and result in a loss of control, injury or death.
Figure 4a

18
Step 5: Seat assembly
Add some white grease to the inside of the seat tube and slide the seat post into the
bicycle. Make sure that the minimum insertion mark is completely covered and that the
seat is pointing forward in alignment with the bicycle. (See figure 5a)
When adjusting When fixed
Figure 5b Figure 5c
WARNING: The seat post must be inserted far enough so that the
minimum insertion marks cannot be seen.
CAUTION: Operate the quick release lever by hand only. Do not use a
hammer or any other tool to tighten the quick release lever (Figures 5b & 5c).
Figure 5a
Minimum insertion mark

19
Testing Seat Clamp & Post Clamp Tightness
After installing the seat post into the bicycle and tightening the clamp, test the tightness of
the saddle. Hold the saddle firmly with both hands and try to move it side to side. The seat
post should not move at all. The seat post and saddle also should not move when the rider
is seated. Make sure the seat clamp nuts at the top of the seat post are tight so that the
seat does not tip forward or backwards (see figure 5d).
Step 6: Reflectors and bell assembly
Attach the white reflector to the front reflector bracket and secure to the fork or handlebar
(figure 6a). Attach the red reflector to the rear reflector bracket and secure to the seat post
(figure 6b). Secure the bell to the handlebar with Phillips head screwdriver (figure 6c).
Figure 6a Figure 6b Figure 6c
Figure 5d

20
Step 7: Training wheel assembly
Use the multi-function wrench to remove the nut, install the training wheel and then tighten
the nut (see figure 7a & 7b). Repeat for both sides.
Ensure the nut is securely reattached before using.
Figure 7a Figure 7b
Table of contents
Other Fortis Bicycle manuals

Fortis
Fortis FSBKE20FLDA User manual

Fortis
Fortis 700C BAFANG User manual

Fortis
Fortis FS26FLDMBKA User manual

Fortis
Fortis FS26LDEBKPA User manual

Fortis
Fortis 700C CITY BREEZE LADIES BIKE User manual

Fortis
Fortis FSMFEXR200A User manual

Fortis
Fortis 700C URBAN HYBRID User manual

Fortis
Fortis 700C URBAN MASTER ROAD BIKE User manual

Fortis
Fortis FS27HCMEBKB User manual

Fortis
Fortis FS700CALRBA User manual