manuals.online logo
Brands
  1. Home
  2. •
  3. Brands
  4. •
  5. Fortis
  6. •
  7. Exercise Bike
  8. •
  9. Fortis FSRCMBIK2XA User manual

Fortis FSRCMBIK2XA User manual

Table of Contents
Usage Warnings......................................................................................................................................................2
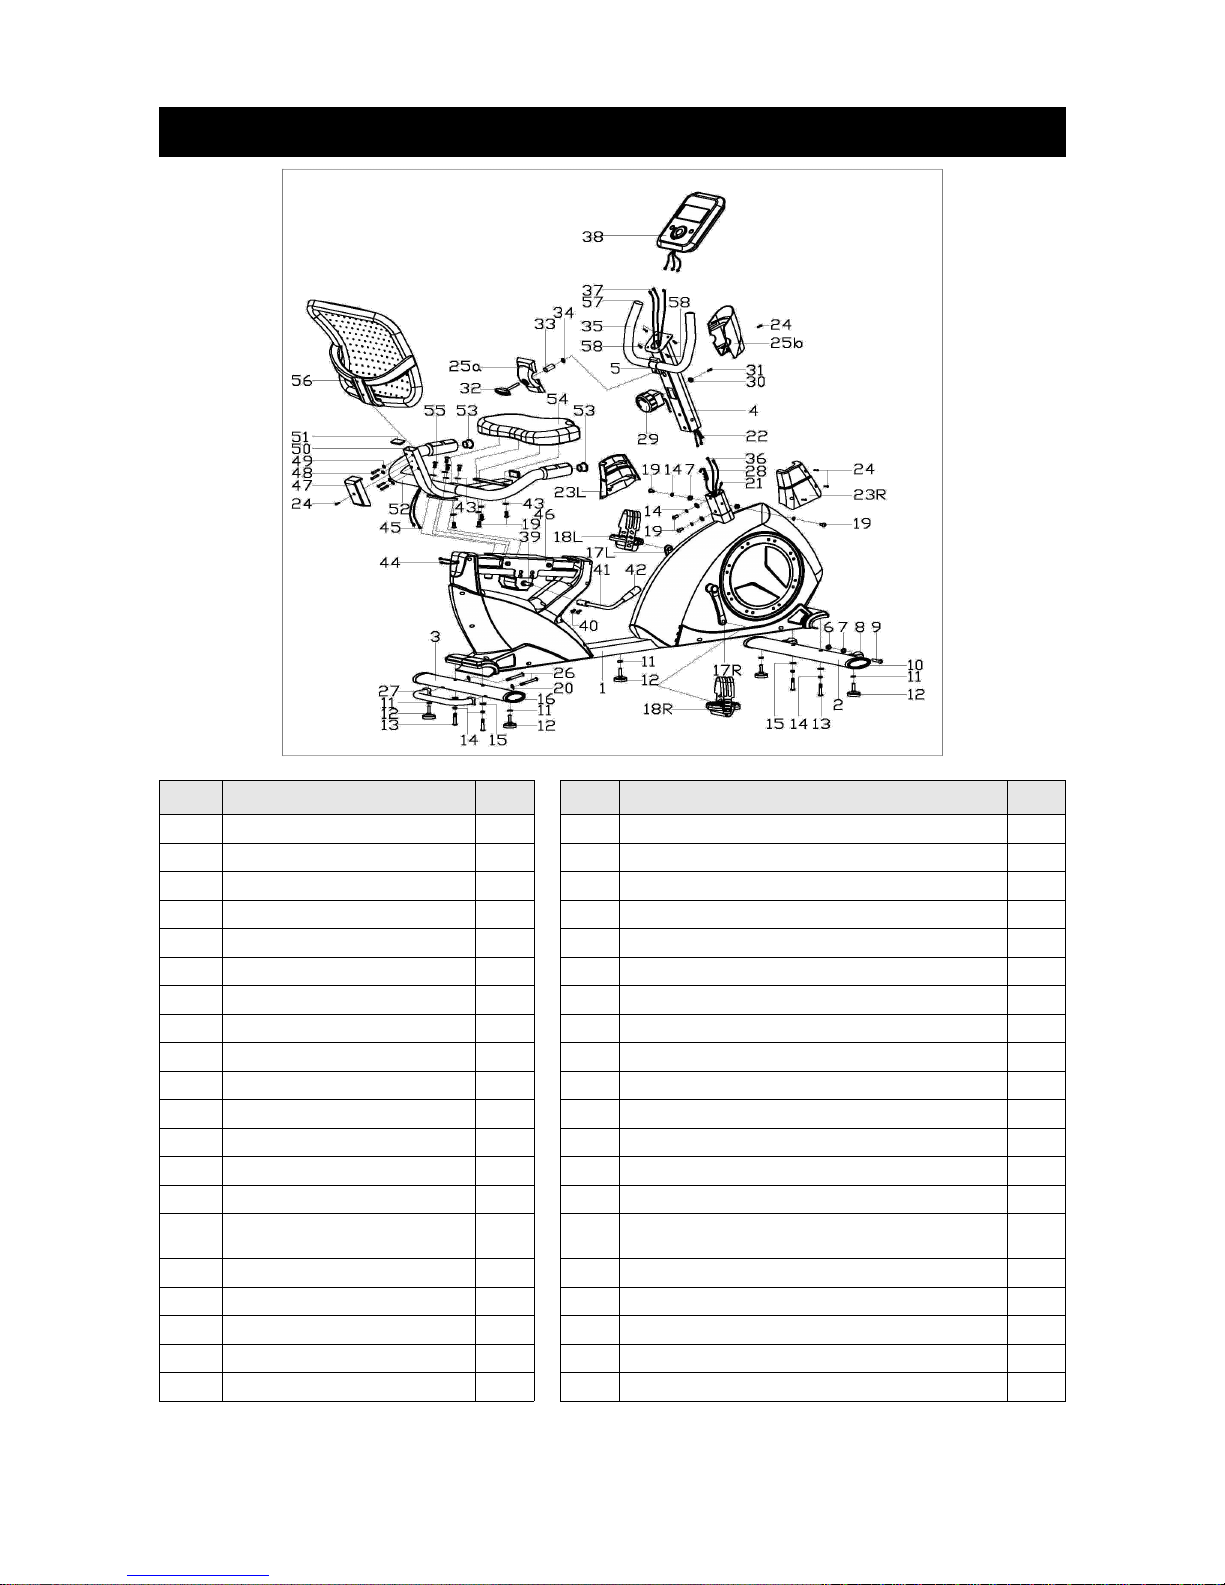
Product Layout.......................................................................................................................................................4
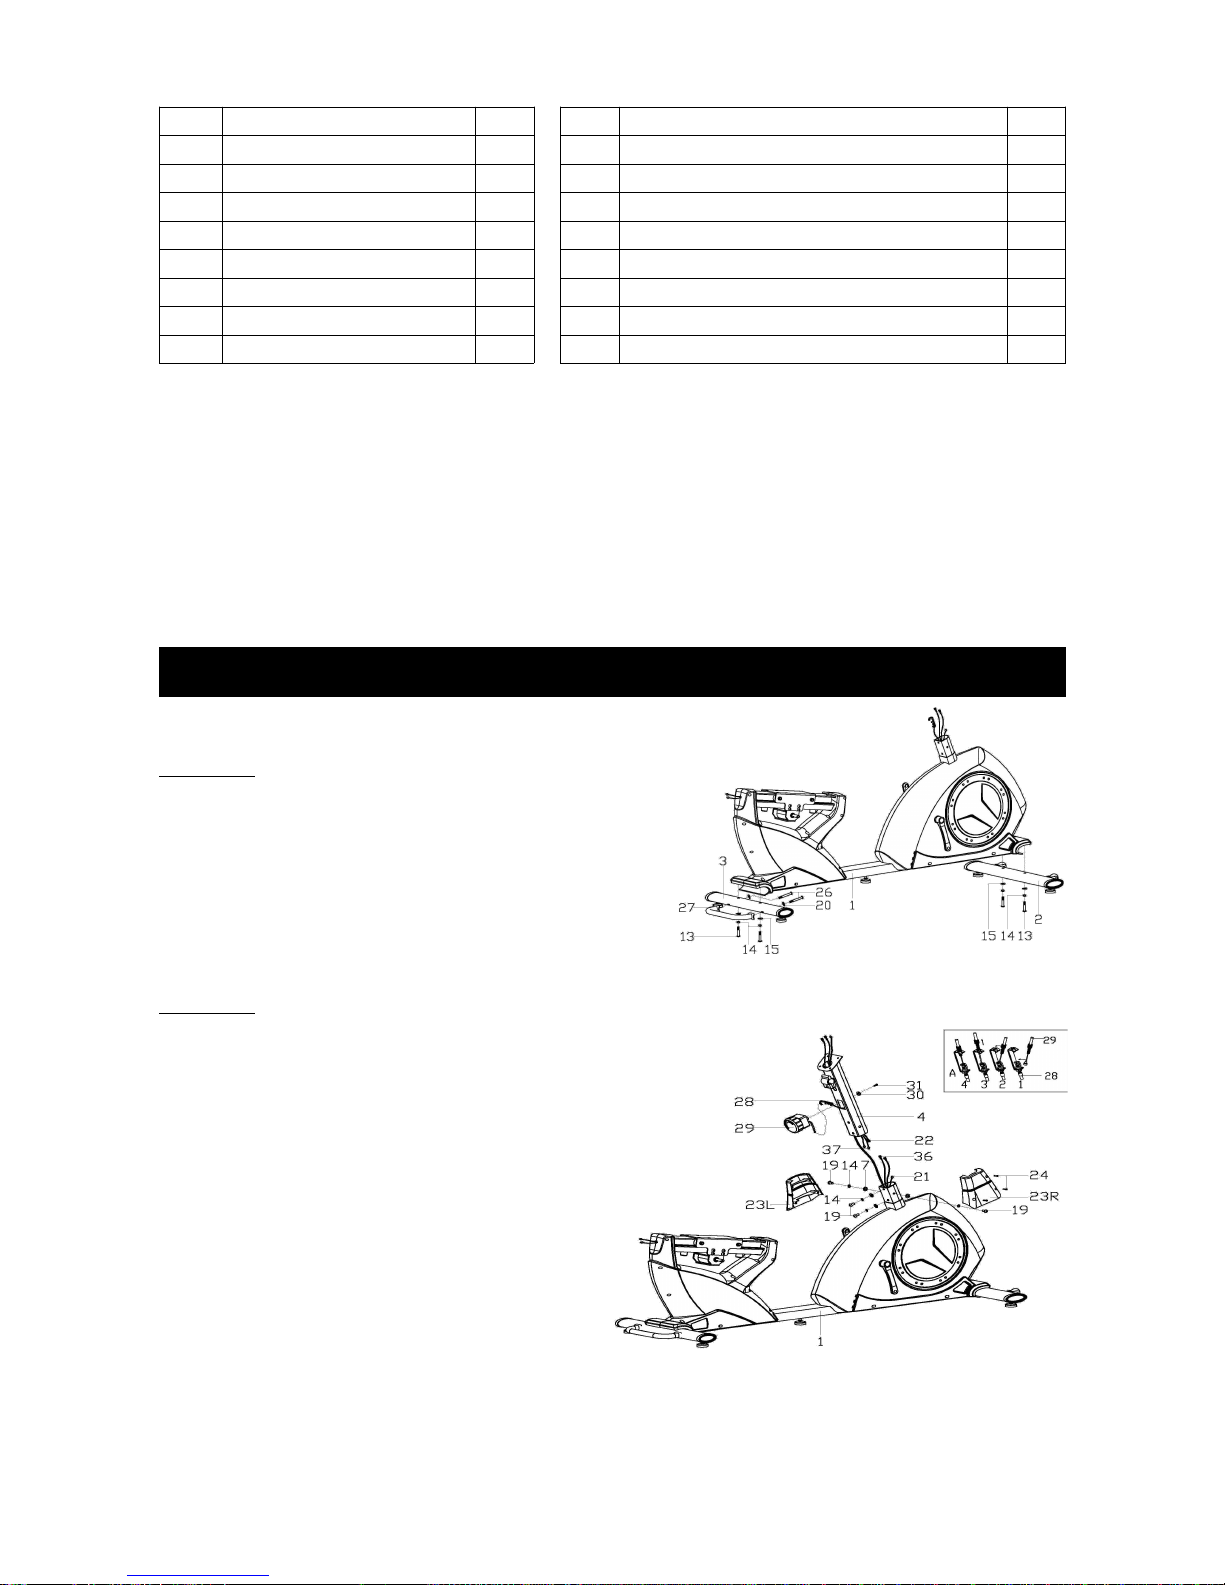
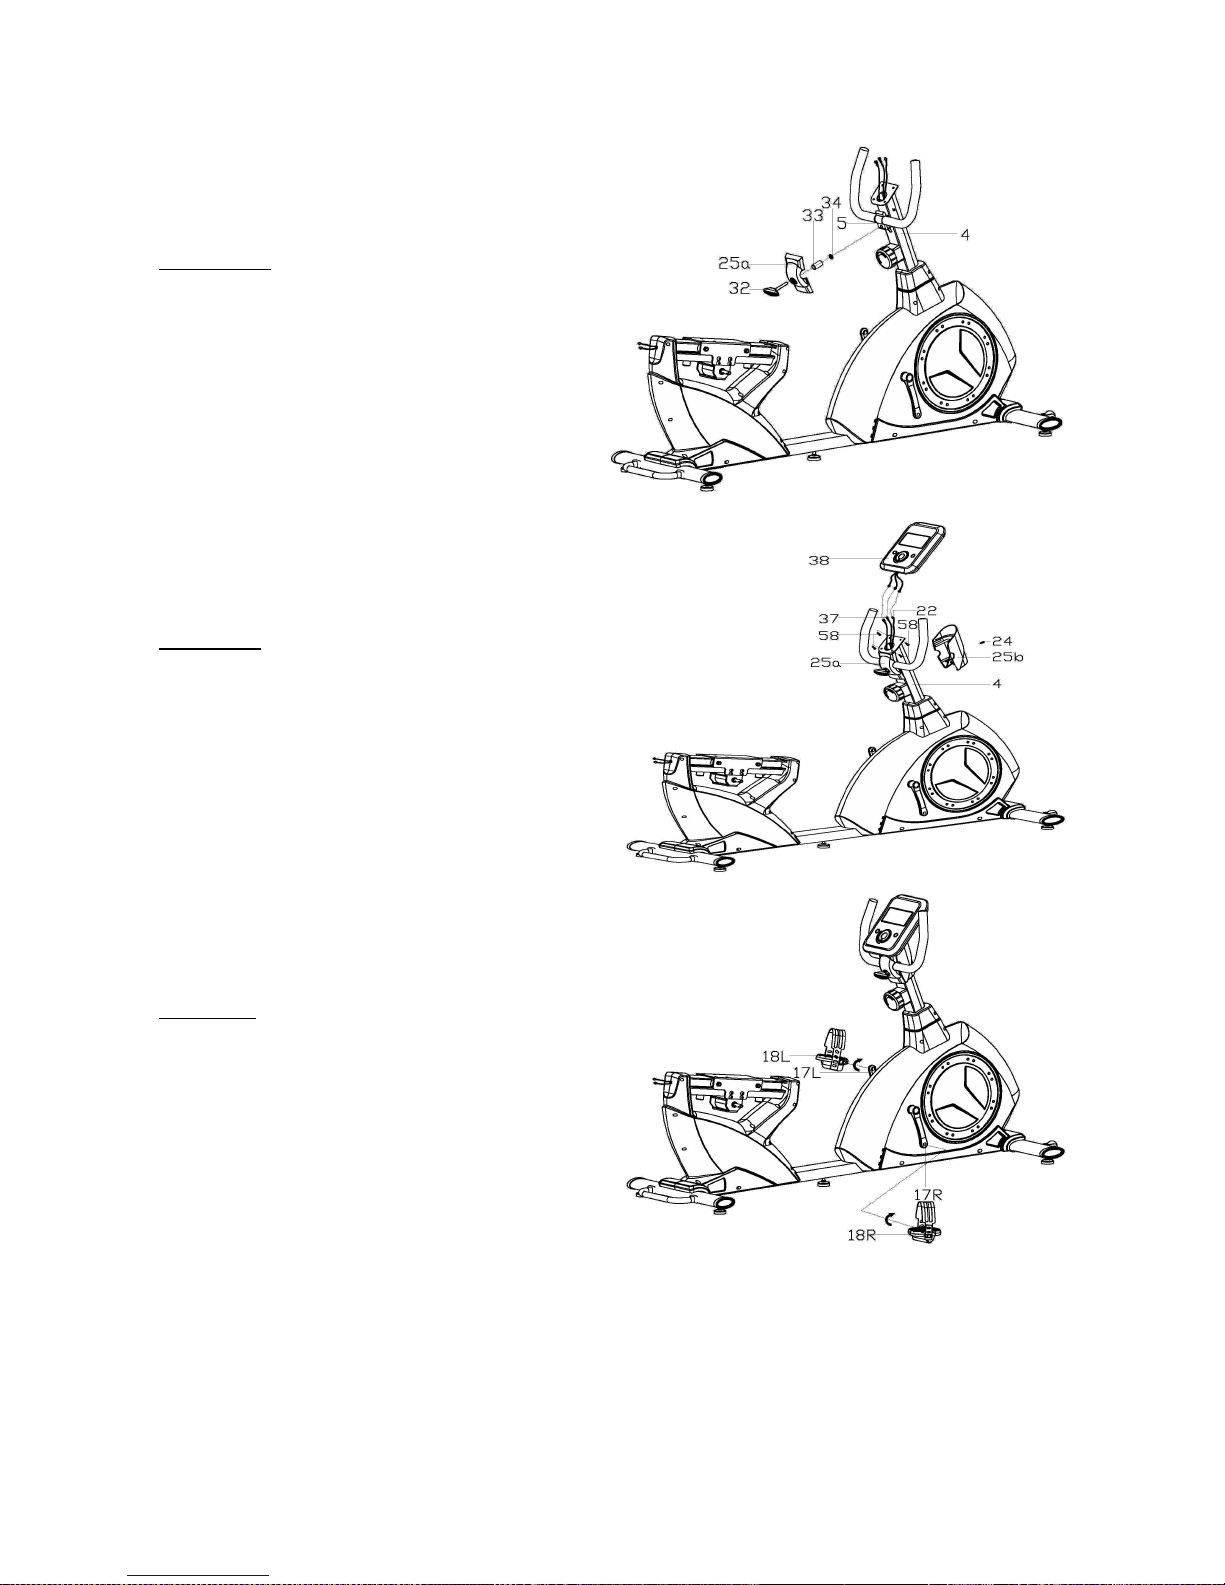
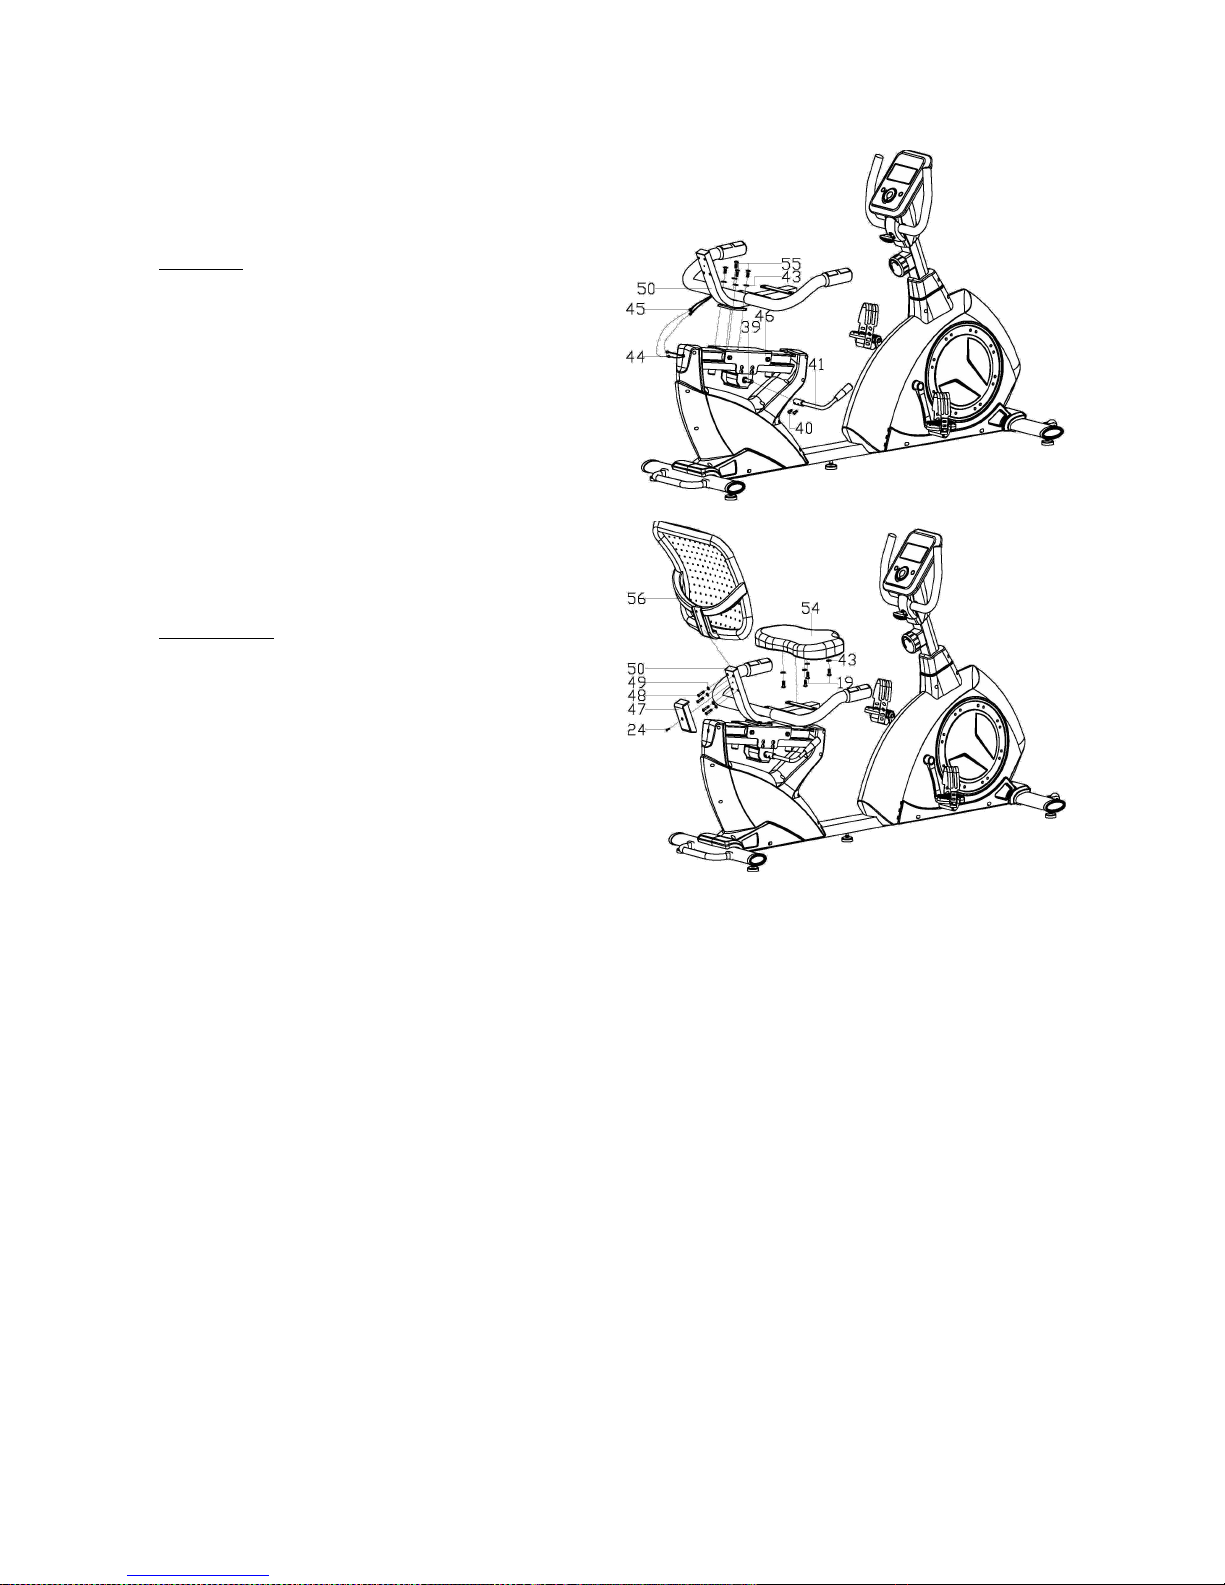
Assembly Steps...................................................................................................................................................... 5
Computer Functionality.......................................................................................................................................8
utton Functions..............................................................................................................................................8
Display Functions............................................................................................................................................. 8
Operating Procedure.......................................................................................................................................9
Workout Modes......................................................................................................................................................9
Manual mode......................................................................................................................................................9
Program mode.................................................................................................................................................10
User Program mode.......................................................................................................................................10
H.R.C. mode........................................................................................................................................................11
WATT mode........................................................................................................................................................ 11
ody Fat..............................................................................................................................................................11
Recovery.............................................................................................................................................................12
eginner's Guide ..................................................................................................................................................13
Work-out Tips...................................................................................................................................................13
How to egin....................................................................................................................................................13
How Hard Should You Work?......................................................................................................................13
Stretching Guide...................................................................................................................................................14
Tips for Stretching..........................................................................................................................................14
Calf Stretch ......................................................................................................................................................14
Hamstring Stretch ..........................................................................................................................................14
Quadriceps Stretch ........................................................................................................................................15
Inner Thigh Stretch ........................................................................................................................................15
Toe Touch Stretch ..........................................................................................................................................15
Glutes Stretch ..................................................................................................................................................16
Lower ack........................................................................................................................................................ 16
Cool Down............................................................................................................................................................... 16
1
Please read this manual carefully before using the machine!
Usage Warnings
This guide contains important information such as installation guides and warm-ups, which
will help you avoid injury and will maximize the effects of using the exercise bike.
•Please put the rowing machine on stable, level ground, with a suitable base (rubber
mat, wooden boards etc.) underneath.
•Ensure that the firm parts of the apparatus are at a locked condition and that each
part is operating correctly.
•While exercising, please wear shoes, preferable sports shoes. Never use the bike with
bare feet.
•Please do warm ups prior to exercising.
•efore beginning use, remove all objects within a radius of 2 meters from the
machine.
•Store the bike in a dry, cool place. Please do not let pets or children near it while in
use.
•Do not use strong cleaning chemicals to clean the bike. Wipe the bike clean with a
soft dry cloth. Remove any sweat from the bike immediately after you finish training.
•This bike can only be used by one person for training at a time.
•The bike is equipped with an adjustable knob that can adjust the resistance. Reduce
resistance by turning the adjusting knob towards stage 1. To increase resistance, turn
the adjusting knob towards stage 8.
Notes:
•Please stop exercising immediately if you get dizzy, experience discomfort, chest-
pains or any other discomfort.
•The maximum usage weight for this bike is 120kg.
•Training volume should be decided in accordance with your physical performance.
•When using the bike, please listen to your body and use common sense. Excessive
exercise may be damaging to your health or body.
•This bike is for domestic, home use only.
2
Product Layout
NO Description QTY NO Description QTY
1 Main Frame 1 30 Arc washer 1
2 Front Stabilizer 1 31 Cross pan bolt 1
3 Rear stabilizer 1 32 T-shape bolt 1
4 Handlebar post 1 33 Spacer bush 1
5 Handlebar 1 34 lat washer 1
6 Nylon nut M8 2 35 oam 2
7 lat washer D8 × Φ16 × 1.5 6 36 Extension wire 1 2
8 Roller 2 37 Extension wire 2 2
9 Hex bolt M8 × 40 × L12 2 38 Computer 1
10 Oval tube cap 1 2 39 Eccentric shaft 1
11 Hex nut M10 5 40 Hex bolt M6 × 10 2
12 Adjustable cushion 5 41 Pressure bar 1
13 Hex bolt M8 × L58 4 42 Pressure bar end cap 1
14 Spring washer D8 8 43 lat washer D8 × Φ19 × 1.5 8
15 Arc washer d8 × 2 × Φ25 ×
R39
4 44 Extension wire 3 2
16 Oval tube cap 2 2 45 Handle pulse wire 2
17L/R Crank 1/1 46 Permanent seat 1
18L/R Pedal 1/1 47 Protective guard 1
19 Hex bolt M8 × 15 8 48 Hex bolt M6 × 40 4
20 Arc washer d8 × R20 2 49 lat washer D6 × 1.2 × Φ16 4
3
21 Sensor wire 1 50 Seat 1
22 Extension wire 1 51 Tube plug 2
23L/R Protective guard 1/1 52 oam 2
24 Cross pan bolt ST4.2 × 18 5 53 End cap 2
25a/b Computer protective guard 1 pair 54 Seat cushion 1
26 Hex bolt M8 × 90 2 55 Hex bolt M8 × 12 4
27 Lifting handle 1 56 Backrest 1
28 Tension controller wire 1 57 End cap 2
29 Tension controller 1 58 Cross pan bolt 4
Note: Most of the listed assembly hardware has been packaged seperately, but some
hardware items have been preinstalled in the identified assembly parts. In these instances,
simply remove and reinstall the hardware as assembly is required.
Please refer to the individual assembly steps and make note of all preinstalled hardware.
Preparation: efore assembling, make sure that you have enough space around the
equipment. Use the present tooling for assembly. efore commencing assembly, please
check that all required parts are available.
It is strongly recommended that this unit is assembled by two or more people to avoid
possible injury.
Assembly Steps
Step One
Lock the lifting handle (27) to the rear stabilizer (3)
with the Hex olt (26) and an Arc Washer (20).
Attach the front stabilizer (2) and rear stabilizer (3)
to the main frame (1) with a hex bolt (13), spring
washer (14) and arc washer (15).
Step Two
Pull out the tension control wire (28) from the
hole in the handlebar post (4), then install the
tension control wire (28) to the tension
controller (29). Ensure the cable has been
connected correctly as shown. Finally lock the
tension controller (29) to the handlebar post
(4) with the cross pan bolt (31) and the arc
washer (30).
Connect the sensor wire (21), extension wire 1
(36) with the extension wire (22), Extension
wire 2 (37), then lock the handlebar post (4)
to the main frame (1) with the hex bolt (19),
spring washer (14) and flat washer (7). Finally
lock the protective guard (23L/R) to the main frame (1) with the cross pan bolt (24).
4
Step Three
Attach the handlebar (5) to the handlebar (4)
with the T-shaped bolt (32), Computer
protective guard (25a), spacer bush (33) and
the flat washer (24).
Step Four
Connect the wires (37 & 22) with the wires from the
computer (38), then attach the computre (38) to the
computer bracket of the handlebar post (4) with the
cross pan bolt (58).
Step Five
Attach the pedal (18L/R) to the crank (17L/R).
NOTE: Ensure that the pedal marked (R) is attached to
the crank (R) and it should be tightened in a clockwise
direction. The pedal marked (L) should be attached to
the crank (L) and it should be tightened in a counter-
clockwise direction.
5
Step Six
Connect the handle pulse wire (45) with the extension
wire 3 (44) from the main frame (1), then lock the seat
(5) to the permanent seat (46) with the hex bolt (55)
and flat washer (43).
Lock the pressure bar (41) to the eccentric shaft (39)
with the hex bolt (40).
Step Seven
Attach the seat cushion (54) to the seat (50) with the
hex bolt (19) and flat washer (43).
Attach the backrest (56) to the seat (5) with the hex
bolt (48) and flat washer (49), then lock the protective
guard (47) to the seat (50) with the cross pan bolt
(24).
efore using the bike, please check all parts to ensure that they are attached firmly and move easily.
If you have any concerns please contact the Kogan.com customer support team.
6
Computer Functionality
Button Functions
Wheel UP Make upward adjustments to functions, or to increase training resistance.
Wheel DOWN Make downward adjustments to functions, or to decrease training
resistance.
MODE/ENTER Confirm all settings.
START/STOP Start or stop workout.
RESET Reset current settings, then have monitor switch to intial training mode
for selection.
RECOVERY Test heart rate recovery status.
ODY FAT Test body fat percentage.
Press the ODY FAT button in standby mode to modify user data.
Display Functions
TIME Count up – No preset target. Time will count up from 00:00 to a
maximum of 99:59, with each increment of 1 minute.
Count down – If training with a preset time, the time will count down from
the preset amount to 00:00. Each preset increment or decrement is 1
minute between 01:00 to 99:00.
SPEED Displays your current training speed. Maximum speed is 99.9 KM/H or
99.9 MPH.
RPM Displays the rotations per minute. Display range 0~15~999.
DISTANCE Accumulates the total distance from 00:00 up to 99.99km or mls. The
user may preset a target distance by pressing UP/DOWN. Each
increment is 0.1km or 0.1ml.
CALORIES Accumulates calory consumption during training from 0 to a maximum of
9999 calories. (this data is a rough guide for comparison of different
exercise sessions, and is not to be used for medical information).
PULSE User may set up a target pulse rate from 0 – 30 to 230; the computer will
beep when your heart rate exceeds the target value during the workout.
WATTS Displays the current workout watts. Range from 0~999.
7
Operating Procedure
Power On
Please connect the power adaptor to the DC JACK, then hold down the RESET button for 2 seconds to
boot the console. The LCD will display all information segments for 2 seconds and sound a tone. The
screen will then clear with 78xx being shown in the top segment.
Preset the clock and calendar by using the wheel (UP and DOWN), then pressing MODE/ENTER to confirm.
The console will then display "SELECT USER". The user can press MODE/ENTER to enter into user
selection mode. Use the wheel to select between U1 to U4, then press MODE/ENTER to confirm. The user
can then enter information for SEX, AGE, HEIGHT and WEIGHT.
In standby mode, the console will display "SELECT WORKOUT"; the user may press MODE/ENTER to enter
into selection mode. You can then use the wheel to select MANUAL -> PROGRAM -> USER PROGRAM ->
H.R.C. -> WATT.
Wor out Modes
Manual mode
In standby mode, select MANUAL and press the MODE/ ENTER key to enter.
Quick start: User may press the START/ STOP key to start training in MANUAL, all exercise values will start
counting up from zero.
After enter into MANUAL mode, user may set up TIME -> DISTANCE -> CALORIES -> PULSE ->
RESISTANCE LEVEL in order with flashing readout texts, and press the START/ STOP key to start
exercising. All values will start counting down to zero. (Press the RESET key to clear all settings.)
In MANUAL mode, biking animation will move forward once every 3 km. PC speed will maintain the same as
user’s speed.
8
Program mode
In standby mode, select a PROGRAM and press the MODE/ ENTER key to enter.
User may turn joggle wheel up or down to select a preferred program from 1 to 12, and press the MODE/
ENTER key for confirmation. Program profile will be in flashing texts; user may use joggle wheel to adjust
profile’s resistance level.
TIME is fixed in 20:00 minutes, which is not adjustable. Press the START/ STOP button to start workout and
racing with PC.
After start, TIME will start counting down; the runway animation will follow user’s RPM input.
User need to follow PC speed by checking below symbols to finish the entire 20 minutes of training:
▲:USER speed >PC RPM – user needs to slow down
●:USER speed = PC RPM
▼:USER speed <PC RPM – user needs to speed up
When TIME counts down to zero, console will beep for 8 seconds and LCD will display the racing result: PC
WIN or USER WIN.
User Program mode
In standby mode, select USER PRO and press the MODE/ ENTER button to enter.
User may create his/her own preferred profile by turning UP and DOWN to set up resistance level of each
row, and press the MODE/ ENTER key to confirm. Press the MODE/ ENTER button when settings are
completed.
Time is fixed in 20:00 minutes, which is not adjustable. User may press the START/STOP button to start
exercising.
After start, TIME will start counting down; the runway animation will follow user’s RPM input. User needs to
follow PC’s speed by checking below symbols to finish the entire 20 minutes of training:
▲:USER speed >PC RPM – user needs to slow down
●:USER speed = PC RPM
▼:USER speed <PC RPM – user needs to speed up
When TIME counts down to zero, console will beep for 8 seconds, and display racing result: PC WIN or
USER WIN.
9
H.R.C. mode
In standby mode, select H.R.C. and press the MODE key to enter.
Default AGE value will be 25 showing with flashing text and user may set his/ her age by using joggle wheel
and press the MODE key after determined. The monitor will calculate preset heart rate value automatically
according to user’s age setting. Screen will show heart rate percentage 55%, 75%, 90% and TARGET. User
may select heart rate percentage by UP/ DOWN/ ENTER button for training.
If there is no HR input detected for 5 seconds, LCD will display “NEED H.R.” until a HR signal is detected.
WATT mode
In standby mode, select WATT and press MODE to enter.
The preset watt value 120 will be in flashing form showing in the WATT setting mode, select UP/ DOWN/
ENTER to set target value from 10 to 350. Press the START button to start training.
After start, Level is adjusted according to RPM to reach the setting WATT.
▲:WATT >setting WATT 25% – user needs to slow down
●:WATT = setting 25%
▼:WATT <setting 25% – user needs to speed up
--- :WATT >or <setting WATT 50% (OVER SPEC)---
Body Fat
User may test and see ODY FAT information when the console is in STOP mode.
Please follow the steps as below:
1. Press the ODY FAT button and user should holds on the handgrip with both hands tightly to start body
fat testing.
2. The symbol "- - - - - - - - " will be displayed during the testing in 8 seconds. After 8 seconds, user will see
the ODY FAT advice in percentage and MI and the fat advice in different symbol.
3. If any following errors are displayed (as shown overleaf), there’ll be other possible indications showing on
LCD.
10
"E-1” - When user sees this indication, it means user did not put your thumb properly on the conductor.
Please try again.
"E-4” - When user sees this indication, it means the ODY FAT advice is exceeded the available area
which is fixed in the program.
After ODY FAT testing, press the ODY FAT button to go back to continue the previous exercise before
testing. The ODY FAT advice figure and MI will disappear.
SEX FAT% LOW LOW/MED MEDIUM MED/HIGH
MALE <13% 13% - 25.8% 26% - 30% >30%
FEMALE <23% 23% - 35.8% 36% - 40% >40%
Recovery
After exercising for a period of time, keep holding on handgrips with both hands and press the
“RECOVERY” button. All functions displaying on LCD will stop, except “TIME” will start counting down from
00:60 to 00:00. LCD will display user’s heart rate recovery status with F1, F2….to F6.
F1 is the best and F6 is the worst.
Users should keep exercising continuously to improve their heart rate recovery status from F6 to F1.
Press the RECOVERY button again to return to the main menu.
Notes:
1. When user stops pedaling for 4 minutes, console will enter into power saving mode, all settings and
exercise data will be stored until user starts the workout again.
2. If the console acts abnormally, please unplug the adaptor, wait for 2 minutes then plug it in again.
3. If the cables connected computer and servo motor break, user will see a warning sign of “E2” displaying
on LCD. Please check the connections to see if they appear to be loose.
11
Beginner's Guide
If you are beginning a new exercise program, you should check with your doctor if:
•You have been diagnosed with heart problems, high blood pressure or other medical
conditions.
•You have not exercised for over a year.
•If you are over 35 years old and do not currently exercise.
•You are pregnant.
•You have diabetes.
•You have chest pain, or experience dizziness or fainting spells.
•You are recovering from injury or illness.
Wor -out Tips
•Always perform stretching exercises both before and after your work-out.
•Start slowly; doing too much too soon can lead to injuries.
•If you are sore or tired, give yourself a few extra days to recover.
How to Begin
•Start with two or three 15 minute sessions per week with a rest day between work-
outs.
•Warm up for 5 to 10 minutes with gentle movements like walking or swinging your
arms in a circle, then stretching the muscles you will use during your work-out.
•Increase the pace and resistance to slightly harder than comfortable, then exercise
for as long as you can. You may only be able to exercise for a few minutes at a time,
but that will change quickly if you exercise regularly.
•End each work-out with a 5 minute cool down with the resistance set to a low level.
You should then stretch the muscles you've just worked out to prevent cramp and
injury.
•Increase your work-out time by a few minutes each week until you can work
continuously for 30 minutes per session.
•Don't worry about distance or pace at this stage. For the first few weeks, focus on
endurance and conditioning.
How Hard Should You Wor ?
When exercising, you should try to stay within your target heart rate zone, as shown in the
table on the previous page. Always be aware of how you feel when you exercise. If you feel
dizzy or light-headed, stop immediately and rest. If you are not even breaking a sweat, then
speed it up!
12
Stretching Guide
Tips for Stretching
•egin with gradual mobility exercises of all the joints, i.e simply rotate your wrists,
bend your arms and roll your shoulders. This will allow your body's natural lubrication
(synovial fluid) to protect the surface of your bones at the joints.
•Always warm up the body before stretching, as this increases blood flow around the
body, which is turn makes the muscles more supple.
•Start with your legs and work your way up your body.
•Each stretch should be held for at least 10 seconds (working up to 20 to 30 seconds),
and usually repeated about 2 or 3 times.
•Do not stretch until it hurts. If there is any pain, ease off.
•Don't bounce. Stretching should be gradual and relaxed.
•Don't hold your breath during a stretch.
•Stretch after exercising to prevent your muscles from tightening up.
•Stretch at least three times a week to maintain flexability.
Calf Stretch
•Stand with one leg in front of the other, with both feet
facing forwards and the front leg bent. (Your front knee
should be above your ankle).
•Press the heel of the back leg into the floor until you
begin to feel the calf muscle in the back of your rear leg
starting to stretch.
Note: keep your back and rear leg straight during this
stretch.
•Slide your rear leg backwards to increase the stretch if
required.
Hamstring Stretch
•Sit with one leg extended. ring the other leg towards
you and rest the sole of that foot onto the inner thigh of
the extended leg.
•Keeping your shoulders square, reach forward towards
your toes as far as possible, then hold for the required
count, then relax.
Note: Keep your back and leg straight during this stretch.
13
Quadriceps Stretch
•With one hand against a wall for balance, reach back and
grasp one foot with your other hand. ring your heel up
as close to your buttocks as possible. Hold for the
required count, then relax.
Inner Thigh Stretch
•Sit with the soles of your feet together and your knees
pointing outwards. Pull your feet in toward your groin
area as far as possible. Hold them for the required count,
then relax.
Toe Touch Stretch
•Stand with your knees slightly bent, then slowly bend
forward from your hips.
•Allow your back and shoulders to relax as you reach
down towards your toes, stretching as far as possible.
Hold for the required count, then slowly return to the
upright position and relax.
14
Glutes Stretch
•Sit with your leg stretched outwards; place your left foot
over your right leg at the knee joint, placing your foot flat
on the floor.
•Use your right arm to pull the bent knee across your
body until you begin to feel a stretch in the left buttock.
Hold for the required time, then relax.
•Repeat using the opposite arms and legs.
Lower Bac
•Lie on your back with your knees bent.
•Keeping your upper back firmly on the floor, allow your
knees to fall to one side, your lower back will rotate
naturally. Hold for the required count, then relax.
•Repeat on the other side.
Note: If any pain is felt, avoid this stretch.
Cool Down
e sure to repeat these stretches after your exercise session as a cool down routine. This will
assist your body to return to its normal resting state after exercise. It will slowly lower your
heart rate, while assisting in moving the blood back to your heart to re-oxygenate it.
It will also assist in keeping you muscles free of cramps.
If you have any further questions or concerns regarding this product, please contact
the Kogan.com customer support team.
15

Other Fortis Exercise Bike manuals

Fortis EXR-200 User manual

Fortis

Fortis EXR-200 User manual

Fortis FSBIKMGTRNA User manual

Fortis

Fortis FSBIKMGTRNA User manual

Fortis FSCMPEXBIKA User manual

Fortis

Fortis FSCMPEXBIKA User manual

Fortis SK-600XL User manual

Fortis

Fortis SK-600XL User manual

Fortis FSUDSKBIKWA User manual

Fortis

Fortis FSUDSKBIKWA User manual

Fortis FSSPNBKX13A SX1000 User manual

Fortis

Fortis FSSPNBKX13A SX1000 User manual

Fortis SK-1800 User manual

Fortis

Fortis SK-1800 User manual

Fortis SX2000 User manual

Fortis

Fortis SX2000 User manual

Fortis FSEMSB2200A User manual

Fortis

Fortis FSEMSB2200A User manual

Fortis EXR-620A User manual

Fortis

Fortis EXR-620A User manual

Fortis AEXR-270 User manual

Fortis

Fortis AEXR-270 User manual

Fortis SK-2200A User manual

Fortis

Fortis SK-2200A User manual

Fortis FSMNMFPDBKA User manual

Fortis

Fortis FSMNMFPDBKA User manual

Fortis RC-400A User manual

Fortis

Fortis RC-400A User manual

Fortis FSRCMBIK1XA User manual

Fortis

Fortis FSRCMBIK1XA User manual

Popular Exercise Bike manuals by other brands

Bodyworx ABX800 manual

Bodyworx

Bodyworx ABX800 manual

Pro-Form 310 CSX PFEVEX73916.0 user manual

Pro-Form

Pro-Form 310 CSX PFEVEX73916.0 user manual

Domyos VM 590 operating instructions

Domyos

Domyos VM 590 operating instructions

Vision Fitness E3600HRT Assembly guide

Vision Fitness

Vision Fitness E3600HRT Assembly guide

Everlast 16516696 owner's manual

Everlast

Everlast 16516696 owner's manual

Sunny Health & Fitness Row-N-Ride 077S user manual

Sunny Health & Fitness

Sunny Health & Fitness Row-N-Ride 077S user manual

Trixter XDREAM user manual

Trixter

Trixter XDREAM user manual

Vision Fitness U60 manual

Vision Fitness

Vision Fitness U60 manual

Reebok RB 450 user manual

Reebok

Reebok RB 450 user manual

Eco-De EVOLUTION TOUR ECO-815 manual

Eco-De

Eco-De EVOLUTION TOUR ECO-815 manual

Sport-thieme 206 9180 owner's manual

Sport-thieme

Sport-thieme 206 9180 owner's manual

Domyos VM 290 operating instructions

Domyos

Domyos VM 290 operating instructions

New Balance 6.0u owner's manual

New Balance

New Balance 6.0u owner's manual

Weslo Pursuit 330 Bike user manual

Weslo

Weslo Pursuit 330 Bike user manual

PowerPeak FHT8313 manual

PowerPeak

PowerPeak FHT8313 manual

Christopeit Sport AX 2000 Assembly and exercise instructions

Christopeit Sport

Christopeit Sport AX 2000 Assembly and exercise instructions

Kettler Tour 7 Assembly instructions

Kettler

Kettler Tour 7 Assembly instructions

DHS Fitness DHS 2019B manual

DHS Fitness

DHS Fitness DHS 2019B manual

manuals.online logo
manuals.online logoBrands
  • About & Mission
  • Contact us
  • Privacy Policy
  • Terms and Conditions

Copyright 2025 Manuals.Online. All Rights Reserved.