FRC INSIGHT FTA400 GPM User manual

FTA400 Rev1105
1
FIRE RESEARCH CORPORATION
www.fireresearch.com
26 Southern Blvd., Nesconset, NY11767
TEL ( 631 ) 724-8888 FAX ( 631 ) 360-9727 TOLL FREE 1-800-645-0074
PORTABLE
FLOWTESTER
MODELS:
FTA400 GPM
FTA410 LPM
Document Number:
XE-FTA4PM-R0A

FTA400 Rev1105
2
CONTENTS
Table of Contents
CONTENTS ............................................................................................................... 2
List of Tables ......................................................................................................... 3
List of Figures ....................................................................................................... 3
INTRODUCTION ...................................................................................................... 4
Overview ............................................................................................................... 4
Features ................................................................................................................. 4
Specifications ........................................................................................................ 5
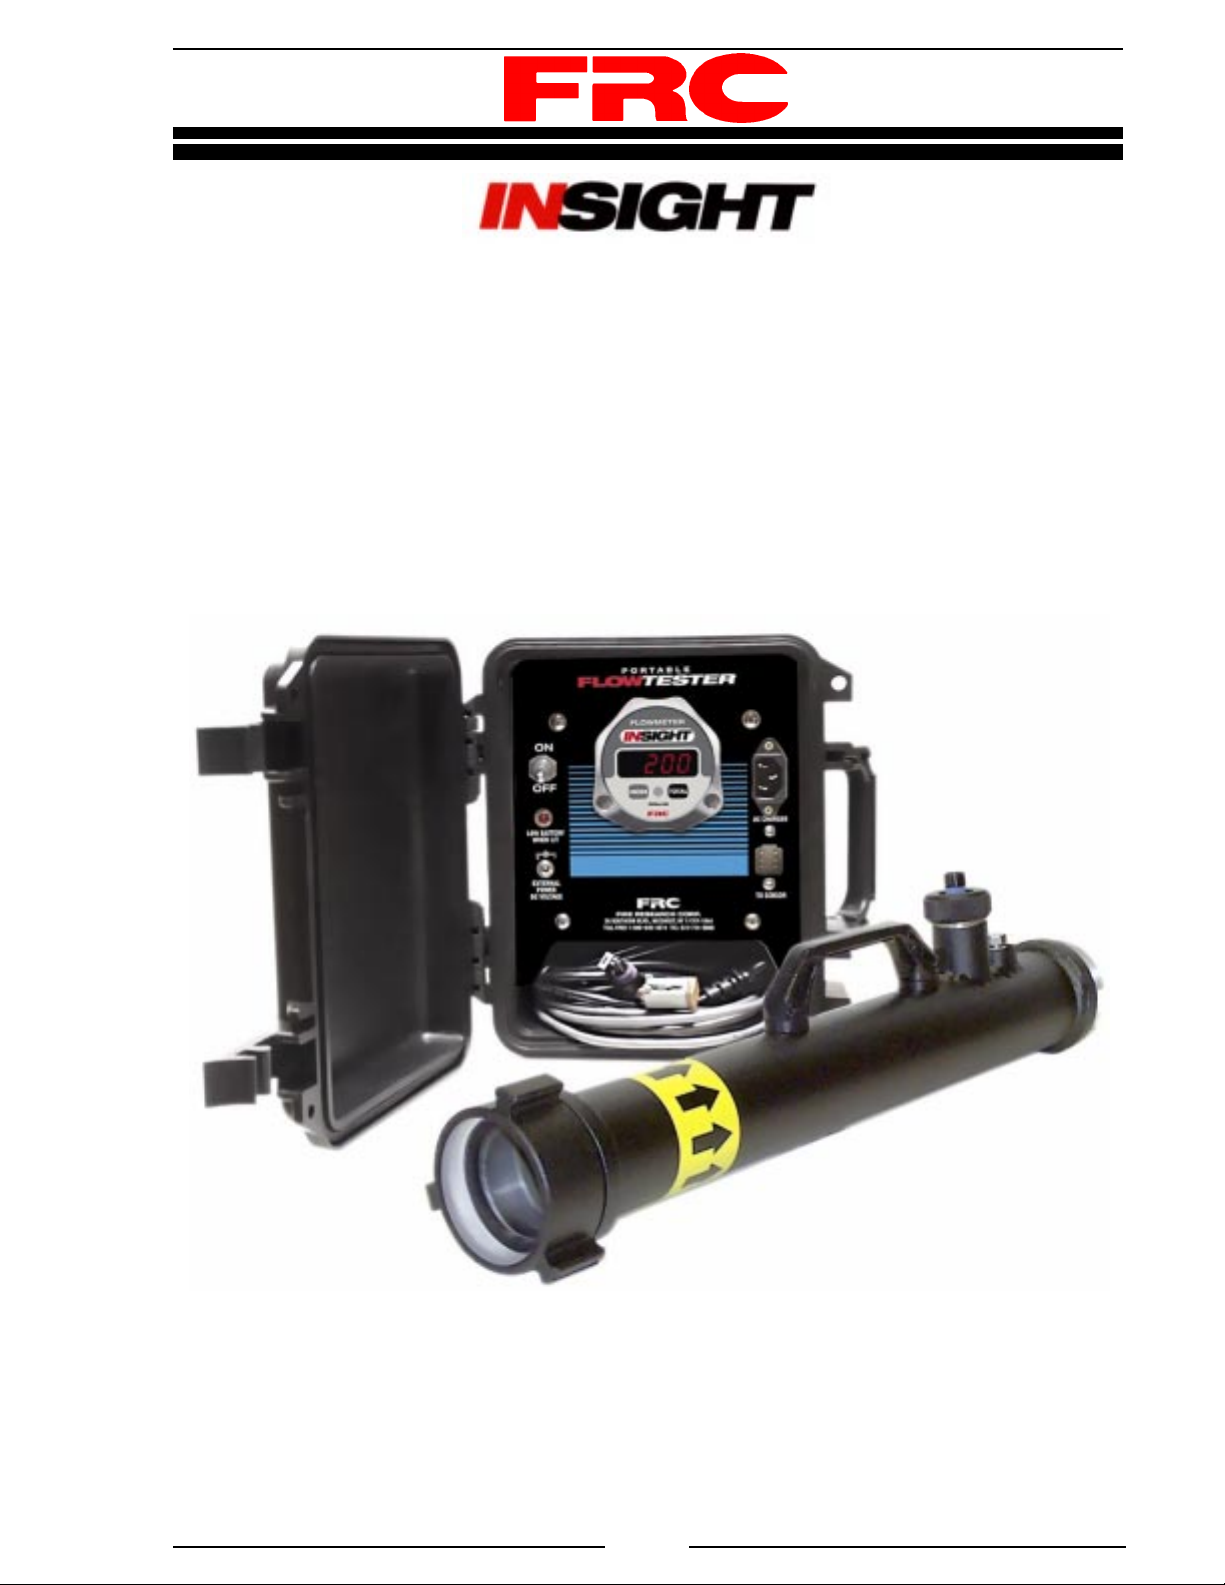
GENERAL DESCRIPTION ....................................................................................... 6
Components........................................................................................................... 6
TYPICAL APPLICATIONS....................................................................................... 8
Hydrant Total Flow Test ........................................................................................ 8
Pump Test .............................................................................................................. 9
Nozzle Test .......................................................................................................... 10
Training ............................................................................................................... 10
Calibrate a Vehicle Mounted Flowmeter............................................................. 10
FLOW RATE MEASURING INFORMATION....................................................... 11
POWER .................................................................................................................... 12
Internal Battery.................................................................................................... 12
Alternate Power Sources ..................................................................................... 12
OPERATION ............................................................................................................ 13
Program Features................................................................................................. 13
Flow Test ............................................................................................................. 14
Totalized Flow ..................................................................................................... 15
PROGRAMMING.................................................................................................... 16
Inputs ................................................................................................................... 16
Program Access Mode......................................................................................... 17
Program Code Descriptions ................................................................................ 18
Enter Sensor/Tube Size ....................................................................................... 22
CALIBRATION........................................................................................................ 24
FLOW SENSOR MAINTENANCE ........................................................................ 26
PARTS LIST ............................................................................................................. 27

FTA400 Rev1105
3
List of Tables
Table 1. Values for K With a 2.5" Flow Tube ............................................................ 8
Table 2. Flowmeter Calibration Flow for Each Pipe Size....................................... 11
Table 3. Program Code Quick Reference ................................................................ 18
List of Figures
Figure 1. Controls and Indicators.............................................................................. 7
Figure 2. Typical Programming Displays................................................................ 16
Figure 3. Sensor/Tube Size Program Displays........................................................ 23
Figure 4. Flow Sensor Maintenance........................................................................ 26
Figure 5. Parts List .................................................................................................. 27

FTA400 Rev1105
4
INTRODUCTION
Overview
The INSIGHT Portable FlowTester is an instrument that will measure flow
rate directly without using charts or doing calculations. The tester is designed around
the FRC INSIGHT digital flowmeter and a paddlewheel type flow sensor mounted
in a flow tube. The flow tester program allows for up to six different calibration schemes
to be set in memory. This enables the operator to press a button and use the same
portable tester with different size flow tubes.
The Portable FlowTester consists of a Pelican case into which a panel is mounted
containing an INSIGHT digital flowmeter, a power switch, low battery indicator, and
cable connections. The Pelican case also contains a rechargeable battery and an AC
charger/power supply. A slot cutout in the front panel allows for the storage of cables.
The INSIGHT digital flowmeter has a 4-digit LED flow display with daylight
bright digits 0.56 inch high. The flowmeter electronics are self contained and program
features are accessed via push buttons on the front of the module. Flow rate information
is provided from the paddlewheel flow sensor mounted in a flow tube. This information
is processed and shown on the digital display as flow rate.
The Portable FlowTester can be powered by its internal rechargeable 12 volt
battery, a 120 VAC source, or an external 12 VDC source (with optional cable). The
battery charging unit is mounted inside the box. To charge the internal battery plug
the cable into the AC CHARGER input on the front panel and connect the other end to
a standard 120 VAC electrical outlet.
All controls, indicators, and input connections are located on the front panel.
Features
Field Programmable
Multiple Flow Rate Calibration Points
Uses Multiple Diameter Flow Tubes
High and Low Flow Warnings
Totalizing Flow Function

FTA400 Rev1105
5
Specifications
Display Module
Supply Voltage: 9 - 30 VDC
Supply Current: 0.5 Amp
Flow Tube
Material: Aluminum
Sizes Available:
FTA400-015 1.5" Tube w/2.5" Couplings (13 - 320 GPM)
FTA400-020 2.0" Tube w/2.5" Couplings (21 - 520 GPM)
FTA400-025 2.5" Tube w/2.5" Couplings (30 - 850 GPM)
FTA400-030 3.0" Tube w/NPT Threads (40- 1380 GPM)
FTA400-040 4.0" Tube w/NPT Threads (80 - 2300 GPM)
Note: GPM rating is at 0 PSI back pressure (no obstruction at end of tube).
Flow Sensor
Type: Paddlewheel
Sensor Material: Acetal (Delrin) with Stainless Steel (316) Shaft
Excitation Voltage: 5 VDC

FTA400 Rev1105
6
GENERAL DESCRIPTION
Components
The INSIGHT Portable FlowTester consists of the following components:
Case
Digital Flowmeter Display
Battery and Charger
Flow Tube(s)
Paddlewheel Flow Sensor and Sensor Housing Assembly
Cables
Case
Mounted inside the Pelican case is a panel that has a digital flowmeter display
module, power switch, low battery indicator, and input cable connectors installed.
The case also houses a rechargeable battery and an AC charger/power supply. A slot
cutout in the front panel allows for the storage of cables. All controls and indicators
are located on the front panel. (Refer to Controls and Indicators.)
Digital Flowmeter Display Module
The flowmeter display module contains a digital display, two buttons and an LED.
It also houses the electronics and programs that are used to operate the portable tester.
The programs are accessed and inputs are made by using two buttons on the front of
the display module.
Battery and Charger
The battery and charger used in the tester is a maintenance free, sealed lead acid
battery. If any problems occur with any of the charging circuits, or if it is found during
a test that the battery is not charged, it is possible to power the unit directly from either
a 120 VAC or a 12 VDC source. (Refer to Power section.)
Flow Tube(s)
The tester can store in memory calibration data for up to six flow tubes. Each
flow tube will have a mount for a paddlewheel flow sensor.
Paddlewheel Flow Sensor
The flow sensor provides an input signal to the display module that is proportional
to the flow rate through the tube. It is mounted in the discharge end of the tube. The
electrical connector is waterproof and molded into the flow sensor housing.

FTA400 Rev1105
7
Figure 1. Controls and Indicators
Mode Button Total ButtonTotalx100
LED
Digital
Display
Storage area for
all cables.
120 VAC Power
Cable Input
(For power or to charge
the internal battery.)
12V DC Power
Cable Input
(Requires optional
power cable.)
Low
Battery
Indicator
ON / OFF
Switch
Flow Sensor
Cable Input
Digital
Flowmeter

FTA400 Rev1105
8
TYPICAL APPLICATIONS
Hydrant Total Flow Test
A direct reading of flow in Gallons Per Minute (GPM) can be obtained by
connecting the portable flow tester to a discharge, flow water and record the flow
displayed. The tester can also be used (employing some simple math) to find the total
output of a hydrant. This can be accomplished by recording the differences in flow
out of one discharge as other ports on the hydrant are opened.
The hydrant test method described below assumes the use of a portable flow
tester with a 2.5" flow tube. If a different size tube is used, the mathematical calculations
below would need to be adjusted.
The Portable FlowTester may be connected to the 2.5" hydrant port in order to
obtain individual hydrant flow measurements. Other ports may be opened as desired.
To conduct this test, proceed as follows:
1. Connect the flow tube to a 2.5" port. (Adapters are not supplied.)
2. Open the hydrant valve and record the flow reading.
3. Shut off the hydrant and remove the other 2.5" cap.
4. Open the hydrant valve and record the flow reading.
Note: This reading will be lower than the first reading as the water is now
being discharged from two ports.
5. If the hydrant has a steamer port, open that and record the flow as above.
If more than one port is opened, the total actual flow will be higher than the
displayed flow, but it will be in proportion to the opened port areas. The actual flow
can be determined by multiplying the displayed flow by a "K" factor such that:
Total Actual Flow = Displayed Flow x K
Use the values for "K" in Table 1 to determine actual estimated flow.
Table 1. Values for K With a 2.5" Flow Tube
PORTS OPENED K
One 2.5" port with 2.5" flowmeter attached 1.00
Two 2.5" ports, one with 2.5" flowmeter attached 2.00
One 2.5" with 2.5" flowmeter attached and one 4.5 “ steamer 4.24
Two 2.5", one with 2.5" flowmeter attached and one 4.5" steamer 5.24

FTA400 Rev1105
9
For different size flow tubes the value for K that is used to determine total flow
out of the hydrant will be different than those shown in Table 1. Use the following
formula to determine new value for K.
Total Flow Area
Constant K =
Area of Flow Tube Opening
Total Flow Area = Finding the sum of the areas of all open discharges.
(Area of a circle is
π
r2)
"K" factor are used as multipliers to determine total flow out of a hydrant when
the portable flow tester is hooked up to only one port of the hydrant, but water is
flowing out of more than one.
Pump Test
The Portable FlowTester can be used to test pumpers not only from draft but
also from the tank or from a hydrant. It is extremely valuable to know not only that
your pumper can pass the service test, but remember it is necessary to know your
capabilities on the fire ground.
Make sure your pump can supply your preconnected lines with enough water
from the tank, if that is the way you expect to use them. For in-line pump testing,
attach the portable flow tester to the hydrant and run a typical hose layout. Next,
extend your standard fire fighting lines and open them. Monitor the flow.
For the service type of test, connect three lines into a common manifold. On the
discharge of the manifold connect a short length of hose leading into the portable
flow tester. Attach another length of hose on the discharge side and connect this to a
deck gun or monitor. If the monitor incorporates a sufficient straight length, with an
integral stream straightener, then the tester may be attached on to the discharge end of
the monitor in lieu of the nozzle.
Test the pumper according to the certification pressure, RPM, and volume or
pressure pump settings. To do that, set the RPM and then adjust the pump pressure by
adjusting the discharge valves. Correct the RPM if it has changed and readjust the
pressure if that has changed. When you are at the correct pressure and RPM point,
note the flow. The flow should meet the pumper rating at that pressure and RPM.

FTA400 Rev1105
10
Nozzle Test
Attach a hose to the inlet of the flow tube and the nozzle to be tested on the
discharge of the flow tube. The nozzle may be either a smooth bore type or automatic.
Flow the nozzle at various pressures and note the flow and pressure displayed on the
readout. This test will provide a vivid depiction of the nozzle pressure/flow relationship.
Training
Use the Portable FlowTester in training sessions to show firemen the effects of
pressure and flow on hose handling, reach of stream, the effects of kinked hose, etc. as
pumper pressure and nozzle sizes are changed.
Install the flow tube in the line behind the nozzle, preferably not directly on to the
discharge port of the pumper. Both the nozzleman and the pump operator vary their
valves. It is now possible to monitor the flow and thus determine the optimum flow
for various situations. This will be a graphic presentation of interaction of pressure,
flow, and nozzles. It will also demonstrate the desirability of Fire Research Flow and
Pressure Testers, which have been specifically designed for the fire industry, particularly
in the case where automatic nozzles are used.
Calibrate a Vehicle Mounted Flowmeter
1. Connect the portable flow tester flow tube to the pump suction port. (Refer to
Figure 2.)
2. Lay a 2 1/2" hose from the discharge to be tested to the flow tube making sure
there is no kink in the hose.
3. With the pump engaged open the discharge gate slowly all the way.
4. Control the flow with the suction port valve and by changing the RPM if
needed.
5. Read the displayed flow on the tester flowmeter.
Note: Refer to the vehicle flowmeter manufacturer's instructions to determine
how to adjust the calibration of the vehicle mounted flowmeter.
6. Have an assistant calibrate the vehicle flowmeter to match the reading on the
tester flowmeter.

FTA400 Rev1105
11
FLOW RATE MEASURING INFORMATION
•The location of the flow sensor in the plumbing system is critical. The flow at
and around the sensor must be laminar, or smooth, to ensure accurate flow rate
measurement. There must be enough straight pipe run before the flow sensor location
to allow the stream to stabilize into a uniform flow.
•Plumbing systems are always unique and may cause small deviations in the
factory flowmeter calibrations. It is recommended to check flowmeter calibration after
installation.
•Flowmeters should be checked from time to time for accuracy and recalibrated
as necessary. Calibrate at the most frequently used flow rate or use the guidelines
provided by NFPA 1901. (Refer to Table 2.)
•Plumbing components upstream of a flow sensor that tend to increase stream
turbulence may cause erroneous flow rate readings. Typical components would include
a valve, flange or elbow, sudden or multiple bends in the piping, or an increase in pipe
diameter. In these cases it may be require that a short length of hose (perhaps a 10 foot
section) be installed upstream of the portable flow tester flow tube to stabilize the
flow. (The hose diameter must be the same as the flow tube diameter.)
Table 2. Flowmeter Calibration Flow for Each Pipe Size
Note: (Reference NFPA 1901) Each fowmeter shall be calibrated to an accuracy of ±5
percent when flowing the amount of water shown for the pipe size in which it is
mounted.
Pipe Size Flow
Inch mm GPM LPM
1 25 40 150
1.5 38 90 340
2 52 160 600
2.5 65 250 950
3 75 375 1400
4 100 625 2400
5 125 1000 4000
6 150 1440 5500

FTA400 Rev1105
12
POWER
Internal Battery
IMPORTANT : Before using the Portable Flow ester for the first time, the
battery must be charged for at least six (6) hours.
The Portable FlowTester is powered by a rechargeable battery and must be
charged regularly. A fully charged battery will provide approximately six hours of
operating time. When the tester is not in use, the ON/OFF switch should be left in the
OFF position. The LOW BATTERY WHEN LIT indicator will illuminate when the
battery needs to be charged.
Charging
A 120 volt charger is mounted inside the box. A 120 VAC power cable is supplied
to power the charger. To charge the internal battery plug the cable into the AC
CHARGER input on the front panel and connect the other end to a standard 120 VAC
electrical outlet.
The battery must be charged with the ON/OFF switch in the OFF position.
Replacing the Battery
The battery used in the tester is a 12 VDC, 3.4 Ah, maintenance free, sealed lead
acid battery. The battery should last 3 to 4 years depending on use.
To remove the battery:
1. Remove the four retaining screws on the bottom of the flow tester case.
2. Open the cover and lift out the front panel.
3. Remove the two screws holding the battery to the front panel.
4. Remove the wires form the battery terminals.
To install a battery do the steps in reverse.
Alternate Power Sources
If any problems occur with any of the charging circuits, or if it is found during a
test that the battery is not charged, it is possible to power the tester directly from either
a 120 VAC or a 12 VDC source.
The tester will operate normally and can be used to perform flow tests when
connected to a 120 VAC power source. Plug the AC Power Cable into the AC
CHARGER input on the front panel and connect the other end to a standard 120 VAC
electrical outlet. The flow tester will work from the internal DC power supply.
A 12 VDC power source (car or truck battery) can also be used to power the flow
tester. Plug the optional 12 VDC Power Cable into the EXTERNAL POWER DC
VOLTAGE input on the front panel and connect the other end to a 12 VDC source.

FTA400 Rev1105
13
OPERATION
Caution: Care should be taken not to drop the flow tube. Dropping the flow
tube could result in damage the exterior of the tube or the flow sensor.
Note: Before using the Portable FlowTester for the first time, it must be
charged for at least six (6) hours.
The battery used in the tester is a maintenance free, sealed, lead acid battery. If
any problems occur with any of the charging circuits, or if it is found during a test that
the battery is not charged, it is possible to power the unit directly from either a 120
VAC or a 12 VDC source. (Refer to Power section.)
It is recommended that the calibration of the meter be checked once annually or if
the operator feels that the reading might be erroneous.
Program Features
See Programming section for more detailed information.
High and Low Flow Warning (Codes 315 and 316)
When the flow rate is above the programmed high flow value a flashing -HI- will
show in the digital display. When the flow rate is below the programmed low flow
value a flashing -LO- will show in the digital display.
Flow Cutoff (Codes 318 or 319)
The digital display will show 0 when the flow rate goes below the programmed
flow cutoff value.

FTA400 Rev1105
14
Flow Test
Set-up
Note: FRC does not provide adapters for connecting flow tubes. Use
appropriate adapters as necessary.
1. Ensure the tester battery is charged or connect it to an alternate power source.
Note: The flow sensor is positioned at the discharge end of the flow tube.
2. Attach a water source to the intake side of the flow tube. Best results will be
obtained by a short run (perhaps 10 feet) of relatively straight hose from the
source to the flow tube.
3. On the discharge side of the flow tube attach a hose, a nozzle, a quarter turn
ball valve, or leave free depending on the type of test.
4. Connect the flow sensor cable between flow tube sensor and the sensor input
on the front panel of the tester.
5. Place ON/OFF switch to ON the display will flash the calibration/tube size
program. After 3 seconds the display will switch to show 0 GPM.
6. Press MODE button to display the current sensor/tube size program.
7. If the sensor/tube size program is correct, press and hold MODE button until
the display begins to flash, release the button and proceed with the flow tests.
8. If the sensor/tube size program is not correct, select the correct program.
Select Sensor/Tube Size
Note: The sensor/tube size programs must be pre-entered into memory and
calibrated. (Refer to Programming section.) If a sensor/tube size had been
entered but not calibrated it can not be selected. (Refer to Calibration
section.)
1. Press MODE button to display the current sensor/tube size program.
2. Each time the MODE button is pressed the display will show the next available
program.
3. When the desired program is shown in the display, press and hold MODE
button until the display begins to flash.
4. Release MODE button to select the sensor/tube size program.
5. Proceed with the flow tests.

FTA400 Rev1105
15
Totalized Flow
The total button is used to perform two functions, display total flow and reset the
totalized flow to 0 if the reset function is set to YES.
Display Total Flow
When the TOTAL button is pressed and released the digital display will show the
total accumulated flow and the TOTALx100 LED will be on. (The flow will be x 100
the number shown in the display.)
Press and release the button again to show normal flow rate.
The total will continue to accumulate even if power has been off unless the reset
function is enabled.
Reset Total Flow to 0
The totalizer reset function (code 317) has two program settings YES or no. (Refer
to Programming section.) To enable the reset function the program totalizer reset is
set to YES.
Totalized flow will reset and start from 0 when power is off. Flow total can be
reset to 0 during operations by displaying the total flow and then pressing and holding
the TOTAL button until the display shows 0.

FTA400 Rev1105
16
PROGRAMMING
The program access mode is selected and inputs are made by using the two buttons
on the front of the flowmeter display module. The digital display will show stored
data and operator inputs. (Refer to Figure 2.)
Note: When entering codes in the program access mode there is a time out
feature that requires an operator input be made every three seconds. If an
input is not detected at a button within three seconds the program will
return to normal operation.
Inputs
The two buttons on the front of the display module allow the operator to gain
access to stored data and program functions.
The MODE button is used to display and select the calibration/tube size program.
Both the MODE and TOTAL buttons are used to enter a program code.
Once a program code is entered the MODE button is used to select the digit to be
changed and the TOTAL button is used to change the digit or option choice.
Figure 2. Typical Programming Displays
Error Code: Shows if an invalid program code has been entered.
PROGRAM ACCESS MODE DISPLAYS
Mode Selected: Ready for program code to be entered.
Entering Code: Ready for first digit of code to be entered.
Code Entered: Valid three digit code.
Automatic: Programmed value or option is shown.
Exit Mode: Ready for another program code to be entered
or return to normal operation.
Change Option: New program value or option is selected.
Note: Refer to Program Access Mode for detailed information.

FTA400 Rev1105
17
Program Access Mode
To gain access to the program features a three digit program code must be entered.
Review the Program Code Descriptions or refer to Table 3. Program Code Quick
Reference for the proper three digit code.
Note: There is a time out feature that will return the program to normal
operation in three seconds if input is not detected at the buttons.
Select Program Access Mode
Turn on power. Press the MODE button and hold it until the display shows four
dashes. The program access mode is ready for a three digit program code to be input.
Enter Program Code
Note: There is a time out feature that will return the program to normal
operation in three seconds if input is not detected at the buttons.
1. Select the Program Access Mode (four dashes are shown in the display).
2. Press the MODE button. The display will show the number 100 and the first
digit 1 will flash. Each time the MODE button is pressed the number will
scroll up by 1. Set the first digit to the number desired.
3. Press the TOTAL button. The second digit shown in the display will flash.
Each time the TOTAL button is pressed the number will scroll up by 1. Set
the second digit to the number desired.
4. Press the MODE button. The third digit shown in the display will flash. Each
time the MODE button is pressed the number will scroll up by 1. Set the third
digit to the number desired.
When a valid three digit program code is entered the display will show a program
value or an option. If an invalid code is entered the display will show an error code.
Note: When a valid code has been entered and the display shows a programed
value or an option, the time out feature is disabled.
Change Values or Options
Press the MODE button to select the digit that is to be changed. The digit will
flash. Press the TOTAL button to change the digit or the option choice.
Exit Program Access Mode
Press both the MODE and TOTAL buttons and hold them until four dashes are
shown in the display. Release the buttons and enter a new code or after 3 seconds the
program will time out and return to normal operation.

FTA400 Rev1105
18
Program Code Descriptions
When a valid three digit program code has been entered a program value or option
will show in the display. The MODE and TOTAL buttons are used change the data.
The MODE button will select the digit that is to be changed. The digit will flash.
The TOTAL button will change the digit that is flashing or change the option
choice.
Table 3 provides a quick reference of the program codes.
Table 3. Program Code Quick Reference
• Refer to Program Code Descriptions for detailed information.
• There is a timeout feature that will return the program to normal operation in
three seconds if input is not detected at the buttons.
• When a valid code has been entered and a programed value or option is shown
in the display, the timeout feature is disabled.
CODE FEATURE OPTIONS
311
Flow Rate Increment Increments by 10 at Flow Rates
Above Program Value
Increments by 1 at Flow Rates Below
Program Value
312
Sensor/Tube Size A, b, c, d, E, F (With Tube Size)
313
Flow Rate Units F1 = GPM; F2 = LPM
315
High Flow Warning 0 to 9999
0 = Disabled
316
Low Flow Warning 0 to 9999
0 = Disabled
317
Totalizer Reset YES = Resets to 0 at Power On
no = Stores Total Flow at Power Off
318
Flow Cutoff (Frequency) 0 to 99.9
319
Flow Cutoff (Flow Rate) 0 to 999
321
Flow Calibration (Single Point) Calibrate One Flow Rate
322
Flow Calibration (Multiple Point) Calibrate Two to Ten Flow Rates
E202
Invalid Code Was Entered Re-enter Code
E204
No Flow Sensor Signal Check Water Flow and Wiring
E206
Invalid Calibration Point Select Different Calibration Point
E208
Memory Failure Contact FRC

FTA400 Rev1105
19
Code 311 Flow Rate Increment
Factory programmed value:
Options: 0000 to 9999
This code will allow a program value to be set where the digital display will
change from incrementing by 1 to incrementing by 10. The display will increment by
1 at flow rates below the program setting and by 10 at flow rates above the program
setting. Settings of this code will not impact flow warnings, flow cutoff settings, or
flow rate display when in the calibration program.
Code 312 Sensor/Tube Size
Factory programmed value: (–.– = Tube Size)
Options: A, b, c, d, E, F (With Any Tube Size)
This code will allow the flow tester to be programmed for up to six different
sensor/tube sizes. Each is identified with a sensor identifying letter (A thru F) and the
tube size. The sensor/tube sizes are entered into memory by setting the program slot
and doing the calibration procedure. Once the tester is programmed the operator presses
the mode button to select a different sensor/tube size. (Note: Tube can refer to pipes,
fittings, or other fixtures that the flow sensor may be mounted in.)
Note: Tube size is in inches or millimeters depending on code 313 setting.
Code 313 Flow Rate Units
Options: F1 (GPM); F2 (LPM)
This code will allow the display to show flow rate in GPM or LPM.
Code 315 High Flow Warning
Factory programmed value: 0 (High flow warning is disabled.)
Options: 0001 to 9999
This code will allow the high flow warning to be set. When the flow rate is above
the high flow warning program value, the flow display will alternately flash between
the flow rate and -HI-.
Code 316 Low Flow Warning
Factory programmed value: 0 (Low flow warning is disabled.)
Options: 0001 to 9999
This code will allow the low flow rate warning to be set. When the flow rate is
below the low flow warning program value, the flow display will alternately flash
between the flow rate and -LO- .

FTA400 Rev1105
20
Code 317 Totalizer Reset
Factory programmed value:
Options: YES, no
This code will toggle the flow totalizer reset function on and off. The totalizer
reset function has two program settings YES and no. For the reset function to work
the totalizer reset is set to YES. Flow total will reset and start from 0 when power is
applied to the display module. Flow total will reset to 0 when the TOTAL button is
pressed and held. When the totalizer reset is set to no, the flow totals will accumulate
and will not reset to 0 even when power is off.
Code 318 Flow Cutoff (Frequency)
Factory programmed value:
Options: 0 to 99.9 Hz
This code allows a cutoff frequency for the flow sensor to be set. There is always
some turbulence in the pipe that could cause the flow sensor to turn with the discharge
closed. This would cause the display to show a flow rate when there is no true flow.
The flow cutoff function is set so that the flow display will show 0 when the signal
from the flow sensor is below the programmed value.
Code 319 Flow Cutoff (Flow Rate)
Factory programmed value:
Options: 0 to 999
This code allows a cutoff flow rate for the flow sensor to be set. There is always
some turbulence in the pipe that could cause the flow sensor to turn with the discharge
closed. This would cause the display to show a flow rate when there is no true flow.
The flow cutoff function is set so that the flow display will show 0 when the signal
from the flow sensor is below the programmed value.
Code 321 Flow Calibration (Single Point)
Factory programmed value: Precalibrated to Pipe Size
Options: 1 Calibration Point
Refer to Calibration section.
Code 322 Flow Calibration (Multiple Point)
Factory programmed value: No Values Entered
Options: 2 to 10 Calibration Points
This code allows for the display to be calibrated at multiple flow rates. This function
should be used when the flow sensor is installed in a difficult plumbing location where
flow is not linear. It corrects for nonlinear flow to provide an accurate flow rate display.
Refer to Calibration section.
This manual suits for next models
1
Table of contents
Other FRC Test Equipment manuals