Freedom Staff Liberty Staff User manual

Liberty Staff
Liberty Staff
Portable Hand Controls
OWNER’S MANUAL
OWNER’S MANUAL

Welcome to your very own hand-controlled driving experience.
1
Table of Contents
Assembly Instructions ................................................................................................................ 4
Installation ...................................................................................................................................... 5
Operation ........................................................................................................................................ 8
Warnings .......................................................................................................................................... 9
Last Note ........................................................................................................................................ 10
Inside the box:
• One control handle assembly
• One brake leg assembly
• One throttle leg assembly
• One brake clamp assembly
• One throttle clamp assembly
• One support strap
• One storage bag
• Four attachment knobs
• One spinner knob

2

3

4
Assembly Instructions
Putting together the Liberty Staff is easy but it does require some work. To make it
even easier, line up all the contents of the box so that they’re within easy reach as
you assemble. Once that’s done, you’re ready for the following:
1. Fasten an attachment knob to one end of the throttle clamp (this will be clearly
marked but just in case, the throttle clamp is the smaller clamp unit). Screw it in
securely so that it doesn’t rattle.
2. On the brake clamp, slip the free end of the safety chain over the free end of the
brake clamp. Fasten it securely.
3. Place the top parts of the throttle and brake clamps over their corresponding
partners. Put a bolt through the eye of the open end of a clamp and fasten each
with a knob.
4. Take the strap and slip the looped end over the brake leg insert (the upper end of
the brake leg assembly that is attached to the control handle). Tuck the throttle
and brake leg inserts toward the free end of the control handle. Coil the strap over
the entire control handle assembly. You can now put it inside the storage bag.
5. Always remember instructions number 6 and 7 and make sure to carry this
instruction booklet in the storage bag with the rest of the control handle
assembly.
6. Put the throttle and brake leg assembly in the storage bag with the clamp ends
on top.
7. Secure the storage bag by pulling the drawstring and tying the ends.

Installation
Installing the portable Liberty Staff into your vehicle—or any vehicle for that
matter—is a straightforward operation. It does not require tools or modifi cations to
the vehicle. With practice, you can do it in 2 minutes tops.
1. Attach the clamps to their respective pedals, throttle to throttle, brake to brake.
Position the clamps for maximum leverage and tighten the attachment knobs.
Begin with the throttle clamp.
2. Double check the throttle clamp attachment. Push on the throttle leg and
examine the following:
• Free movement. Check if the clamp clears the side of the transmission tunnel
and won’t get caught in the rug, fl oor mat, or on anything else that might get in
the way of the throttle returning to its neutral position. Adjust the clamp’s
position by loosening the knobs, moving it clear of the obstruction, and
retightening the knobs.
• Range of movement. Although you might not need to go all the way and fl oor
your throttle, check how far or how deep it can go. If the clamp has the pedal
more than a few eights of an inch from the fl oorboard, you need to readjust.
• Secure attachment. After clamping, checking, adjusting (if at all), make sure that
the attachment knobs are fastened tightly. Test it with a few fi rm shakes to
confi rm that the clamp is securely attached to the pedal.
3. Move on to the brake clamp attachment. Attach the brake clamp onto one side of
the brake arm—the steel bar that attaching the brake pedal to the master
cylinder—and swing the safety chain onto the other side of the brake arm. Slip the
open end of the safety chain over the attachment bolt on the free end of the brake
clamp; put the bolt through the eye and screw on the attachment knob. Make
sure the knobs are tightened.
5

4. Double check the brake clamp attachment. Push on the brake leg and examine
the following:
• Free movement. Because of its placement, having anything that the brake clamp
might snag or get caught on from the fl oorboards is unlikely, except for the
neighboring throttle pedal. With the throttle clamp attached to it, a striking
overlap is a distinct possibility. Should the movement of the brake going down
interfere with the throttle coming up, adjust and move one or both of the
clamps around until they can move free and clear.
• Range of movement. With the brake pedal, it’s usually the arm it’s joined to that
touches the fl oorboard when stepped on all the way, not the pedal itself. Placing
the brake clamp on the brake pedal without causing an obstruction to the brake
pedal’s range of movement should be easy. For overall safety considerations, you
must ensure that you can employ the brakes fully.
• Secure attachment. As with the throttle, after clamping, check and re-check!
Examine tightness of the attachment knobs, the pedal’s range of movement, and
freedom from obstructions. Test the attachment with a few fi rm shakes to make
sure that it’s securely connected to the pedal. The safety chain is an added
protective measure in the unlikely event that the clamp attachment gets loose.
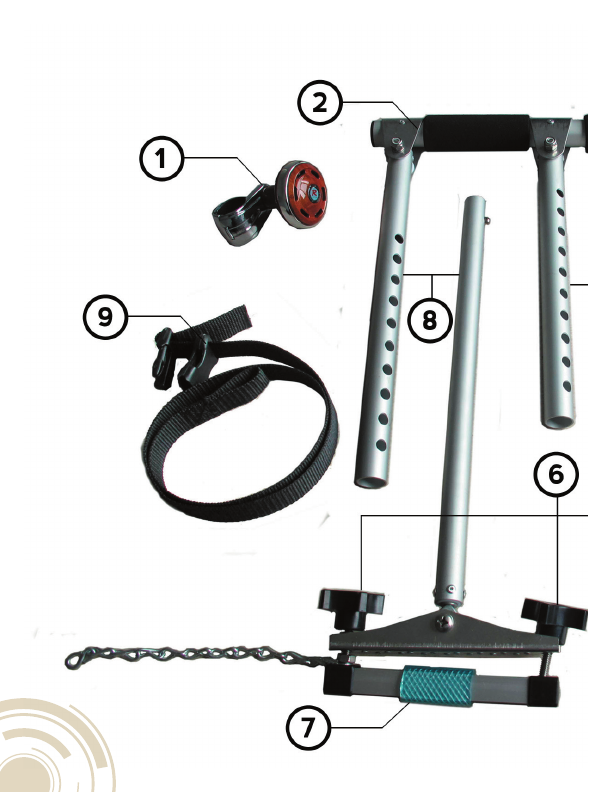
5. Tackle the control handle assembly. The “handle” (the padded protruding end) of
the control handle assembly goes to the left side, opposite the throttle. Take hold
of the brake and throttle legs; you will fi nd adjustment buttons. Rotate and align
them to the holes in the leg adjustment inserts. With the adjustment buttons
pressed down, you can slip in the leg adjustment inserts. This will let you easily
modify the hand controls to a length comfortable to you.
6. Hang the support strap. The support strap should go over the steering column
and around the upper end of the throttle leg before being clipped—via the
side-release buckle. When hanging the strap, make sure that it does not get in the
way of steering, turn signal control lever and wiper control lever, and the ignition
switch. The adjustment strap assembly is optional. It is designed to ease the
6

Liberty Staff out of the way when you’re getting in and out of the vehicle and for
support while driving. For those who prefer having the Liberty Staff resting
against their legs instead, remove the strap from the brake leg and keep it in
storage.
7. Take a seat. All assembly is pretty much done at this point. Slide and adjust
throttle and brake legs to a comfortable length and position. Rotate the legs do
that the adjustment holes are on top and rearrange led adjustment inserts as
needed.
8. Do a fi nal check. While seated on the driver’s seat, you can do a better check on
the hand controls. Try it out to see if you have full range of motion. Check if your
steering wheel is getting in the way, you can either adjust the Liberty Staff or the
steering column until it’s all clear. Test if the Liberty Staff handle is at an awkward
or unwieldy position or distance for you, this is the perfect opportunity to
readjust it.
Do a check with the engine running. Make sure that the transmission is set in PARK
at all times during testing. Push down on the brake and start your vehicle and
slowly release or pull up to give the throttle some power. If all works without a
hitch, then your adjustments are good and your test is complete.
Last note: Be sure there are no obstructions for the pedals. Keep your feet clear
of pedals especially if you have no sensory feedback from them. A blockage in the
pedal range of movement can be extremely dangerous while driving both for
everyone on the road and to your feet. Always check that you can fully employ the
brakes from your normal driving position.
9. Install the spinner knob. Attaching the spinner knob on the steering wheel is an
easy clamp and screw operation. Basically, once the spinner knob is on the
steering wheel, you can tighten the screw on the base and that’s it. The
recommended position is at about the 2 o’clock position for better
leverage on sharp turns and for parking.
7

Operation
Using the Liberty Staff is a simple push and pull operation. Pull to go. Push to stop.
The beauty of it rests not only on its simplicity but also on its portability. This device
can be attached to a wide variety of vehicles; this is where its portability becomes
extremely relevant.
While operating a vehicle with a simple push and pull motion sounds easy, it does
take getting used to. The most important bit of instruction we have for you is
practice, practice, practice!
In the same way that you learned how to drive the fi rst time around, allow yourself
time to get used to driving with your new hand controls. Even when you know what
to do, having the muscle memory for the task of driving with hand controls is
invaluable.
Before using the Liberty Staff make sure you get all your paperwork together. Update
your license, get all the necessary certifi cations and permits, get your doctor’s go
signal. Requirements might diff er from state to state, so check your local DMV if
you’re good to go.
The Liberty Staff is a tool to support your independence and mobility. Use it wisely
and responsibly. To that end, please heed the following:
• Take the time to practice driving with the Liberty Staff in safe and open locations
such as an empty parking lot or an open fi eld. You already know how to drive; now
you will learn to drive in a slightly diff erent way.
Have a friend accompany you for back up and yes, for a bit of moral support. It’s
best to start out cautious but optimistic, and then go home triumphant.
• Because you’ll be using your hands and your arms to drive with the Liberty Staff ,
make sure you have more than suffi cient upper body strength to perform this task.
This is vital when you’re either trying to purposely lock up your brakes or avoiding
8

doing so—by pushing and releasing the brake pedal multiple times in quick
bursts—while coping with possible emergency.
• Before going out in traffi c, make sure you can perform a sudden stop surely and
with confi dence; that your reaction time and execution is swift and smooth
between stimulus and response.
Practice applying the brakes is various situations: slowly or evenly (as in regular
driving conditions) and abrupt, sudden stops. You never know when you’ll need
the latter, but it’s better to practice it until you feel you can do it automatically and
without too much thought or eff ort.
• Whenever you place the Liberty Staff in your vehicle or any vehicle, test the
controls before heading out into traffi c. Press on the throttle and press on the brake
all the way. Make it a habit to do a controls check each time you drive out. This is a
safety check for you and for everyone else on the road: other drivers, pedestrians,
and the occasional child playing in the sidewalk who unpredictably ventures into
the street from time to time.
Warnings
• Be sure that you’re not on medication that can aff ect your driving. Whether it’s a
pain reliever or anti-depressant. Consult your physician regarding this matter but
just the same, err on the side of caution and avoid getting behind the wheel when
even slightly impaired.
Also, for the same reasons as above, driving and the consumption of alcohol is a
no-no.
• The “handle” end of the control handle must be on the left. The Liberty Staff works
on a system of leverage: pushing down increases pressure on the brake and
releases the throttle and vice versa. This hand control system has been designed to
take full advantage of leverage; altering or modifying the Liberty Staff in any way
will mess with the system and render it ineff ective and very likely, dangerous.
9

Some might be tempted to make this a two-handed rig by adding a handle on the
right end of the control handle assembly; that’s a really bad idea. It’s easy to do and
it might make putting pressure on the throttle easier but it will hamper the brake
operation that leaves yourself and others in a dangerous situation.
• The Liberty Staff was created for paraplegics and amputees. Lately though, other
types of users have surfaced such as people suff ering from leg numbness,
weakness or paralysis and seniors who have trouble with arthritis and other health
problems relating to the use of their legs.
It is important to note that with hand controls, the parameters for their use include
normal or common upper body strength and dexterity. If you have arm strength or
grip concerns, there are other hand control devices that you can use on their own
or in tandem with the Liberty Staff .
• Driving with a disability is what it is. It can be challenging but it’s not impossible.
The Liberty Staff is designed to help a wide variety of people but it’s not a fi ts-all
solution. If you fi nd that it is a suitable device for you, great! If not, something else
that better fi ts your needs might be out there.
Last Note
Adaptive or hand control driving is by itself, something to think about. Try your best
to make your driving less of a worry. Although the Liberty Staff can fi t a wide variety
of vehicles, don’t make it a challenge for yourself to fi t it into vehicles that will make
driving more diffi cult for you e.g. quirky automobiles, poorly maintained cars, or
older models without power steering—which by the way, should be a standard on
your requirements when say, renting a vehicle or driving a friend’s car.
Always place safety and comfort above all else.
10

Table of contents
Other Freedom Staff Mobility Aid manuals
Popular Mobility Aid manuals by other brands

Invacare
Invacare Growth Bracket Installation and operating instructions

Gima
Gima FS9125L manual

NORMBAU
NORMBAU Nylon Care 0300 471 Fixing instructions and directions for use

identités
identités EVOLUTION 2 instruction manual

Invacare
Invacare FR300 Assembly, installation and operating instructions

Lumex
Lumex LF1600 Assembly and operation manual

CareCo
CareCo Kona Owner's handbook

Harmar Mobility
Harmar Mobility AL003 Installation and owner's manual

aidapt
aidapt VP119 Fixing and maintenance instructions

AMF-BRUNS
AMF-BRUNS Alu Ramp operating instructions

Invacare
Invacare DOLOMITE Melody user manual

identités
identités NEO FOLD EVOLUTION instruction manual