9
CONTROLS AND SETTINGS
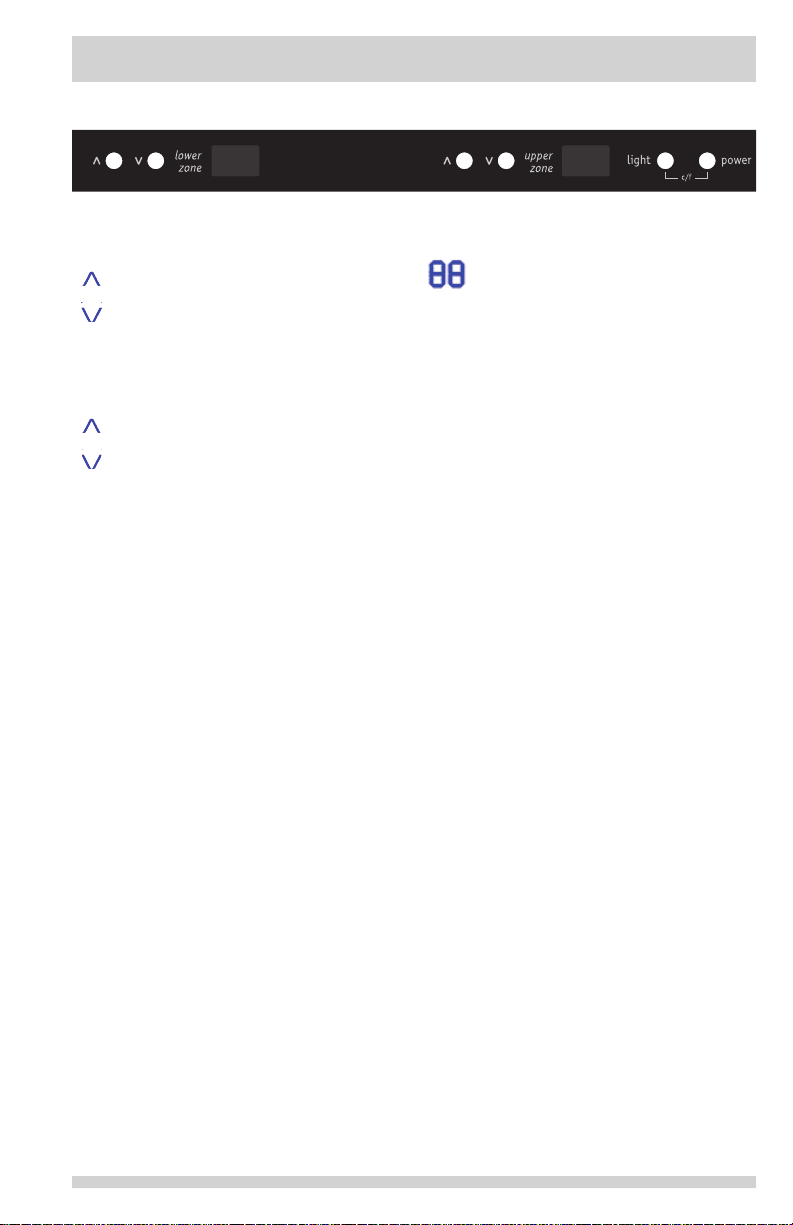
Temperature Control for Dual Zone Model
Temperature in lower
chamber indicator
Press this button once to increase
temperature 1° F/C.
Press this button once to decrease
temperature 1° F/C.
Temperature in upper
chamber indicator
Press this button once to increase
temperature 1° F/C.
Press this button once to decrease
temperature 1° F/C.
Indication of Temperature in Lower Chamber
: Press this button once and the temperature increase 1°C.
: Press this button once and the temperature decrease 1°C.
Indication of Temperature in Upper Chamber
: Press this button once and the temperature increase 1°C.
: Press this button once and the temperature decrease 1°C.
: Temperature display.
Light: Lighting button for LED lamp; it controls the on/off of lamp.
Power: On/off button used to turn on/off all load.
Press Light and Power together for 2 seconds and you can convert between
fahrenheit temperature and Celsius temperature.
Notice!
zThe default temperature is 10/10°C, and the temperature after power
failure will be the temperature set before the power failure.
zTo elongate the service life of compressor, please wait for at least 5
minutes before the wine cooler is restarted after power failure.
zFailure display
zIf there is failure on the sensor, the screen may display failure code, such
as: E and F. When the screen displays the above-mentioned errors, please
do not disassemble it for check by yourself. You should contact local
after-sales service personnel for repair.
zIf the temperature in the cooler is too low, it will display “L”.
When the temperature in the cooler is too high, the screen will display “H”
and will flash; under this state, the buzzer will buzz until 30 seconds; one
minute later, the buzzer will continue to give alarm in the next 30 seconds; after
the alarm is given for three times, it will not give alarm any more. You can
press any key to cancel sound alarm.
zWhen you put a lot of wines together in the cooler, the temperature in the
cooler may rise temporarily.
- 10 -
Temperature display
Light: This LED turns the light ON and OFF.
Power: This LED turns the power ON and OFF.
Press both Light and Power LED’s at the same
time to change between fahrenheit and Celsius
temperatures.
• The default temperature is 46°F (8°C) for upper zone and 59°F (15°C) for lower zone. The
temperature after power failure will be the temperature set before the power failure.
• To prolong the life of compressor, please wait for at least 5 minutes before the wine cooler is
restarted after power failure.
The temperature range MIN and MAX is 41 - 54° F for the upper zone and 54 - 64° F for the
lower zone.
Failure display
• If “E” and “F” are displayed, please contact local service personnel for repair.
• If the temperature in the cooler is too low, it will display “L”.
• If the temperature in the cooler is too high, the screen will display “H” and will ash. Under
this state, the buzzer will buzz for 30 seconds. One minute later, the buzzer will continue to
buzz for the next 30 seconds. After three times, the alarm will not buzz any more. You can
press any key to cancel sound alarm.
• Storing too many wine bottles in the cooler may cause the temperature in the cooler to rise
temporarily.
The wine cooler can be operated by adjusting the temperature control buttons (up arrow and
down arrow) until the desired temperature is reached.
The display will ash for a few seconds before set point is locked in.
Indication of Temperature in Lower Chamber
: Press this button once and the temperature increase 1°C.
: Press this button once and the temperature decrease 1°C.
Indication of Temperature in Upper Chamber
: Press this button once and the temperature increase 1°C.
: Press this button once and the temperature decrease 1°C.
: Temperature display.
Light: Lighting button for LED lamp; it controls the on/off of lamp.
Power: On/off button used to turn on/off all load.
Press Light and Power together for 2 seconds and you can convert between
fahrenheit temperature and Celsius temperature.
Notice!
zThe default temperature is 10/10°C, and the temperature after power
failure will be the temperature set before the power failure.
zTo elongate the service life of compressor, please wait for at least 5
minutes before the wine cooler is restarted after power failure.
zFailure display
zIf there is failure on the sensor, the screen may display failure code, such
as: E and F. When the screen displays the above-mentioned errors, please
do not disassemble it for check by yourself. You should contact local
after-sales service personnel for repair.
zIf the temperature in the cooler is too low, it will display “L”.
When the temperature in the cooler is too high, the screen will display “H”
and will flash; under this state, the buzzer will buzz until 30 seconds; one
minute later, the buzzer will continue to give alarm in the next 30 seconds; after
the alarm is given for three times, it will not give alarm any more. You can
press any key to cancel sound alarm.
zWhen you put a lot of wines together in the cooler, the temperature in the
cooler may rise temporarily.
- 10 -
lower
zone
upper
zone