Frontpoint Smart Chime User manual

SMART CHIME
USER GUIDE

INSTALLATION AND APP SETUP
To complete the setup, you will need:
• the Smart Chime
• a mobile phone
• a strong 2.4 GHz Wi-Fi connection
• your Wi-Fi password
• the product sticker- depicted
to the right (recommended)
To add the Smart Chime to your Frontpoint account, follow the steps below:
1. Plug the Smart Chime into an outlet near your Wi-Fi router*, ideally 5 to 10
unobstructed feet (or no more than 4 physical steps) away.
A. Ensure the chosen outlet is not connected to a switch that you can turn
ON/OFF.
*You can move the Smart Chime to its final location once app setup is complete.
2. Wait up to 90 seconds for the Power LED (shown below) to change from
blinking to solid.
Meet your Frontpoint camera’s new best friend. Required for the
Wireless Doorbell Camera to create the ringing tone when someone
is at your door, the Smart Chime also boosts Wi-Fi to help maintain a
steady connection for any connected Frontpoint camera.
In this manual, we guide you through:
1. Connecting the Smart Chime to your Frontpoint account
2. Configuring the Smart Chime’s volume and tone
3. Connecting cameras to your Smart Chime
For help along the way, refer to page 15 for Troubleshooting or page 13
to reference what the LEDs mean.
Let’s get started!
SMART CHIME USER GUIDE
1
2
3
TABLE OF CONTENTS
Installation and App Setup
Configuration
Connecting Your Cameras
LED Reference Guide
Troubleshooting
.............Page 3
.............................Page 10
............Page 11
..................Page 13
.........................Page 15
2

INSTALLATION AND APP SETUP
To complete the setup, you will need:
• the Smart Chime
• a mobile phone
• a strong 2.4 GHz Wi-Fi connection
• your Wi-Fi password
• the product sticker- depicted
to the right (recommended)
To add the Smart Chime to your Frontpoint account, follow the steps below:
1. Plug the Smart Chime into an outlet near your Wi-Fi router*, ideally 5 to 10
unobstructed feet (or no more than 4 physical steps) away.
A. Ensure the chosen outlet is not connected to a switch that you can turn
ON/OFF.
*You can move the Smart Chime to its final location once app setup is complete.
2. Wait up to 90 seconds for the Power LED (shown below) to change from
blinking to solid.
SMART CHIME USER GUIDE
1
2
3
A

INSTALLATION AND APP SETUP (Continued)
3. Once the Power LED is solid, open the Wi-Fi Settings on your mobile phone.
A. Wait for the “Chime Config (XX:XX:XX)” Wi-Fi network to appear- it
may take an additional two minutes as the device boots up.
*The X’s are indicative of the device’s unique MAC address and will vary.
B. Please note that a network named “Chime (XX:XX:XX)” will likely appear
first but is not a substitute for the “Chime Config (XX:XX:XX)” network.
If the “Chime Config (XX:XX:XX)” network doesn’t appear after two full minutes,
toggle OFF/ON the Wi-Fi on your phone. If the problem persists, move the Smart
Chime closer to your router. If the network still doesn’t appear after another two
minutes, perform a factory reset following the instructions on page 16.
A. Once available, connect to the “Chime Config (XX:XX:XX)” network by
using the Wi-Fi password (Wi-Fi PW) from the sticker included with the
Smart Chime- indicated in green below.
*The Wi-Fi password can also be found on the back of the Smart Chime.
3
A
B
C
4

4. Once successfully connected to the Chime Config (XX:XX:XX) network, it will
appear like this on your phone, with an indication that internet connection is
not available:
i. If you’re having trouble staying connected to the Chime Config. network,
your phone may be defaulting back to your home network. Press “Forget
This Network” next to your home network to prevent this from happening.
i. If you’re using an iOS phone, you may get a pop-up in which you need to
select “Use without Internet”.
i. If you’re using an Android phone, you may get a pop-up telling you the
“Chime Config (XX:XX:XX)” network has no Internet access. Press the
drop-down arrow to select “Yes” or “Use Every Time” to stay connected
to the network.
4
A
B
5
C

INSTALLATION AND APP SETUP (Continued)
5. Scan the code to the right with the camera on your
mobile phone or type “192.168.173.1” into the
URL bar of your mobile phone’s web browser to be
directed to the Wi-Fi setup web page.
*If your browser indicates “no connection” and does not let you
open this page, refer back to the Wi-Fi Settings of your phone
and check “Connect Anyway” or “Always Connect” next to the
Chime Config (XX:XX:XX) network.
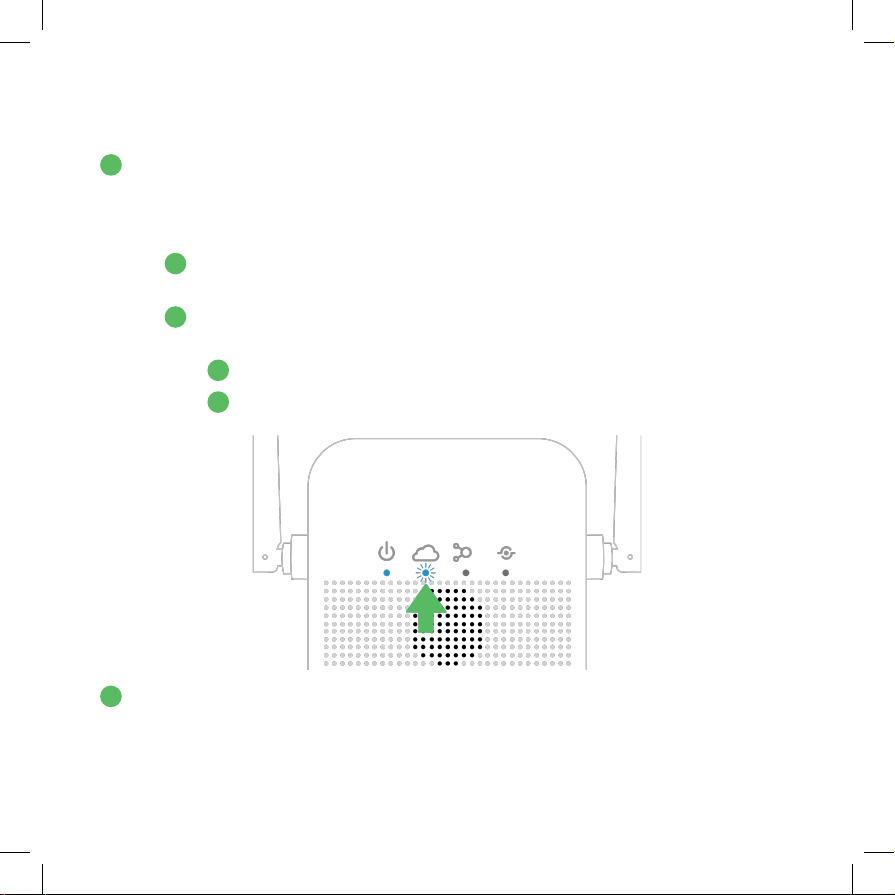
6. Upon opening the Wi-Fi setup page (shown below), press the yellow button to
“Scan for Wi-Fi Networks”*.
*Do not manually enter your Wi-Fi network or auto-populate the SSID field unless you know the
network’s security protocol and key format- these will update automatically if selected from the list
of networks when scanned.
A. From the list of nearby networks, choose your
home’s 2.4 Ghz Wi-Fi network.
i. If you cannot find your home’s Wi-Fi
network name initially, press “Refresh” at
the bottom of the page to reload the list of
available networks.
ii. After selecting your network from the list,
the “Security” protocol and “Key Format”
will be automatically selected as necessary-
do not make changes to these selections.
B. Enter your Wi-Fi password next to “Security Key”.
C. Press “Save” to complete and then close.
5
6
A
B
C
i
ii
6

7. After submitting a password, the Smart Chime will attempt to connect to
your Wi-Fi and the Router LED (shown below) will start blinking. When the
connection is successfully established, the Router LED will turn solid. (Your
phone’s Wi-Fi will now switch back to your original network as well.)
A. If the “Router LED” doesn’t start blinking, try moving your Smart Chime
closer to your router and starting from step #1 of the setup.
B. If the “Router LED” doesn’t stop blinking and become solid after two
minutes of waiting, the connection was not successful. Try:
i. Carefully re-reading and repeating step #6
ii. Double checking your Wi-Fi password
8. Log into the Frontpoint app on your mobile phone and press “Keep me Logged
In” until you complete the setup.
*If you are unable to login due to lack of connectivity, the connection was not successfully
established in step 6; please try steps 6 and 7 again.
A
7
i
ii
8
7
B

INSTALLATION AND APP SETUP (Continued)
9. Tap the navigation menu ( ).
A. Select “Add Device”
B. Select “Doorbell Camera”
1. Tap “Enter MAC Address” at the bottom of the page.
1. Manually enter the Smart Chime’s MAC Address
found on the included sticker (or on the back of
the Smart Chime), as indicated below in green.
2. Tap “Install” and enter a name for your Smart Chime.
9
10
11
12
A
B
8

1. Wait for the Smart Chime to complete setup.
When complete, you will see the screen to
the right:
A. When firmware updates are available, your
Smart Chime will update automatically but
it may take an additional 15 minutes to
complete setup. (The progress bar will not
move along steadily- each update takes a
variable amount of time.)
*If installation fails, press “Retry”- the firmware updates may have caused the installation
process to time-out.
1. If desired, move the Smart Chime closer to the location of the camera(s) you
intend to connect with:
A. Place the Smart Chime no further than 20 feet from your router (or no
more than 8 physical steps) and try to place them at a similar height.
B. Use an outlet that is not controlled by a switch to avoid being turned ON/
OFF.
C. Once the Smart Chime completes booting up (usually 90 seconds), the
Smart Chime’s “Router LED” (see page 13) should start blinking. If it does
not begin blinking, your Smart Chime is too far from your router; relocate
the Smart Chime to an electrical outlet closer to your router.
D. Once the “Router LED” changes from blinking to solid (after about 2
minutes), the connection is complete.*
*Please note that the strength of a connection fluctuates and you may not see a
connection issue immediately. If you later experience an issue, simply move the Smart
Chime closer to the router.
13
A
14
A
B
C
D
9

CONFIGURATION
After installing your Smart Chime, you can customize and test its volume and tone in the
Frontpoint app.
1. Log into the Frontpoint app on your mobile phone.
2. Tap the navigation menu ( ) in the left-hand corner.
3. Select Manage Devices.
4. Find your Smart Chime under the “Other” section and tap the Options ( )
button.
5. Tap Device Settings ( ).
6. As desired, adjust the Smart Chime’s volume by moving the volume slider to left
(quieter) or right (louder).
7. Select your desired chime tone from the Chime Sound drop-down menu where
20 tones are available.
8. Tap Test Chime Tone to hear the selected tone settings.
9. Once you land on your favorite tone and desired volume, press Save.
4
3
2
1
5
6
7
8
9
10

CONNECTING YOUR CAMERAS
Connect up to eight Frontpoint cameras to your Smart Chime, improving their
connection stability if placed far from the router. Follow the steps below, depending on if
your camera is new to your home or already installed.
Pre-installed cameras:
If your camera is already attached to your system prior to setting up the Smart Chime, the
camera must first be removed.
1. Log into the Frontpoint app on your mobile phone.
I. Tap the navigation menu ( ) in the left-hand corner.
I. Select Manage Devices.
I. Find your camera and tap the Options ( ) button.
I. Tap Remove Device.
I. Re-confirm you wish to delete by pressing Remove again.
2. Power cycle the device by unplugging the camera from its power source,
waiting a few seconds, and then plugging it back in.
3. Follow the steps below for “New cameras”.
New cameras:
Follow the instructions provided in the camera’s
box to add your camera to the system. If you no
longer have the instructions, please scan the QR
code to the right with your mobile phone to
access all of our camera manuals.
3
2
1
i
ii
iii
iv
v
11

CONNECTING YOUR CAMERAS (Continued)
IMPORTANT: When selecting the final network for your camera during the digital
setup, choose “Chime (XX:XX:XX)” listed at the top of the page under “Access Points”.
(The X’s are indicative of the MAC address and will vary.)
When the Smart Chime’s “Devices LED” (see page 13) becomes solid your camera has
successfully paired.
12

LED REFERENCE GUIDE
1. Power LED
1. Router LED
1. Devices LED
1. Pairing LED
1. Speaker
1. Reset Button
1. Pairing Button
2
1
3
4
5
6
7
13
2
1
3
4
5
6
7

LED REFERENCE GUIDE (Continued)
Power
O - Device is powered o
On - Device is powered on
Blinking - Device is booting up
Router
O - No connection to router
or internet
On - Connected to internet
Blinking - Connected to router,
no internet
Blinking (five quick blinks) -
Communication test initiated
Devices
O - No device(s) connected to chime
On - Device(s) connected to chime
Blinking (three quick blinks) -
New device connected to chime
Pairing
O - Pairing mode is not enabled
Blinking (slowly) - Pairing mode
is not enabled to connect to router
Blinking (rapidly) - Pairing mode
is enabled to connect to device(s)
Additional States
All LEDs Blinking (escalating) -
Firmware upgrade in progress
All LEDs Blinking (simultaneously) -
Factory Reset in progress
14

TROUBLESHOOTING
If you’re having issues with either the setup or operation of the Smart Chime, please
scan the QR code below for answers to a range of questions such as:
• How can I complete the installation without my Wi-Fi password?
• How can I factory reset my Smart Chime?
• Why won’t my Smart Chime finish loading?
• Why can’t I connect to the network?
http://redirect.frontpointsecurity.com/ChimeTroubleshooting
For any other questions or to chat with a live support agent:
Tap Support in the navigation menu of the Frontpoint mobile app
-OR-
Visit frontpoint.com/support
To speak to an agent, you can also
call 1-877-602-5276.
15

Other manuals for Smart Chime
1
Table of contents
Other Frontpoint Accessories manuals
Popular Accessories manuals by other brands

General Awnings
General Awnings IMPERIAL LATTICE Assembly instructions

Giatec
Giatec SmartRock user guide

RayTek
RayTek RAYCMLTJM operating instructions

netvox
netvox R718PA2 user manual

Sensortech Systems
Sensortech Systems ST-2200 installation instructions

PCB Piezotronics
PCB Piezotronics TLA288D01 Installation and operating manual

Sennheiser
Sennheiser S 180 stereo Gebrauchsanleitung

UPPAbaby
UPPAbaby RUMBLESEAT V2 manual

elsner elektronik
elsner elektronik KNX RW Technical specifications and installation instructions

Crestron
Crestron ST-VS Operation guide

Okoia
Okoia Relax Cocoon operating instructions

Waterpik Technologies
Waterpik Technologies WP-480 manual