Fuller Brush 55004 User manual

3 in 1
Window Cleaner
3 en 1
Limpiador de Ventanas
TABLE OF CONTENTS
ÍNDICE
Medidas adicionales������������������������������������������������������������������������������������������������������������11
Cargador ���������������������������������������������������������������������������������������������������������������������� 11
Baterías ������������������������������������������������������������������������������������������������������������������������ 11
Uso previsto������������������������������������������������������������������������������������������������������������������ 11
Peligro de lesión ����������������������������������������������������������������������������������������������������������� 11
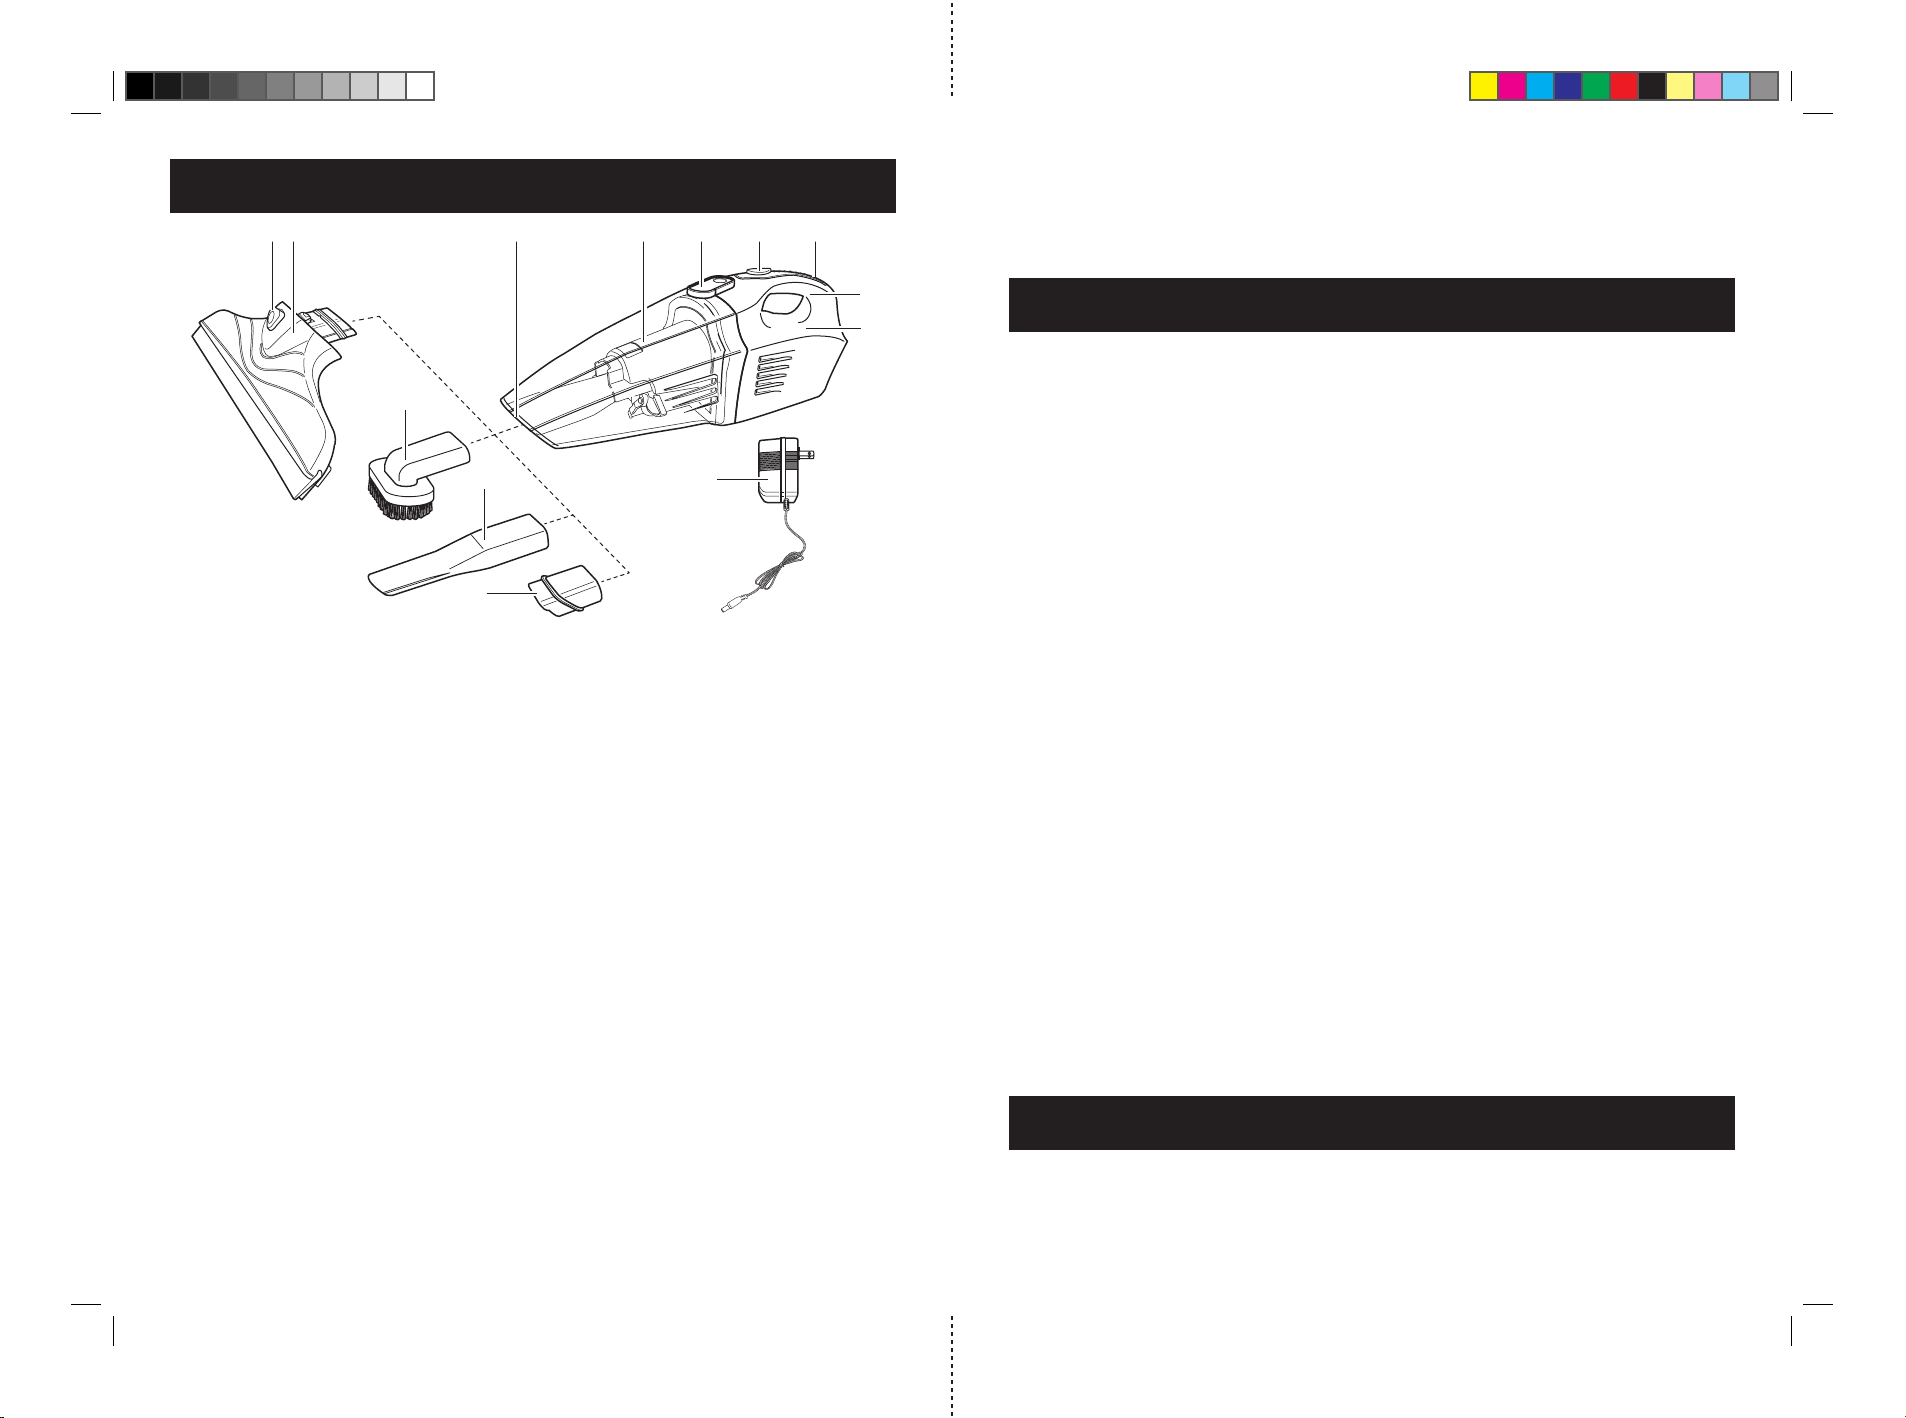
Partes ����������������������������������������������������������������������������������������������������������������������������������13
Funcionamiento�������������������������������������������������������������������������������������������������������������������14
Antes del primer uso ���������������������������������������������������������������������������������������������������� 14
Fijar/Retirar piezas de fijación �������������������������������������������������������������������������������������� 15
Extracción/Colocación de recipiente colector �������������������������������������������������������������� 16
Uso del producto:���������������������������������������������������������������������������������������������������������� 16
Limpieza �����������������������������������������������������������������������������������������������������������������������������17
Eliminación ��������������������������������������������������������������������������������������������������������������������������17
Solución de problemas��������������������������������������������������������������������������������������������������������17
Extracción de las baterías ���������������������������������������������������������������������������������������������������18
Datos téchnicos�������������������������������������������������������������������������������������������������������������������18
Important safeguards�������������������������������������������������������������������������������������������������������������2
Additional safeguards������������������������������������������������������������������������������������������������������������3
Charger �������������������������������������������������������������������������������������������������������������������������� 3
Batteries�������������������������������������������������������������������������������������������������������������������������� 3
Intended use ������������������������������������������������������������������������������������������������������������������� 3
Danger of injury �������������������������������������������������������������������������������������������������������������� 3
Operation�������������������������������������������������������������������������������������������������������������������������������4
Before first use���������������������������������������������������������������������������������������������������������������� 4
Mounting the wall bracket ����������������������������������������������������������������������������������������������� 5
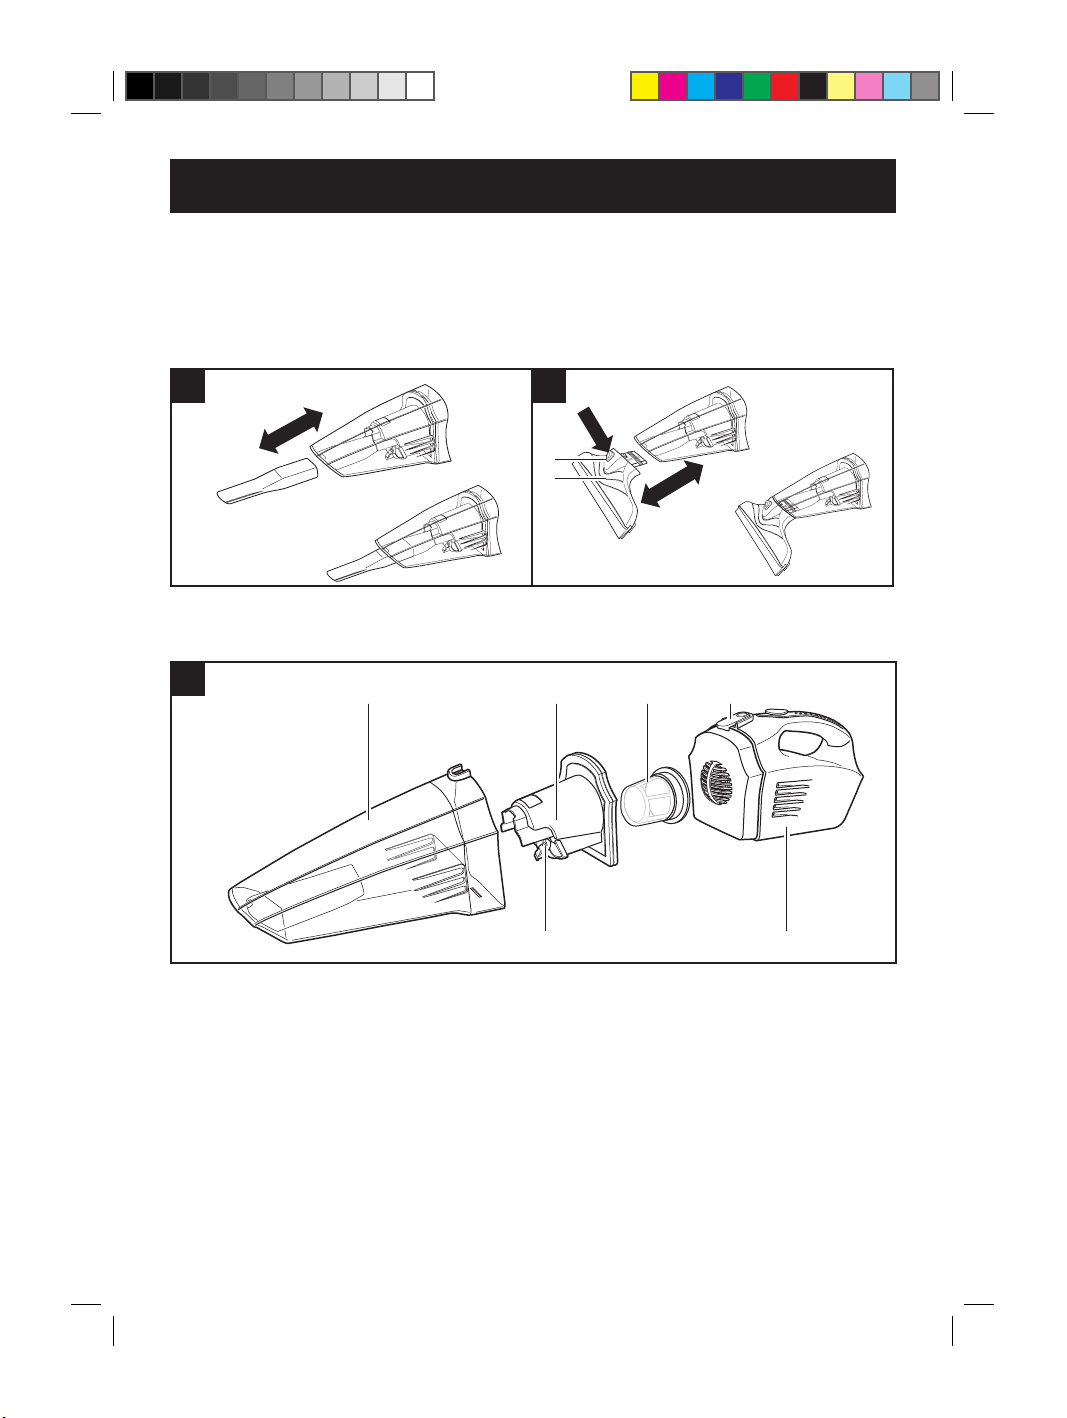
Attaching/Removing attachments ����������������������������������������������������������������������������������� 6
Collecting container assembly ���������������������������������������������������������������������������������������� 6
Removing/Inserting collecting container ������������������������������������������������������������������������� 6
Using the appliance: ������������������������������������������������������������������������������������������������������� 7
Cleaning �������������������������������������������������������������������������������������������������������������������������������7
Disposal���������������������������������������������������������������������������������������������������������������������������������8
Troubleshooting���������������������������������������������������������������������������������������������������������������������8
Removing batteries����������������������������������������������������������������������������������������������������������������8
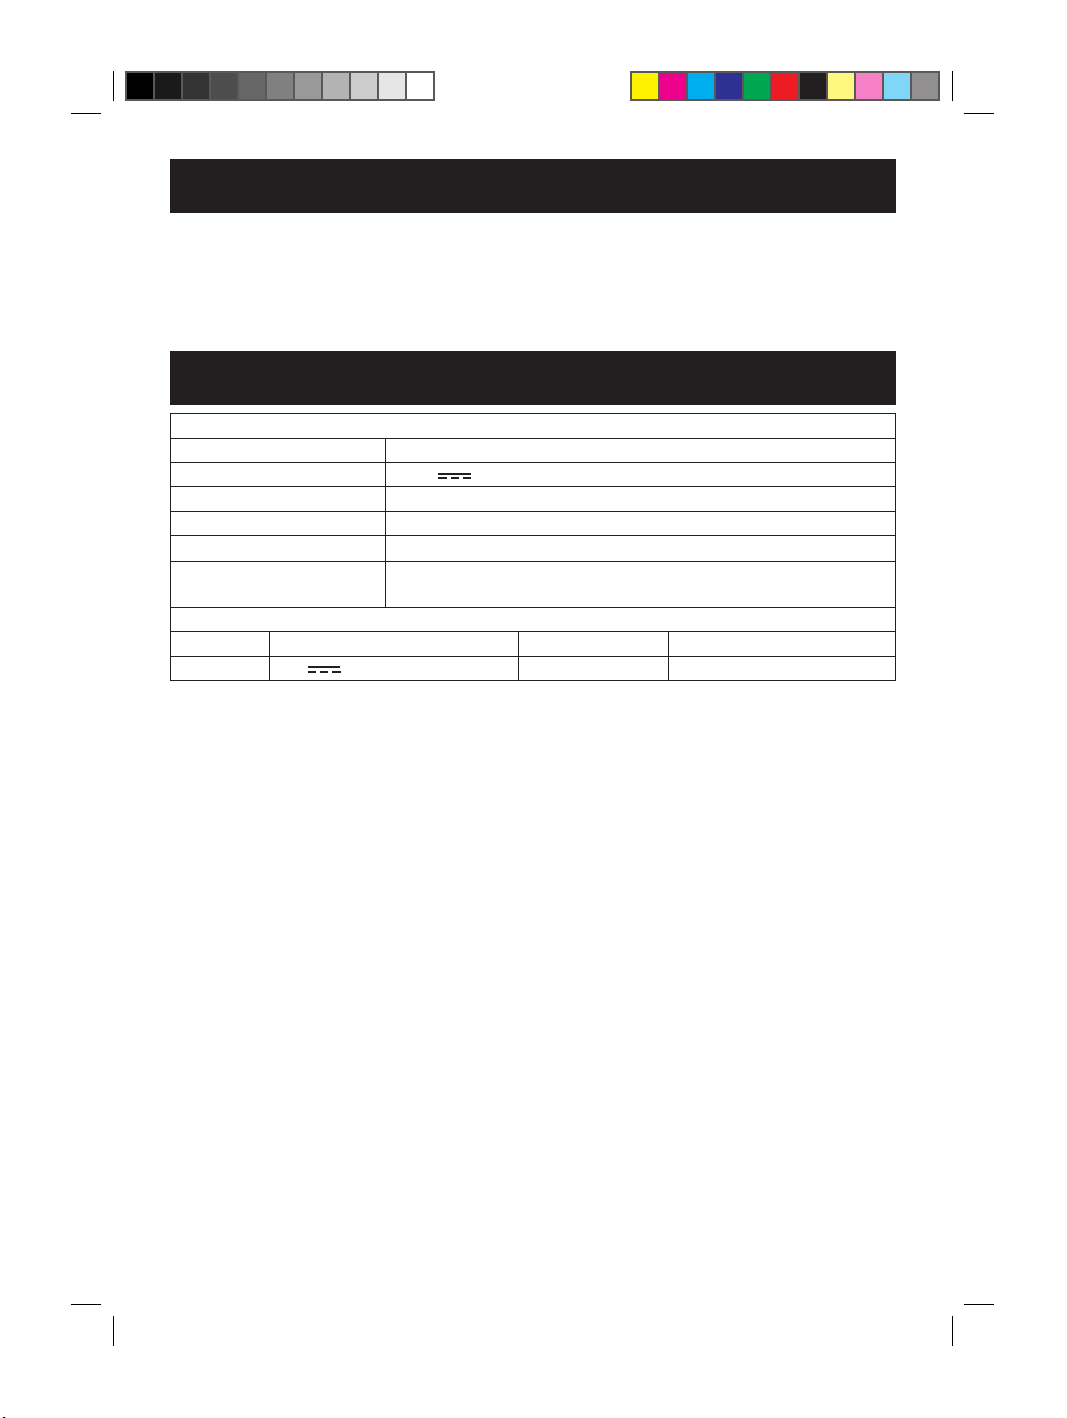
Technical data������������������������������������������������������������������������������������������������������������������������9
US
ES
We reserve the right to modify the product, packaging or enclosed documentation at any time in conjunction with our policy of continuous development�
Nos reservamos el derecho de modicar el producto, el embalaje o documentación adjunta en cualquier momento en relación con nuestra política de
desarrollo continuo�
Customer Service:
The Fuller Brush Company, 860 Kaiser Road, Suite D,
Napa, CA 94558, U�S�A�
Toll Free phone number: (800) 522-0499 & (888) 280-7707
Internet email: info@fuller�com
Servicio de Atención al Cliente:
The Fuller Brush Company, 860 Kaiser Road, Suite D,
Napa, CA 94558, U�S�A�
Número telefónico gratuito: (800) 522-0499 & (888) 280-7707
Correo electrónico de Internet: info@fuller�com
Instruction Manual
Manual de Instrucciones
Model No./Modelo nº: 55004
Window cleaner_56004(P002W)_US+ES_IM_V1_130515.indb 1 5/15/13 4:19 PM

1 2
Dear Valued Customer,
Congratulations on the purchase of the 3 in 1 Window Cleaner� We understand that a
clean and organized home is important for a happy, healthy life for you, your family and
friends� At Fuller, we strive to help you achieve this goal�
IMPORTANT SAFEGUARDS
When using electrical equipment, basic precautions should always be followed, including
the following:
READ ALL INSTRUCTIONS BEFORE USING THIS APPLIANCE.
WARNING – To reduce the risk of re, electric shock, or injury:
• Do not use the appliance outdoors�
• Do not allow the appliance to be used as a toy� Close attention is necessary when using
by or near children�
• Only use as described in this manual� Use only manufacturer’s recommended
attachments and accessories�
• Do not use the charger with damaged connection cord or plug� If the appliance or the
charger is not working as it should, has been dropped, damaged, left outdoors, or
dropped into water, return it to a service center�
• Do not pull or carry by connection cord, use cord as a handle, close a door on cord, or
pull cord around sharp edges or corners� Keep cord away from heated surfaces�
• Do not unplug by pulling on connection cord� To unplug, pull the plug, not the connection
cord�
• Do not handle charger, including charger plug, and charger terminals with wet hands�
• Do not put any object into openings� Do not use with any opening blocked; keep free of
dust, lint, hair, and anything that may reduce air ow.
• Keep hair, loose clothing, ngers, and all parts of body away from openings and moving
parts�
• Use extra care when cleaning on stairs�
• Do not use to pick up ammable or combustible liquids, such as gasoline, or use in areas
where they may be present�
• Do not charge the appliance outdoors�
• Use only the charger supplied by the manufacturer to recharge the appliance�
• Do not incinerate the appliance even if it is severely damaged� The batteries can explode
in a re.
• Unplug before connecting attachments�
• Do not pick up anything that is burning or smoking, such as cigarettes, matches, or hot
ashes�
• Do not use without the lter in place.
SAVE THESE INSTRUCTIONS!
PARTS
345
1
2
678
10
11
12
13
9
1� Main unit
2� Handle
3� Control light
4� On/Off switch
5� Release button for collecting container
6� Collecting container (with insert)
7� Suction opening
8� Window attachment
9� Release button
10� Brush attachment
11� Crevice attachment
12� Attachment for liquids
13� Charger
Not shown:
- Wall mounting bracket with dowel and screw
- Filter
Window cleaner_56004(P002W)_US+ES_IM_V1_130515.indb 1 5/15/13 4:19 PM

3
ADDITIONAL SAFEGUARDS
• For household use only!
Charger
• CAUTION: Risk of Electric Shock - dry location use only� Do not expose to liquid, vapor,
or rain�
Batteries
• Recharge only with the charger specied by the manufacturer. A charger that is suitable
for one type of battery pack may create a risk of re when used with another battery pack.
• Under abusive conditions, liquid may be ejected from the battery; avoid contact� If contact
accidentally occurs, ush with water. If liquid contacts eyes, additionally seek medical
help� Liquid ejected from the battery may cause irritation or burns�
• The battery pack is not replaceable by the user, please contact customer service�
Intended use
• This appliance must only be used for its intended use� No liability will be accepted for
damage resulting from improper use or non-compliance with these instructions�
• This appliance is intended to vacuum dry and wet dirt as well as small quantities of liquid�
• Never use the appliance to vacuum the following:
- Glowing ash, cigarette ends, matches, etc�
- Inammable or explosive substances
- Very ne dust (e. g. concrete dust), ash or toner
- Pointed, hard objects such as e� g� pieces of broken glass
• Only use the appliance in dry rooms, never outdoors or on hot surfaces�
• This appliance is for household use only and is not intended for commercial application�
Use this appliance only as described in these instructions� Any other use is deemed to
be improper�
• Do not leave the appliance unattended while switched on�
• Disconnect the appliance from its charger during a thunderstorm�
Danger of injury
CAUTION: Risk of suffocation! Packaging materials are not toys� Plastic bags, foils and
Styrofoam parts can suffocate children� Always keep all packaging materials away from
children and animals�
• This appliance is not intended to be used by persons (including children) with reduced
physical, sensorial or mental capabilities, or lack of experience and/or lack of knowledge,
unless they have been given supervision or instructions concerning the use of the
appliance by a person responsible for their safety�
• Children should be supervised to ensure that they do not play with the appliance�
• Switch off the appliance:
- when the appliance is not in use
- before removing/changing the attachments
- if a fault or error occurs during operation
- if something is blocking the appliance
- before cleaning the appliance
• The charger must only be connected to a wall outlet that has been properly installed�
Window cleaner_56004(P002W)_US+ES_IM_V1_130515.indb 3 5/15/13 4:19 PM

4
ADDITIONAL SAFEGUARDS
• The wall outlet must be readily accessible after connection� The mains voltage must
match the technical data for the charger� Only use suitable extension cords whose
technical data is the same as that of the charger�
• Make sure that the connection cord does not present a trip hazard, does not become
squashed or bent and does not come into contact with hot surfaces�
• The appliance must be switched off when connecting or removing the charger�
• While cleaning or during operation, do not immerse the main unit, the charger and the
cord of the appliance into water or other liquids� Never hold the appliance under running
water� Never touch these parts with wet or damp hands�
• Never use the appliances if it is damaged�
WARNING - Danger of electrocution! Do not try to repair the appliance
yourself. Please return the appliance to the dealer or a qualied customer service center for
maintenance and repairs�
• The appliance may only be used, if all original parts, such as the collecting container,
lter, insert and seals are not damaged and used together. Do not try to replace any part
by another one� If a part needs to be replaced, please contact our customer service�
• In the event of damage/faults switch off the appliance immediately�
• Never place heavy objects on the appliance�
• Empty and clean the collecting container after each use. The lter must be regularly
cleaned in order to prevent overloading of the motor� Please refer to chapter “CLEANING”�
OPERATION
Before rst use
• Carefully remove the appliance and its accessories from the packaging�
• Check package contents for completeness and damage� Do not use the appliance if
package content is incomplete or appears damaged� Return it to the retailer immediately
(see chapter “PARTS”)�
• WARNING! To avoid danger of suffocation, keep the plastic bag away from babies and
children� Do not use this bag in cribs, beds, carriages or play pens� This bag is not a toy�
• Store the packaging material if you want to use it to pack, ship or transport the product�
Store it in such a way that it cannot cause harm�
• Before using the appliance for the rst time, the battery needs to be fully charged.
Window cleaner_56004(P002W)_US+ES_IM_V1_130515.indb 4 5/15/13 4:19 PM

5
OPERATION
Charging the battery
• Connect the charger to socket on the back of the appliance
as shown in the illustration�
• Connect the charger delivered with the appliance to a
proper installed wall outlet�
NOTE: During the charging process the control light (3) on the
handle (2) will be illuminated�
• Allow the battery to charge for approx. 8 – 10 hours (rst
time: approx� 12 – 15 hours)�
• After charging disconnect the charger from the appliance�
• Recharge the battery after nishing work.
NOTE: It is normal for the appliance housing/battery pack
and charger to become warm (but not hot) during charging
process�
3
2
1
WARNING! To reduce risk of re, never leave the appliance/battery pack connected with
the charger for more than 24 hours!
Mounting the wall bracket
NOTE: Mount the wall bracket close to a plug wall outlet if possible so it is easier to charge
the battery when the appliance is not in use�
• The hook of the wall bracket must be pointing upwards�
• Mark a hole for drilling� Ensure that there are no cable/pipes in the wall that could be
damaged�
• Drill the hole and insert the dowel supplied�
• Fasten the bracket to the wall with the screw supplied�
• Hook the appliance to the bracket, using the slot on the bottom of the main unit�
Attachment Application
Window attachment (8):
For removing water from smooth surfaces such as windows,
tiles or mirrors�
Brush attachment (10):
For removing dust from delicate objects such as picture
frames, lamp shades, keyboards, books etc�
Crevice attachment (11):
For vacuuming in folds, corners, recesses or other places
which are hard to reach�
Attachment for liquids (12):
For vacuum small quantities of liquids�
Window cleaner_56004(P002W)_US+ES_IM_V1_130515.indb 5 5/15/13 4:19 PM

6
OPERATION
Attaching/Removing attachments
• Insert the required tool into the suction opening (7)�
• For the window attachment (8) it must lock in place�
• For removing any suction tool (10, 11 or 12) just pull it out of the suction opening (7)�
• For the window attachment (8) press the release button (9) and pull it out of the suction
opening (7)�
2 3
9
8
Collecting container assembly
Overview
46 14 15 5
16 1
1� Main unit
5� Release button
6� Collecting container
14� Insert
15� Filter
16� Silicone plug
Removing/Inserting collecting container
Removing: Press the release button (5) and remove the collecting container (6) by pulling it�
Inserting : Attach the collecting container (6) to the main unit (1)�
Window cleaner_56004(P002W)_US+ES_IM_V1_130515.indb 6 5/15/13 4:19 PM

7
OPERATION
Using the appliance:
• Never direct the appliance at persons, animals and parts of your body while in use�
• If the appliance gets blocked switch it off immediately�
• Switch on the appliance once you ensured that all parts are locked in place correctly�
• Always switch off the appliance before changing/removing any attachments or cleaning
the appliance and attachments�
• Do not overll the collecting container. Refer to the maximum ll level (marking).
• Do not use the appliance when it is connected to the charger�
1� Insert the required attachment into the suction opening�
Make also sure that all other parts are inserted correctly�
(See section “Collection container assembly”)�
2� Switch on the appliance by pressing the on/off switch
(4)�
3� Clean the surface� During use check if the maximum
ll level (marking) has been reached, if yes empty the
collecting container�
4� Clean the collecting container after each use� (Refer to
chapter “Cleaning”)�
5� Charge the battery after use�
5
CLEANING
Clean the appliance after every use to ensure a long appliance lifecycle�
CAUTION: Always handle the appliance with care�
• Always switch off the appliance before cleaning and disconnect from the charger�
• Remove the collecting container, insert and lter.
• Empty the collecting container�
• Clean the insert and lter under lukewarm running water.
Note: The lter may lose some of its color over time. This is normal and does not have any
effect on its function�
• Keep the main unit, the charger and the connection cord away from water or other liquids
to avoid electric shocks� Make sure that no liquid gets into the main unit during cleaning�
Only the collecting container, the insert, the lter and the suction tools may be cleaned
with lukewarm water and some gentle cleaning agent� However, they must be completely
dry before using them again�
• Let the accessories air dry, never use a hair dryer�
• If needed clean the main unit with a slightly damp cloth� Dry it properly�
• Never use any sharp or abrasive cleaning agents or cleaning pads to clean the appliance
and accessories� These could damage the surfaces�
• The appliance can be stored on the wall mounting bracket�
• Store the appliance in a cool, dry indoor room out of the reach of children�
Window cleaner_56004(P002W)_US+ES_IM_V1_130515.indb 7 5/15/13 4:19 PM

8
DISPOSAL
The packaging material is recyclable� Please dispose of it in an environmentally friendly
manner�
TROUBLESHOOTING
If the appliance should stop working properly, rst check whether you are able to correct the
problem yourself� Otherwise, contact our customer service department� Do not try to repair
a faulty appliance yourself!
Problem Possible cause/solution
The appliance does
not function, or
function slow�
- Recharge the battery�
Low suction force� - Is the collecting container full?
Empty it�
- Is the lter heavily clogged up?
Clean it�
- Is the suction opening blocked?
Switch off the appliance and remove the blockage�
- It is also possible that some items are too big/heavy to be picked
up by the appliance�
Dust escapes from
the appliance during
cleaning�
- Check whether the collecting container, insert and lter are
inserted correctly and adjust the tting if necessary.
The control light
does not illuminate
when the appliance
is connected to the
wall outlet�
- Is the charger plugged in the wall outlet correctly, and also
connected to the appliance?
- Check the fuse of your wall outlet�
Streaks when
cleaning windows or
smooth surfaces�
- Clean the scraper lip of the window attachment�
- Turn over a worn scraper lip: Pull the scraper lip sideways out of
its holder, moisten with water or cleaning agent in the rounded
area and slide back into the holder the other way round�
- Replace the scraper lip if necessary�
- Check the metering of the cleaning agent�
REMOVING BATTERIES
• This appliance contains a built-in battery, which must be removed prior to disposal of the
appliance� Only do this at the end of the product lifecycle�
• Open the main unit only to dispose of the battery�
• Take care when opening the main unit, short-circuits must be avoided�
• Do not open the battery as there is a danger of a short-circuit; irritant vapors or caustic
liquids may also escape�
• Do not expose the battery to strong sunlight, heat or re as there is a risk of explosion.
Window cleaner_56004(P002W)_US+ES_IM_V1_130515.indb 8 5/15/13 4:19 PM

9
REMOVING BATTERIES
1� The battery compartment is located on the bottom of the main unit� Unscrew the battery
compartment�
2� Slide open the battery compartment�
3� Take out the battery and open the clip on the connecting cord�
4� Dispose of the battery in an environmentally friendly manner (collection points or retailers)�
TECHNICAL DATA
Appliance
Model: 56004
Voltage supply: 7�2 V (6 x 1�2 V Ni-MH batteries, AA type), 1300 mAh
Power: 50 W
Battery charging time: approx. 8 - 10 hours (The rst charge lasts for 12 - 15 hours.)
Battery operating time: approx� 15 - 18 minutes
Collecting container,
max. ll level:
6�76 oz (200 ml)
Charger
Model: LK-D090020 Voltage supply: 120 V ~, 60 Hz
Output: 9 V , 200 mA Protection class: II
Window cleaner_56004(P002W)_US+ES_IM_V1_130515.indb 9 5/15/13 4:19 PM

10
Estimado Cliente,
Enhorabuena por la adquisición de la 3 en 1 Limpiador de ventanas� Comprendemos que
un hogar limpio y organizado es importante para una vida feliz, saludable para usted, su
familia y amigos�En Fuller nos esforzamos por ayudarle a lograr este objetivo�
MEDIDAS DE SEGURIDAD
IMPORTANTES
Cuando se utilizan aparatos eléctricos, se deben seguir las precauciones básicas de
seguridad, incluyendo las siguientes:
LEA TODAS LAS INSTRUCCIONES ANTES DE USAR ESTE APARATO.
ADVERTENCIA – Para reducir el riesgo de incendio, descarga
eléctrica o lesiones:
• No utilice este aparato al aire libre�
• No permita que el aparato sea utilizado como juguete� Preste especial atención cuando
sea utilizado por o cerca de niños�
• Utilice sólo como se describe en este manual� Utilice únicamente accesorios
recomendados por el fabricante�
• No utilice el cargador si el cable de conexión o el enchufe está dañado� Si el dispositivo
o el cargador no está funcionando como debiera, se ha caído, dañado, dejado a la
intemperie o se ha caído al agua, retornelo a un centro de servicio�
• No jale ni transporte el cable de conexión, no utilice el cable como mango, no cierre
la puerta sobre el cordón, ni tire del cordón alrededor de bordes o esquinas con lo.
Mantenga el cable lejos de supercies calientes.
• No desconecte el aparato tirando del cable de conexión� Para desenchufar, tire del
enchufe, no del cable de conexión�
• No manipule el cargador, incluyendo el enchufe del cargador y terminales del cargador
con las manos mojadas�
• No coloque ningún objeto en las aberturas� No use con aberturas bloqueadas,
manténgalas libre de polvo, pelusa, pelo y cualquier cosa que pueda reducir el ujo de
aire�
• Mantenga el cabello, la ropa suelta, los dedos y todas las partes del cuerpo lejos de las
aberturas y piezas móviles�
• Tenga especial cuidado al limpiar escaleras�
• No lo use para aspirar líquidos inamables o combustibles, tales como gasolina, ni la
use en áreas donde puedan estar presentes�
• No cargue el artefacto al exterior�
• Utilice sólo el cargador suministrado por el fabricante para recargar el aparato�
• No queme el aparato, incluso si está muy dañado� Las baterías pueden explotar en el
fuego�
• Desenchufe antes de conectar los accesorios�
• No recoja nada que esté ardiendo o humeando, como cigarrillos, fósforos o cenizas
calientes�
• No utilice si el ltro no está en su lugar.
¡GUARDE ESTAS INSTRUCCIONES!
Window cleaner_56004(P002W)_US+ES_IM_V1_130515.indb 10 5/15/13 4:19 PM

11
MEDIDAS ADICIONALES
• Sólo para uso doméstico!
Cargador
• ADVERTENCIA: Peligro de descarga eléctrica - utilizar sólo en lugares secos� No
exponer a líquidos, vapores o lluvia�
Baterías
• Recargue sólo con el cargador especicado por el fabricante. Un cargador adecuado
para un tipo de batería puede crear un riesgo de incendio cuando se utiliza con otra
batería�
• En condiciones abusivas, el líquido puede ser expulsado de la batería; evitar el contacto�
En caso de contacto accidental, enjuague con agua� Si los ojos entran en contacto con
el líquido, consulte adicionalmente a un médico� El líquido expulsado de la batería puede
causar irritación o quemaduras�
• La batería no es reemplazable por el usuario, por favor póngase en contacto con el
servicio al cliente�
Uso previsto
• Este aparato sólo debe ser utilizado para el uso previsto� No se aceptará responsabilidad
alguna por los daños resultantes del uso indebido o incumplimiento de estas instrucciones�
• Este aparato está diseñado para aspirar suciedad seca y húmeda, así como pequeñas
cantidades de líquido�
• Nunca utilice el aparato para aspirar lo siguiente:
- Ceniza, colillas de cigarrillos, fósforos ardiente, etc�
- Sustancias inamables o explosivas
- Polvo muy no (por ejemplo, polvo de concreto), ceniza o tóner
- Objetos punzantes, duros como p� ej� pedazos de vidrio roto
• Utilice el aparato sólo en lugares secos, nunca al aire libre o en supercies calientes.
• Este aparato es sólo para uso doméstico y no está diseñado para uso comercial� Use
este aparato sólo como se indica en estas instrucciones� Cualquier otro uso se considera
inadecuado�
• No deje el artefacto sin supervisión si está encendido�
• Desconecte el aparato del cargador durante una tormenta eléctrica�
Peligro de lesión
ADVERTENCIA: ¡Riesgo de asxia! Los materiales de embalaje no son juguetes. Bolsas de
plástico, láminas y piezas de espuma de poliestireno pueden asxiar a los niños. Mantenga
siempre todos los materiales de embalaje alejados de niños y animales�
• Este artefacto no ha sido concebido para personas (incluyendo niños) con capacidades
físicas, sensoriales o mentales reducidas, o sin experiencia y/o sin conocimiento a
menos que estén supervisados o hayan recibido instrucción sobre el uso del artefacto
por una persona responsable de su seguridad�
• Los niños deben ser supervisados para asegurar que no jueguen con el artefacto�
• Apague el artefacto:
- cuando el aparato no esté en uso
- antes de quitar/modicar los accesorios
- si ocurre una falla o error durante la operación
Window cleaner_56004(P002W)_US+ES_IM_V1_130515.indb 11 5/15/13 4:19 PM

12
MEDIDAS ADICIONALES
- si algo está bloqueando el aparato
- antes de limpiar el aparato
• El cargador sólo debe conectarse a una toma de corriente que se ha instalado
correctamente�
• La toma de corriente debe ser fácilmente accesible después de la conexión� La tensión
de red debe coincidir con los datos técnicos del cargador� Utilice únicamente cordones
de extensión adecuados cuyos datos técnicos sean los mismos que los del cargador�
• Asegúrese de que el cable de conexión no represente peligro de tropiezo, no sea
doblado o aplastado y que no entre en contacto con supercies calientes.
• El aparato debe estar apagado al conectar o extraer el cargador�
• Al limpiar o durante la operación, no sumerja la unidad principal, el cargador y el cable
del aparato en agua u otros líquidos� Nunca sostenga el aparato bajo agua corriente�
Nunca toque estas piezas con las manos mojadas o húmedas�
• Nunca use los aparatos si están dañados�
ADVERTENCIA - ¡Peligro de electrocución! No intente reparar este artefacto usted
mismo. Por favor devuelva el aparato a su distribuidor o a un centro de servicio cualicado
de mantenimiento y reparaciones�
• El aparato sólo puede ser utilizado, si todas las piezas originales, como el recipiente
colector, el ltro, el inserto y juntas no están dañados y se utilizan juntos. No trate de
reemplazar ninguna pieza por otra� Si una pieza debe ser sustituida, por favor póngase
en contacto con nuestro servicio de atención al cliente�
• En caso de daños/averías apague el aparato inmediatamente�
• Nunca coloque objetos pesados sobre el aparato�
• Vacíe y limpie el recipiente colector después de cada uso. El ltro debe limpiarse
regularmente con el n de evitar la sobrecarga del motor. Consulte el capítulo
“LIMPIEZA”�
Window cleaner_56004(P002W)_US+ES_IM_V1_130515.indb 12 5/15/13 4:19 PM

13
PARTES
345
1
2
678
10
11
12
13
9
1� Unidad principal
2� Mango
3� Luz de control
4� Interruptor encender/apagar
5� Botón de desenganche de contenedor colector
6� Contenedor colector (con inserto)
7� Abertura de succión
8� Accesorio para ventana
9� Botón de desenganche
10� Accesorio de cepillo
11� Accesorio boquilla
12� Accesorio para líquidos
13� Cargador
No se muestra:
- Soporte de montaje de pared con taco y tornillo
- Filtro
Window cleaner_56004(P002W)_US+ES_IM_V1_130515.indb 13 5/15/13 4:19 PM

14
FUNCIONAMIENTO
Antes del primer uso
• Retire con cuidado el aparato y sus accesorios del embalaje�
• Revise si el contenido del paquete está completo y no tiene daños� No utilice el aparato
si el contenido del paquete está incompleto o parece estar dañado� Lleve a la tienda de
inmediato (véase el capítulo “PARTES”)�
• ¡ADVERTENCIA! Para evitar el peligro de asxia, mantenga la bolsa de plástico lejos
de bebés y niños� No utilice esta bolsa en cunas, camas, coches o corralitos� Esta bolsa
no es un juguete�
• Guarde el material de embalaje si desea utilizarlo para empacar, enviar o transportar el
producto� Guarde de tal manera que no pueda causar daño�
• Antes de utilizar el aparato por primera vez, debe cargar completamente la batería�
Carga de la batería
• Conecte el cargador al conector situado en la parte
posterior del aparato, como se muestra en la ilustración�
• Conecte el cargador suministrado con el aparato a una
toma de corriente instalada correctamente�
OBSERVACIÓN: Durante el proceso de carga se iluminará la
luz de control (3) en el mango (2)�
• Deje que la batería se cargue durante aprox� 8 - 10 horas
(primera vez: aprox� 12 - 15 horas)�
• Después de la carga desconecte el cargador del dispositivo�
• Cargue la batería después de terminar el trabajo.
OBSERVACIÓN: Es normal que la carcasa/el paquete de
baterías del aparato y el cargador se entibien (no calienten)
durante el proceso de carga�
3
2
1
ADVERTENCIA! ¡Para reducir el riesgo de incendio, no deje el aparato/el paquete de
baterías conectado al cargador por más de 24 horas!
Montar el soporte de pared
OBSERVACIÓN: Monte el soporte de pared cerca de una toma de enchufe, si es posible,
de forma que sea más fácil cargar la batería cuando el aparato no esté en uso�
• El gancho del soporte de pared debe apuntar hacia arriba�
• Marque un agujero para perforar� Asegúrese de que no hayan cables/tubos en la pared
que podrían dañarse�
• Perfore el agujero e inserte la clavija suministrada�
• Ajuste el soporte a la pared con el tornillo suministrado�
• Enganche el aparato en el soporte, usando la ranura en la parte inferior de la unidad
principal�
Window cleaner_56004(P002W)_US+ES_IM_V1_130515.indb 14 5/15/13 4:19 PM

15
FUNCIONAMIENTO
Accesorio Solicitud
Accesorio para ventana (8):
Para eliminar el agua de supercies lisas como ventanas,
azulejos o espejos�
Accesorio de cepillo (10):
Para eliminar el polvo de los objetos delicados tales como
marcos de cuadros, pantallas de lámparas, teclados, libros
etc�
Accesorio boquilla (11):
Para pasar la aspiradora en los pliegues, esquinas, rebordes u
otros lugares que son difíciles de alcanzar�
Accesorio para líquidos (12):
Para el vacío de pequeñas cantidades de líquidos�
Fijar/Retirar piezas de jación
• Inserte la herramienta requerida en la abertura de succión (7)�
• Para el accesorio de ventana (8) se debe bloquear en su lugar�
• Para retirar cualquier herramienta de succión (10, 11 ó 12) sólo sacarlo de la boca de
aspiración (7)�
• Para el accesorio de ventana (8), pulse el botón de liberación (9) y sáquelo de la abertura
de aspiración (7)�
2 3
9
8
Window cleaner_56004(P002W)_US+ES_IM_V1_130515.indb 15 5/15/13 4:19 PM

16
FUNCIONAMIENTO
Conjunto de recipiente colector
Descripción general
46 14 15 5
16 1
1� Unidad principal
5� Botón de desenganche
6� Recipiente colector
14� Inserto
15� Filtro
16� Tapón de silicona
Extracción/Colocación de recipiente colector
Extracción: Pulse el botón de liberación (5) y retire el recipiente colector (6) tirando de él�
Insertar : Fije recipiente colector (6) a la unidad principal (1)�
Uso del producto:
• No dirija nunca el aparato a personas, animales o partes de su cuerpo mientras esté en
uso�
• Si el aparato se bloquea apaguelo inmediatamente�
• Encienda el aparato una vez que se haya asegurado de que todas las piezas están
colocadas correctamente�
• Apague siempre el aparato antes de cambiar/retirar los accesorios o de limpiar el aparato
y los accesorios�
• No llene excesivamente el depósito colector� Consulte el nivel de llenado máximo
(marca)�
• No utilice el aparato cuando está conectado al cargador�
1� Inserte el accesorio necesario en el oricio de succión.
Asegúrese también de que todas las otras piezas estén
colocadas correctamente� (Ver la sección “Conjunto
de recipiente colector”)�
2� Encienda el aparato pulsando el interruptor de
encendido/apagado (4)�
3� Limpie la supercie. Durante el uso revise si se ha
alcanzado el nivel de llenado máximo (marcado), en
caso armativo vaciar el recipiente colector.
4� Limpie el recipiente colector después de cada uso�
(Consulte el capítulo “Limpieza”)�
5� Cargue la batería después de cada uso�
5
Window cleaner_56004(P002W)_US+ES_IM_V1_130515.indb 16 5/15/13 4:19 PM

17
LIMPIEZA
Limpie el producto después de cada uso para asegurar una larga vida útil�
ADVERTENCIA: Siempre manipule el aparato con cuidado�
• Apague siempre el aparato antes de limpiarlo y desconecte del cargador�
• Retire el recipiente colector, el inserto y el ltro.
• Vacíe el depósito colector�
• Limpie el inserto y el ltro con agua tibia.
NOTA: El ltro puede perder parte de su color con el tiempo. Esto es normal y no tiene
ningún efecto sobre su función�
• Mantenga la unidad principal, el cargador y el cable de conexión lejos del agua u otros
líquidos para evitar descargas eléctricas� Asegúrese de que no penetre ningún líquido
en la unidad principal durante la limpieza. Sólo el contenedor colector, el inserto, el ltro
y las herramientas de succión puede ser limpiadas con agua tibia y detergente suave�
Sin embargo, deben estar completamente secos antes de usarlos de nuevo�
• Deje que los accesorios se sequen al aire libre, nunca use un secador de pelo�
• Si es necesario limpie la unidad principal con un paño ligeramente humedecido� Seque
correctamente�
• Nunca utilice agentes de limpieza o almohadillas de limpieza fuertes o abrasivos para
limpiar el aparato y los accesorios. Estos podrían dañar las supercies.
• El aparato puede guardarse en el soporte de montaje a la pared�
• Guarde el aparato en un lugar interior, fresco y seco, fuera del alcance de los niños�
ELIMINACIÓN
El material del empaque es reciclable�Deshágase de los mismos de una manera
ambientalmente amistosa�
SOLUCIÓN DE PROBLEMAS
Si el aparato dejara de funcionar correctamente, compruebe primero si puede corregir el
problema por su cuenta� De lo contrario, póngase en contacto con nuestro departamento
de servicio al cliente� ¡No trate de reparar un electrodoméstico defectuoso usted mismo!
Problema Posible causa/Solución
El aparato no
funciona, o funciona
lentamente�
- Recargue la batería�
Baja fuerza de
succión�
- ¿El recipiente colector está lleno?
Vaciarlo�
- ¿El ltro está muy obstruido?
Límpielo�
- ¿Está bloqueada la abertura de aspiración?
Apague el aparato y elimine la obstrucción�
- También es posible que algunos elementos sean demasiado
grandes/pesados para ser recogidos por el aparato�
Window cleaner_56004(P002W)_US+ES_IM_V1_130515.indb 17 5/15/13 4:19 PM

18
SOLUCIÓN DE PROBLEMAS
El polvo escapa del
aparato durante la
limpieza�
- Compruebe si el recipiente colector, el inserto y el ltro están
insertados correctamente y ajustar el ajuste si es necesario�
La luz de control no
se enciende cuando
el aparato está
conectado a la toma
de corriente�
- ¿El cargador está enchufado en el tomacorriente de pared
correctamente y también conectado al aparato?
- Revise el fusible de la toma de corriente�
Rayas al limpiar
ventanas o
supercies lisas.
- Limpie el labio del accesorio ventana�
- Dé la vuelta a un labio rascador desgastado: Extraiga el labio
por el lado de su soporte, humedezca con agua o productos de
limpieza en la zona redondeada y deslice de nuevo al revés por
el soporte�
- Reemplace el labio si es necesario�
- Revise la dosicación del agente de limpieza.
EXTRACCIÓN DE LAS BATERÍAS
• Este aparato contiene una batería integrada, que debe ser retirada antes de la eliminación
del aparato Haga esto al nal del ciclo de vida del producto.
• Abra la unidad principal sólo para deshacerse de la batería�
• Tenga cuidado al abrir la unidad principal, se debe evitar un cortocircuito�
• No abra la batería, ya que hay peligro de cortocircuito; vapores irritantes o líquidos
cáusticos pueden escapar�
• No exponga la batería a la luz solar, el calor o el fuego ya que existe riesgo de explosión�
1� El compartimiento de la batería se encuentra en la parte inferior de la unidad principal�
Desenrosque el compartimiento de la batería�
2� Luego abra el compartimiento de baterías (28)�
3� Saque la batería y abra el clip en el cable de conexión�
4� Deseche la batería de forma respetuosa con el medio ambiente (puntos de recogida o
minoristas)�
DATOS TÉCHNICOS
Aparato
Modelo: 56004
Alimentación de tensión: 7,2 V (6 baterías de 1,2 V Ni-MH tipo AA), 1300 mAh
Potencia: 50 W
Tiempo de carga de la batería: aprox� 8 - 10 horas (La primera carga tarda 12 - 15 horas)
Duración de la batería: aprox� 15 - 18 minutos
Recipiente colector,
max� nivel de llenado:
6,76 oz (200 ml)
Cargador
Modelo: LK-D090020 Alimentación de tensión: 120 V ~, 60 Hz
Salida: 9 V , 200 mA Clase de protección: II
Window cleaner_56004(P002W)_US+ES_IM_V1_130515.indb 18 5/15/13 4:19 PM
Table of contents
Languages:
Popular Cleaning Equipment manuals by other brands

Kärcher
Kärcher WV Series manual

Kärcher
Kärcher BR 30/4 C Service manual

Ultrawave
Ultrawave Neon Series Operator's manual

Bissell
Bissell CleanView ALLERGEN PET REWIND 3402 Series manual

DIVERSITECH
DIVERSITECH GREEN owner's manual

Larson Electronics
Larson Electronics IND-HVAC-DTW-UVC-R1-SS Series Instruction guide

Tekmar
Tekmar Target TG-300 Instructions and care

REITEL
REITEL STEAMY MINI operating instructions

Biosecurity Technology
Biosecurity Technology Bio-Safe quick start guide

HOSPECO
HOSPECO SPHERGO POP TUCK n' GO Starter Kit user guide

Tennant
Tennant 9018842 installation instructions

Kärcher
Kärcher KM 170/600 R LPG manual