Fysic FX-3920 User manual

USER’S MANUAL
FX-3920

2
CONTENTS
1. DECLARATION OF CONFORMITY ......... 4
2. NETWORK COMPATIBILITY ................... 4
3. MAINTENANCE........................................ 5
4. INSTALLATION
4.1 Table stand................................................ 6
4.2 Wall-mounting ........................................... 7
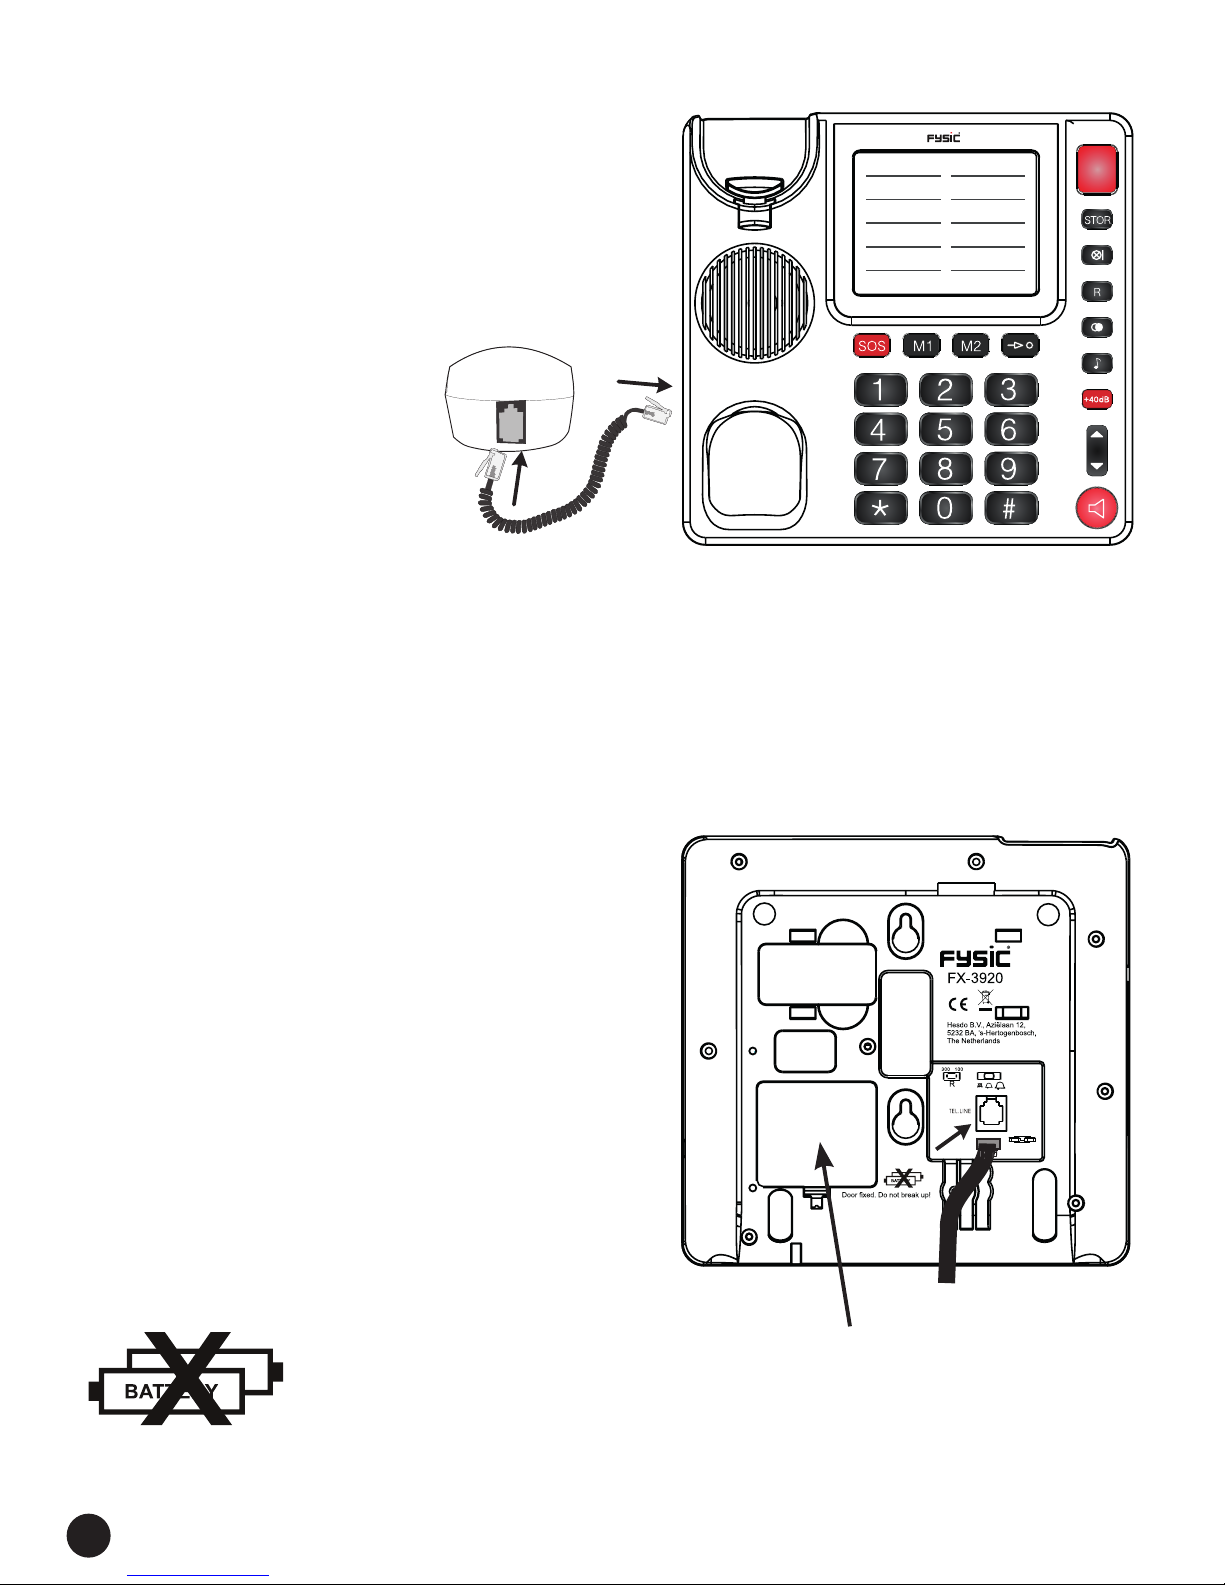
4.3 Receiver .................................................... 8
4.4 Telephone.................................................. 8
5. USING THE TELEPHONE
5.1 Incoming calls ........................................... 9
5.2 Answering calls ......................................... 9
5.3 Ending calls............................................. 10
5.4 Dialling numbers ..................................... 10
5.5 Redialling the last number....................... 10
5.6 Dialling memories directly ....................... 11
5.7 Dialling 2-button memories ..................... 11
5.8 Call volume and tone .............................. 12
5.9 Muting the microphone............................ 13
5.10 * and # buttons ........................................ 13
5.11 R button................................................... 14

3
6. NUMBER MEMORY
6.1 Introduction ............................................. 15
6.2 Programming........................................... 15
6.3 Dialling .................................................... 17
6.4 Changing or erasing................................ 17
7. WARNINGS AND USER TIPS
7.1 General ................................................... 18
7.2 Installation ............................................... 18
7.3 Environment ............................................ 19
8. PROOF OF WARRANTY........................ 20

4
1. DECLARATION OF CONFORMITY
The declaration of conformity is
available on the website
WWW.FYSIC.COM
2. NETWORK COMPATIBILITY
This telephone is designed for use on the ‘public
switched telephone networks (analogue single
line)’ of telephony and cable companies in all
countries of the EU.
However, each provider could require a different
connecting wire with plug.
This device meets the essential
requirements and other relevant
provisions as stipulated by the
European Guideline 1999/5/EC.
Loading factor: 50

5
3. MAINTENANCE
• Only clean the housing with a moist cloth,
never use chemical cleaning agents.
• Never place the FX-3920 onto cellulose-treated
surfaces; the rubber feet could leave tracks.
Service
Help
Service Help
WWW.FYSIC.COM
NL 073 6411 355
(Lokaal tarief)
BE 03 238 5666
(Lokaal tarief)
(Tarif local)
DE 0180 503 0085
Lokale Festnetzkosten
Hesdo, Australiëlaan 1
5232 BB, ‘s-Hertogenbosch
The Netherlands
WWW.FYSIC.COM
NL 073 6411 355
BE 03 238 5666
DE 0180 503 0085
Hesdo, Australiëlaan 1, 5232 BB,
‘s-Hertogenbosch, The Netherlands
(Lokaal tarief)
(Tarif local)
(Lokaal tarief)
(Lokale Festnetzkosten)

6
4. INSTALLATION
4.1 Table stand:
When using the telephone on a table or desk, you
should rst attach the table stand to the bottom of
the telephone.
1. rst, hook this
side of the stand
into the bottom
of the telephone
(see 1)
2. now push the other side of the stand into the
bottom until the 2
clips lock (see 2),
if necessary
depress these
clips somewhat
(see 3)
When you want to
detach the stand
again, press at 3
and remove in the
direction of 4.
1
3
4
2
3

7
4.2 Wall-mounting:
1. in a vertical line, drill
2 holes at a distance
of 8.4 cm from each
other and insert plugs
and screws; let the
head of the screws
protrude for 5 mm
2. slide the receiver
clamp out of the
telephone, turn it 180°
and place it back onto
the telephone; this
clamp will hold the
receiver in case of
wall-mounting
3. hook the telephone with the screw holes over
the screws and press it downward
4. x the telephone wire to the wall using the cable
clips
In case of wall-mounting, the table stand is NOT
used.
8,4cm

8
4.3 Receiver:
1. connect the receiver with
the telephone by attach-
ing one side of the spiral
cable to the bottom of the
receiver and
the other side
to the left side
of the tele-
phone
2.
push in the plugs until they’re securely connected
4.4 Telephone:
1. plug the telephone wire
into the bottom of the
telephone
2. insert the telephone plug
into a telephone wall
socket
The FX-3920 requires NO batteries

9
5. USING THE TELEPHONE
5.1 Incoming calls:
adjust the call volume using the call
volume switch at the bottom of the
telephone:
: high call volume
: low call volume
: mute
the call indicator with also light up
when you receive an incoming call
5.2 Answering calls:
pick up the receiver to have your
conversation through the receiver
or
briey press the speaker button to
answer the call in hands-free mode

10
5.3 Ending calls:
put the receiver back onto the cradle
if using the receiver for the current
call
or
press the speaker button again to
end the call if using the speaker for
the current call
5.4 Dialling numbers:
neem de hoorn op of schakel de luid-
sprekerfunctie in
enter the desired phone number
the number will be dialled directly
5.5 Redialling the last number:
pick up the receiver or turn on the
speaker function

11
press the button to redial the last
dialled number
5.6 Dialling memories directly (*):
pick up the receiver or turn on the
speaker function
press the SOS, M1 or M2 button
this number will be dialled
5.7 Dialling 2-button memories:
pick up the receiver or turn on the
speaker function
press the button
press the button under which the
memory is saved
this number will be dialled
*: for programming the memories, see paragraph
6.2

12
5.8 Call volume and tone:
ATTENTION: EXCESSIVE VOLUMES CAN
LEAD TO HEARING LOSS. IF MULTIPLE
USERS ARE USING THE TELEPHONE,
ALWAYS SET THE VOLUME TO NEUTRAL AFTER
EACH CALL.
volume
press to increase the volume or
press to decrease the volume,
these volume buttons control the
volume of both the receiver and the
speaker
amplier:
press the +40dB button to switch on
the amplier, press again to turn off
the amplier,
this function is only available in com-
bination with the receiver
ATTENTION: DANGER DUE TO THE
PRESENCE OF EXTREMELY HIGH
MAXIMUM VOLUME

13
tone adjustment:
press the button the increase the
high tones
attention: this function is only avail-
able in combination with an activated
amplier and the receiver
5.9 Muting the microphone:
press and hold this button during a
call to turn off the microphone
as soon as you release this button,
the microphone will be switched on
again
5.10 * and # buttons:
the and are buttons mainly used
for tele-banking:
• press the
button when requested
to press the ASTERISK button
• press the
button when requested
to press the POUND button

14
5.11 R button:
the R button (also called FLASH) is
used to briey interrupt the telephone
connection; this brief interruption is
used by some home or ofce switch-
boards for call forwarding; public
switchboards use this button for tele-
com functions, such call waiting.
The bottom of the tele-
phone is provided with a
small switch for setting the
duration of the interrup-
tion.
• 100 = 0.1 sec, this is the
most common setting in
the Benelux
• 300 = 0.3 sec, this setting is often used by
company switchboards
For more information regarding this function,
please contact your telephone service provider.

15
6. NUMBER MEMORY
6.1 Introduction:
The FX-3920 offers a direct call memory for 3 tele-
phone numbers and a 2-button numeric memory for
10 frequently used numbers. The maximum length
of each memory is 16 digits.
In addition to regular phone numbers, you can
also program numbers of mobile phones.
The telephone uses the voltage of the telephone
connection to store the memories, eliminating the
need for batteries. However, always make sure to
keep the telephone connected. A short interruption
is allowed, e.g. to quickly move the device, without
losing any memories.
6.2 Programming:
place the receiver next to the tele-
phone
press 1x the STOR button

16
enter the number using the keypad
press 1x the STOR button
press one of the 3 direct memory
buttons to store the number as a
speed-dial number
or
press one of the 10 numeric buttons
to store the number as a 2-button
memory call.
put down the receiver
if you want to add a dial pause to the number, e.g.
because the phone is connected through a home
or ofce switchboard and 0 must be pressed rst
to get an outside line, then press the button at
that position in the phone number; while dialling,
the telephone will pause for at least 2.5 seconds

17
6.3 Dialling:
pick up the receiver or switch on the
speaker function
press the SOS or M1 or M2 button
or
press the button followed by
the button under which the memory
is saved
the number will be dialled
6.4 Changing or erasing:
You can change a number by programming the
new number in the place of the old number. The
old number will be overwritten.
You can erase a number by programming a non-
existing number (e.g. 000) in the place of the old
number. The old number will be erased.

18
7. WARNINGS AND USER TIPS
7.1 General:
• Carefully read the user’s manual and follow all
directions.
• Always remove the telephone plug from the
telephone wall socket before cleaning the de-
vice.
• Never install or use the telephone in wet or
moist rooms or environments.
• Ensure adequate heat dissipation; never cover
the telephone nor place it directly next to a
heat source.
• Make sure not to damage the telephone wire
and ensure nobody can fall or trip over it.
• Never disassemble the telephone, only quali-
ed personnel are allowed to do so.
7.2 Installation:
• Only connect/disconnect the telephone wire
with/from the telephone when the telephone
plug is removed from the wall socket.
• Never install the telephone during thunder
storms.
• Never install telephone connecting terminals in
wet or moist environments.

19
• Never touch non-insulated telephone wires un-
less disconnected from the telephone network
7.3 Environment:
The packaging of this telephone can
be collected as old paper. However, we
recommend you to save it, to adequately
protect the phone during transport. When
replacing this telephone, please return it to the
supplier to ensure environment-friendly process-
ing.

20
8. PROOF OF WARRANTY
For the FYSIC FX-3920 telephone you have a warranty of
24 months from the date of purchase. During this period,
we guarantee the free repair of defects caused by mate-
rial and workmanship errors. All this subjected to the nal
assessment of the importer.
HOW TO HANDLE: If you notice any defect, rst refer to
the user’s manual. Please contact the supplier of this tele-
phone or contact customer service of FYSIC on telephone
number 073 6411 355 (Netherlands), 03 238 5666 (Bel-
gium), 018 0503 0085 (Germany) or via the Internet
www.fysic.com.
THE WARRANTY BECOMES NULL AND VOID: In case
of improper use, incorrect connections, leaking and/or
incorrectly installed batteries, use of unoriginal parts or
accessories, negligence and in case of defects caused by
moisture, re, ooding, lightning and natural disasters.
In case of unauthorised modications and/or repairs per-
formed by third parties. In case of incorrect transportation
of the device without adequate packaging and when the
device is not accompanied by this warranty card and proof
of purchase. The warranty does not cover connecting
cables, plugs and batteries. All further liability, especially
concerning any consequential damages, is excluded.
v1.0
Table of contents
Other Fysic Telephone manuals