Galileo my1stpiano User manual


"!

!
#!
INTRODUCTION
Congratulations on purchasing the new Galileo ³P\VWSLDQR´
Combining sophisticated digital technology with piano-learning functions, your
my1stpiano is a highly advanced learning and playing piano especially designed for children in
grades 1 thru 6.
While reading this manual, it will be helpful to try the various functions of the instrument
at the same time. And remember, keep this manual close at hand for future reference
MAIN FEATURES
61 regulation-size piano keys with Variable Touch Response (VTR) for authentic
piano performance
129 different instrument voices
100 unique auto-accompaniment styles
100 built-in demonstration songs
3 memory banks to store your favorite sound settings
Accompaniment volume, tempo and transpose controls for versatility
Recording function stores up to 450 notes to easily record and save your original
compositions or lessons
Authentic piano-style sustain pedal
Other great functions include: Metronome, dual voice playing and lots more!
!

!
$!

!
%!
Contents
Introduction . . . . . . . . . . . . . . . . . . . . . . . . . . . . . . . . . . . . . . 3
Contents . . . . . . . . . . . . . . . . . . . . . . . . . . . . . . . . . . . . . . . . 5
Safety & Precautions . . . . . . . . . . . . . . . . . . . . . . . . . . . . . . . 6
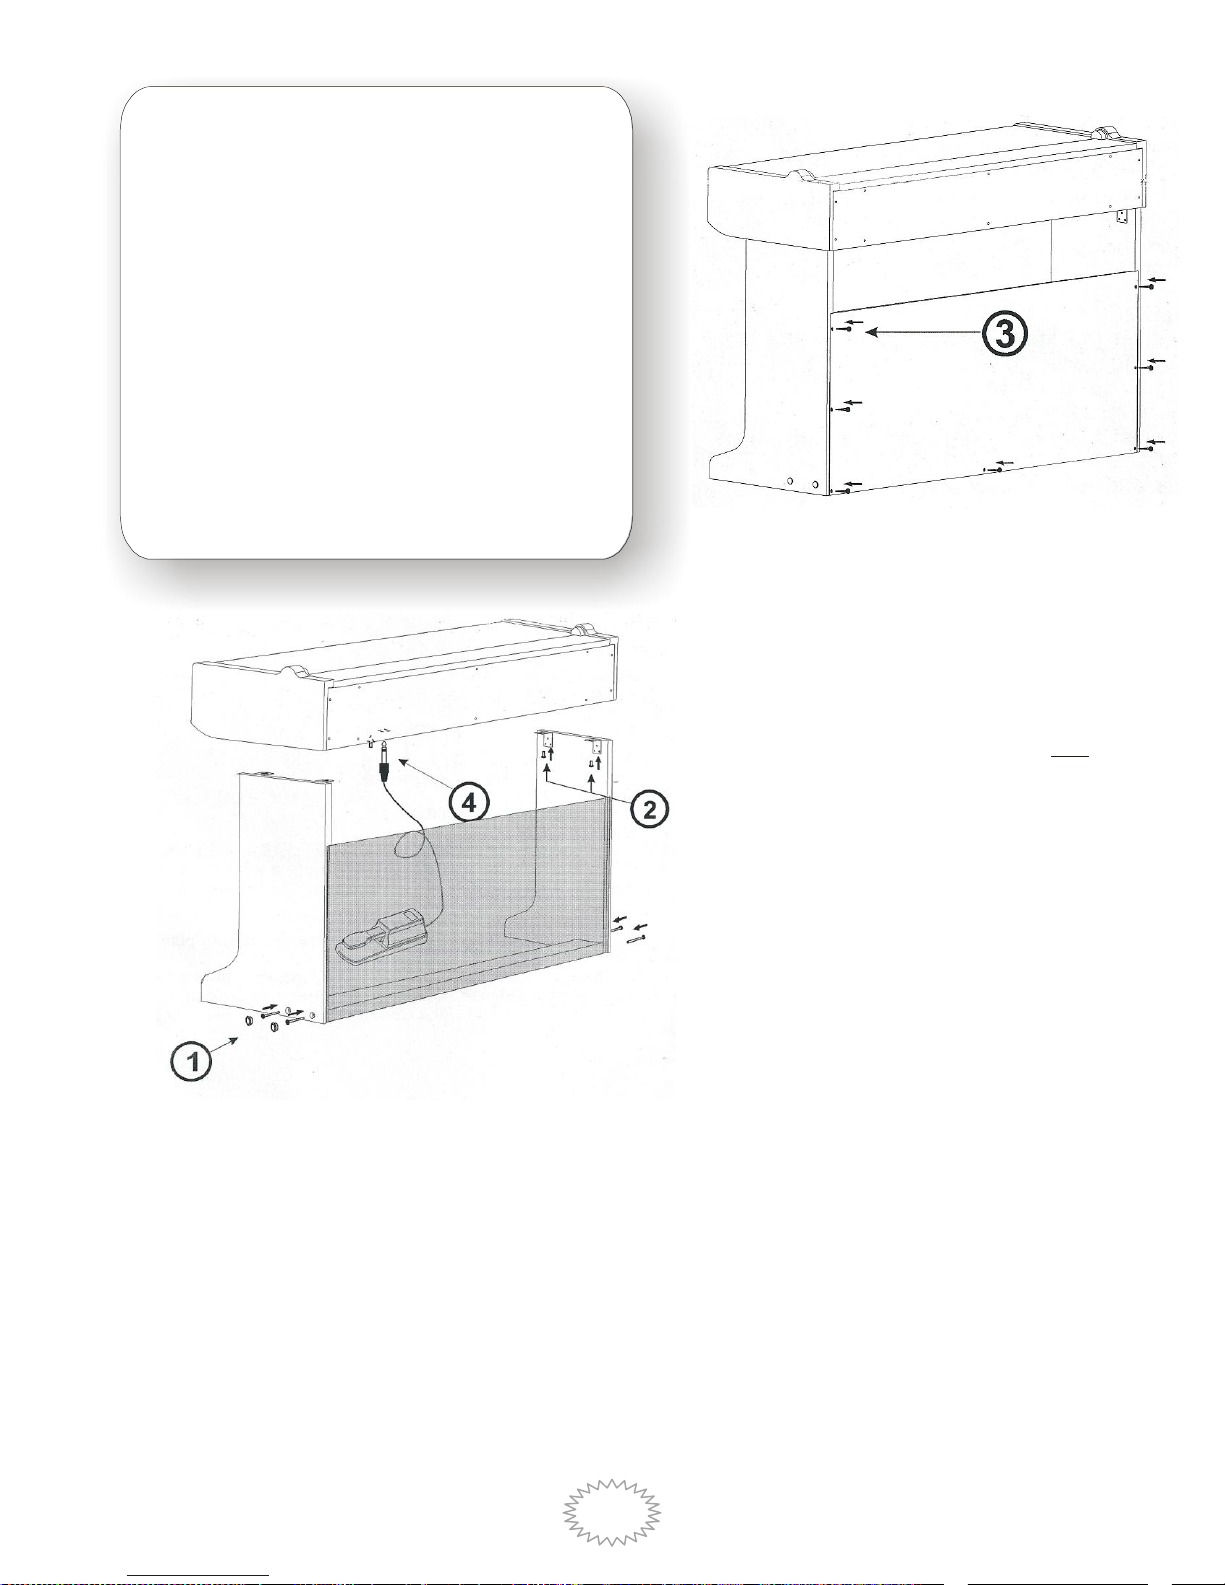
Installation . . . . . . . . . . . . . . . . . . . . . . . . . . . . . . . . . . . . . . . 7
Power On (and Volume Controls) . . . . . . . . . . . . . . . . . . . . . 8
Instrument Functions . . . . . . . . . . . . . . . . . . . . . . . . . . . . . . 8
Voices . . . . . . . . . . . . . . . . . . . . . . . . . . . . . . . . . . . . 8
Touch . . . . . . . . . . . . . . . . . . . . . . . . . . . . . . . . . . . . . 8
Dual . . . . . . . . . . . . . . . . . . . . . . . . . . . . . . . . . . . . . . 9
Split . . . . . . . . . . . . . . . . . . . . . . . . . . . . . . . . . . . . . . 9
Rhythm Controls . . . . . . . . . . . . . . . . . . . . . . . . . . . . . . . . . . 10
Rhythm . . . . . . . . . . . . . . . . . . . . . . . . . . . . . . . . . . . . 10
Start . . . . . . . . . . . . . . . . . . . . . . . . . . . . . . . . . . . . . . 10
Fill-In . . . . . . . . . . . . . . . . . . . . . . . . . . . . . . . . . . . . . 10
Endings . . . . . . . . . . . . . . . . . . . . . . . . . . . . . . . . . . . . 10
Accompaniment Chords (A.B.C) . . . . . . . . . . . . . . . . . 11
Metronome . . . . . . . . . . . . . . . . . . . . . . . . . . . . . . . . . 11
Tempo . . . . . . . . . . . . . . . . . . . . . . . . . . . . . . . . . . . . . 11
Functions . . . . . . . . . . . . . . . . . . . . . . . . . . . . . . . . . . . . . . . . 11
Transpose . . . . . . . . . . . . . . . . . . . . . . . . . . . . . . . . . . 11
Octave . . . . . . . . . . . . . . . . . . . . . . . . . . . . . . . . . . . . . 12
Beat . . . . . . . . . . . . . . . . . . . . . . . . . . . . . . . . . . . . . . . 12
Chord Point . . . . . . . . . . . . . . . . . . . . . . . . . . . . . . . . . 12
Recording . . . . . . . . . . . . . . . . . . . . . . . . . . . . . . . . . . . . . . . . 12
Activating . . . . . . . . . . . . . . . . . . . . . . . . . . . . . . . . . . 12
Start . . . . . . . . . . . . . . . . . . . . . . . . . . . . . . . . . . . . . . 13
End . . . . . . . . . . . . . . . . . . . . . . . . . . . . . . . . . . 13
Playback . . . . . . . . . . . . . . . . . . . . . . . . . . . . . . . . . . 13
Demonstration Songs . . . . . . . . . . . . . . . . . . . . . . . . . . . . . . 12
Memory Settings . . . . . . . . . . . . . . . . . . . . . . . . . . . . . . . . . . 14
Saving To Memory . . . . . . . . . . . . . . . . . . . . . . . . . . . 14
Transferring To Memory . . . . . . . . . . . . . . . . . . . . . . . 14
External Connections . . . . . . . . . . . . . . . . . . . . . . . . . . . . . . . 15
Specifications . . . . . . . . . . . . . . . . . . . . . . . . . . . . . . . . . . . . . 16
Instrument Voice Chart . . . . . . . . . . . . . . . . . . . . . . . . . . . . . 17
Accompaniment Chart . . . . . . . . . . . . . . . . . . . . . . . . . . . . . . 19
Demo Song Chart . . . . . . . . . . . . . . . . . . . . . . . . . . . . . . . . . .20
Percussion Chart . . . . . . . . . . . . . . . . . . . . . . . . . . . . . . . . . . 22
Accompaniment Finger Chart . . . . . . . . . . . . . . . . . . . . . . . . 23

!
&!
ATTENTION: To avoid electrical shock, do not remove the top cover of
the piano. Refer servicing to qualified service personnel.
SAFETY & PRECAUTIONS
WARNING
This digital instrument should only be used at room temperature (between 60 and 80 degrees).
Do not remove the top cover of the digital piano or attempt to modify it.
If the power cord becomes frayed or damaged, or if any unusual smells or smoke appear,
immediately turn off the power switch, disconnect the electric plug from the outlet and have the
instrument inspected by qualified service personnel.
Remember to unplug the instrument before cleaning and always use dry hands when handling
the power cord and plug.
ATTENTION
1. Power Supply
To prevent damage to wires, do not over-bend, curve or place heavy objects on wires.
When removing the electric plug from the instrument or an outlet, always hold the plug itself
and not the wires.
Remove the electric plug from the outlet when the instrument is not in use for extended
periods of time or during thunderstorms.
Before moving the instrument, please remove all connected cables.
It is highly recommend that you connect the instrument to a power conditioner or power
strip with spike protection.
2. Placement
Do not expose the instrument to extreme cold or heat (such as direct sunlight, near a
heater or in the car during the day) to prevent the possibility of panel disfiguration or
damage to the internal components.
Be sure to place the instrument on a solid, stable surface.
3. Cleaning
When cleaning the instrument, use a soft, dry or slightly damp cloth. Do not use paint
thinner, solvents, cleaning fluids or chemically treated wiping cloths.
4. Usage
Do not sit, rest your weight or place heavy objects on the instrument.
Do not use excessive force when opening or closing the piano cover.
Do not operate the instrument for a long period of time at a high and/or uncomfortable
volume level since this may cause hearing loss or damage.
Galileo Music cannot and will not be held responsible for damage caused by improper usage or
modifications to the instrument or data that is lost or destroyed.

!
'!
7. Attach the headphone hanger to the inside left leg about
midpoint near the front edge of leg. Remove adhesive
backing on the bracket and insert the two (2) small wood
screws through the bracket. Align tips of screws with
holes and then press bracket into place. Tighten screws
but as the bracket will crack easily.
8QSDFNSLDQRNH\ERDUGDQGFDUHIXOO\SODFHRQVWDQG7KHSLDQR¶VHGJHVVKRXOGH[WHQG
RYHUWKHVLGHVDSSUR[LPDWHO\´DQGWKHEDFNDERXW´ If you align the top as described,
WKHWRSVKRXOGEDODQFHDQGEHFORVHLQDOLJQPHQWZLWKWKHPRXQWLQJKROHVDQG³/´EUDFNHWV
:KLOHVWHDG\LQJWKHSLDQRORRNXQGHUWKHNH\ERDUGDQGFRQILUPDWOHDVWRQH³/´EUDFNHW
LVLQDOLJQPHQWZLWKWKHSLDQR¶VPRXQWLQJKROH$GMXVWWKHWRSLIQHFHVVDU\,QVHUWDKDQGNQRE
and tighten. Repeat for the remaining (3) mounting holes.
10. Insert sustain pedal cable in socket under the keyboard as marked, route the cable under
the base and insert pedal in the front base cavity.
11. Plug AC cable into plug under the keyboard (marked) observing of
the previous page.
DO NOT OVERTIGHTEN
'2127/(7*22)7+(3,$12817,/<28.12:,7¶6%$/$1&('217+(67$1'
Safety & Precautions
Unpack all piano stand pieces and hardware prior
to beginning assembly.
You should have the following hardware:
%DJ ´VWHHOZRRGVFUHZV
(4) Hand knob bolts
%ODFN´ZRRGVFUHZV
(4) Plastic caps
%DJ 0HWDO³/´EUDFNHWV
ò´EODFNZRRGVFUHZV
Bag #3 (1) Headphone bracket (plastic)
(2) Small wood screws
Bag #4 (varies)
´VWHHOZRRGVFUHZ
(1) Hand knob bolt
%ODFN´ZRRGVFUHZ
(1) Plastic cap
(1) Fuse
EXTRA PARTS
ASSEMBLY
Diagram (1)
Diagram (2)
Diagram (3)
(Read Before Starting)
1. Place pedal base with pedals pointing
up and underside of base facing you.
2. Place left leg on its back edge and
align holes in leg with holes in pedal
EDVH,QVHUWWZR´VWHHOVFUHZV
through leg, tighten and insert
decorative plastic caps. : The
inside of each leg should have the
back cutout facing inward as well as
have (6) tapped screw holes visible
QHDUWKHWRSIRU³/´EUDFNHWV
3. Repeat above for right leg.
$WWDFKWZR³/´EUDFNHWVto the top
inside of each leg using three (3)
ò´EODFNZRRGVFUHZVIRUHDFK
bracket.
5. Fit the modesty panel to the back of
the base between the legs aligning
the pre-tapped holes ith the bottom
and sides. Attach with seven (7)
EODFN´ZRRGVFUHZV
6. Carefully stand base up.
Note

!
(!
Main VOL Accomp VOL
POWER
Ensure that the POWER switch is in the OFF position
before attempting to connect the AC plug to a 110v power
outlet. After plugging in the piano, turn the power switch
to the ON position. Note: Allow 2-3 seconds of start-up time to
ensure that all circuitry is fully powered.
MAIN VOLUME
You can adjust the Main Volume by using the Main VOL knob.
Turn it counter-clockwise (to the left) to decrease the volume and turn it clockwise (to
the right) to increase the volume.
ACCOMPANIMENT VOLUME
You can adjust the Accompaniment (rhythm styles) volume using the Accomp VOL
knob. Turn it counter-clockwise to decrease the volume and turn it clockwise to
increase the volume.
INSTRUMENT FUNCTIONS
VOICES
There are 128 different instrument sounds as well as
one (1) drum/percussion kit.
Pressing the VOICE button will cause the LED to display
001. You can now select different instrument voices with
the + / - buttons.
For the complete list of instrument voices, please refer to page 17 of this manual.
TOUCH
my1stpiano features Touch Response that allows you to play with varying degrees
of loudness (dynamics), giving students accurate experience playing the piano with
expression.
POWER
ON
OFF

!
)!
Split
Split point
Split (right) voice
Split (left) voice
Press the TOUCH button to toggle between SOFT, MIDDLE, HEAVY and OFF
settings. This will modify the touch of the piano to respond to softer, medium
or heavier playing.
Turning the knob to ³2))´ will result in the same loudness regardless of how
KDUG\RXSOD\WKHNH\VDWUDGLWLRQDOVHWWLQJIRU³RUJDQ´DVDQ example).
DUAL
Pressing the DUAL button activates playing of two (2) different instrument voices at the
same time (also known as a layering).
Press the DUAL button and the light indicator above the button lights up.
The primary instrument voice will be your current voice selected and the
secondary instrument voice (layer) is voice #50 (String Ensemble 2)
Press the DUAL function again to turn the dual function off.
SPLIT
Pressing the SPLIT button splits the keyboard into two (2) separate areas ±known as
the lower and upper part of the keyboard ±each with its own sound.
Press the SPLIT button and the light indicator above the button lights up.
The keyboard is now split into two (2) separate areas (also known as zones).
The separating/split point is the 24th NH\IURPWKHOHIWD³%´QRWH
The instrument voice of the left side (lower keyboard) is to be selected
before pressing the SPLIT button, and the instrument voice of the right side
(upper keyboard) is to be selected after splitting.

!
*+!
RHYTHM
There are a total of 100 built-in rhythm styles (r01 to r00)
A complete list of rhythms can be found on page 19 of
this manual.
START THE RHYTHM STYLE
Direct Start: Press the START/STOP button to start playing the rhythm
immediately. If the INTRO/END button is pressed first followed by the START/STOP
EXWWRQDQ³LQWUR´LQWURGXFWLRQVHFWLRQZLOOEHSOD\HGEHIRUHWKHUK\WKPVWDUWV
Synchronized Start: Press the SYNC button and the METRONOME LED
will flash at the current tempo speed. When any key is touched, the rhythm starts
playing automatically (in synchronization with the first key pressed). If the INTRO/END
button is pressed first followed by the SYNC buttoQDQ³LQWUR´VHFWLRQZLOOEHSOD\HG
before the rhythm starts.
FILL-IN
Every rhythm has a fill-in which is a rhythmic break used for transitions between a
verse to a chorus, for example.
Press the FILL-IN EXWWRQWRWULJJHUD³ILOO´VHFWLRQ The function LED will
light up when it is in play.
Press the FILL-IN button again to return to normal playing mode.
ENDINGS
Quick Stop: Press the STOP button to immediately stop the rhythm.
Ending: While the rhythm is playing, press the ENDING button and an
ending section will be played prior to stopping the rhythm.
ACCOMPANIMENT CHORDS (A. B. C.)
3UHVVWKHA. B. C. button to turn on the accompaniment chords function.
The piano will read the notes in your left hand and will play an instrumental
accompaniment for your selected rhythm style.

!
**!
3UHVVWKHA. B. C. button again to turn off the accompaniment chords
function.
METRONOME
3UHVVWKHMETRONOME button to activate the metronome function.
3UHVVWKHMETRONOME button three (3) times and the LED will display
³´PHDQLQJWKHWHPSRLVEHDWW\SH³´DEHDW8VHWKH+ / - buttons
to select between beat types 1 thru 9. [Examples: 2/4, 6/8, etc.]
TEMPO
3Uess the TEMPO button to set the tempo (tempo can be adjusted from
40 ±240 beats per minute).
3UHVV+ / - to adjust the tempo accordingly.
:KHQWKHWHPSRLVVHWZLWKRXWWKHUK\WKPSOD\LQJthat value will be set as
the default tempo. When the tempo is set while the rhythm is playing, that
will not be set as the default tempo.
FUNCTIONS
Pressing the FUNCTION button repeatedly will toggle between the different function
modes that include Transpose, Octave, Beat and Chord Point. (Note: If inactive for
five (5) seconds, the function selection mode will be deactivated)
Order Function Adjustment Range Display
1 Transpose -6, 0, 6 t 0
2 Octave -1, 0, 1 0 0
3 Beat 00, 02, . . . 09 0 4
4 Chord Point 0 . . . 61 1 9
TRANSPOSE
Allows you to raise or lower WKHNH\\RX¶re playing in up to six (6) half steps.
3UHVVWKHFUNCTION button and the display will show t 0.
3UHVV+ / - to adjust the key to a maximum of one octave
(6 half steps up or down).

!
*"!
Split point
Right Voice
Auto-Accompaniment
OCTAVE
Allows you to transpose the instrument up or down one (1) octave.
3UHVVWKHFUNCTION button twice and the display will
show 0 0.
3UHVV+ / - to adjust the key to a maximum of one (1) octave.
BEAT
3UHVVWKHFUNCTION button three (3) times and the display will show 0 4
indicating a 4/4 beat.
3UHVV + / - to adjust between nine (9) different beats.
CHORD POINT
This function allows you to set the split point for the auto accompaniment feature
(A.B.C).
3UHVVWKHFUNCTION button four (4) times and the display will show 19
meaning the split point is the 19th key from the left (F#). The accompaniment will read
your notes to the left of this point.
RECORD
START
Press the RECORD button and the record light will light up indicating the record
function is now activated and in standby mode. You are now free to select the
instrument voice, tempo, memory status, etc.

!
*#!
START RECORDING
When the recording function is in standby mode, playing any key or pressing the
START / STOP button will start the recording immediately at the default tempo set
indicated in the display. The record status light will be lit indicating that recording is in
progress.
END RECORDING
7KHUHFRUGLQJZill end automatically when a maximum of 450 notes are
recorded.
:KHQWKHUK\WKPLVSOD\LQJZKLOHUHFRUGLQJSUHVVLQJWKHINTRO / END will
end the recording when the rhythm style ends.
3UHVVWKHRECORD button during recording to stop recording immediately.
When recording ends, the record light indicator will turn off.
PLAYBACK
3UHVVWKHPLAY button and the recorded track will start to play and the play
light indicator will light up.
:KHQWKHWUDFNHQGVWKHSOay light indicator will turn off.
:KLOHSOD\LQJSUHVVLQJWKHPLAY button will stop playback and the play
light indicator will turn off.
DEMONSTRATION SONGS
7KHUHDUHEXLOW-in demonstration songs for your listening enjoyment.
Pressing the MODE button repeatedly will activate the
demonstration standby mode.
3UHVVWKHSTART button or wait 1-2 seconds for the
demonstration song to start playing.
7KHGHIDXOWGHPRQVWUDWLRQVRQJLVd01 and you can select the
demonstration song number with the + / - keys (the Demo will play after a
few seconds).
)RUWKHGHPRQVWUDWLRQVRQJOLVWUHIHUto page 20.

!
*$!
MEMORY
SAVING SETTINGS
3UHVVDQGKROGWKHMEMORY button and press one of the M1 ±M3 buttons
to save your settings. The settings that can be saved into memory include the
following:
Instrument: VOICE, DUAL, SPLIT
Functions: TOUCH On/Off/Level
Accompaniment: STYLE, TEMPO, BEAT, ACCOMPANIMENT
CHORDS
CHANGING MEMORY LOCATION
Pressing the M1, M2 or M3 button will change the current memory location.
MEMORY M1 M2 M3
Hold Any Button
M1 M2 M3

!
*%!
EXTERNAL CONNECTIONS
SUSTAIN PEDAL
The sustain pedal connection is on the right side of the digital piano. When the pedal is
pressed, the sustain pedal allows the played note to continue sounding even after the
key is released (sustain). When the sustain pedal is not depressed, there will be no
sustain effect.
HEADPHONES
You may connect one or two sets of standard stereo headphones into the headphone
inputs located on the left underside of the piano. (Note: 7KHVHDUHó´SKRQRMDFNV)RU
use with headphones that plug into handheld playback systems such as iPods, etc.,
you would need to get an adaptor for use with the my1stpiano.)
WhHQWKHKHDGSKRQHVDUHFRQQHFWHGWKHGLJLWDOSLDQR¶VVSHDNHUVZLOOEHPXWHG
allowing you to practice without disturbing others.
86%DQG´$8',2,1387
For your added convenience, a USB port is included for use in connecting your
my1stpiano WRDFRPSXWHU,QDGGLWLRQD´$XGLR,QSXWLVDOVRincluded to allow you
to play recorded songs, music lessons, etc. from your iPod (or similar device with an
audio output) through the P\VWSLDQR¶V sound system.

*&!
SPECIFICATIONS
Keys
61 Keys with Touch Response Accompaniment Functions
3 Touch Levels Normal Playing, Split Keyboard,
Multi-Finger Mode, Single-Finger Mode
Instrument Voices
32-Note Polyphony Memory
129 Instrument Voices 3 Memory Locations, 1 Button
1 Percussion Voice Selection
Keyboard Split: Left & Right
Dual Voices: Left & Right Other Functions
Transpose, Octave Shift
Auto-Accompaniment Functions
100 Rhythm Styles External Connections
Accompaniment: Bass, Tempo Sustain Pedal, Headphones, USB,
´$XGLR,QSXW
Fill-In, Finger Chords
Accompaniment Controls: Power Output
Synchronize Start 10W + 10W Speaker System
Ending, Start/Stop 32 Ohm Headphone Jack
Tempo: 40-240 BPM
Speakers
Metronome 2 x 4 Inch, 8 Ohms
9 Different meters Voltage
110 Volts AC
Memory Songs Dimensions
100 Demonstration Songs ´[´[´
988 x 385 x 775 mm
Memory Recording Weight
1 Memory Track (450 Notes) 66.8 Pounds
Accessories
User Manual, Warranty Card,
Power Cord!

!
*'!
INSTRUMENT!VOICE!CHART!
!!
!!
!!
!!
PIANO!
#%!
,-./!0122!
+*!
34156!,-157!
#&!
849:;922!0122!
+"!
04-3<:!,-157!
#'!
2;1,!0122!*!
+#!
9=!34156!,-157!
#(!
2;1,!0122!"!
+$!
<75/>!:75/!
#)!
2>5:<!0122!*!
+%!
9=!,-157!*!
$+!
2>5:<!0122!"!
+&!
9=!,-157!"!
STRINGS!
+'!
<14,2-.<746!
$*!
?-7;-5!
+(!
.;1?-!
$"!
?-7;1!
MALLET!
$#!
.9;;7!
+)!
.9;92:1!
$$!
.75:410122!
*+!
3;7./952,-9;!
$%!
:49@7;7!2:4-532!
**!
@A2-.!07B!
$&!
,-CC-.1:7!2:4-532!
*"!
?-041,<759!
$'!
74.<92:41;!<14,!
*#!
@14-@01!
$(!
:-@,15-!
*$!
B>;7,<759!
STRING!ENSEMBLE!
*%!
:A0A;14!09;;2!
$)!
2:4-53!9529@0;9!*!
*&!
6A;.-@94!
%+!
2:4-53!9529@0;9!"!
ORGAN!
%*!
2>5:<!2:4-532!*!
*'!
641D014!74315!
%"!
2>5:<!2:4-532!"!
*(!
,94.A22-?9!74315!
%#!
.<7-4!11<2!
*)!
47./!74315!
%$!
?7-.9!11<2!
"+!
.<A4.<!74315!
%%!
2>5:<!?7-.9!
"*!
4996!74315!
%&!
74.<92:41!<-:!
""!
1..746-75!
BRASS!
"#!
%'!
:4A@,9:!
"$!
:1537!1..746-75!
%(!
:47@0759!
GUITAR!
%)!
:A01!
"%!
5>;75!3A-:14!
&+!
@A:96!:4A@,9:!
"&!
2:99;!3A-:14!
&*!
8495.<!<745!
"'!
E1CC!3A-:14!
&"!
04122!29.:-75!
"(!
.;915!3A-:94!
&#!
2>5:<04122!*!
")!
@A:96!3A-:14!
&$!
2>5:<04122!"!
#+!
7?9464-?9!3A-:14!
REED!
#*!
6-2:74:96!3A-:14!
&%!
27,4157!21B!
#"!
3A-:14!<[email protected]!
&&!
1;:7!21B!
BASS!
&'!
:9574!21B!
##!
1.7A2:-.!0122!
&(!
014-:759!21B!
#$!
8-5394!0122!
&)!
7079!

!
*(!
INSTRUMENT!VOICE!CHART!
!!
!!
!!
!!
REEDS!(Cont'd)!
*+$!
2.-F8-!
'+!
953;-2<!<745!
ETHNIC!
'*!
0122775!
*+%!
2-:14!
'"!
.;14-59:!
*+&!
015E7!
WIND!
*+'!
2<1@-295!
'#!
,-..7;7!
*+(!
/7:7!
'$!
8;A:9!
*+)!
/1;-@01!
'%!
49.74694!
**+!
013!,-,9!
'&!
,15!8;A:9!
***!
8-66;9!
''!
0;7D5!07::;9!
**"!
2<151-!
'(!
2<1/A<1.<-!
PERCUSSION!
')!
D<-2:;9!
**#!
:-5/;9!
(+!
7.14-51!
**$!
13737!
SYNTH!REED!
**%!
2:99;!64A@2!
(*!
2GA149!
**&!
D776!0;7./!
("!
21D:77:<!
**'!
:1-/7!64A@!
(#!
.1;;-7,9!
**(!
@9;76-.!:7@!
($!
.<-88!
**)!
2>5:<!64A@!
(%!
.<14153!
*"+!
49?9429!.>@01;!
(&!
?7-.9!
SOUND!EFFECTS!
('!
8-8:<2!
*"*!
3A-:14!849:!57-29!
((!
0122!H!;916!
*""!
0491:<!57-29!
SYNTH!PAD!
*"#!
2912<749!
()!
59D!139!
*"$!
0-46!:D99:!
)+!
D14@!
*"%!
:9;9,<759!4-53!
)*!
,7;>2>5:<!
*"&!
<9;-.7,:94!
)"!
.<7-4!
*"'!
1,,;1A29!
)#!
07D96!
*"(!
3A52<7:!
)$!
@9:1;;-.!
DRUM!SET!
)%!
;7<17!
*")!
2:156146!/-:!
)&!
2D99,!
!!
!!
SYNTH!EFFECTS!
!!
!!
)'!
41-5!
!!
!!
)(!
27A56:41./!
!!
!!
))!
.4>2:1;!
!
!
*++!
1:@72,<949!
!!
!!
*+*!
04-3<:5922!
!!
!!
*+"!
370;-52!
!!
!!
*+#!
9.<792!
!!
!!

!
*)!
ACCOMPANIMENT!CHART!
!!
!!
!!
!!
!
!
BEAT!&!POP!
I#'!
<JK!<LK!
I'"!
0LMM!5LNO!"!
I+*!
(!0POQ!*!
I#(!
:PRSTL!
I'#!
4SUVWO!
I+"!
(!0POQ!"!
SOUL!&!FUNK!
I'$!
,LK!4SUVWO!
I+#!
(!0POQ!#!
I#)!
8UTXY!,LK!
I'%!
.SO!.SO!
I+$!
(!0POQ!$!
I$+!
EOZZ!8UTX!
I'&!
,LK!.SO!.SO!
I+%!
&+[M!(!0POQ!
I$*!
.LL\!8UTXY!
I''!
:OT]L!
I+&!
(!0POQ!0O\\O^!
I$"!
2LU\!*!
I'(!
EOZZ!2OVWO!
I+'!
(!0POQ!4LRX!
I$#!
2LU\!"!
I')!
4P]]OP!
I+(!
*&!0POQ!*!
I$$!
2LU\!2SU__\P!
I(+!
,LK!4P]]OP!
I+)!
*&!0POQ!"!
I$%!
2LU\!0\UPM!
TRADITIONAL!
I*+!
*&!0POQ!,LK!
I$&!
4!H!0!
I(*!
@OIRS!*!
I**!
*&!0POQ!2SU__\P!
I$'!
&`(!3LMKP\!
I("!
@OIRS!"!
I*"!
0O\\O^!
I$(!
,LK!3ILLNP!
I(#!
3PIVOT!@OIRS!
I*#!
2\La!0O\\O^!
JAZZ!
I($!
&`(!@OIRS!
I*$!
*&!0POQ!0O\\O^!
I$)!
2aJT]!
I(%!
,L\XO!
I*%!
ATK\U]]P^!
I%+!
.LL\!EOZZ!
I(&!
,LK!,L\XO!
ROCK!
I%*!
,LK!2aJT]!
I('!
DO\QZ!
I*&!
4LRX!
I%"!
2aJT]!8Lb!
I((!
2\La!DO\QZ!
I*'!
,LK!4LRX!
I%#!
0J]!0OT^!
I()!
?JPTTO!DO\QZ!
I*(!
8OMQ!4LRX!
I%$!
0J]!0OT^!@P^JUV!
I)+!
@UMPQQP!
I*)!
2\La!4LRX!*!
I%%!
EOZZ!DO\QZ!
PIANO!
I"+!
2\La!4LRX!"!
I%&!
4O]QJVP!
I)*!
(!0POQ!
I"*!
4LRX!H!4L\\!
I%'!
6JbJP\OT^!
I)"!
0O\\O^!
I""!
<PONY!@PQO\!
I%(!
GUJRX!2QPK!
I)#!
0LL]JP!
I"#!
0\UPM!0LL]JP!
COUNTRY!
I)$!
EOZZ!2OVWO!
I"$!
0\UPM!
I%)!
.LUTQIY!*!
I)%!
2aJT]!
I"%!
2SU__\P!
I&+!
.LUTQIY!"!
I)&!
EOZZ!DO\QZ!
I"&!
0\UPM!2SU__\P!
I&*!
,LK!.LUTQIY!
I)'!
:aJMQ!
I"'!
4LRX!2SU__\P!
I&"!
.LUTQIY!4LRX!
I)(!
@OIRS!
I"(!
.SOI\MQLT!
I&#!
.LUTQIY!8L\X!
I))!
&`(!@OIRS!
DANCE!
I&$!
#`$!.LUTQIY!
I++!
DO\QZ!
I")!
6JMRL!*!
I&%!
.LUTQIY!DO\QZ!
!!
!!
I#+!
6JMRL!"!
I&&!
.LUTQIY!2SU__\P!
!!
!!
I#*!
6JMRL!!8UTX!
I&'!
.LUTQIY!0LL]JP!
!!
!!
I#"!
6OTRP!
I&(!
.LUTQIY!0\UPM!
!!
!!
I##!
<LUMP!*!
I&)!
.LUTQIY!GUJRX!2QPK!
!!
!!
I#$!
<LUMP!"!
I'+!
0\UP]IOMM!
!!
!!
I#%!
4OK!
LATIN!
!!
!!
I#&!
9UIL!0POQ!
I'*!
0LMMO!5LNO!*!
!!
!!

!
"+!
DEMONSTRATION!SONG!LIST!
!!
!!
!!
!!
FAVORITES!
^#(!
:SJM!7\^!@OT!
^+*!
0OQQ\P!<YVT!7_!:SP!4PKUW\JR!
^#)!
<UVKQY!6UVKQY!
^+"!
7[!2L\L!@JL!
^$+!
2XJK!:L!@Y!;LU!
^+#!
.OIIY!@P!0ORX!:L!7\^!?JI]JTJO!
FOLK!
^+$!
2L\NPJ][M!2LT]!
^$*!
2OTQO!;URJO!
^+%!
:SP!7\^!3IOY!@OIP!
^$"!
DSPT!ELSTTY!.LVPM!@OIRSJT]!<LVP!
^+&!
:SP!2J^PaOY!
^$#!
-_!>LU[IP!<OKKY!1T^!>LU!/TLa!-Q!
^+'!
3IOT^_OQSPI[M!.\LRX!
^$$!
:KLTXO!
^+(!
:UIXPY!-T!:SP!2QIOa!
^$%!
7\^!/JT]!.L\P!
^+)!
1NP!@OIJO!
^$&!
;JQQ\P!0ILaT!EU]!
^*+!
8ILV!:SP!5Pa!DLI\^!
^$'!
:aJTX\P!:aJTX\P!
^**!
0J\\!0OJ\PY!
^$(!
1U\^!;OT]!2YTP!
^*"!
7Sc!2UMOTTO!
^$)!
>OTXPP!6LL^\P!
^*#!
;LT]d!;LT]!1]L!
^%+!
2SP!DLIP!1!>P\\La!4JWWLT!
^*$!
2J\PTQ!5J]SQ!
^%*!
-[NP!0PPT!DLIXJT]!7T!:SP!4OJ\ILO^!
^*%!
EJT]\P!0P\\M!
^%"!
<LUMP!7_!:SP!4JMJT]!2UT!
^*&!
:SP!0\UPF0P\\M!7_!2RLQ\OT^!
^%#!
!ATXTLaT!
^*'!
.OVKQLaT!4ORPM!
^%$!
2Z\O!6ZJPaPRZXO!
^*(!
1\LSO!7P!
^%%!
3IPPT!2\PPNPM!
^*)!
:SP!9TQPIQOJTPI!
^%&!
1VPIJROT!,OQIL\!
^"+!
1VPIJRO!:SP!0POUQJ_U\!
^%'!
.P\JQL!;JT^L!
^"*!
6PRX!:SP!<O\\M!
^%(!
EOVOJRO!8OIPaP\\!
^""!
@Y!7\^!/PTQURXY!<LVP!
^%)!
@JRSOP\!4La!:SP!0LOQ!1MSLIP!
^"#!
:SP!>P\\La!4LMP!7_!:PbOM!
^&+!
<OKKY!0JIQS^OY!:L!>LU!
^"$!
1TTJP!;OUIJP!
^&*!
DSPT!:SP!2OJTQM!3L!@OIRSJT]!-T!
^"%!
EPOTTJP!DJQS!:SP!;J]SQ!0ILaT!<OJI!
^&"!
4P^!4JNPI!?O\\PY!
^"&!
7\^!8L\XM!1Q!<LVP!
^&#!
@Y!0LTTJP!;JPM!7NPI!:SP!7RPOT!
KID'S!SONGS!
^&$!
-T!:SP!4OJT!
6"'!
<LVP!2aPPQ!<LVP!
^&%!
6OTTY!0LY!
^"(!
2JKKJT!.J^P!:SILU]S!1!2QIOa!
^&&!
1UIO!;PP!
^")!
,L\\YFDL\\YF6LL^\P!
BALLROOM!
^#+!
0UQQPI_\Y!
^&'!
,L\XO!
^#*!
<LVP!7T!:SP!4OT]P!
^&(!
:OT]L!7_!.UWO!
^#"!
;LT^LT!0IJ^]P!
^&)!
/U\ZOX!
^##!
1T]P\M!DP!<ONP!<POI^!7T!<J]S!
^'+!
4UMMJOT!
^#$!
AK!7T!:SP!<LUMP!:LK!
^'*!
2OVWO!
^#%!
;O!.UROIORSO!
CLASSIC!
^#&!
2OTQO!.\OUM!-M!.LVJT]!:L!:LaT!
^'"!
/URXURXMaO\ZPI!
^#'!
:PT!;JQQ\P!-T^JOTM!
^'#!
:LY!2YVKSLTY!
Table of contents
Other Galileo Musical Instrument manuals

Galileo
Galileo Concerto User manual

Galileo
Galileo VP111 User manual

Galileo
Galileo VP121 User manual

Galileo
Galileo Milano 3G User manual

Galileo
Galileo VP110 User manual

Galileo
Galileo Maestro II User manual

Galileo
Galileo Milano II User manual

Galileo
Galileo YP200 User manual

Galileo
Galileo YP300 User manual

Galileo
Galileo Milano 3G User manual