Galileo YP200 User manual

YP200
owner’s manual
digital piano


1) Make sure you have the following parts, which are supplied in the package:
A) Piano cabinet
B) Right Leg
C) Left Leg
D) Rear Panel
E) Bottom crossbar with three pedals group
F) Pedal clog
G) Headphone hang
and the fi ing accessories to be found into a nylon bag:
H) M6 20 TC screw (2 )
I) M6 20 TC screws (8 )
L) WL 4 20 TC screw (4 )
M) WL 4 12 TC screw (2 )
N) Adhesive clamp (5 )
O) Phillips screwdriver
2) Remove the nylon protection and white foam on the wooden parts, free the pedals cable
under the crossbar as shown in Fig. 3
3) Fi on pedals group the pedal clog (F) as shown in Fig.1.
4) Fi the right leg (B) to crossbar (E) with screws (I).
5) Fi the left leg (C) to crossbar (E) with screws (I).
6) Fi the rear panel (D) to the crossbar (E) with screws (L) and to the legs (B) and (C) with
screws (H) as shown in Fig.1.
7) Place the piano cabinet (A) on stand, fi it with screws (I) as shown in Fig.1
by paying particular attention to the position of the hook, as shown in Fig.2.
8) Fi the headphone hang (G) whit screws (M) as Fig. 1
9) Attach the adhesive clamps (N) as shown in Fig.4
10) Insert the MINI DIN pedals cable plug into the proper socket of I/O group under the
pianocabinet (A) and fi the cable on the adhesive clamp (N) of Fig. 4.
11) Place the piano in its final location and adjust on floor the clog (F) of pedals group.
Assemb y instruction


Table of Contents
Introduction ....................................................................................... 1
Control Panel ..................................................................................... 1
Instrument Switching .......................................................................... 2
Adjusting Volume ............................................................................... 2
Connecting Headphone........................................................................ 2
Listening Demo Songs ......................................................................... 2
Sound Preset Selection........................................................................ 3
Sound Preset List ............................................................................... 3
Metronome......................................................................................... 3
Transpose .......................................................................................... 4
Functions ........................................................................................... 4
Functions Menu .................................................................................. 5
TOUCH ......................................................................................... 5
TUNE ........................................................................................... 5
TEMPERAMENTS............................................................................. 6
TIME SIGNATURE ........................................................................... 6
EFFECTS ....................................................................................... 6
MAF ............................................................................................. 7
EQUALIZER ................................................................................... 7
MIDI ............................................................................................ 7
BACKUP........................................................................................ 8
HELP ............................................................................................ 8
STANDBY ...................................................................................... 8
Rear Panel ......................................................................................... 9
Technical Specifications ..................................................................... 10
Technology....................................................................................... 10

YP200
owner’s manua
E
N
-
1
Grand Piano button
METRONOME: enables/disables
and modifies the metronome
function
Function keys *
• Preset selection
• Data insert
• Demo listening
Vo ume knob
* Called “DATA UP” and
“DATA DOWN” from now on
in this manual
TRANSPOSE: allows you to
transpose the global pitch of the
instrument
Congratulations! We thank you for selecting the all-new YP200 digital piano!
Whether you are a student, teacher or professional, your piano will impress you with its
musical quality and stylish design - providing years of enjoyment. In addition, your digital
piano is equipped with a high performance Hammer Action keyboard, for a realistic
touch that allows you to e press yourself in endless varieties of shades and colors.
For these and many other reasons, you will discover your YP200 is an absolute pleasure to play!
To get the absolute most out of your new piano, we recommend that you read this manual
carefully so that you can take full advantage of all the advanced and convenient functions.
We also recommend that you keep this manual in a safe and handy place for quick and easy
reference in the future.
If you're enjoying your YP200, please tell a friend!
Most of the functions of the instrument are controlled by the control panel.
CONTROL PANEL
Introduction
Contro Pane

E
N
-
2
YP200
owner’s manua
Listening Demo Songs
Connecting Headphones
In addition to the internal amplification system, you can connect
two sets of standard stereo headphones.
The headphone inputs are located under the left-hand side of the
keyboard.
• The headphone connection disables the internal speaker system
• The Main volume knob adjusts the headphone volume.
Note: Connecting headphones cuts off the PA system inside of the
piano
Your YP200 features eight built-in demo songs, that you can play by following
this procedure:
Start the demo sequence by pressing the two DATA UP/DOWN
buttons AT THE SAME TIME.
Press the two DATA UP/DOWN buttons again to STOP the demo
sequence.
Press DATA UP to select ne t demo song,
DATA DOWN to select the previous one.
STANDBY/ON switch
Wait a couple of seconds while your piano powers up. The Grand Piano button will
illuminate indicating the default sound.
Adjusting Vo ume
Turn the volume knob on the control panel to set your piano volume.
Turning the knob to the left will decrease the volume and turning it to the
right will increase the volume
Warning! E cessive volume (especially with headphones connected) can
be harmful for your hearing.
It’s also possible to disable automatic loading of Grand Piano by Backup function described on
page 8.
Connect the power cord to a power outlet, your YP300/GYP300 is now in
power saving mode (standby) and the red LED indicates the status. At
this point, press the standby button located on the right side of the
keyboard to turn on the instrument, the LED turns from red to green (ON).
Press the standby button again to switch to power saving mode, the LED
changes from green to red (standby / OFF).

YP200
owner’s manua
E
N
-
3
Sound Preset Se ection
The Sound Preset , the timber resource of YP200, is the combination of one or more sounds, a
reverberation effect and a modulation effect. There are 19 available presets, 15 single and 4
combination.
Use the DATA UP/DOWN buttons to select any sound preset you like.
Press the Grand Piano button on the control panel to quickly recall the Grand Piano preset.
Sound Preset List
Main preset
Recall Grand Piano preset
Recall previous preset
Use the TEMPO/DATA
button to change BPM
value.
Numbers 1;2;...0 are assigned to the keys of
the first octave of YP200 keyboard.
1 2 3 4 5 6 7 8 9 0
There are two methods to change the frequency:
1. Type the number of BPM by means of only the white keys ranging from B0 to D2.
Each of these keys is assigned a number whose value is shown below the key.
2. Press DATA to speed and DOWN DATA UP to slow the heart of BPM.
Metronome
Recall ne t preset
The METRONOME button has two functions:
1. Activate / deactivate the metronome (via normal pressure)
2. Change BPM frequency (via a longer pressure of at least two seconds).
Pressing the button once, the BPM
changes by one unit , while a long press
is a variation continues until the button
is released or it reaches the lower limit
(30 BPM) or higher (250 BPM).
Simultaneously pressing DATA UP and
data DOWN , the BPM will be set to the
value 120.
Press Metronome button to e it the BPM
editing.
prg Sound Preset
1
2
3
4
5
6
7
8
9
10
11
12
13
14
15
16
17
18
19
Grand Piano (MAF)
Bright Piano (MAF)
E . Vintage 1
E . Vintage 2
E . Vintage 3
FM Piano
C avinet 1
C avinet 2
Harpsichord
Vibraphone
Guitar
Jazz Organ
Pipe Organ
Strings Ensemb e
S ow Strings
Piano dual Strings
Piano dual Pad
FM Piano dual Pad
Pipe Organ dual Choir

E
N
-
4
YP200
owner’s manua
Functions
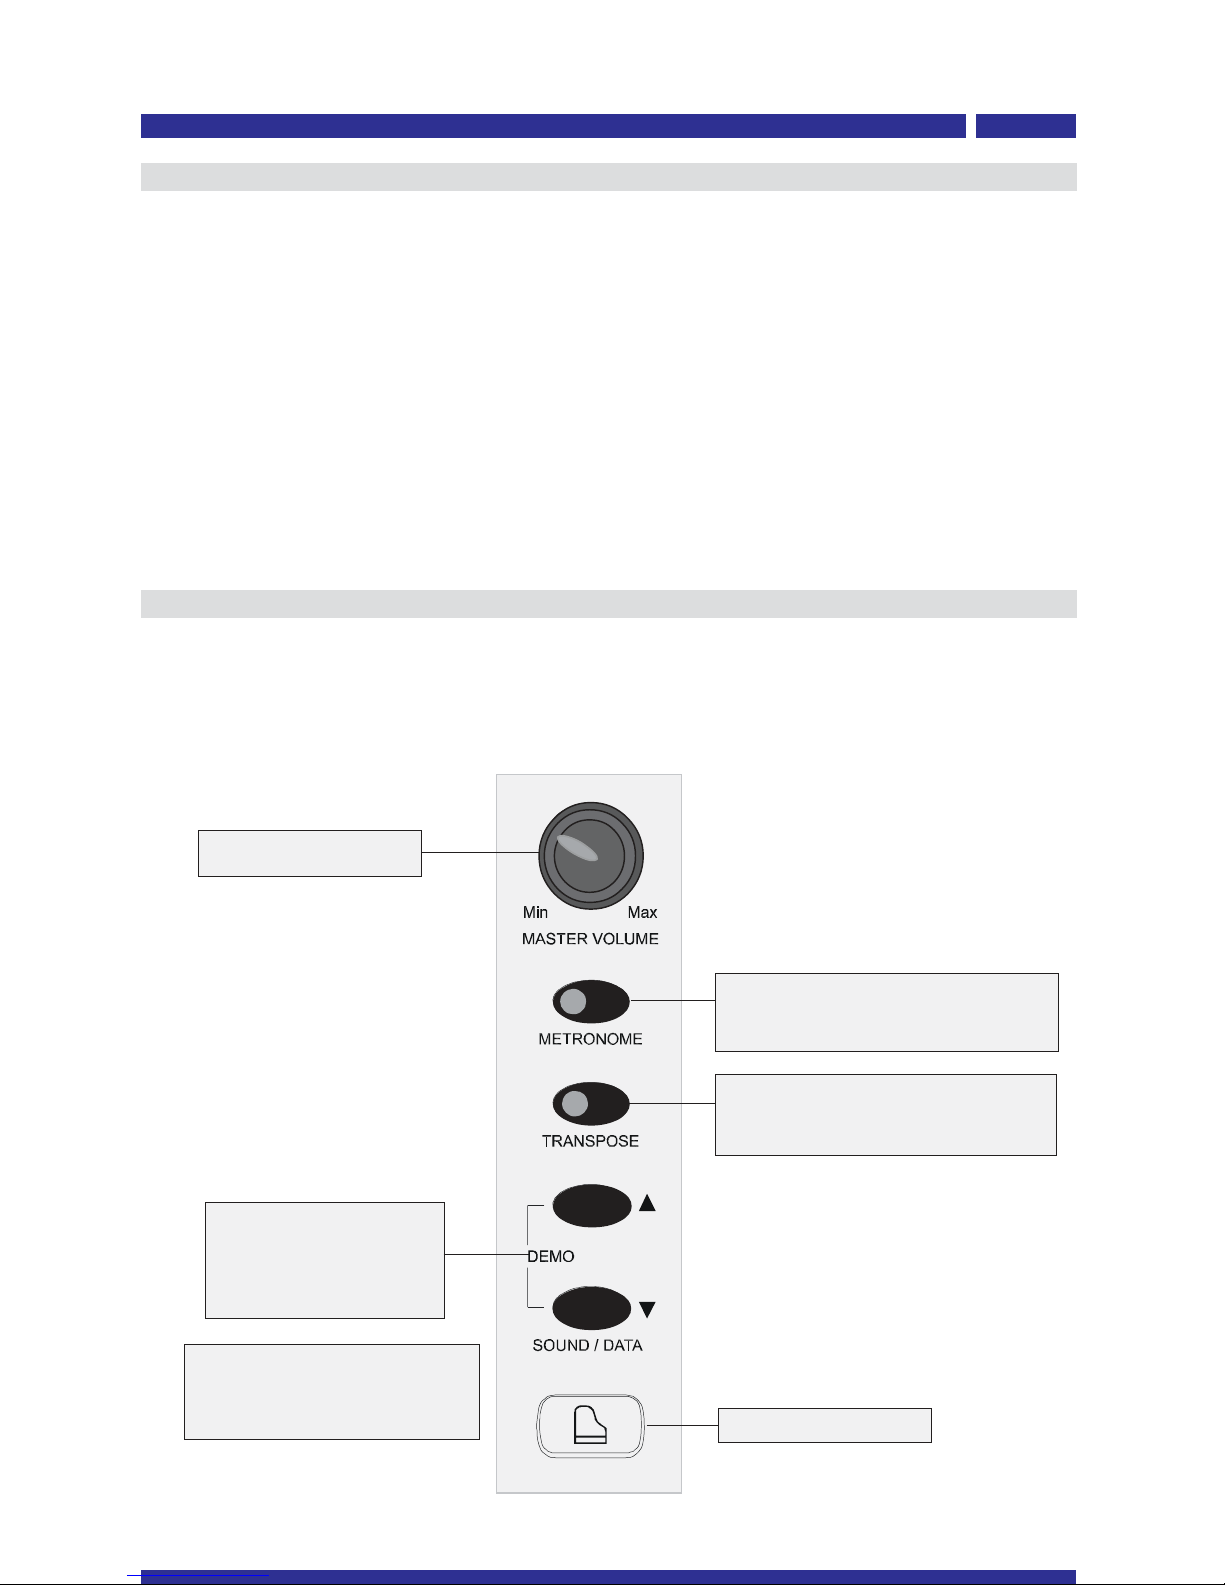
Eleven useful functions allow you to customize YP200 to your needs.
Each function is assigned to a key (Function Key) of the last eleven white keys of the
keyboard. The function names are printed on the cabinet edge below the keyboard, as shown
in the picture below.
Transpose
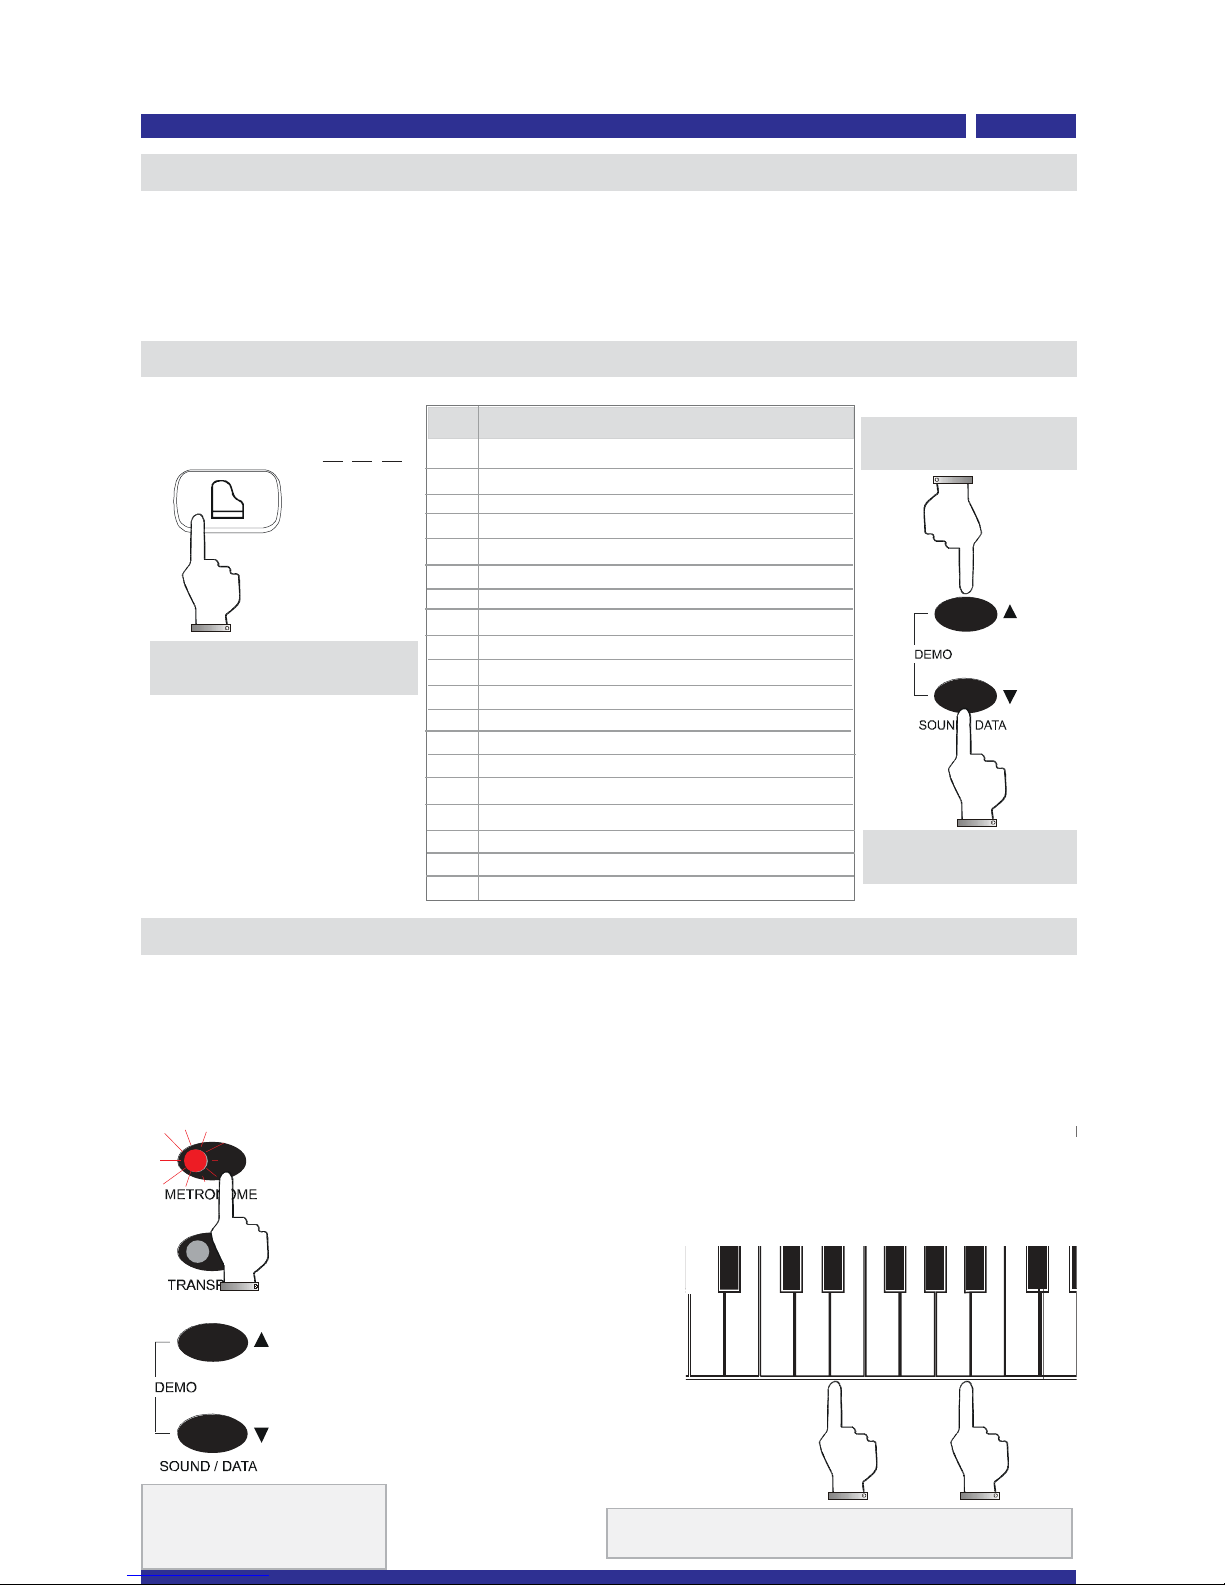
A function can be recalled by
pressing&holding its Function Key
and pressing DATA UP or DATA
DOWN buttons.
The Grand Piano button will start to
blink (as shown by the picture on
the right hand side) and the function
name and value will be declaimed
by the audio help guide.
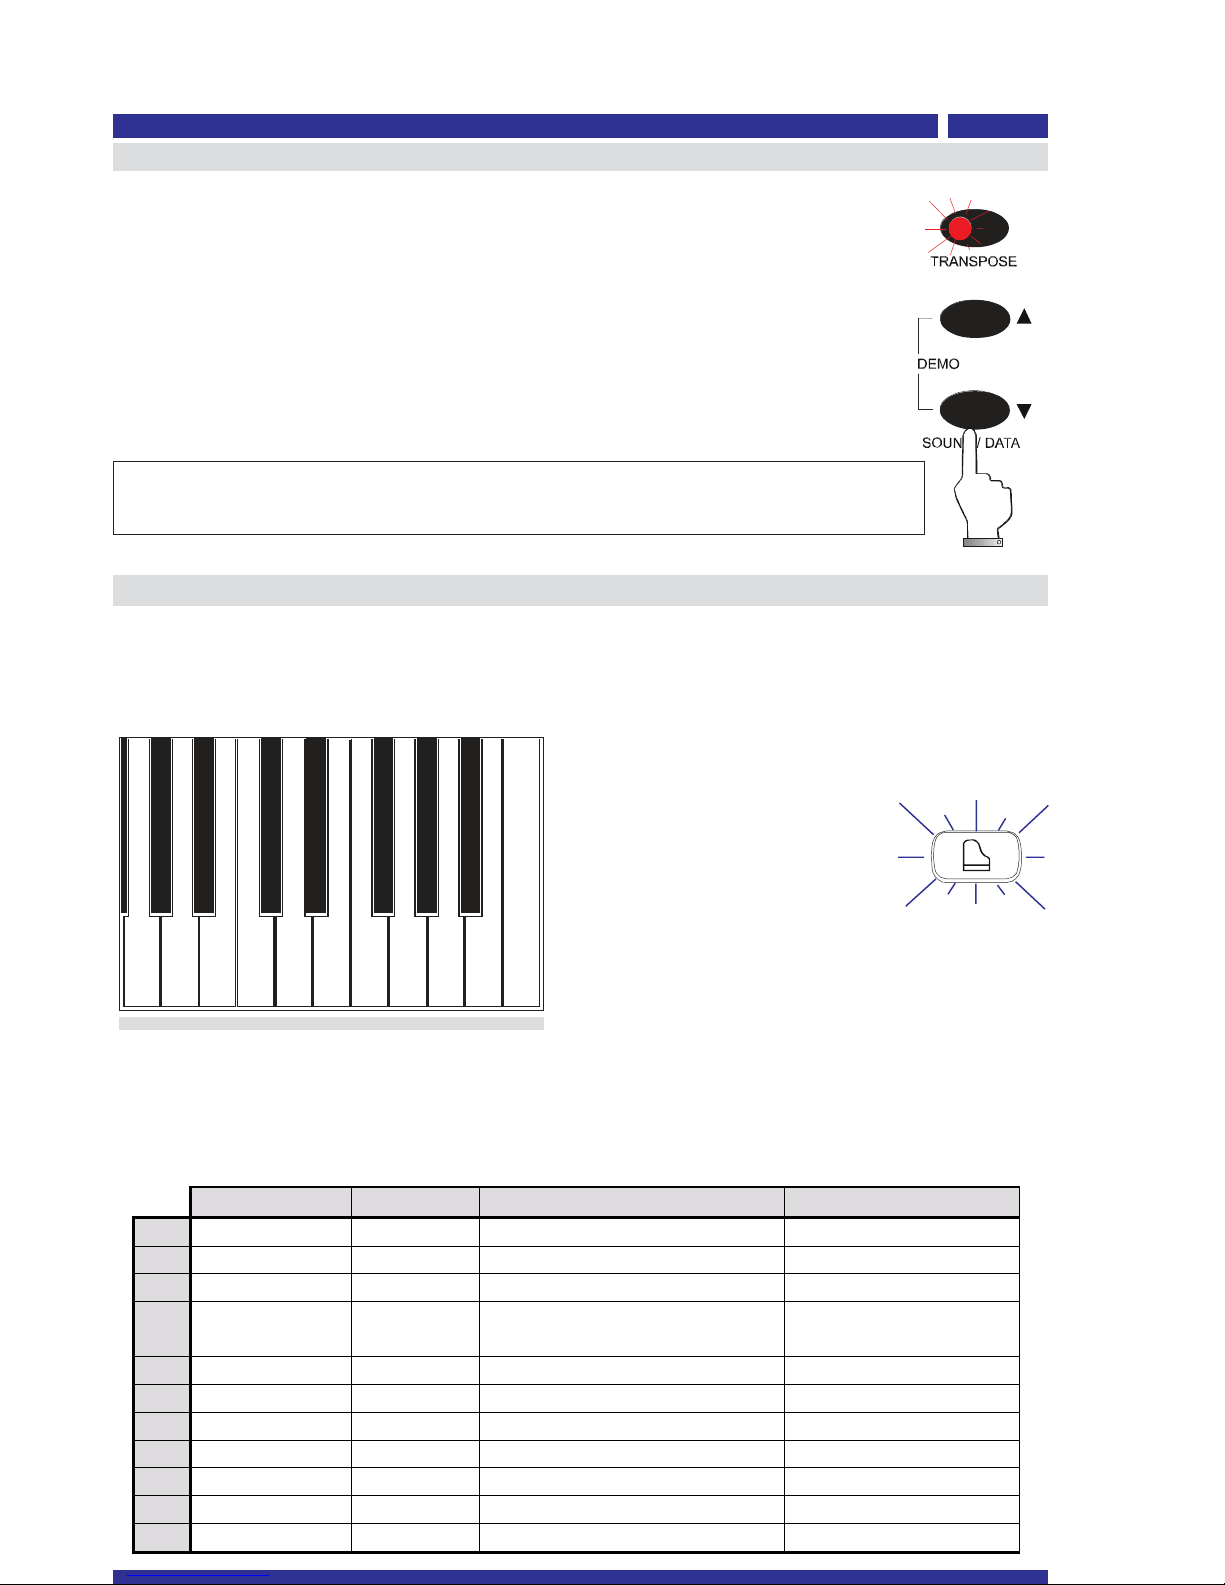
It is possible to apply a transposition of + / -12 semitones. The TRANSPOSE
button has a dual functionality :
1. Activate and deactivate the transpose (via the normal pressure):
the button light will indicate the transpose state: light on means
transpose active, no light means no transpose.
2. Set the number of semitones of transposition : press the TRANSPOSE
button for at least two seconds, the button light starts flashing,
then press the DATA UP / DOWN DATE to change the transpose
value. Simultaneously pressing DATA UP and DATA DOWN the
transposition will be canceled.
Note: if you enable the transpose with the value set to zero, the button light
will blink twice and then goes off permanently; no transposition will be applied.
touch tune temper. time s. effects maf eq midi backup he p standby
The table below describes all YP200’s functions in detail:
FUNCTION KEY ALLOWEDVALUES DEFAULTVALUE
1 Touch G6 Soft; Normal; Hard Normal
2 Tune A6 415.3 Hz÷ 466.2 Hz A4 =440
3 Temperament B6 Equal; Meantone; Kirnberger Equal
4 Time Signature C7 1/4; 2/4; 3/4; 4/4; 5/4; 6/4; 7/4
3/8; 6/8; 7/8; 9/8; 12/8 4/4
5 Effect D7 ON/OFF ON
6 MAF E7 ON/OFF ON
7 Equalizer F7 ON/OFF ON
8 MIDI G7 01 ÷ 16 Channel 01
9 Backup A7 ON/OFF OFF
10 Help B7 ON/OFF ON
11 Standby C8 ON/OFF On
the simultaneous pressure of DATA UP and DATA DOWN will recall the default value.
Once the Function Key is released, YP200 will return back to normal performance mode.
In edit mode the keyboard doesn’t play and only
DATA UP / DOWN buttons are enabled. Press DATA UP
to increase the value, DATA DOWN to decrease it;

YP200
owner’s manua
E
N
-
5
TOUCH
By pressing the DATA
buttons repeatedly, you can
select one of the available
touch curve (SOFT;
NORMAL; HARD)
Press and hold the TOUCH (G6) function on the
keyboard and press the DATA UP button on the
control panel.
Pressing the DATA button once, the vocal guide
signals the current active touch value.
To select the default NORMAL curve,
simultaneously press the DATA UP/DOWN
buttons, while TOUCH function key (G6) is
held down.
Function Menu
touch tune temper. time s. effects maf eq midi backup he p standby
TUNE
Allows you to change the overall intonation of the instrument. This function is very useful when
you play with other musicians because YP200 can be tuned according to the needs of the
moment.
Press and hold the Function Key ( A6),
corresponding to the TUNE function, and press
DATA UP or DATA DOWN button - the GRAND
PIANO button will blink and will play a reference
tone of the note A4. Use the DATA UP / DOWN
to change the intonation. The e cursion of the
value ranges from A4 = 415.3 (-100 cents of a
semitone) to A4 = 466,16 (+100 cents of a
semitone). Pressing the button normally you will
get a unit change (± 1 cent of a semitone) by
pressing and holding the button the variation
proceeds until the reaching of e tremes values.
To e it the TUNE function is necessary to release
the A6 button, and the last value stored will be
recorded.
Simultaneously pressing DATA UP and DATA
DOWN, the default value (A4 = 440Hz) will
be set.
touch tune temper. time s. effects maf eq midi backup he p standby

E
N
-
6
YP200
owner’s manua
touch tune temper. time s. effects maf eq midi backup he p standby
TEMPERAMENTS
This function allows you to modify the current piano temperament (or tuning). The default
setting is EQUAL temperament, but other temperaments can easily be recalled.
Press the TEMPERAMENTS (B6) function key on
the piano keyboard and the DATA button on the
control panel. The vocal guide will tell you the
current temperament selection, Pressing the DATA
button again, it will be possible to recall the other
temperaments.
1. Equa (default)
2. Meantone
3. Kirnberger
touch tune temper. time s. effects maf eq midi backup he p standby
TIME SIGNATURE
This function allows you to modify the metronome
Time Signature. The default value is 4/4.
Press the Function Key C7 (Time Sign) and the
DATA button on the control panel.
The metronome will properly signal the current
time signature, and the metronome led will start
flashing.
Press the DATA UP/DOWN button to change the
time signature:
1/4 - 2/4 – 3/4 - 4/4 – 5/4 – 6/4 – 7/4 –
3/8 – 6/8 – 7/8 – 9/8 – 12/8 .
Simultaneously pressing DATA UP and DATA DOWN, the default time
signature (Equal) will be set.
To e it the TIME SIGNATURE, you must release the C7 key will be
stored as the last time signature.
touch tune temper. time s. effects maf eq midi backup he p standby
To change the value, keep the Function Key
pressed then press the DATA button on the
panel. The vocal guide will tell you the status
(EFFECTS ON or EFFECTS OFF).
Simultaneously pressing DATA UP and DATA
DOWN will be set the default value: EFFECTS
ON.
This menu allows you to disable or enable the Reverb effect. Press and hold the Function Key
D7, corresponding to the EFFECTS function and press DATA UP or DATA DOWN button. The
vocal guide tells you the active effect status.
EFFECTS
The sounds of YP200 are enriched by digital effects generated by the internal Sound Engine.
Simultaneously pressing DATA UP and
DATA DOWN, the default
temperament (Equal) will be set.

YP200
owner’s manua
E
N
-
7
touch tune temper. time s. effects maf eq midi backup he p standby
To change the MAF status, keep the MAF (E7)
function key and press the DATA button on the
panel. The vocal guide will tell you the status (MAF
ON or MAF OFF).
By default the function status is: MAF ON
MAF
This function allows you to enable or disable the
MAF effect (Multiple Acoustic Feel) e clusively
present on the two piano presets.
Keep the MAF Function Key pressed (E7) and press
the DATA button on the panel.
The vocal guide will tell you the MAF status.
touch tune temper. time s. effects maf eq midi backup he p standby
EQUALIZER
This function allows you to enable or disable the
internal equalizer.
To change the equalizer status, keep the
EQUALIZER Function Key (F7) pressed and press
the DATA button on the panel. The vocal guide
tells you the EQUALIZER status (EQUALIZER ON or
OFF).
Simultaneously pressing DATA UP and DATA DOWN
will be set to the default value: EQUALIZER ON.
To e it the EQUALIZER you must release the
Equalizer Function Key, last EQUALIZER status will
be stored.
touch tune temper. time s. effects maf eq midi backup he p standby
MIDI
With this function you can set the transmit and
receive MIDI channel.
Hold down the function key MIDI (G7) and press
the DATA button. The vocal guide signals MIDI.
To change the channel number (valid for both
transmitting and receiving) press the first octave
of the keyboard referring to the numbers below
them. Numbers vary from 01 to 16.
For e ample, to set the channel 03, first press
the C2 (0), then the key C1 (3).
Unlike other functions, as soon as it recognizes a
valid channel number, YP200 automatically e its
the operation.
Simultaneously pressing DATA UP and DATA DOWN will be set to the
default value (MIDI In/Out Channel: 01)
To e it the MAF function you must release MAF
Function Key, last MAF status will be stored.

E
N
-
8
YP200
owner’s manua
touch tune temper. time s. effects maf eq midi backup he p standby
This function sets the YP200 starting mode:
Mode 1: YP200 load the factory set.
Mode 2: YP200 loads the user set.
BACKUP
Keep the Backup Function Key (A7) pressed
and press the DATA button on the panel. The
vocal guide signals the
active BACKUP status.
To change the Backup status, keep
the BACKUP Function Key pressed then
use the DATA buttons on the panel to
modify the value. The vocal guide
signals backup status (BACKUP ON or
OFF).
The default value is: BACKUP OFF
(YP200 load the factory set).
STANDBY
touch tune temper. time s. effects maf eq midi backup he p standby
This function allows you to enable or disable the
voice guide. The voice guide help you to easily
setup the functions of YP200.
To change the HELP status, keep HELP Function
Key pressed and press the DATA buttons on the
panel. The vocal guide signals help status (HELP
ON or OFF). Default value is HELP ON.
Simultaneously pressing DATA UP and
DATA DOWN will be set to the default
value (HELP: ON).
To e it the HELP function you must
release the Function Key B7; the last
value will be stored.
HELP
It allows to permute YP200 automatically in low-
power mode after 30 minutes of inactivity. To
change the value, press and hold the button (C8),
then using the DATA UP and DATA DOWN, YP200
will declaim the new value:
1. STANDBY ON (default): Automatic low-
power switched on
2. STANDBY OFF: Automatic low-power
switched off
Simultaneously pressing DATA UP and DATA DOWN
will be recalled the default value (STANDBY ON).
To e it Standby function is necessary to release the Function Key C8, the
last value will be stored.

YP200
owner’s manua
E
N
-
9
Rear Pane
MAIN OUT
Right e Left/Mono Connect the instrument to an e ternal amplification system.
(2)
(3)
(4)
(5) INPUT
(note 2)
Right e Left/Mono
Connect an e ternal audio source to the YP200 amplification
system (CD, MIDI player, etc.)
MIDI
In-Thru-Out
Socket to connect the pedals (Damper, Soft, Sostenuto)
PEDAL
Standard MIDI connections
(1) USB (note 1) USB port to PC connection
(2) (3) (4) (5)
(1)
(note 1) An U B cable (not provided) is needed to connect YP200 to a Personal
Computer.
Once YP200 is connected to a PC, please follow the driver installation wizard
of the computer operating system.
After a proper driver installation, YP200 can be used as MIDI device.
(note 2) The Master Volume Knob does not affect the volume of an external
audio source

E
N
-
1
0
YP200
owner’s manua
Technica Specifications
keyboard 88 hammer action keys
po iphony 128 notes ma
volume; demo; metronome; sound/data; transpose
functions menu: touch; global tune; temperaments (3 types); effects
on/off; maf on/off; equalizer on/off; midi menu (receive/transmit
channel); back up mode; help; standby
14 presets + 4 combinations
Viscount Sound Generator VEGA (Versatile Engine Generator Audio)
MAF technology (Multiple Acoustic Feel)
sounds
contro s
techno ogy
digita effects 4 reverbs and 4 modulations, associated to the presets
sequencer metronome; demo songs
connections stereo in/out L (mono)/R; MIDI (In/thru/out); Headphone X 2; AC In; USB
peda s damper; soft; sostenuto
cabinet
amp ification
dimensions (W D H)
weight
25W + 25W
rosewood (with a sliding keyboard cover)
(1366 425 816) mm
54 kg

YP200
mode d’ emploi
digital piano

Disposal of old Electrical & Electronic Equipment (Applìcable throughout the European Union
and other European countries with separate collection programs)
Dir. 2002/95/CE, 2002/96/CE e 2003/108/CE
This syrnbol, found on your product or on its packaging, indicates that this product should not be
treated as household waste when you wish to dispose of it. Instead, it should be handed overt to an
applicable collection point for the recycling of electrical and electronic equipment. By ensuring this
product is disposed of correctly, you will help prevent potential negative consequences to the
environment
and human health, which could otherwise be caused by inappropriate disposal of this product. The
recycling of materials will help to conserve natural resources. For more detailed information about the
recycling of this product, please contact your local city offi ce, waste disposal service or the retail store
where you purchased this product.
This product complies with the requirements of EMCD 2004/108/EC and LVD 2006/95/EC.
FCC RULES
NOTE: This equipment has been tested and found to comply with the limits for a Class B digital Device, persuant to Part 15 if the FCC
Rules. These limits are designed to provide reasonable protection against harmful interference in a residential installation. This
equipment generates, uses and can radiate radio frequency energy and, if not installed and used in accordance with the instruction,
may cause harmful interference to radio comunications. However, there is no guarantee that the interference will not occur in a
particular installation. If this equipment does cause harmful interference to radio or television reception, which can be determinated by
turning the equipment off and on, the user is encuraged to try to correct the interference by one or more of the following measures:
-Reorient or relocate the receiving antenna.
-Increase the separation between the equipment and receiver.
-Connect the equipment into an outlet on a circuit different from that to which the receiver is connected.
-Consult the dealer or an experienced Radio/Tv technician for help.
The user is cautioned that any changes or modification not expressly approved by the party responsable for compliance could void the
user’s authority opearate the equipment.
INFORMATIONS FCC
NOTE : Cet instrument a été controlé et il est garanti pour etre en conformité avec les spécifications techniques établies pour les
dispositifs numériques de la « Classe B » selon les normes de protection contre les interférences avec d’autres dispositifs électroniques
environnants. Cet appareil produit et utilise des fréquences radio. S’il n’est pas installé et utilisé selon les instructions contenues dans le
mode d’emploi, il peut générer des interférences. L’observation des normes FCC ne garanti pas qu’il y aura aucune interférence. Si cet
appareil est la cause d’ interférences avec une réception Radio ou TV, il est possible
de le vérifier en éteignant puis en allumant l’instrument : Vous pouvez alors résoudre le problème en suivant les procédures suivantes :
-déplacer ou orienter l’antenne de l’appareil avec lequel se manifeste l’interférence.
-déplacer cet instrument ou l’appareil avec lequel se produit l’interférence
-connecter cet instrument à une prise de courant différente afin de mettre les deux appareils sur deux circuits différents.
-consulter le revendeur ou un technicien radio/tv pour d’autres renseignements.
D’éventuelles modifications non approuvées par le constructeur peuvent annuler votre garantie de l’appareil.

1) Vérifiez que l’emballage comprend les parties suivantes:
A) Caisse
B) Pied droit
C) Pied gauche
D) Panneau postérieur
E) Traverse inférieure avec groupe à 3 pédales
F) Pied à vis
G) Porte-casque
et que les accessoires de fi ation décrits ci-après se trouvent dans le sachet en nylon:
H) Vis M6 20 TC (2 )
I) Vis M6 20 TC (8 )
L) Vis WL 4 20 TC (4 )
M) Vis WL 4 12 TC (2 )
N) Passe-fil adhésifs (5 )
O) Tournevis en croi
2) Retirez les protections en nylon et mousse des parties en bois et libérez le câble pédales
sous la traverse comme indiqué sur la Fig. 3
3) Vissez sur le groupe pédales le pied à vis (F) comme indiqué sur la Fig. 1
4) Fi ez le pied droit (B) à la traverse (E) avec des vis (I) comme indiqué sur la Fig. 1
5) Fi ez le pied gauche (C) à la traverse (E) au moyen de vis (I) comme indiqué sur la Fig. 1
6) Fi ez le panneau postérieur (D) à la traverse (E) à l’aide de vis (L) et au pieds droit (B) et
gauche (C) à l’aide de vis (H) comme indiqué sur la Fig.1
7) Positionnez la caisse (A) au-dessus du support, fi ez-la avec les 4 pommeau (I) comme
indiqué sur la Fig. 1 et insérez les pivots comme indiqué sur la Fig. 2
8) Fi ez le porte-casque (G) à l’aide de vis (M) comme indiqué sur la Fig. 1
9) Fi ez les 5 passe-fil (N) dont 3 sur le panneau postérieur (D) et 2 sur le fond de la caisse (A)
comme indiqué sur la Fig. 4
10) Introduisez la fiche DIN du câble pédales dans la prise sur le groupe I/O de la caisse (A) et
fi ez le câble à l’intérieur du passe-fil (N) comme indiqué sur la Fig. 4
11) Positionnez le piano à l’endroit défini et réglez le pied (F) du groupe pédales
Instructions pour ’Assemb age


Sommaire
Présentation ...................................................................................... 1
Panneau de Controle ........................................................................... 1
Allumage de l’instrument ..................................................................... 2
Réglage du volume ............................................................................. 2
Conne ion du casque .......................................................................... 2
Ecoute des démos .............................................................................. 2
Sélection des Presets .......................................................................... 3
Liste des Presets ................................................................................ 3
Metronome......................................................................................... 3
Transpose .......................................................................................... 4
Fonctions ........................................................................................... 4
Menu Fonctions .................................................................................. 5
TOUCH ......................................................................................... 5
TUNE ........................................................................................... 5
TEMPERAMENTS............................................................................. 6
TIME SIGNATURE ........................................................................... 6
EFFECTS ....................................................................................... 6
MAF ............................................................................................. 7
EQUALIZER ................................................................................... 7
MIDI ............................................................................................ 7
BACKUP........................................................................................ 8
HELP ............................................................................................ 8
STANDBY ...................................................................................... 8
Panneau Posterieur ............................................................................. 9
Spécifications Techniques .................................................................. 10
Technologie ...................................................................................... 10
Table of contents
Languages:
Other Galileo Musical Instrument manuals

Galileo
Galileo VP110 User manual

Galileo
Galileo Milano II User manual

Galileo
Galileo YP300 User manual

Galileo
Galileo Concerto User manual

Galileo
Galileo Maestro II User manual

Galileo
Galileo Organ User manual

Galileo
Galileo VP111 User manual

Galileo
Galileo Milano 3G User manual

Galileo
Galileo VP121 User manual

Galileo
Galileo Milano 3G User manual