Garlock Life Point Duo User manual

P/N 161594 Rev 3/15/16
Garlock provides this Operators’ Manual as
a tool to help instruct the owner/worker in
the proper use of this equipment. Garlock
expects the reseller and equipment owner to
comply with OSHA 1926.503 and make every
effort to educate the worker in the proper
use and limitations of this equipment before
putting it into service.
Keep this Manual with the Life Point Duo Tie-Off System at all times. This will allow new users
to read it before operating this equipment.
It is the Life Point Duo Tie-Off System owner’s responsibility to ensure that all workers using
this anchor are thoroughly trained. Provide workers with this Operators’ Manual. Make sure
they understand its’ contents. Read it to them if necessary. Letting poorly trained workers use
this anchor can result in serious injury or death to personnel.
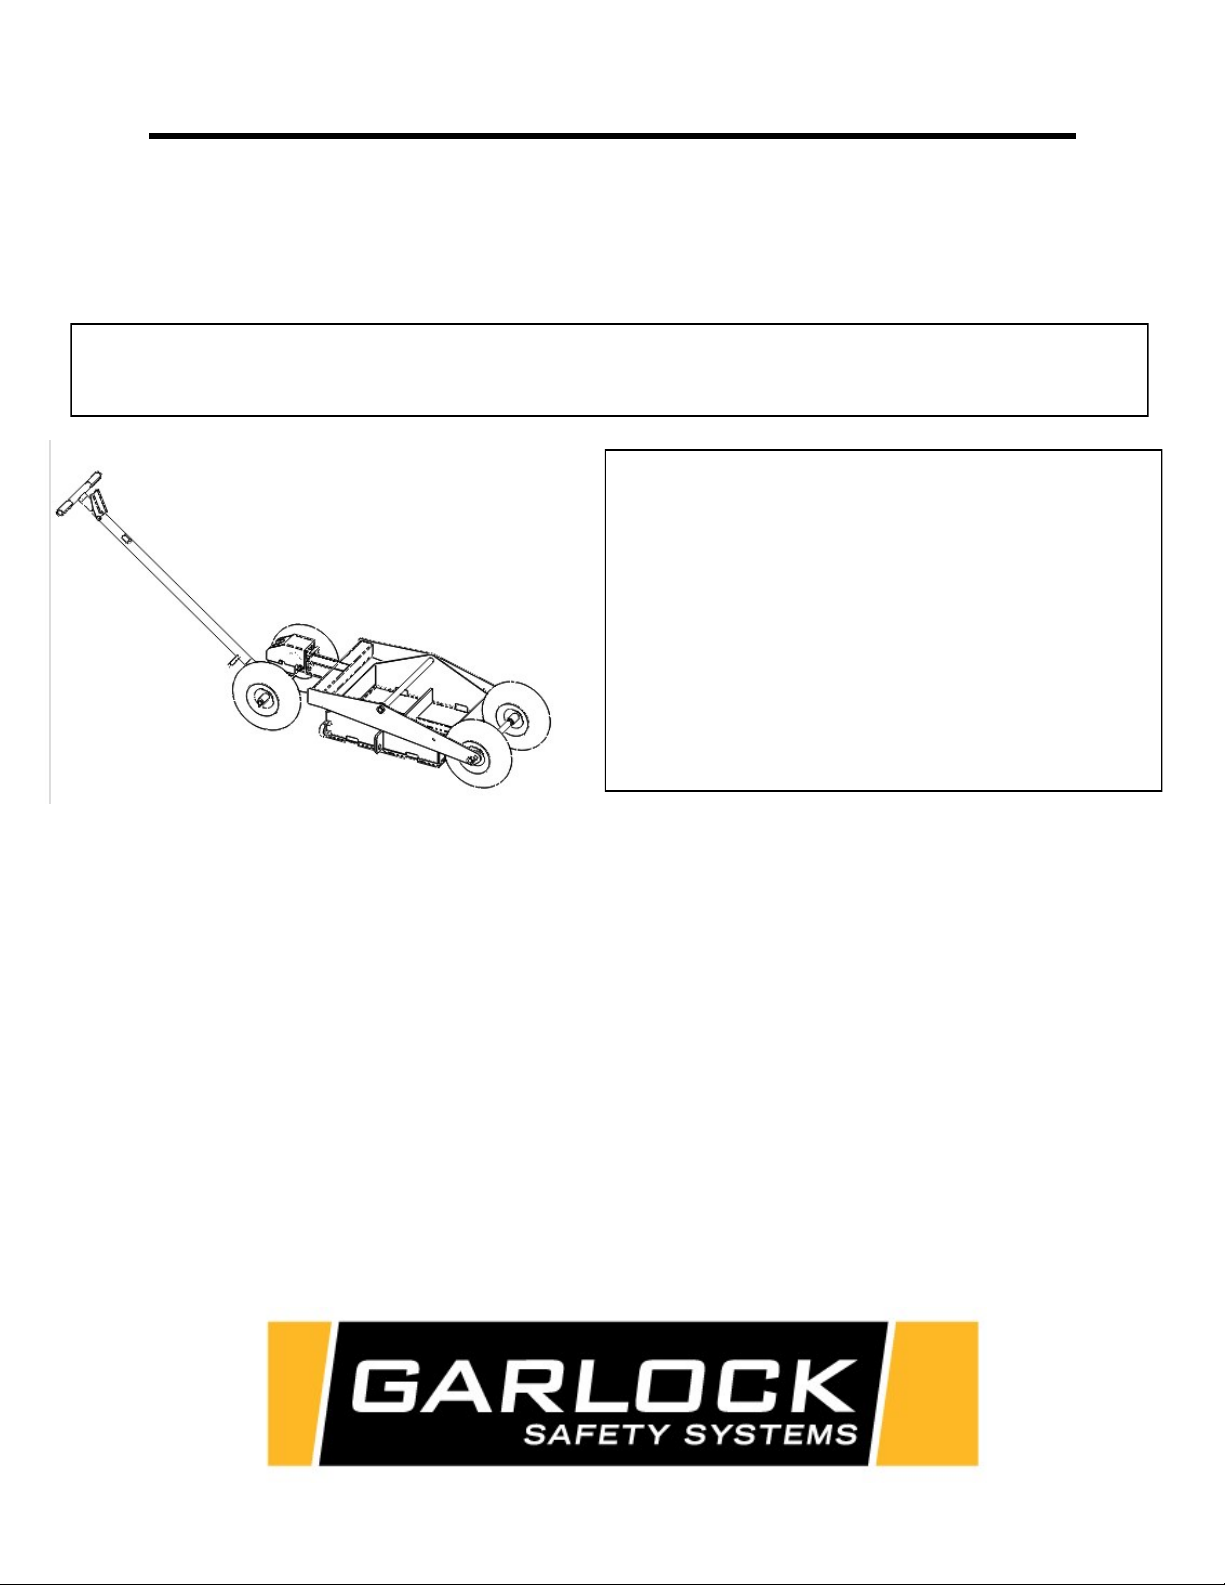
LIFE POINT DUO TIE-OFF SYSTEM
Operators’ Instruction Manual
Per OSHA 1926.503 it is the equipment owner’s responsibility to ensure that all workers
using this Anchor are thoroughly trained in its’ use and limitations.
Consulte la página 17 para Español

2
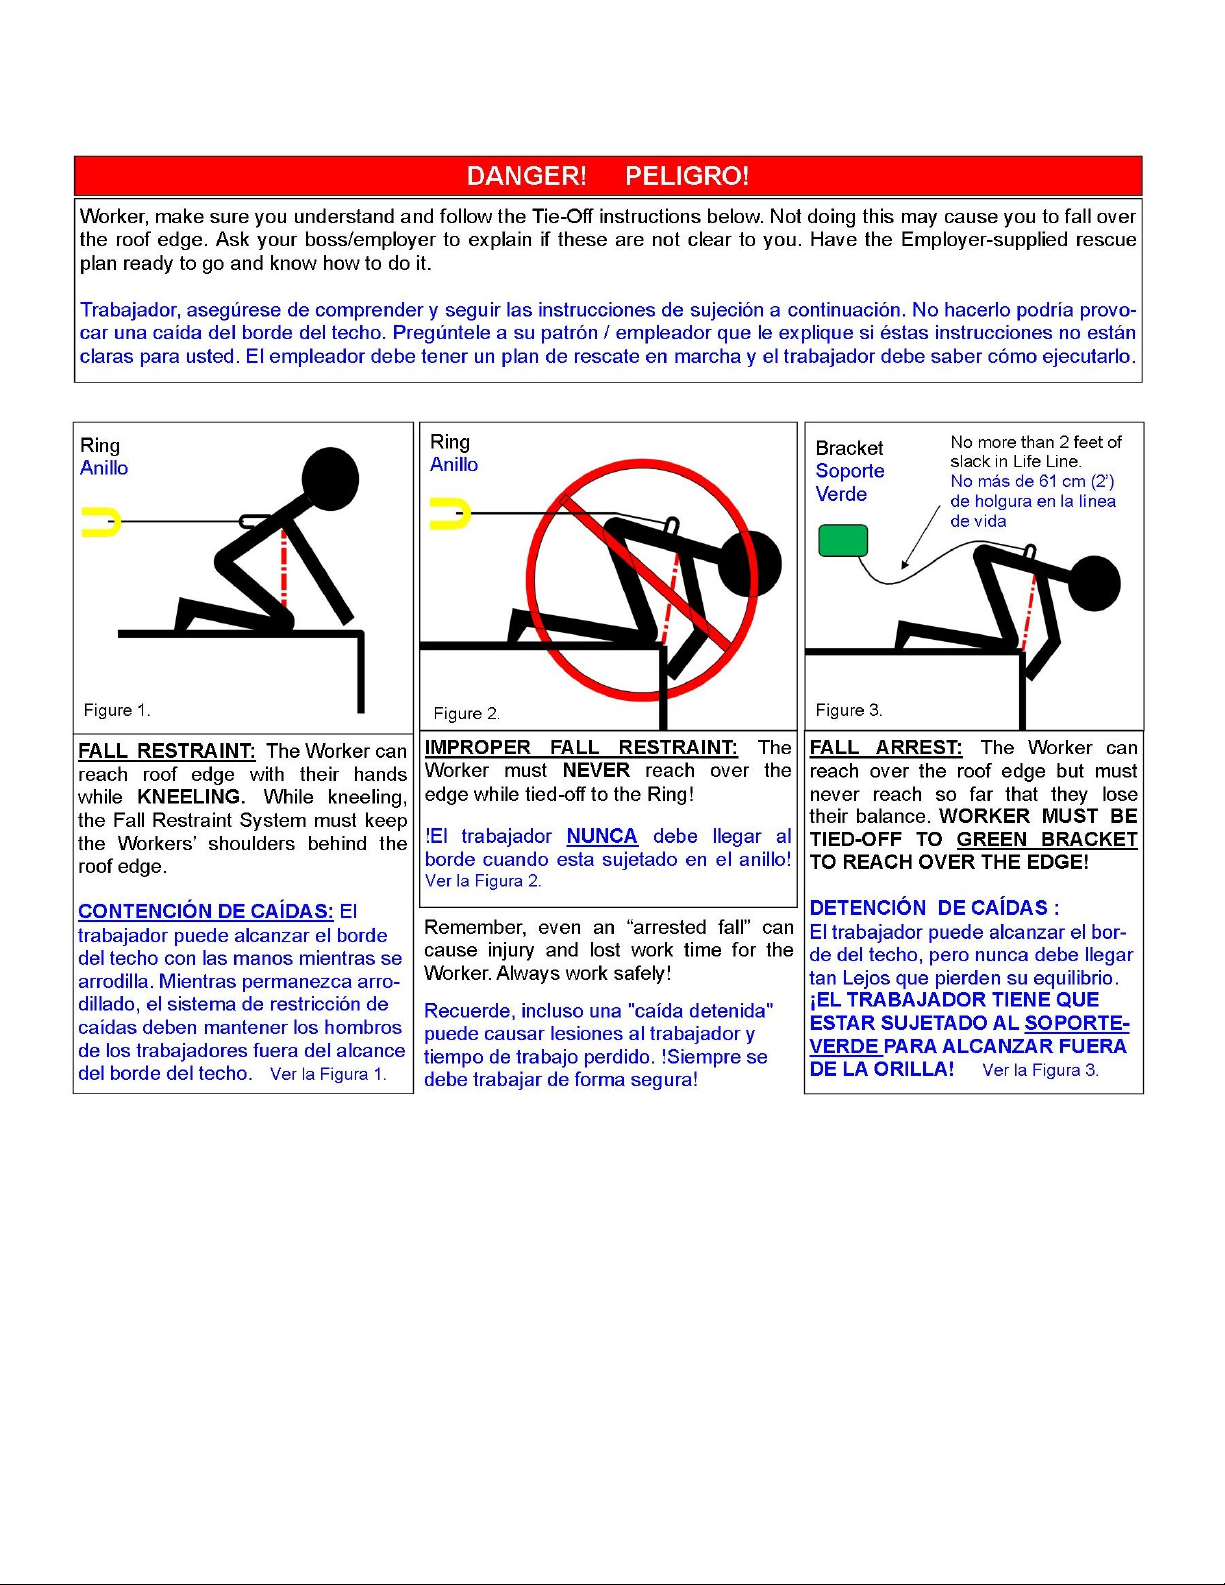
NOTICE TO WORKERS USING THE LIFE POINT DUO:

3
Specifications:
Length-Minus Handle 70”
Height 20”
Width 28
Weight 930 Lbs.
Tire Contact Pressure Front: 27 PSI each Rear: 35 PSI each
Contact Pressure (actuated): 1.45 PSI
Counterweights Quantity 8 Concrete or Quantity 12 Steel as supplied by Garlock.
Limitations:
The Life Point Duo has been tested and approved for 1-Person Fall Arrest plus 1-Person Fall Restraint for
the following roof substrates (coverings):
Built-up roofing systems (BUR)
TPO / EPDM Adhered Membranes
Metal Decks 22 gauge minimum.
Plywood/Hardboard Decking
ISO insulation
Concrete
FALL RESCUE PLAN:
Federal law requires the Employer to have a Fall Rescue Plan for their employees in the event a fall should
occur.
ANSI Z359.2-2007 mandates that “Employers shall develop and maintain written fall protection and rescue
procedures for every location where an active fall protection system is used to control a fall”.
ANSI Z359.2-2007 Section 6.1:
“The employer shall provide prompt rescue to all fallen authorized persons”
ANSI Z359.2-2007 Section 6.2:
“Written rescue procedures shall be prepared and maintained by the competent person for all instances
where authorized persons work at heights. Such procedures shall contain provisions for the prompt rescue
and self-rescue of any authorized person who falls”.
ANSI Z359.2-2007 Section 6.3 provides specific guidelines regarding the circumstances during which emer-
gency services can be called to carry out a rescue.
ANSI Z359.2-2007 is very specific about the roles of all individuals involved in the rescue process.
OSHA 1910.66 subpart F Section 1(e)(8) states “The employer shall provide for prompt rescue of employees
in the event of a fall or shall assure the self-rescue capability of employees.”
OSHA 1926.502(d)(20) reads “The employer shall provide for prompt rescue of employees in the event of a
fall or shall assure that employees are able to rescue themselves.”
Refer to these standards in their entirety for specific requirements regarding the creation and use of a Fall
Rescue Plan.
Garlock Equipment Company strongly advises the employer to read, understand and adhere to these Federal
Standards.

4
WARNING! Working at or near the roof edge is dangerous and can subject the Worker to serious injury or
death from falls. The Roofing Contractor and the Worker must make every effort to ensure the area where
he/she will be working is as safe as possible. This means taking only the tools you need to the roof edge,
removing all trip hazards and loose material, the wearing and proper use of OSHA approved Harnesses and
Life-Lines, making no sudden or unplanned moves and being constantly aware of your surroundings and
your position/location relative to the roof edge.
It is also imperative that the Worker read the Operators’ Manual for this equipment and thoroughly under-
stand how to set up and use this equipment. This includes knowledge of what the equipment can do and
also how to avoid situations this equipment was not designed to handle. Garlock provides this Operators’
Manual at the time of sale as a tool to help instruct the owner/worker in the proper use of the equipment and
expects the reseller and owner/worker to make every effort to educate themselves before putting this Life
Point Duo Tie-Off System into service.
Garlock recommends that no worker be on the roof or sent to any job or repair site by themselves.
This leaves the worker unaided should an accident occur regardless of its’ nature.
1. OPERATOR PREPARATION:
Read Operators’ Instruction Manual!
Reading and understanding the instructions completely is the first step to safe operation. An uninformed
operator can subject themselves and others to serious injury or death.
NOTICE TO OPERATOR! Make sure you have a thorough knowledge of how to set up and use the Life Point
System, as well as a complete understanding of the systems’ limitations and conditions for use before you
attach yourself to the system. READ THE OPERATORS’ INSTRUCTION MANUAL!
Wear Proper Attire When Roofing
When doing roofing or roofing repair work, wear safety glasses and protective clothing if any cutting, scraping,
or sweeping is being done in your work area. Wear safety shoes. Hard hat must be worn by Worker when
work is being done overhead. When working with hot stuff, long sleeved cotton shirt buttoned at sleeves and
collar must be worn (or other suitable protective clothing). Long pants without cuffs and a face shield are also
required when working with hot bitumen.
2. BEFORE HOISTING OR CARRYING LIFE POINT SYSTEM TO THE ROOF:
Make sure roof is in good condition. It must be able to support the combined weight of the Life Point System
(930 lbs.) plus all material, equipment and personnel which will be near or working near the system.
Be sure to include the Building Owner and/or a certified Architect when making this evaluation.

5
3. HOISTING ANCHOR TO THE ROOF:
BEFORE HOISTING OR CARRYING LIFE POINT SYSTEM TO THE ROOF:
Make sure roof is in good condition. It must be able to support the combined weight of
the Life Point System (930 lbs.) plus all material, equipment and personnel which will
be near or working near the system.
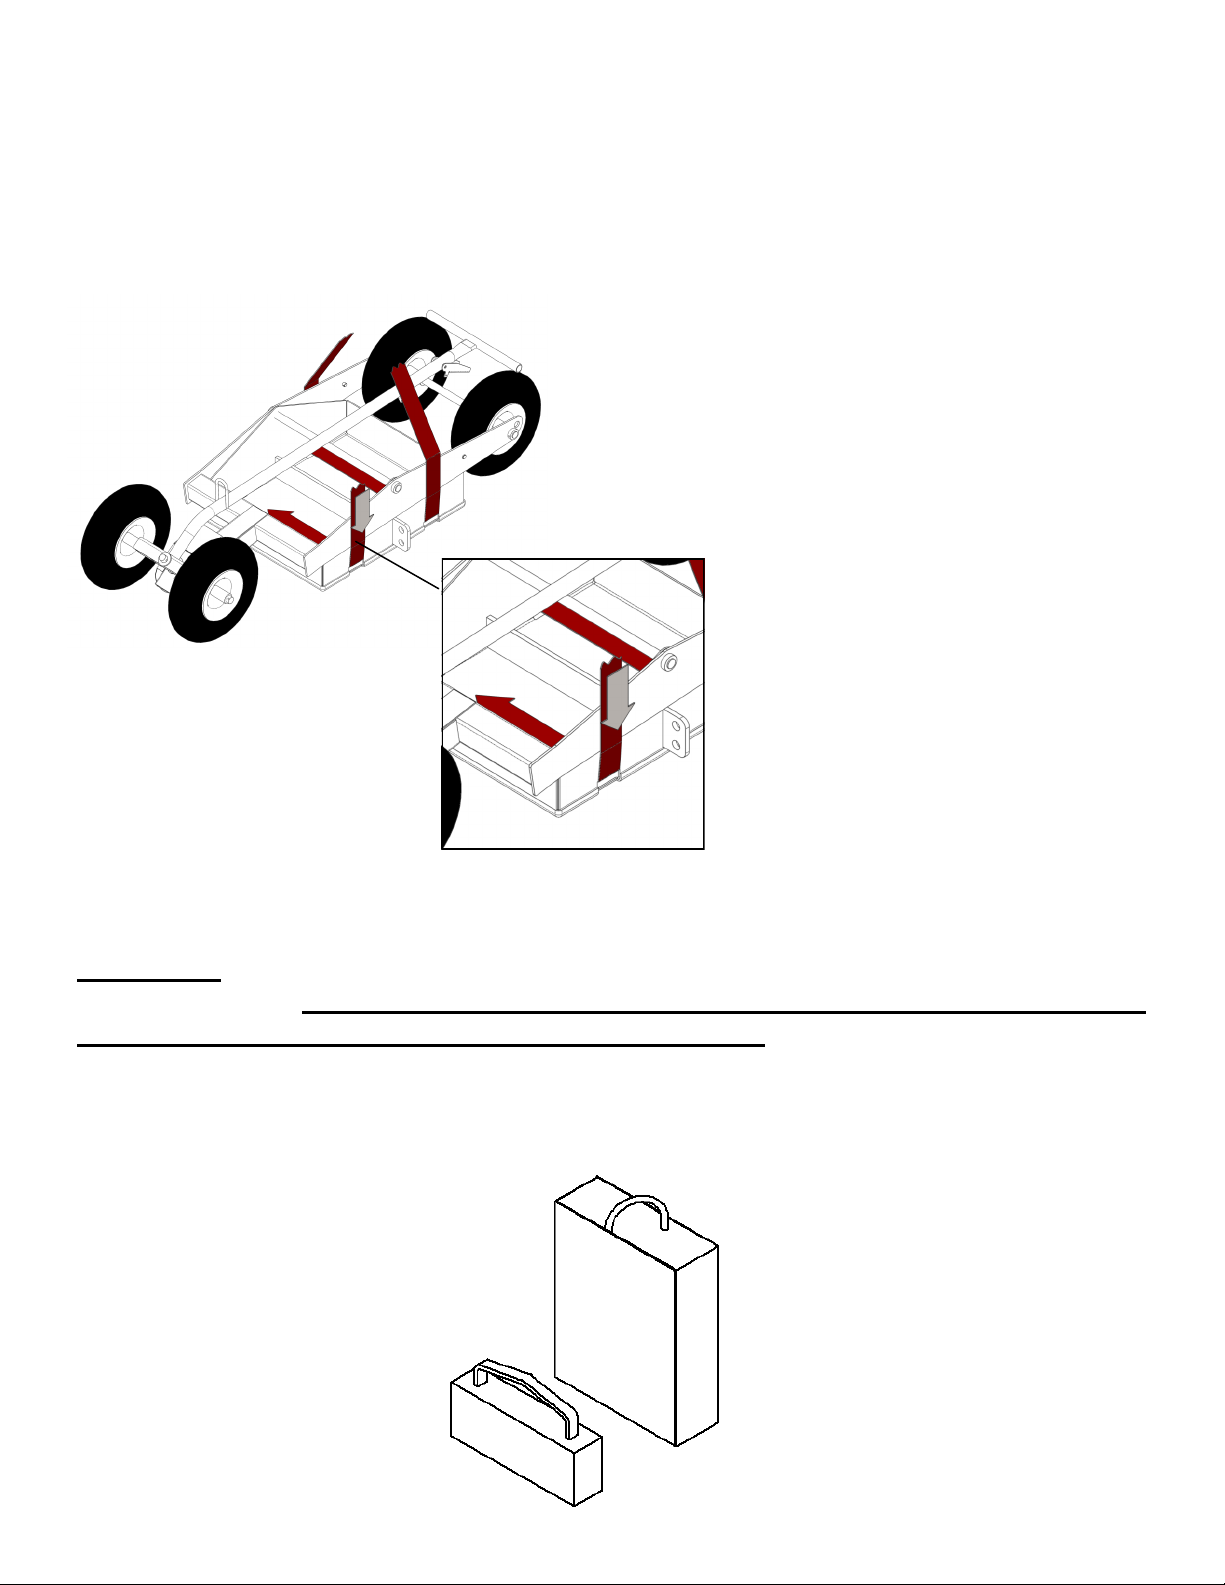
LOADING COUNTERWEIGHTS:
Remove all Counterweights.
Insert lifting straps through the slots along
bottom of Box and out the other side.
Connect all 4 ends of straps to hoist hook.
Hoist Counterweights separate from Anchor.
WARNING! Use counterweights supplied by Garlock Safety Systems as ballast
for this anchor. Use of any other ballast may result in an anchor not able to
arrest a fall, causing serious injury or death to user.
Use 12 steel weights (408996S) or 8 weight cans (408999) filled to top with concrete.

6
WARNING! Never work in, move to or in any way inhabit the areas outside, to the left
or right of the SAFE ZONE while attached to the Life Point Duo. The Life Point Duo is
not designed to protect the Worker at these extreme angles.
Life Point Duo must be placed at least 15 feet from
roof edge and parallel to the roof edge.
4. CHOOSING A LOCATION FOR THE ANCHOR TO THE ROOF:
WARNING! If you must move side to side along the roof edge for brief periods to per-
form your work, move slowly and do not go any farther than 45 degrees to the right or
left. This is the SAFE ZONE. Leaving this zone will put you in DANGER and may
cause serious injury or death to you should you fall over roof edge.
Stay Inside The SAFE ZONE.
WARNING! Inspect the area over the roof edge
where you will be working and make sure there are
no objects below the edge such as balconies,
awnings, lights, security cameras or anything else
protruding from the side of the building that you
may hit in the event of a fall.

7
WARNING! BEFORE PLACING THE UNIT AT POINT OF USE FOLLOW THESE
RULES.
Anchor must be placed at least 15 feet from roof edge and parallel to the roof edge.
Anchor must be located straight back from the area where you will be working.
Remove all debris and loose roof coverings from the area where you will locate the
Anchor for use.
Make sure the area is free of ice, snow, water, oils, dirt, dust or any other substance
upon which the Anchor may slide. Sweep the area free of all dust and dirt.
On Hot Built-Up (BUR) roofs, sweep a 5 foot X 6 foot area completely free of loose
gravel. Set the Anchor on this completely swept area.
TOWARD ROOF EDGE
On gravel topped roofs, BUR, Ballasted etc… thoroughly sweep away all gravel, dirt
and dust over the area where you will locate the anchor. Allow at least 3 feet of swept
area in front of the Anchor (direction toward roof edge).
WARNING! When attaching to a Life Point Anchor that has been left on the roof over
time: If there has been any snow accumulation you MUST clear the area in front of
the Anchor for at least 3 feet making sure to remove any ice covering the roof
substrate.
5. ROOF PREPARATION:

8
6. PUTTING ANCHOR IN ACTUATED POSITION:
While standing along side the Anchor,
Push and hold Handle slightly forward.
Depress red Lever
Continue to hold the Handle firmly,
resisting its tendency to move
backward.
Walk the Handle toward the Anchor
while continuing to depress red
Lever.

9
WARNING! Before attaching life line to Anchor, make sure Anchor is in the
activated position.
This means the bottom of the Anchor is firmly resting on the roof and the tires
are completely off the roof.
Continue to move the Handle toward the Anchor until it rests over the top of Anchor.

10
7. ATTACHING YOURSELF TO THE UNIT:
WARNING! It is the responsibility of the Life-Line user to adjust the length of his/her Life-Line as described
above. Proper length adjustment will prevent excessive fall height, lessening the chance of injury to user.
Inspect the area over the roof edge where you will be working and make sure there are no objects below the
edge such as balconies, awnings, lights, security cameras or anything else protruding from the side of the
building that you may hit in the event of a fall.
Attach approved commercially available life-line to the Tie Off Bracket in the center of the anchor.
Use self-locking snap hooks and carabineers only when hooking up to this machine. Use attaching hardware
that is specifically designed for Fall Protection devices. After attachment, make sure all connectors are
closed and locked in place.
WARNING! Never work in, move to or in any way occupy the areas outside of the SAFE ZONE while
attached to the Life Point System. It is not designed to protect the Worker at these extreme angles.
STAY INSIDE THE SAFE ZONE.
When working at the roof edge, locate the Life Point
System so it is straight back from the area where you will
be working.
If you must move side to side for brief periods to perform
your work, move slowly and do not go any farther than 45
degrees to the right of left. This is the SAFE ZONE. Leaving
this zone will put you in DANGER and may cause serious
injury or death to you should you fall over roof edge.
Connect to the Green Bracket only for Fall Arrest.
Detencion de Caidas.
Adjust length of Life-Line to be no more than 2 feet
longer then the distance from cart to roof edge.
Connect to the Round Loop only for Fall Restraint.
Restriccion de Caidas.
Adjust the length of your Life-Line so your shoulders
can not extend over the roof edge.

11
Fall Prevention Safety Tips for Employers
Falls from elevations account for approximately one-third of all deaths in construction. The following tips highlight
some of the key issues that employers should consider when planning, implementing, and maintaining their fall
prevention programs.
1. Develop a written fall prevention plan.
2. Identify potential fall hazards prior to each project and during daily walk-arounds.
Pay attention to hazards associated with routine and non-routine tasks.
3. Eliminate the need for fall protection where possible by rescheduling the task,
isolating the task, or changing the task.
4. Ensure fall protection equipment is appropriate for the task, in good condition and used properly.
5. Conduct general fall prevention training on a regular basis.
6. Train workers on the specific fall hazards identified and on the required personal
protective equipment.
7. Conduct regular inspections of fall protection equipment in accordance with
manufacturer’s recommendations and OSHA requirements.
8. Emphasize fall hazards unique to the site, such as open floor holes or shafts, riser
penetrations, and skylights.
9. Team up with other construction employers and employees to identify best
practices and share fall prevention solutions.
10. Get more information from the Occupational Safety and Health Administration
(OSHA): Visit OSHA’s Website at www.osha.gov or call (800) 321-OSHA.
Fall Prevention Safety Tips for Employees.
It only takes a second for a fall to occur. Falling a few feet can result in serious injury or death.
1. Understand your company’s written fall prevention plan.
2. Attend and participate in fall prevention training.
3. Use fall protection equipment if required for the job.
Be sure that the equipment is right for the task, fits properly, and is in good condition.
4. Inspect fall protection equipment (for example, harness systems) and devices (for
example, guardrails and tie-off points) before each use.
5. Make sure that floor holes, open shafts, and riser penetrations are protected by
sturdy guardrails or covers.
6. Get specialized training before working on scaffolds, lifts, or ladders.
7. When using scaffolds, make sure there is proper access, full planking, stable
footing, and guard railing.
8. Keep your feet firmly on the platform of a boom lift and tie-off at all times.
9. Chose the correct ladder for the task, read the instructions, and be sure that the
ladder is in good condition. Check for surrounding hazards, stable footing, and the proper angle.
10. Identify skylights and make sure they are properly protected.
11. Contact your supervisor if you see fall hazards or have any other questions about
fall prevention. Do not work until unsafe conditions have been corrected.

12
8. PERIODIC MAINTENANCE:
Before each job:
Check all Set Collars holding Tires and Weight Box to Frame. They must be
securely attached to Axle and Pivot Rod.
Check Cotter Pins securing front Tires to the Axles. They must be in place and in
good condition.
Turn the Anchor on its side (after removing Weights) and examine plastic coating
on bottom of Weight Box. It must be free of imbedded material, gouges and any
loose areas.
Check Cable connected to red Lever. It must be securely attached at both ends.
Lever must move freely.
Ensure the correct number of Garlock supplied counterweights are ready to load
into Weight Box.
Remove red Cover and inspect Ratchet Teeth and Pawl for wear.

13
9. PARTS DIAGRAM

14
10. PARTS LIST:

15
This page intentionally left blank.
Fill out and tear off warranty card on back cover of manual and send it in to manufacturer.


N/P 161594 Rev 20/2/16
Garlock proporciona el presente manual del
operador como una herramienta para ayudar
a instruir al propietario/trabajador en el uso
adecuado del equipo. Garlock espera que el
agente de ventas y el propietario del equipo
cumplan con la norma OSHA 1926.503 y
hagan todos los esfuerzos necesarios para
enseñarle al trabajador el uso adecuado y
las limitaciones de este equipo antes de
ponerlo en servicio.
Mantenga este manual con el sistema de anclaje LifePoint Duo todo el tiempo. Esto permitirá a
los nuevos usuarios leer el manual antes de usar el equipo.
Es responsabilidad del propietario del sistema de anclaje LifePoint Duo asegurarse que todos
los trabajadores que usen este anclaje estén completamente capacitados. Entregue a los
trabajadores este manual del operador. Asegúrese que entienden su contenido. Léaselo en
caso de ser necesario. Si se permite el uso de este anclaje a trabajadores mal capacitados
puede resultar en lesiones graves o mortales al personal.
SISTEMA DE ANCLAJE LIFEPOINT DUO
Manual de instrucciones del operador
Según la norma OSHA 1926.503, es responsabilidad del propietario del equipo asegurarse
que todos los trabajadores que utilicen este anclaje tengan capacitación plena en cuanto al
uso y limitaciones del mismo.

18
AVISO PARA LOS TRABAJADORES QUE USAN EL LIFEPOINT DUO:

19
Especificaciones:
Longitud menos la manija 70"
Altura 20"
Ancho 28
Peso 930 lb
Contrapesos cantidad 8 de hormigón o 12 de acero, según lo que incluya Garlock.
Restricciones:
El LifePoint Duo ha sido probado y autorizado para el sistema de detención de caídas de 1 persona y
también para el sistema de restricción contra caídas de 1 persona para los siguientes sustratos de techo
(cubiertas):
Sistemas de impermeabilización de techos (BUR)
Membranas adheridas TPO/EPDM
Terrazas de metal de calibre 22 como mínimo.
Terraza de madera terciada/madera maciza
Aislamiento ISO
Hormigón
PLAN DE RESCATE ANTE CAÍDAS:
La legislación federal exige que el Empleador tenga un plan de rescate para sus empleados en caso de que
ocurra una caída.
ANSI Z359.2-2007 ordena que “Los empleadores deben elaborar y mantener por escrito procedimientos de
rescate y protección contra caídas para cada lugar en donde se use un sistema de protección contra caídas
para controlar una caída”.
ANSI Z359.2-2007 Sección 6.1:
“El empleador deberá rescatar oportunamente a todas las personas autorizadas que sufran una caída”
ANSI Z359.2-2007 Sección 6.2:
“Se deberán elaborar y mantener procedimientos de rescate por escrito para todos los lugares en donde
personas autorizadas trabajen en alturas. Dichos procedimientos deberán contener disposiciones para el
rescate oportuno y el autorrescate de cualquier persona autorizada que sufra una caída”.
ANSI Z359.2-2007 Sección 6.3 proporciona directrices específicas en relación a las circunstancias durante
las cuales se puede llamar a los servicios de rescate para que realicen el rescate.
ANSI Z359.2-2007 es muy específico acerca de las funciones de todas las personas involucradas en el
proceso de rescate.
OSHA 1910.66 subparte F sección 1(e)(8) establece que “El empleador debe proveer el rescate oportuno de
los empleados en el caso de una caída o debe asegurar la capacidad de autorrescate de los empleados”.
OSHA 1926.502(d)(20) indica que “El empleador debe proveer el rescate oportuno de los empleados en el
caso de una caída o debe asegurar que los empleados puedan rescatarse por sí mismos”.
Consulte estas normas para conocer los requisitos específicos completos en relación a la elaboración y uso
de un Plan de rescate ante caídas.
Garlock Equipment Company recomienda firmemente que el empleador lea, comprenda y se adhiera a estas
normas federales.

20
¡ADVERTENCIA! El trabajo en el borde o cerca del borde del techo es peligroso y puede exponer al
trabajador a lesiones graves o la muerte debido a una caída. El contratista y el trabajador deben hacer
todos los esfuerzos para asegurarse que la zona donde trabajarán es lo más segura posible. Esto quiere
decir llevar solamente las herramientas que necesita al borde del techo, eliminar todos los riesgos de
tropezones, retirar el material suelto, utilizar y usar adecuadamente las cuerdas de seguridad y los arneses
aprobados por la OSHA, no hacer movimientos repentinos o no planeados, y estar alerta constantemente
del entorno y su posición/ubicación con respecto al borde del techo.
También es imperativo que el trabajador lea el manual del operador de este equipo y entienda
completamente cómo instalar y usar el equipo. Esto incluye un conocimiento de lo que puede hacer el
equipo, además de situaciones en las que este equipo no se puede utilizar por su diseño. Garlock provee
este manual del operador al momento de la venta como una herramienta para ayudar a instruir al
propietario/usuario en el uso correcto del equipo, y espera que el revendedor y el propietario/trabajador
hagan todos los esfuerzos para instruirse por sí mismos antes de poner en servicio este sistema de anclaje
Garlock recomienda que ningún trabajador se suba al techo ni acuda a ningún trabajo o sitio de
reparación solo. Esto deja al trabajador sin ayuda en caso de un accidente, independientemente de la
naturaleza del accidente.
1. PREPARACIÓN DEL OPERADOR:
¡Lea el manual de instrucciones del operador!
El primer paso hacia un uso seguro es leer y entender completamente las instrucciones. Un operador
desinformado puede exponerse a sí mismo, y exponer a los demás, a lesiones graves o la muerte.
¡AVISO AL OPERADOR! Antes de atarse al sistema, asegúrese que sabe cómo instalar y usar el sistema
LifePoint, y que tiene un conocimiento de todas las limitaciones y condiciones de uso del sistema.
¡LEA EL MANUAL DE INSTRUCCIONES DEL OPERADOR!
Uso de ropa apropiada cuando trabaje en la instalación o reparación de techos
Cuando se realicen trabajos de instalación o reparación de techos, use gafas de seguridad y ropa protectora
si va a cortar, raspar o barrer en la zona de trabajo. Use botas de seguridad. El trabajador debe usar un
casco de seguridad si se ejecutan trabajos sobre la cabeza. Cuando se trabaja con materiales calientes,
se debe usar una camisa de algodón de mangas largas abotonada en los puños y el cuello (u otra ropa
protectora adecuada). Al trabajar con alquitrán caliente también se requiere el uso de pantalones largos sin
bastillas y una careta protectora.
2. ANTES DE ELEVAR O ACARREAR EL SISTEMA LIFEPOINT:
Cerciórese de que el techo se encuentre en buenas condiciones. Deberá ser capaz de soportar el peso
combinado del Sistema LifePoint (930 lb) más todos los materiales, equipos y personal que estarán cerca o
trabajando cerca del sistema.
Asegúrese de incluir al propietario del edificio y/o un arquitecto certificado para llevar a cabo esta evaluación.
Table of contents
Languages:
Other Garlock Safety Equipment manuals
Popular Safety Equipment manuals by other brands

Gas Clip Technologies
Gas Clip Technologies GCT quick start guide

TimeKeeping
TimeKeeping Guard1 Tracking TAG-008 quick start guide

Innotech
Innotech BARRIER-VARIO instruction manual

AGPtek
AGPtek BSR2G user manual

Avlite
Avlite AV-OL-KT-A0 Installation & service manual

ECOSAFE
ECOSAFE AMS200 instruction manual