Gastrodomus TR 70 Operating instructions

MOD. TR 70 - TR 75/E
Cop Man TR70 75_E:00678 Cop Man TR70-75/E 2-08-2012 12:49 Pagina 1
OPERATING AND MAINTENANCE MANUAL

16
Thank you for choosing this machine. We are sure that its performance will meet your requi-
rements.
It is in your interest to keep the machine in perfect running order. In this handbook you will
find the necessary instructions on how to use and service it.
SAFETY STANDARDS
Throughout the manual this symbol indica-
tes important information warning you of
any hazardous operation. Always read the
message that follows it.
GENERAL WARNINGS
This machine has been manufactured to make your work as safe as possible.
Caution is, nevertheless, the golden rule to follow to prevent accidents.
KNOWING YOUR MACHINE
Caution: Store this manual in a safe
place, near the machine, and disclo-
se its storage location to all involved
personnel.
Do not put this manual away without having
first read it, regardless of any previous perso-
nal experience. A little time spent in reading
will save time and extra work.
Read this handbook thoroughly before pro-
ceeding with start-up, use, maintenance
and other operations. Read and rigorously
follow the herein contained instructions and
recommendations:
• read all warning labels applied to any part of the machine, and promptly replace them
when they become worn or illegible;
• only trained and authorised personnel should operate the machine;
• if any part jams or locks up, before clearing make sure you first switch off the motor. DO
NOT clean, oil or grease by hand any moving parts of the machine. In addition, all repair
and setting operations of any moving parts with the motor running, are prohibited, unless
the necessary precautions to prevent any accidents have been taken beforehand;
• all moving parts are fitted with adequate guards and protections. Always remount
them after removal for servicing.
Man TR ING:Man TR ING 2-08-2012 13:44 Pagina 16

17
ENGLISH
WEAR ADEQUATE CLOTHING
Be sure to wear tight-fitting clothing without
any loose parts. Never wear open or unfaste-
ned jackets, shirts or overalls.
IMPORTANT
To prevent accidents and ensure best performance the machine must not be
modified or altered unless authorised by the manufacturer. Nor must it be used in
conditions or for purposes other than those for which it has been expressly desi-
gned. Any arbitrary modification implemented in this machine will automatically
exempt the manufacturer from any liabilities for ensuing damage or injury.
This machine has been designed and engineered in conformity to European directives:
2006/42/CE, 2014/30/CE and the regulation 1935/2004/CE..
BE SURE TO READ “IMPORTANT” MESSAGES
Information highlighted as “Important” in the Operator’s Manual and/or machine indicate
specific instructions about settings, maintenance and so on. Failure to comply with these
instructions may lead to damage to the machine.
ELECTRICAL SHOCK
For your own personal safety, before connecting the machine to mains:
•check that power mains leading to distribution socket is fitted with an appropriate multi-
polar switch protected against overloads and shortcircuits.
•carry out all phase connections, as well as any neutral and ground connections (compul-
sory) with a standard plug compatible with the above mentioned socket. The protection
lead (ground) is the one with the yellow/green insulating sheath; make sure that the power
supply cable is appropriate to its use, according to length, mains voltage and machine
consumption.
•unless adequate protections against electrical shock are fitted, do not operate the machi-
ne in damp or wet environments.
Strictly do not start up the machine without the protective panelling. This may jeopar-
dise personnel safety and machine serviceability.

18
- SAFETY STANDARDS AND GENERAL WARNINGS page 16-17
- TECHNICAL SPECIFICATIONS OF MODELS page 19
- INSTRUCTIONS page 20
- 1. PREPARING THE MACHINE page 21
- 2. OPERATING PRINCIPLE page 21
- 3. USE OF THE MACHINE page 21-22
3.1 USEFUL ADVICE IN ORDER TO OBTAIN GOOD DOUGH page 22
3.2 QUANTITIES IN ORDER TO OBTAIN GOOD DOUGH page 22-23
3.3 INSTALLATION OF THE DRAWPLATE AND START-UP OF PRODUCTION page 23-24
- 4. TRANSPORTATION AND HANDLING page 24
- 5. INSTALLATION, CONNECTION AND SET-UP page 24-25
5.1 CONTROL OF THE INSTALLATION page 25
- 6. CLEANING page 25-26
6.1 COVER AND POOL CLEANING page 26-27
6.2 CLEANING OF THE ARCHIMEDEAN SCREW, MIXER, RING NUT AND DRAWPLATE page 27
- 7. MAINTENANCE AND ADJUSTMENT page 27
7.1 BELT STRETCHING page 27
- 8. MACHINE WHIRR page 28
- 9. DISMANTLING AND DEMOLISHING THE MACHINE page 28
- 10. INCONVENIENCES AND THEIR REMEDIES page 28
ANNEX A: STATEMENT OF CONFORMITY.
INDEX
Man TR ING:Man TR ING 2-08-2012 13:44 Pagina 18
19
ENGLISH
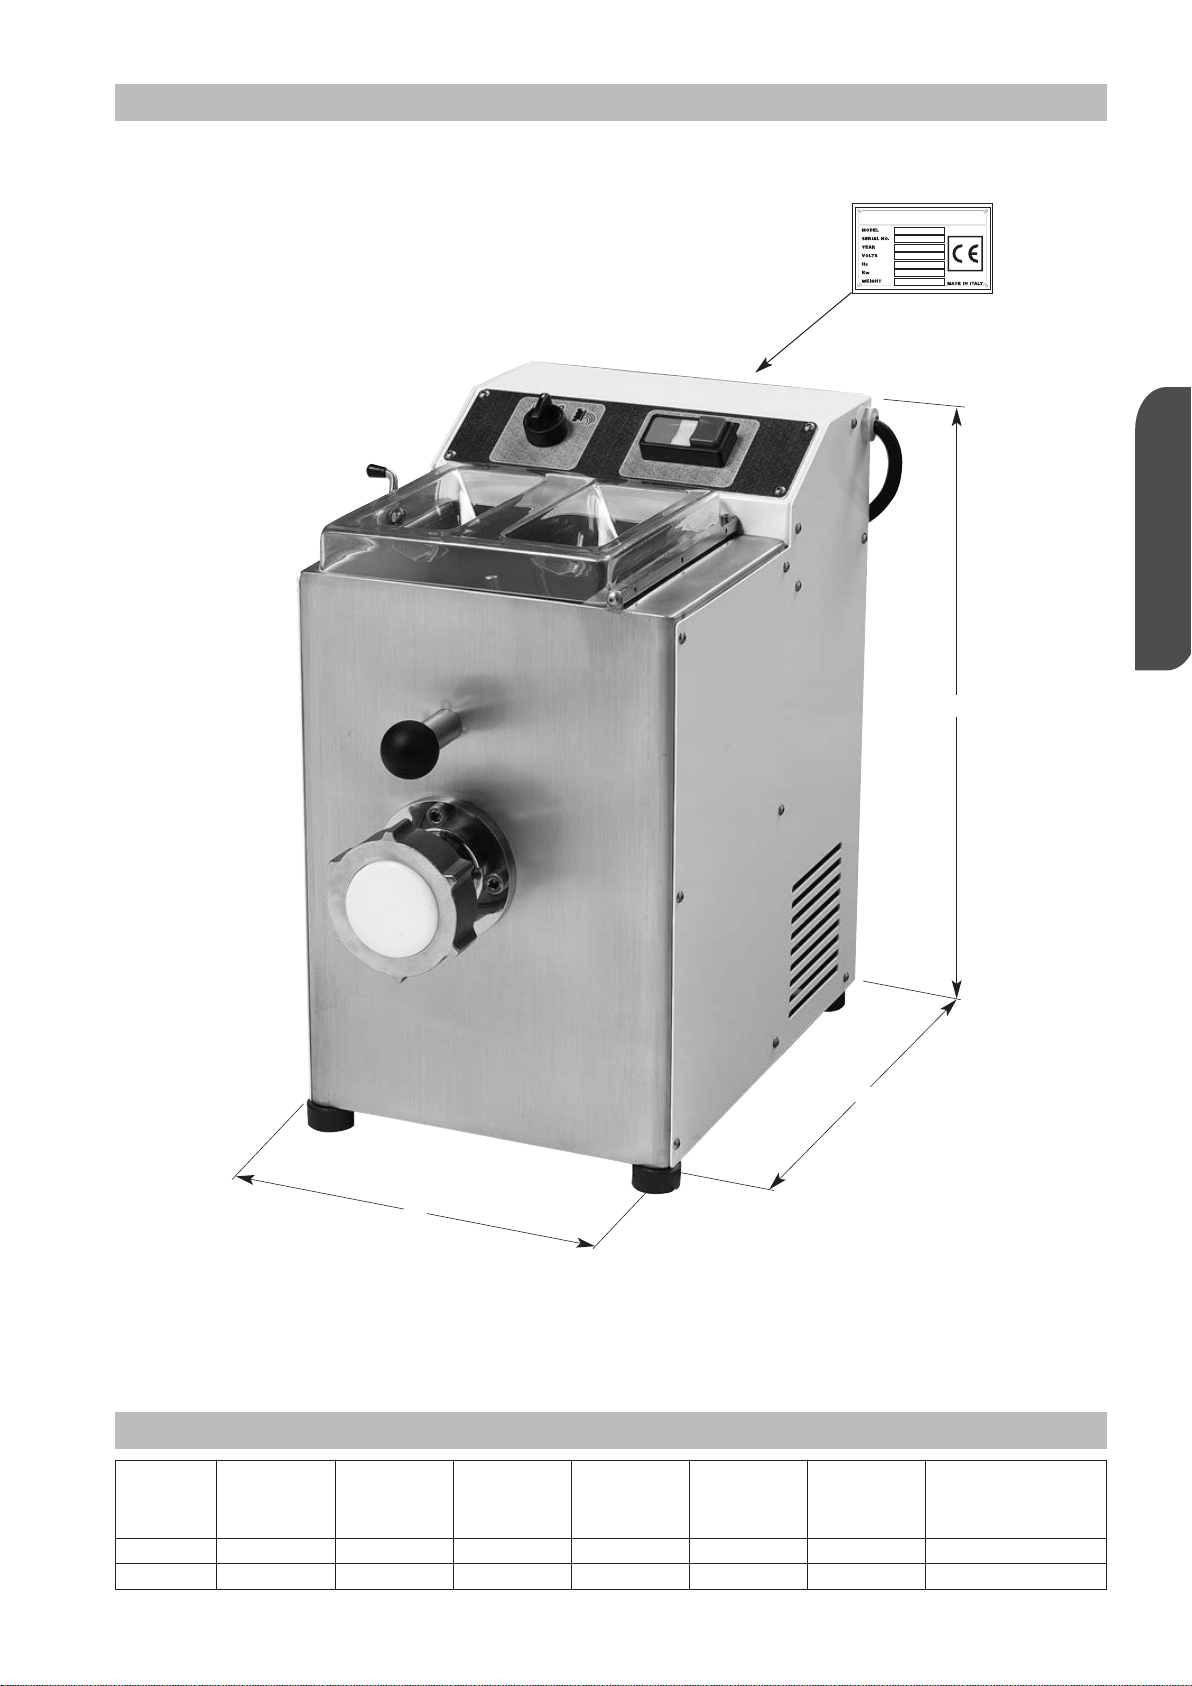
TECHNICAL SPECIFICATIONS OF MODEL TR 70 - TR 75/E
Model A B C Kneading Mass Motor Maximum production
Length Width Height capacity daN power per hour daN/h
daN (based on the kind
mm mm mm ≅kg ≅kg kW of drawplate used)
TR 70 440 250 425 1.5 28 0.38 4
TR 75/E 510 310 570 3 48 0.55 8
SPECIFICATIONS TABLE
B
C
A
Man TR ING:Man TR ING 2-08-2012 13:44 Pagina 19

20
• The elements in contact with the noodles
are made of stainless steel or bronze for
foodstuffs.
• Moving parts mounted on ball bearings
with long-life sealing gaskets or with sup-
ports with greaser.
• Driven by one motor; belt transmissions
with a reducer without maintenance requi-
rements.
• The machine has special footers which
can be adjusted and equipped with plastic
material.
• Connection by flameproof power cable
according to necessary supply voltage,
standard length L = 2 m, without terminal
plug (only 75/E).
• Supplied accessories:
- liquid measure decanter;
- noodle-collecting frame (only 75/E);
- wrench for locking ring nut.
• Working elements with the ability of tur-
ning in two directions: this enables the
kneading of the initial dough, not yet ready,
without any damage to the drawing group.
• Protection of iron parts by furnace coating
with epoxy powders.
• Easy disassembling of the working parts;
the machine is freely accessible in order
to carry out thorough cleaning.
• The possibility of obtaining different pro-
ducts thanks to the change of the relevant
drawplate.
NOODLES PRODUCING MACHINE
Produces different kinds of noodles and is basically made up of
a kneading part and of an extrusion unit in order to cut
the finished product
INSTRUCTIONS
The machine has only been realized to prepare cereal-based flour noodles for noodle
shops and catering requirements.
WARNING
For reasons of hygiene, health and warranty, it is strictly prohibited to use the
machine for the processing of substances other than foods. Any other uses are
contrary to the applications as originally intended by the manufacturer, who shall con-
sequently not be held liable for any damage to the machine itself or to other objects,
or for any injuries to persons that may arise thereof. In taking the risk of misuse, the
user will be held responsible for any consequences.
Always keep children away from the machinery.
• Power:
Model
TR 70 1-phase standard power 1-phase optional power
230/50 Hz. 110/60 Hz. 220/60 Hz.
TR 75/E
Standard power supp. - three phase
1-phase optional power
400/50 Hz. 230/50 Hz. 220/60 Hz.
Man TR ING:Man TR ING 2-08-2012 13:44 Pagina 20
21
ENGLISH
1. PREPARING THE MACHINE
Prepare the machine before every pro-
cess cycle. BE SURE that the machine,
especially parts which come in contact
with food products (extrusion sleeve,
Archimedean screw, pool, mixer and draw-
plate) are perfectly clean (see chapter 6
CLEANING on page 25).
Always clean with machine off.
2. OPERATING PRINCIPLE
This machine kneads the different products
desired and enables you to obtain different
kinds of noodles with a different group of
lengths because it draws the dough, thanks
to different discs.
This action is carried out thanks to a mixer
linked to an Archimedean screw which obli-
ges the product to assume the desired
shape going through a drawplate.
3. USE OF THE MACHINE
Only after making sure that the
machine is completely clean, espe-
cially all the parts which are directly
in contact with the product (extru-
sion sleeve, Archimedean screw, pool,
mixer, drawplate, cover, control
system; if it is necessary, use some
warm water; see chapter 6 CLEANING
page 25) you can carry out the reque-
sted operations in order to have the
desired dough.
Caution: the machine will run only if
the safety microswitch is serviceable
and perfectly positioned.
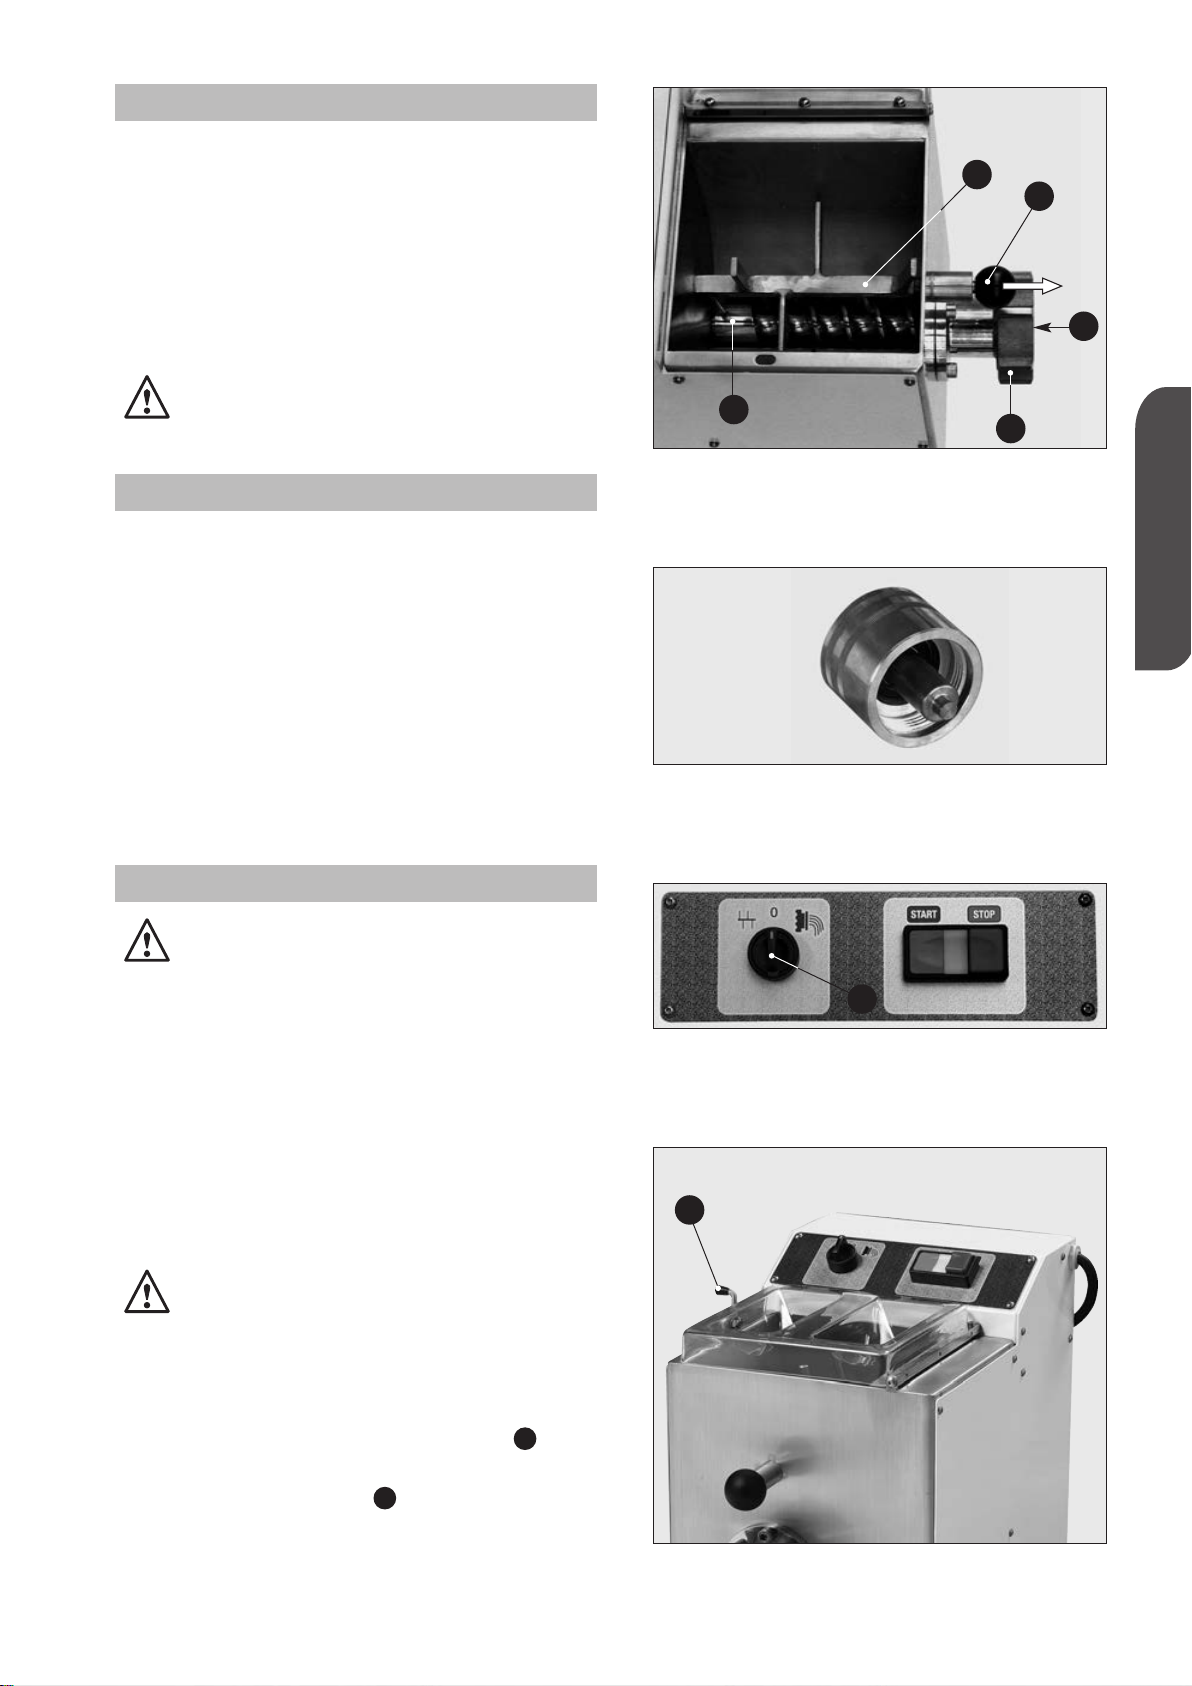
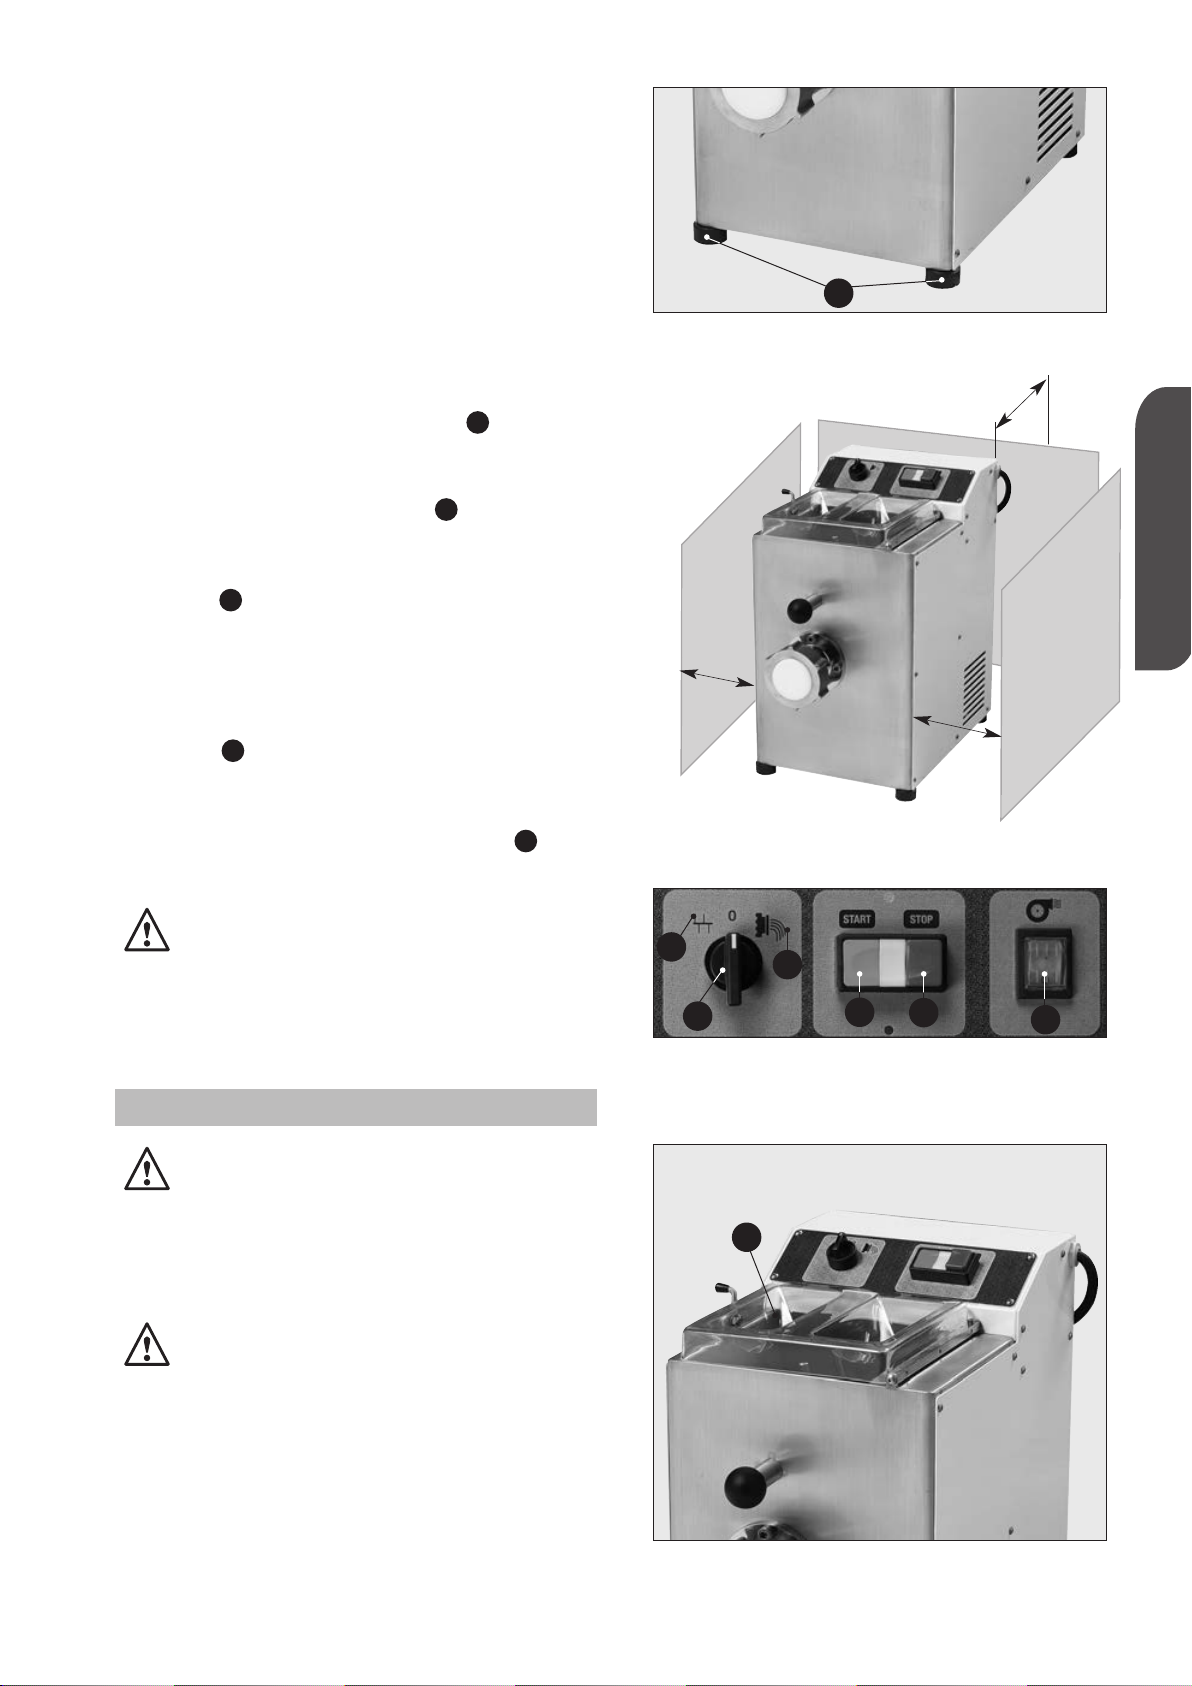
After having turned the machine off:
• position the selector on “0” (Fig. 2 ) and
verify the correct set-up of the Archi-
medean screw (Fig. 1 ) making sure that
the cylinder part is sustained by the drag-
ging shaft;
A
C
Fig. 1
Fig. 3
C
B
A
A
D
E
Fig. 1 bis
Mobile
support
for TR 75/E
Fig. 2
C
Man TR ING:Man TR ING 6-08-2012 13:03 Pagina 21

Any kind of flour can be used (bran or bran-
flour). The dough can be kneaded only with
eggs or with a mix of water and eggs. Water
can be partially replaced by spinach or well-
cut vegetables in order to obtain green
noodles.
Because the flour’s humidity changes
according to the kind, the environment and
the place where it is stocked, the indicated
quantities have to be adapted to the kind of
flour which is used, lowering or increasing
the quantity of water.
The dough is the right one when, at the end
of kneading, it is as big as coffee beans.
If the flour forms lumps you have poured in
too much liquid.
In this case, before turning the switch from
KNEAD to DRAWPLATE you have to add
some more flour and knead a little longer. If
flour does not form a ball and is too floury,
add some more water.
For the dough for the sheet of pasta which is
to be re-kneaded please use “00” flour and
add two eggs per kilo of flour (maximum).
With these quantities you will obtain a very
stretchy dough which is easy to knead.
22
• then make sure that the plastic cap
(Fig. 1 ) which replaces the drawplate is
correctly positioned and the ring nut
(Fig. 1 ) is tightly well-screwed on;
• lastly lock the mixer (Fig. 1 ) tightly in its
seat by means of the head-knob (Fig. 1 )
or tighten the mobile support in the TR
75/E (Fig. 1 bis see page 21).
Pull up the pool cover (Fig. 3 ) and
always put in the pre-established ingre-
dients in the following sequence: flour and
then, after closing the cap, all the other
liquid elements.
In order to obtain the right dough, you need
to create the right ratio between the weight
of the flour and the weight of the liquid part;
in order to obtain a very good product, the
flour has to contain a humidity percentage
of no more than 15%; this allows the addi-
tion of water equal to 35% or up to 38% of
the flour’s weight. If you are using flours
with different humidity contents, please
change the quantity of the liquid in the
opposite ratio. Moreover, in order to better
use the machine, the product inside the
pool has to be higher than at a minimum
level which coincides more or less with the
position of the mixer axle.
B
C
A
E
D
3.1 USEFUL ADVICE IN ORDER TO OBTAIN GOOD DOUGH
3.2 QUANTITIES IN ORDER TO OBTAIN GOOD DOUGH
Pour the desired quantity of flour into the pool; it needs 7 eggs per kilo of flour:
• Supposed weight of an egg: 50 grams.
• If you take 1 egg away you need to add 50 grams of water.
Model Flour kg. Number of eggs
Grams of pasta product
0,5 3 650
TR 70 1 7 1.350
1,2* 9 1.650
1 7 1.350
TR 75/E 2 14 2.700
3 21 4.150
* This is the maximum capacity of the pool.
Man TR ING:Man TR ING 6-08-2012 13:03 Pagina 22
23
ENGLISH
Now shut the cover and put the selector in
the position (Fig. 4 ).
Push the start button (Fig. 4 ).
Add the liquid part pouring it slowly but
quickly through the small hole in the cover.
At the end of the kneading operation, which
should take around 10 minutes, make sure
the product has the right thickness and
should look like coffee beans (check throu-
gh the small holes of the cover).
Turn the machine off by switching the selec-
tor to “0” (Fig. 4 ), or push the Stop button
(Fig. 4 ).
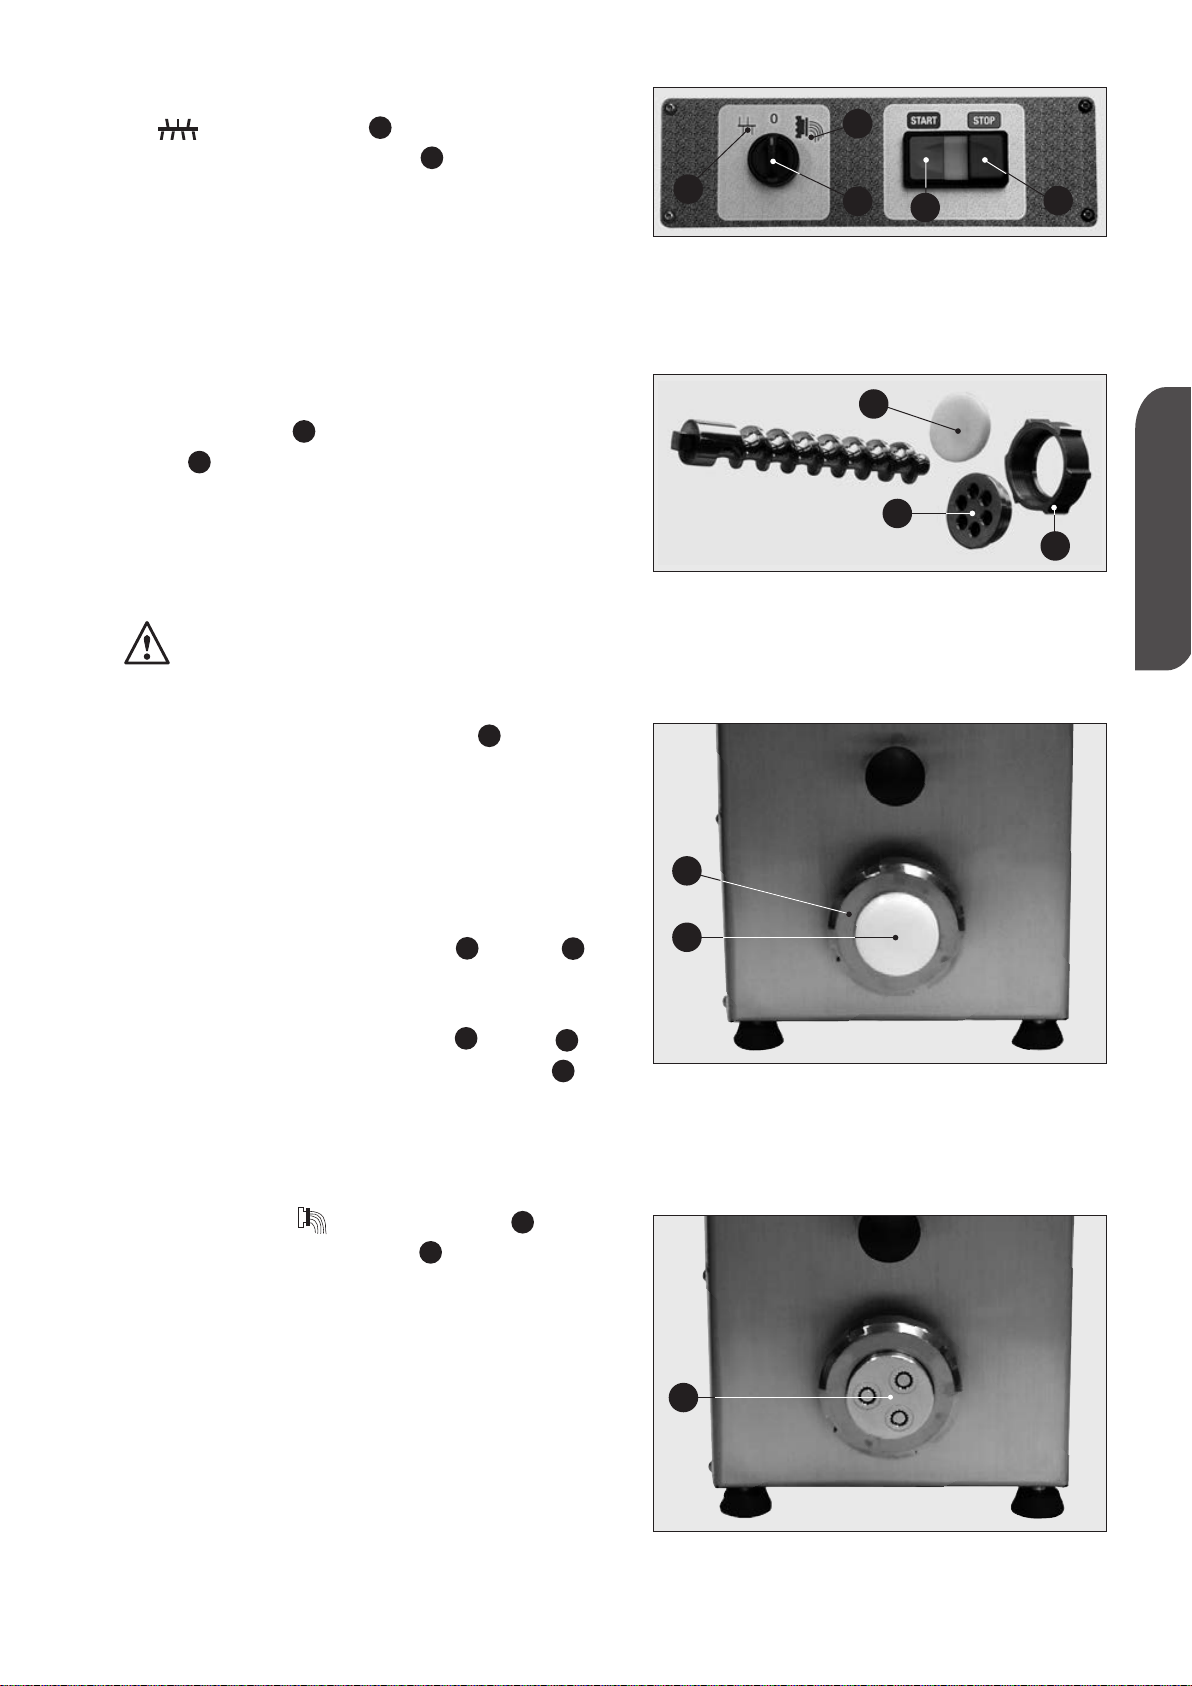
3.3 INSTALLATION OF THE DRAWPLATE
AND START-UP OF PRODUCTION
Make sure the machine is switched
off.
Withdraw the drawplate (Fig. 5 ) reque-
sted by the container filled with water where
it was put after its last use.
Thoroughly rinse with plenty of running
warm water in order to have the piece at the
right temperature (see chapter 6 CLEANING
page 25). Dry it with a soft cloth. Unscrew
the blocking ring nuts (Fig. 5 and 6)
and carefully clean the internal part inclu-
ding the edging.
Take the plastic cap off (Fig. 5 and 6).
Disassemble the drawplate (Fig. 7 ).
Screw in the ring nuts by hand and verify
that all the pieces are in their places and
that they are aligned along the axle.
In order to start production, position the
selector on the position (Fig. 4 ) and
push the start button (Fig. 4 ).
The initial product coming out of the machi-
ne has an unacceptable look; this is the rea-
son why it has to be eliminated.
After a short time (a couple of minutes) the
product coming out is acceptable, the
colour goes from whitish to yellow and it has
a greater thickness.
The cut of the pasta at the desired length
can be made by hand or by knife.
In the first case it is usually long length
B
D
A
C
B
B
A
A
E
C
B
A
Fig. 5
C
B
A
Fig. 6
Fig. 7
B
A
A
Fig. 4 - TR 70 Panel
C
D
A
B
E
Man TR ING:Man TR ING 6-08-2012 13:13 Pagina 23
24
noodles (spaghetti or tagliatelle) and in the
second case is especially short noodles
(macaroni, etc.).
If the product is quite wet and tends to be
sticky, it is best to dry the surface in any
case, by switching on the fan (Fig. 11 ,
only 75/E).
At the end of the operation:
• stop the machine by switching the selec-
tor to the “0” position (Fig. 11 ) and
then turn it on the kneading position
(Fig. 11 ) for 10-15 seconds so that the
pressure on the drawplate, caused by the
product itself, is eliminated;
• switch the selector to “0” (Fig. 11 ) or
push the Stop button (Fig. 11 );
• disassemble and wash the moving pieces
and clean the machine (see chapter 6
CLEANING page 25).
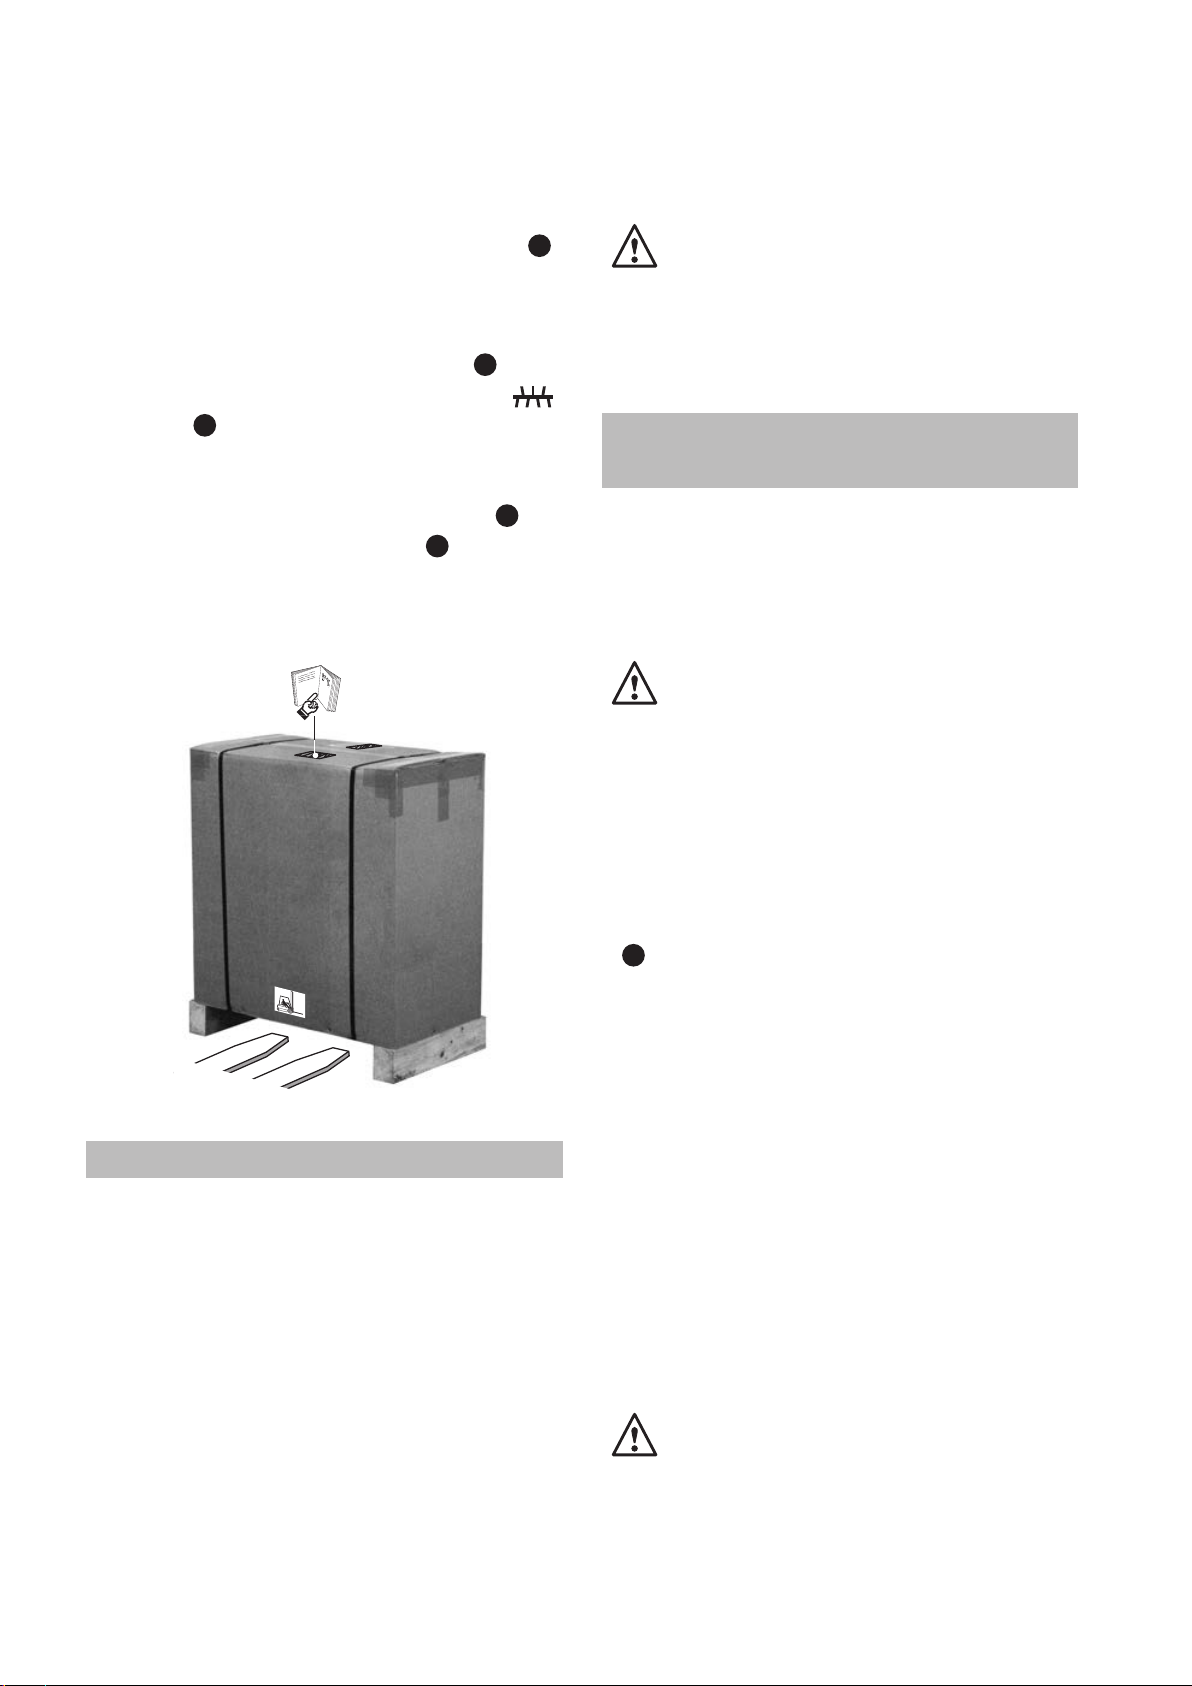
4. TRANSPORTATION AND HANDLING
The machine is forwarded contained in spe-
cial packaging which is securely closed
with bands (Fig 8).
Apart from the machine, you can find the
operating instructions and the conformity
declaration to the EC directive.
The machine has to be unloaded from the
means of transport, pulling it up and tran-
sporting it with a wheel-trolley.
Unless you need to check its contents, you
are recommended not to open the packing
until the moment of installation.
E
C
A
C
G
Remove straps, packing and polystyrene
strips. Dispose of this material according to
the regulations in force. Lift the machine
and place on the installation site.
Make sure that the bearing surface
of the machine is horizontal and
steady.
5. INSTALLATION, CONNECTION
AND SET-UP
Install and use the machine in a room that
can be efficiently ventilated, and where the
floor is smooth and compact and easy to
clean.
WARNING: During the machine’s
operation, in order to obtain a pro-
duct with the right thickness and
humidity, avoid air currents which will
cause precocious drying of the pro-
duct together with its deterioration.
In order to give the necessary stability to
the machine, check that the footers (Fig.
9) are securely attached to the floor;
otherwise, turn them to avoid instability.
Position the machine in the desired place
with a free back space of around 50 centi-
meters and a side space of 70-80 centime-
ters in order to guarantee easy use of the
machine and its cleaning (Fig. 10).
Please check that the voltage of the machi-
ne which is written on the identification
label, (see page 19) matches the one fore-
seen by the system on your premises.
Attach the right plug to the machine power
cable in order to make the electrical con-
nection to the system.
WARNING: (75/E) Have the plug fit-
ted to the power supply by quali-
fied personnel. Take the necessary
precautions to prevent the cable from
being crimped or damaged.
A
Fig. 8
Man TR ING:Man TR ING 6-08-2012 13:13 Pagina 24
50
cm
25
ENGLISH
After mating the plug to the mains socket,
the machine is ready for use.
First, however, check out proper operation
of all moving parts and components of the
machine.
5.1 CONTROL OF THE INSTALLATION
NOTE: Every drive is voluntarily run by
the start button, when the bowl
cover is closed (Fig. 12 ).
Verify that:
• In the “0” position (Fig. 11 ) all the ele-
ments of the machine have to stop; for
model TR 75/E, in the “drawplate position”
(Fig. 11 ) the mixer rotates in a clockwise
direction and the Archimedean screw must
rotate in the same direction (check through
the slots in the lid); for model TR 70, on the
other hand, in the “drawplate position”
(Fig. 11 ) the mixer rotates in a counter-
clockwise direction and the Archimedean
screw must rotate in the opposite direction;
in the “knead” position (Fig. 11 ) the
parts must rotate in the opposite direction.
If the machine or some of its parts fail,
call your local authorised dealer or
concessionaire for repairs.
6. CLEANING
Warning: For healthy and
hygienic processing of nutritio-
nal products, be sure to keep
your machine and the surroun-
ding environment clean.
DANGER: Always cut off power sup-
ply before cleaning.
You have to properly clean all the elements
which are in contact with the product; pro-
tection cover, pool, mixer, Archimedean
screw, drawplate, ring nut, when the pro-
duct is still soft.
A
D
D
C
F
Fig. 9
Fig. 10
A
Fig. 12
F
Fig. 11 - TR 75/E Panel
A
C
D
B
E
G
70÷80
cm
70÷80
cm
Man TR ING:Man TR ING 6-08-2012 13:14 Pagina 25

Fig. 14
26
The moving parts have to be disassembled
as follows:
• Mixer: make sure the external shovel is in
the upper vertical position (Fig. 13 )
(only this position allows the disassem-
bling of the piece).
For model TR 70: remove the mixer, pull
out the knob (Fig. 13 ) until the mixer
disengages;
for model TR 75/E: remove the mixer by
unscrewing the external mobile support
until the mixer disengages (Fig. 13 bis ).
Take the square shaft away from its place
(Fig. 13 ) and at the same time turn the
external end upwards. If you want to
assemble the piece follow these instruc-
tions vice versa. Line the central point of
the shaft with the peg of the moving sup-
port; then, leave the handle.
•Ring nut: (Fig. 13 ) and drawplate
(Fig. 13 ): unscrew the ring nut by hand,
avoiding pieces falling when the ring nut
comes out of its place, in order to avoid
causing damage both to people or to the
pieces themselves.
• Archimedean screw: (Fig. 13 ): after
disassembling the ring nut and the draw-
plate, the Archimedean screw can easily
be taken off from the machine by pushing
its spiral from the internal end.
6.1 COVER AND POOL CLEANING
Eliminate the dough residue and make sure
to thoroughly clean the most remote-access
pieces: connections of the Archimedean
screw and mixer movements (Fig 14), extru-
sion sleeve, cover and pool internal parts.
Use some warm water in order to eliminate
the residual product and then rinse; dry the
surfaces with the help of blotting paper.
WARNING: Never use non-nutritional,
abrasive or corrosive chemicals to
clean. Also never use coarse or abrasi-
ve objects such as steel wool, abrasive
sponges and so on.
To clean machine internal and external
parts:
F
E
D
C
A
B
A
Fig. 15
A
Fig. 13
D
F
A
E
B
C
Fig. 13 bis
A
Man TR ING:Man TR ING 6-08-2012 13:14 Pagina 26
27
ENGLISH
•remove power supply plug from power
mains socket;
•clean coated surfaces with soft cloth and
disinfect with alcohol;
•to clean internal parts of machine:
- turn the machine and lay it down on a
side;
-
clean the internal parts with the help of a
soft cloth and blow with a compressed air
jet.
CAUTION: Do not clean the tank lid
with alcohol or other solvents.
6.2 CLEANING OF THE ARCHIMEDEAN SCREW,
MIXER, RING NUT AND DRAWPLATE (Fig. 15)
Eliminate the dough residue and wash the
pieces with water; you may use a soft brush
or a plastic egg-slice.
These elements can be thoroughly washed
in a dishwasher. Rinse and dry the mixer, the
Archimedean screw and the ring nut and
reassemble them on the machine.
The drawplate (Fig. 15 ) is to stay in a
container with water when it is not in use.
For reasons of hygiene, please change
the water every day.
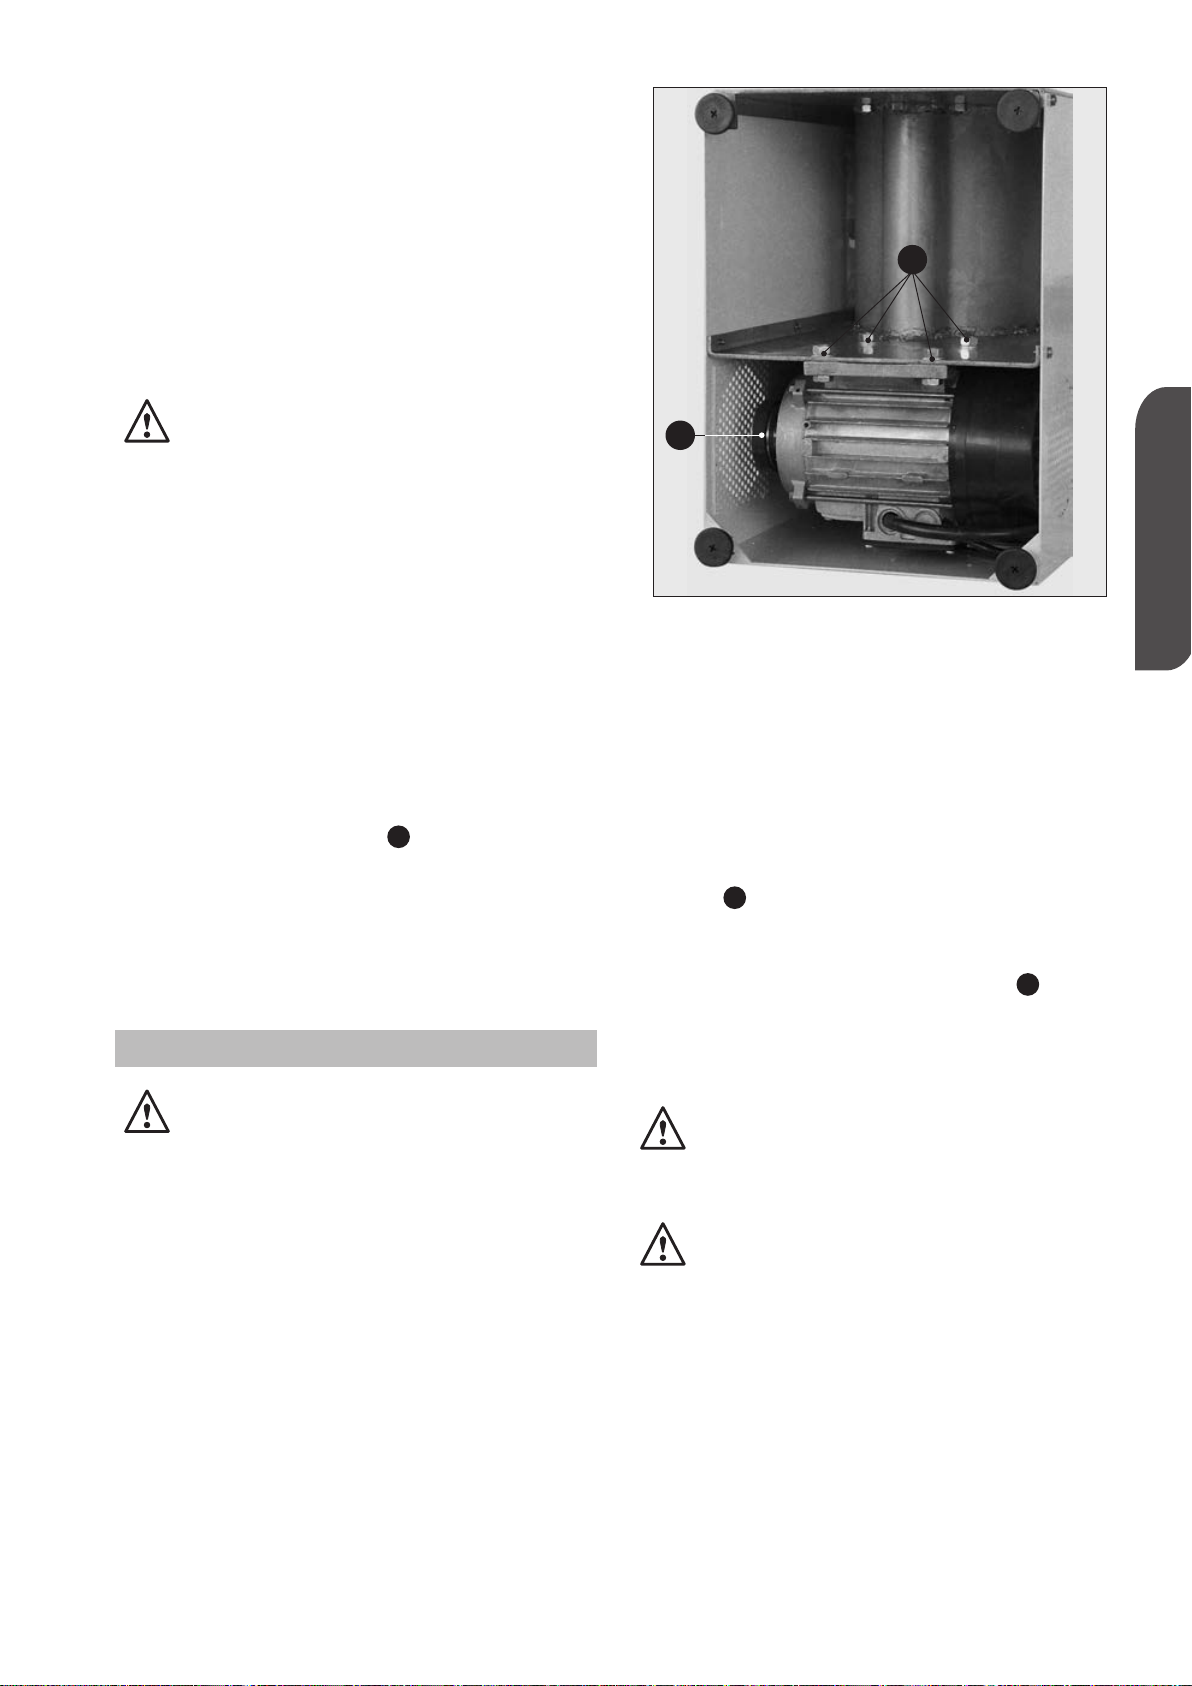
7. MAINTENANCE AND ADJUSTMENT
WARNING: Remember that all main-
tenance operations are hazardous if
you do not first disconnect the power
supply plug from power mains.
The points of the machine which need a
certain maintenance are the following: the
transmission gears, the dragging belt and
the mixer external support. Please carry out
the first maintenance after the first 100
hours and thereafter every 500 hours.
Mixer support: Use registered fats for foods
(USDA-H1) (in case of requirement contact
your local dealer).
Drive gears and chain: please use mineral
grease SAE MR3.
A
Fig. 16
A
B
7.1 BELT STRETCHING
When performing the abovementioned
maintenance or when the machine is not
working properly, (loss of rounds) verify the
correct stretching of the transmission belt
(Fig. 16 ). Put the machine on one side
and make sure that the belt is sufficiently
stretched. If necessary, unscrew the
blocking motor screws (Fig. 16 ) and
push it downwards and stretch the belt
without exaggerating; then re-block the
screws.
Never use the machine with any mis-
sing, disassembled or open guards
and shields.
If servicing operations require repairs
to electrical system and/or replace-
ment of bearings or mechanical com-
ponents, call an expert technician or
your local dealer.
B
A
Man TR ING:Man TR ING 6-08-2012 13:15 Pagina 27

28
8. MACHINE WHIRR
The whirring noise emitted by the machine has been measured on an identical sample
machine in compliance with standard DIN 45635. A constant value not exceeding 70_dB(A)
was measured as stated in the manufacturer’s test report.
9. DISMANTLING AND DEMOLISHING THE MACHINE
If machine needs to be dismantled and/or demolished, its components do not entail a
degree of danger that requires any particular precaution.
Remember, however, that to facilitate material recycling operations, it is a good rule to
remove electrical system components from the machine.
10. INCONVENIENCES AND THEIR REMEDIES
INCONVENIENCES CAUSES REMEDIES
1) Machine operation • disconnected plug • connect plug
failure • plug leads not • check lead connections
correctly connected
• trip switch adjusted • adjust trip switch
for insufficient values accordingly
• unsuitable trip switch • replace trip switch
• the security hook • position the hook
on the pool cover is not at the end of the run
inserted properly
2) Problems on the product:
The product gets stuck • dough too humid is used • reduce the quantity of
when being poured out water used for the dough
respecting the abovemen-
tioned percentage
The product looks • too short kneading time • increase the kneading time
unacceptable even after • too reduced water • increase the quantity of
the initial minutes: it percentage water in order to respect
breaks and looses flour the aforementioned
percentage
The product does not come • the blocking of the drawplate • disassemble and clean
out from the drawplate because of dried dough the drawplate
INFORMATIVE REPORT TO THE CUSTOMERS
according to the art.13 of Decree Legislative 25 July 2005, n.151 “Performance
Directives 2002/95/CE, 2002/96/CE and 2003/108/CE, relative to the reduction of the use
of dangerous substances in the electronic and electrical equipment, let alone to dispos-
al of the refusals”.
The symbol of the crossed bin brought back on the equipment or its packing indicates that the product at
the end of its own life cycle must be collected separately from the other refusals. The differentiated collec-
tion of the present equipment at the end of its life cycle is organized and is managed from the distributor.
The customer who want to unravel itself the present equipment will have therefore to contact the distribu-
tor and follow the system that he has adopted in order to concur the separate collection of the equipment
at the end of its life cycle. The adapted differentiated collection for the successive start of the cast-off
equipment to the recycling, to the treatment and to the compatible with environment disposal contributes
to avoid possible negative effects on the atmosphere and the health and favours the re-employment
and/or the recycling of the materials of which the equipment is made. Illicit disposal of the product by the
holder involves the application of the previewed administrative endorsements from the enforced norm.
EN 50419
Man TR ING:Man TR ING 3-08-2012 9:18 Pagina 28
This manual suits for next models
1
Table of contents
Other Gastrodomus Cooking Equipment manuals


