GBA ST2 User manual

GBA
Global Bill Acceptors
GBA ST2
Operations Manual
Page 1 of 25
Astrosys International Ltd
January 200
GBA ST2 Op Manual V1.01
GBA ST2
Operations Manual

GBA
Global Bill Acceptors
GBA ST2
Operations Manual
Page 2 of 25
Astrosys International Ltd
January 200
GBA ST2 Op Manual V1.01
Contents:
Introduction 3
Product Information 4
General Specifications 4
Product Assembly 4
Build Options 5
Mechanical Configuration 6
Faceplate & Bezel Fitting and Removal 6
Note Guide Fitting and Removal 6
Note Guide Plate Fitting and Removal 6
Interface Protocols 7
NAMA MDB 7
ccTalk® 7
Software Configuration 8
On Board Push Button 8
PC Based Tools
USB Download 11
Software Configuration Options 11
Mechanical Installation 14
lectrical Interface Specifications 15
Power 15
Outputs 15
Environmental 16
lectrical Connections 17
Maintenance 1
Cleaning 1
Jam Clearance 1
Diagnostics and Troubleshooting 20
Diagnostics 20
Troubleshooting 21
Dimensional Drawings 22
Revision Data and Contact Details 25

GBA
Global Bill Acceptors
GBA ST2
Operations Manual
Page 3 of 25
Astrosys International Ltd
January 200
GBA ST2 Op Manual V1.01
Introduction:
This manual describes the operation and basic servicing of the GBA ST2 note validator. It is
intended to assist the user in the set-up, installation and operation of the product.
If you have any questions about this or any other Astrosys International products then please visit
our web sites at www.globalbillacceptors.com and www.microcoin.com, or contact your local sales
office for assistance (see last page).
The GBA ST2 has been specially designed to retrofit into all applications previously served by the
GBA stacker less product range. It is also designed for the rigours of the amusement and gaming
markets and can be used in all applications. The following features are also offered:
• Sense Technology note discrimination
• Up to 32 note x 4 way acceptance
• Accepts notes from 61 to 85mm wide (and up to 170mm in length)
• Escrow
• Simple configuration using Programming Card or PC software
• Internal Optical and Mechanical Anti String protection as standard
• 12V (+/- 10%) operation
• Easy access to note path for servicing and cleaning
• On board tri-colour diagnostic LED
• Automatic calibration of optical sensors
• Automatic temperature compensation
•
Blue illuminated runway note guide fitted as standard
•
Various faceplate and bezel options to suit host machine
• Manufactured to ISO 001 standards
• RoHS compliant

GBA
Global Bill Acceptors
GBA ST2
Operations Manual
Page 4 of 25
Astrosys International Ltd
January 200
GBA ST2 Op Manual V1.01
2.0 PRODUCT INFORMATION
2.1 General Specifications
Bill Insertion: Up to 32 bill denominations with 4 way insertion
Bill Dimensions: 61 to 85mm wide; up to 170 mm long
Bill Acceptance Rate: Typically greater than 8%
Cycle Time for Validation: Approximately 2 seconds
Interface Protocols Supported: Pulse, Parallel, cctalk
®
(plain & encrypted), bi-direction
serial (“RS232”), NAMA MDB, SSP
Power Supply: 12Vdc +/-10% (Note: Tip positive for the DC power
supply jack)
Power Consumption (Validating): 800mA @ 12V
(Idle): 200mA @ 12V
Environmental Range (Operating Temp): 0° to 60°C
(Operating Hum): Up to 5% R.H., non-condensing
(Storage Temp): -10° to 65°C
2.2 Product Assembly

GBA
Global Bill Acceptors
GBA ST2
Operations Manual
Page 5 of 25
Astrosys International Ltd
January 200
GBA ST2 Op Manual V1.01
2.3 Build Options
2.3.1 Note Guide
Note guides are available in an illuminated, flashing style. The note guide can be configured in a
number of options, to provide specific information to the user / technician. Note guides of specific
widths are fixed to the note guide common assembly and to the internal path of the lower sensor
assembly, to suit particular currencies. For information about the most appropriate design for your
currency please contact your local regional office.
2.3.2 Faceplate / Bezel options
Faceplates and bezels are available in four styles, to suit the host machine, please see details
below. Please note that for currencies containing note denominations over 82mm, the Wide
Compact Bezel must be used.
2.3.3 Standard Faceplate 2.3.3 Compact Bezel
2.3.3 Standard Bezel 2.3.3 Wide Compact Bezel
2.3.4 Interface Cable Assembly
The GBA ST2 is fitted with a 20 pin interface connector. All interfaces, with the exception of NAMA
MDB, utilise this connector for communication to a host machine. For further details relating to
interface and connection information, please refer to section 8.0 – Electrical Connections.
GBA
Global Bill Acceptors
GBA ST2
Operations Manual
Page 6 of 25
Astrosys International Ltd
January 200
GBA ST2 Op Manual V1.01
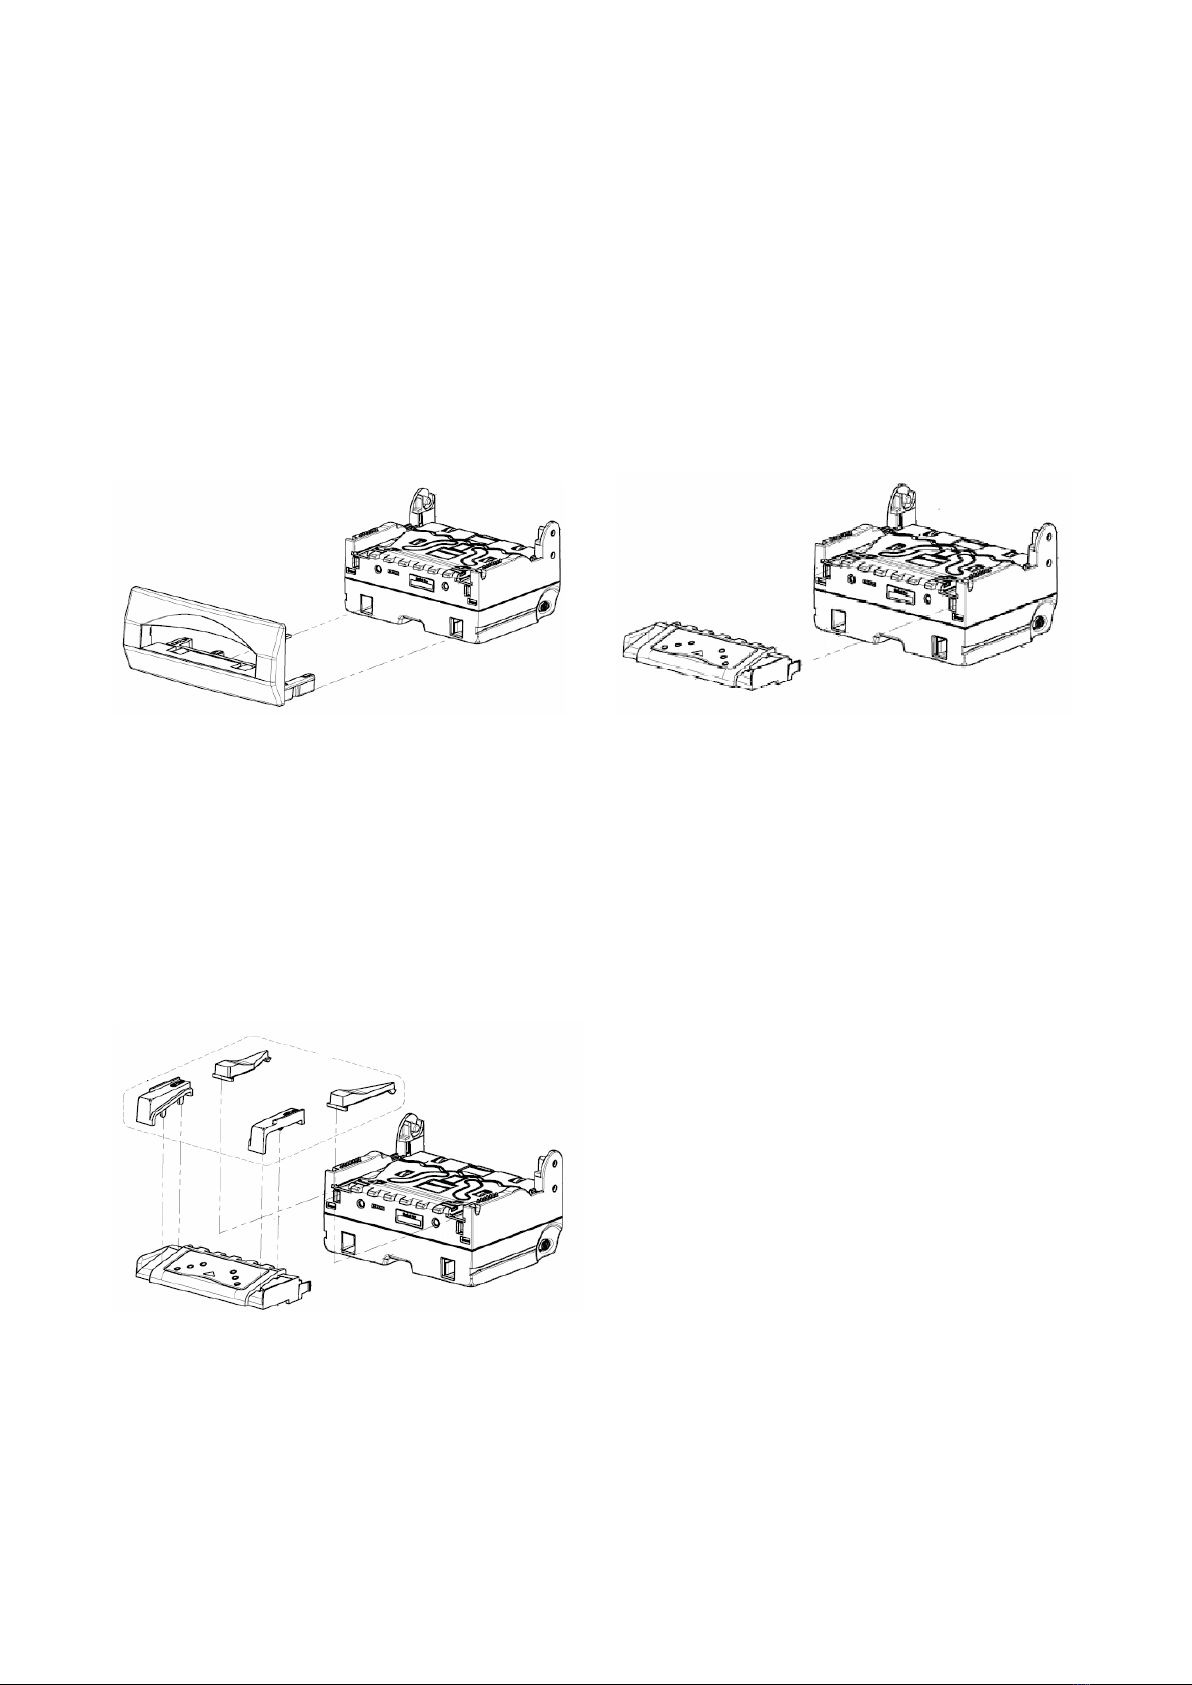
3.0 M CHANICAL CONFIGURATION
3.1
Faceplate and Bezel Fitting / Removal
Refer figure 3.1.1
To remove the faceplate / bezel, gently push the two purple bezel retainer buttons inwards until
they are in contact with the validator. With these depressed, pull on the faceplate / bezel to
remove from its locking stage. To fit the faceplate / bezel, simply insert the two black locating legs
into the holes and push fully until you hear a loud clipping sound. Pull fully on the faceplate / bezel
to ensure correct fitment.
3.1.1 - Images of faceplate fitment 3.1.2 - Image of note g ide fitting
3.1.2 Note Guide Fitting / Removal
Refer figure 3.1.2
To remove the note guide first remove the faceplate / bezel. Push together the two sides of the
note guide and pull away from the validator. To fit the note guide, please ensure that the four pins
locate fully into the four connection holes, then push the note guide so the clips are secure.
3.1.3 Note Guide Plate Fitting / Removal
3.1.3 – Image of note plate fitting
The note guide uses note guide plates to aid insertion of the notes inserted. As listed above, these
are available in a number of sizes, dependant on currency required. To remove these from the
GBA ST2 you will first need to remove the note guide as per 3.1.2. To remove the plates, push
down on the side of the plate and (if looking at side of note guide) twist it away from the note guide.
To refit the note plate, insert the two location legs into the holes and push down.

GBA
Global Bill Acceptors
GBA ST2
Operations Manual
Page 7 of 25
Astrosys International Ltd
January 200
GBA ST2 Op Manual V1.01
4.0 INT RFAC PROTOCOLS
The GBA ST2 can communicate with a host (machine) via one of five base interface protocols.
These protocols are; NAMA MDB, pulse, parallel, cctalk
®
and bi-directional serial (“RS232”).
Variants to some of these protocols are also available, please contact your regional office for
further details.
The product is connected to the host using an appropriate interface cable assembly. With the
exception of MDB the GBA ST2 will be connected to the host machine using a cable assembly
terminated with a 20-way connector, as denoted in section 8.0 – Electrical Connections.
4.1 NAMA MDB
If the GBA ST2 is used in an MDB interface application, an additional interface cable assembly is
required to connect to a standard NAMA 6 pin connector. Please contact Technical Support for
details.
4.2 CCTALK
®
INT RFAC
If the validator is used in a ccTalk
®
interface application, an alternative 20 pin harness is required.
Part Number: ASY-W-10265.
Please contact Technical Support for details.
For further details relating to the operation of specific interfaces please refer to the Interface
Description Manual.

GBA
Global Bill Acceptors
GBA ST2
Operations Manual
Page 8 of 25
Astrosys International Ltd
January 200
GBA ST2 Op Manual V1.01
5.0 SOFTWAR CONFIGURATION
5.0 - Image ill strating top of ST2
The GBA ST2 can be configured using either the on-board push button, USB memory stick, or via
a Windows based PC package – GBA Tools.
5.1 ON-BOARD PUSH BUTTON
The on-board push button is located on purple lid of the unit, next to the diagnostics LED. This
push button will allow access to on-board programming modes including note enable, note disable
and Primary Calibration / Configuration. A single long press of more than 2 seconds will cancel the
programming mode. In the note enable and disable modes a sample note must then be presented
for scanning. If the operation is successful the validator will return to normal operation mode. If it
is unsuccessful, it will remain in the program mode. If the push button is held for more than 5
seconds an error is reported (LED solid red).
5.1.1 Configuration Procedure – nable Note
Procedure:
1. Push button x 1, the diagnostic LED will flash green rapidly.
2. Insert the specific denomination required to be enabled.
3. The GBA ST2 will take the note in and then return it.
4. Enable complete. The diagnostic LED will return to solid green.
5.1.2 Configuration Procedure – Disable Note
Procedure:
1. Push button x 2, the diagnostic LED will flash red rapidly.
2. Insert the specific denomination required to be disabled.
3. The GBA ST2 will take the note in and then return it.
4. Disable complete. The diagnostic LED will return to solid green.

GBA
Global Bill Acceptors
GBA ST2
Operations Manual
Page of 25
Astrosys International Ltd
January 200
GBA ST2 Op Manual V1.01
5.1.3 Configuration Procedure – Programming Card
quipment Required;
Program Card. (PC software is available to print these cards. Please consult your local sales
office)
Procedure;
1. Push button x3, the diagnostic LED will flash orange rapidly.
2. Insert the Program Card into the reader.
3. The Program Card will be taken into the validator and held for a small period of time, then
returned in one smooth movement
4. Configuration is complete.
Note:
Please ensure the programming card has been printed on a high quality printer with good
solid black lines on the card.
5.1.4 Configuration Procedure – Re-Calibration
Although calibration of the GBA ST2 is not a necessity it is recommended periodically for
preventative maintenance, and also after any change to the software configuration of the unit.
quipment Required:
Calibration Paper.
Procedure:
1. The push button is located on the purple lid of the unit
2. Push button x3, diagnostic LED will rapidly flash orange.
3. Insert the Calibration paper into the reader.
4. The reader will draw in the paper until it reaches the internal string gate. At this point it
will hold the paper momentarily before it is returned in several movements.
5. Remove the calibration paper from the note entry point.
6. Calibration is complete.
Note:
Please ensure the ST2 calibration paper has 2 chamfered corners. The part number for
this is ASY-W-10268
5.2 PC BAS D GBA TOOLS
The GBA ST2 can also be configured using PC based software, GBA Talk. This software also
provides calibration and diagnostic functions.
NB for full instructions on the GBATalk software package refer to the GBATalk Manual.

GBA
Global Bill Acceptors
GBA ST2
Operations Manual
Page 10 of 25
Astrosys International Ltd
January 200
GBA ST2 Op Manual V1.01
5.2.1 Configuration Procedure – GBA Talk PC Software Calibration
quipment required;
GBA ST2 Calibration paper
GBA Talk Kit, consisting of PC software, Diagnostic harness and 20 pin harness.
Note: the 20 pin harness m st contain a 4 pin socket connected to pins 18 and 20.
Procedure;
1. Clean Validator Bill path
2. Apply power to the Validator and connect it to a PC running the Talk software. This is done
utilising the Astrosys International diagnostics harness.
3. Press upload data button to confirm connection.
4. Click on Calibrate button and follow on screen prompts.
5. Any errors will be notified to the user.
If errors occur, disconnect the unit and re-apply power, then start from point 3.
NB. The GBA ST2 is factory calibrated and should only require re-calibration after the on-
board software or firmware has been changed or following modification to the configuration
of the unit via a programming card or GBATalk Tools. In general, re-calibration of the unit
should be carried out once every 6 months in normal conditions. When the note acceptor is
located in areas that are particularly smoke filled or dusty, re-calibration should be carried
out more frequently.
5.2.2 Configuration Procedure – GBA Talk PC Software Configuration
quipment Required;
GBA Talk Kit, consisting of PC software, Diagnostic harness and 20 pin harness.
Note: the 20 pin harness m st contain a 4 pin socket connected to pins 18 and 20.
Procedure;
1. Connect the GBA ST2 to the PC by placing the diagnostic harness into the DB connector
of the PC, and the 4 pin connector into the 4 pin plug of the 20 pin harness.
2. With GBA Talk open, select “Upload” to see on screen the current configuration of the
validator.
3. Make the required changes by using the drop down menus, then select the “Set All” button
to send changes to the validator.
4. To complete the procedure, carry out the calibration process by selecting “Calibrate” from
the Calibration window.
Table of contents
Other GBA Bank Note Validator manuals


