GBlife TS-8210 User manual
Gblife TS-8210 Wireless Weather Station
User Manual
1. Introduction
Thank you for your purchase of the Gblife TS-8210 Colorful LCD Wireless Professional Weather
Station with Thermo-hygrometer .The following user guide provides step by step instructions for
installation, operation and troubleshooting.
2. Getting Started
Note: In order to enable better and faster matching of indoor and outdoor signals, please turn on
the remote sensor first, then the indoor weather station. If you turn on the base station first, the
outdoor data will not display properly, please long press CHANNEL/+ button to receive the
outdoor signal manually.
NOTE: This weather station can only match and display one outdoor sensor, multi-channel
switching is not supported.
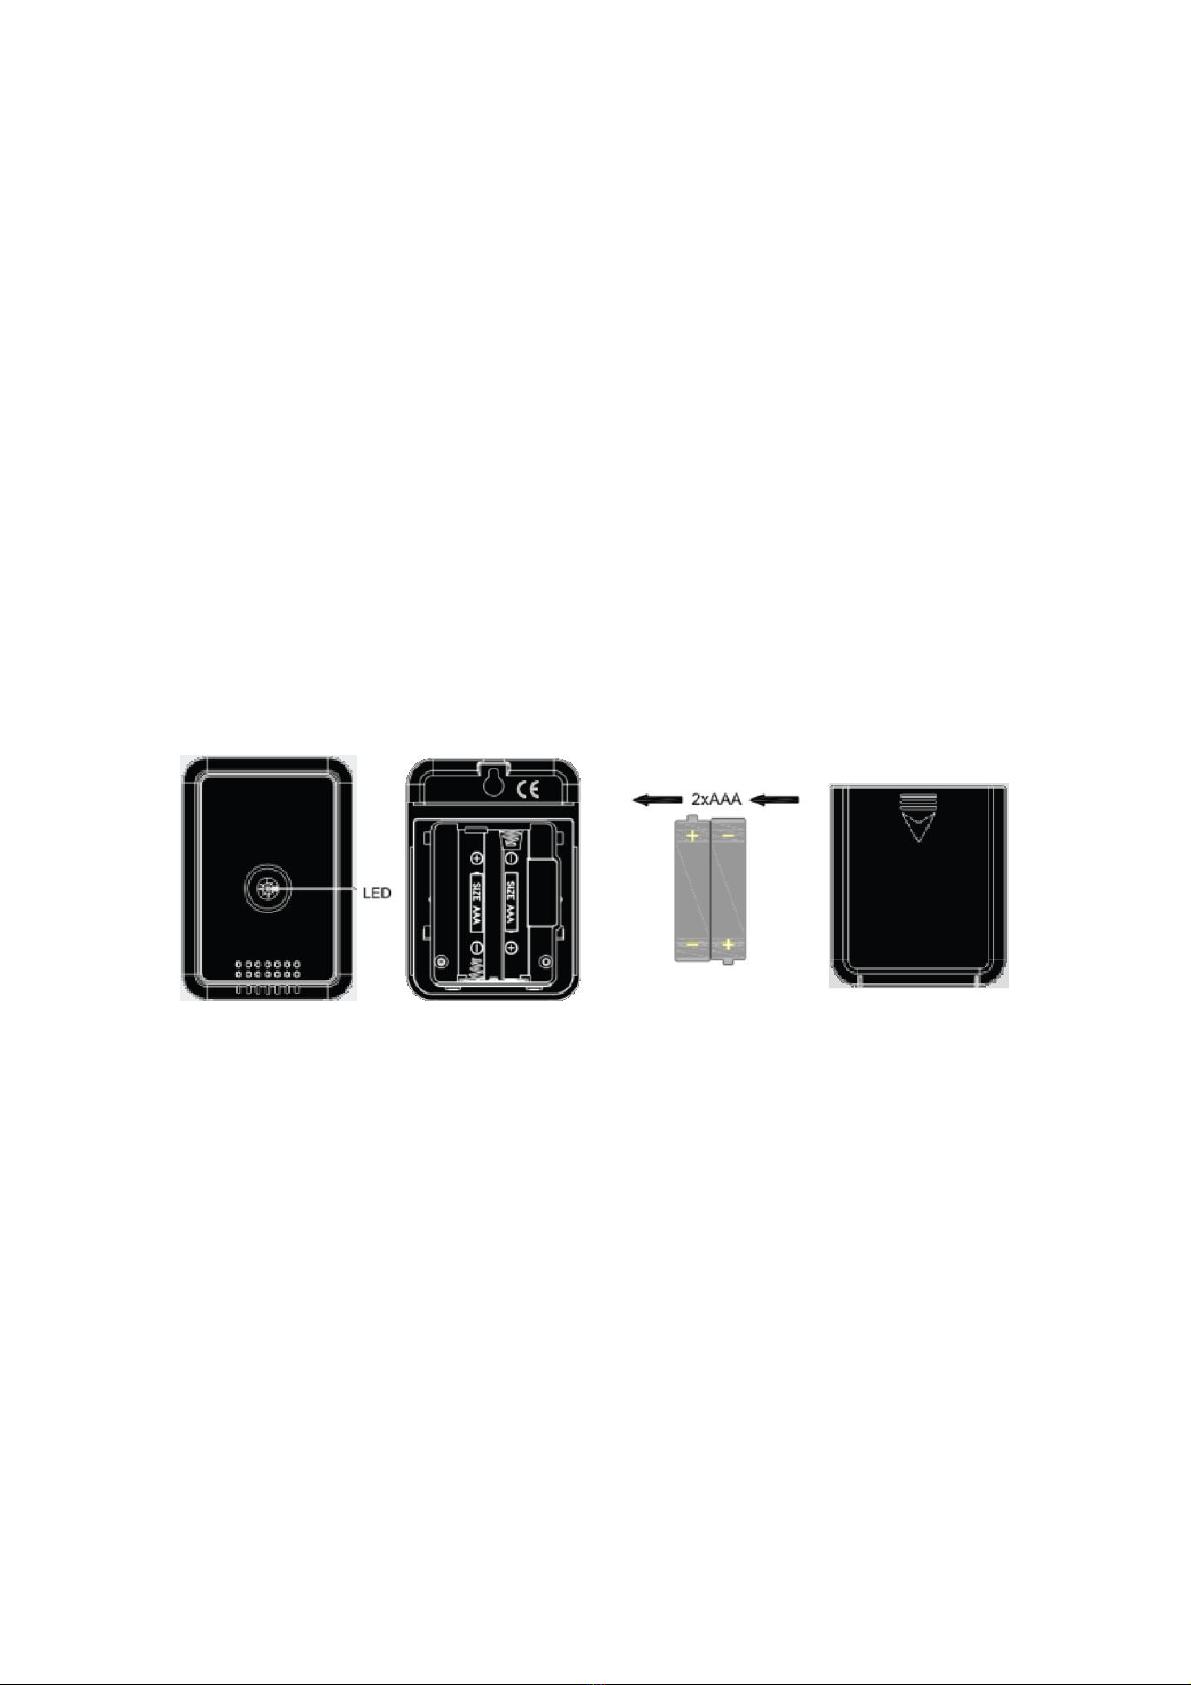
2.1 Remote Sensor Set Up
Note: To avoid permanent damage, please take note of the battery polarity before inserting the
batteries.
Figure 1
Push the battery cover away in the direction of the indicated arrow, as shown in Figure 1. Insert
two fresh AAA batteries (with the negative terminal of the battery in contact with each spring).
Lithium batteries are recommended for cold weather environments. Close the battery cover. The
LED shown in Figure 1. will light up (visible through the plastic).
2.2 Indoor Machine Screen Display
2.2.1 Screen Layout(Figure 2.)
Note: The following illustration shows the full segment LCD display for description purposes
only and will not appear like this during normal operation.
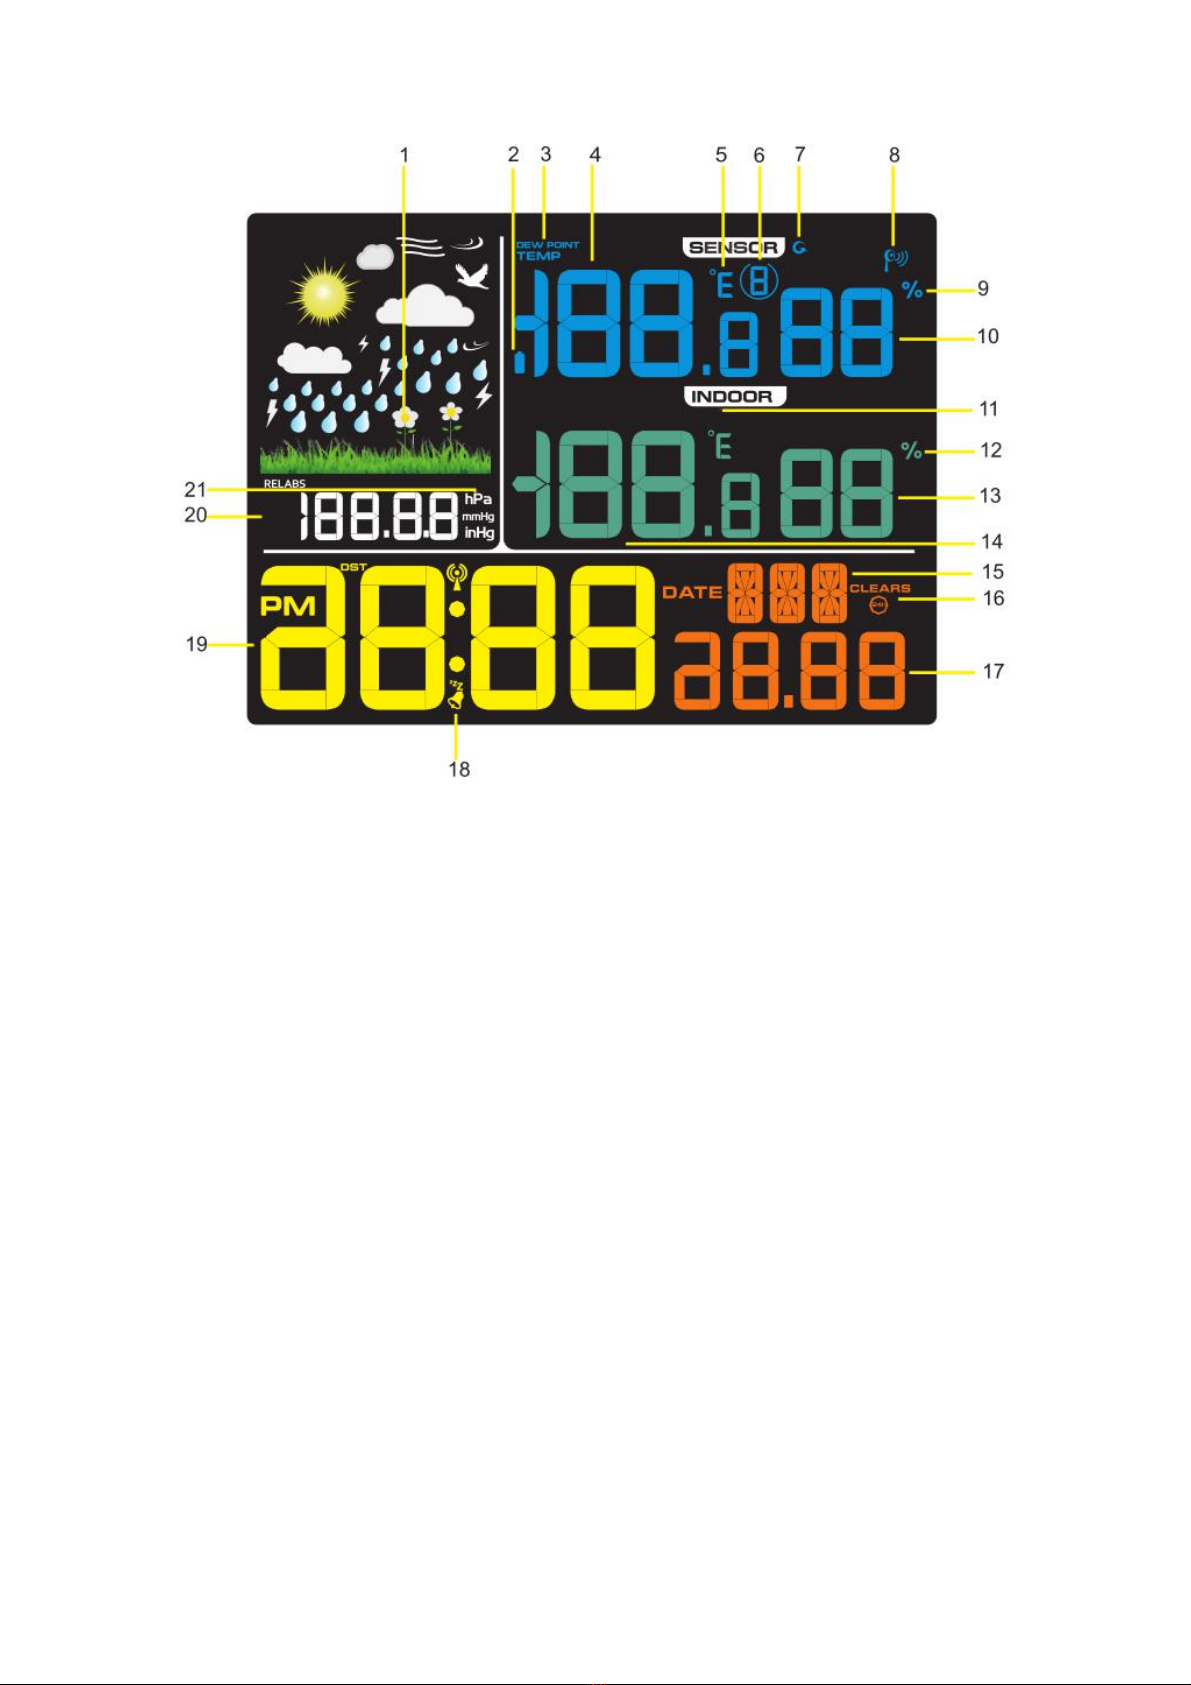
Figure 2
1. Weather tendency indicator
2. Sensor Low power indicator
3. Dew point and temperature display
4.Outdoor temperature display
5.Outdoor Temperature units (°F or °C)
6.Channel indicator
7.Scroll mode indicator
8. Remote Symbol Signalsuche
9. Outdoor Humidity units of measure (%)
10. Outdoor humidity display
11.Indoor Temperature units (°F or °C)
12. Indoor Humidity units of measure (%)
13. Indoor humidity display
14. Indoor temperature display
15.week or second
16.Clear for 24h icon
17.Year or date
18.SNOOZE Flashing Time sleep
19. Time
20. Pressure (REL and ABS) display
21.Pressure measure units
2.2.2 Indoor Machine Initial Set Up
NOTE: The weather station can be powered by 3*AAA batteries(not inclueded) or a USB
cable(included).
1. Remove the battery cover on the back of the unit as shown in Figure 3.
2. Insert three AAA batteries in the back of the unit. The machine will beep once and all of the
LCD segments will light up for a few seconds to verify all segments are operating properly. The
screen will cycle through a spectrum of colors.
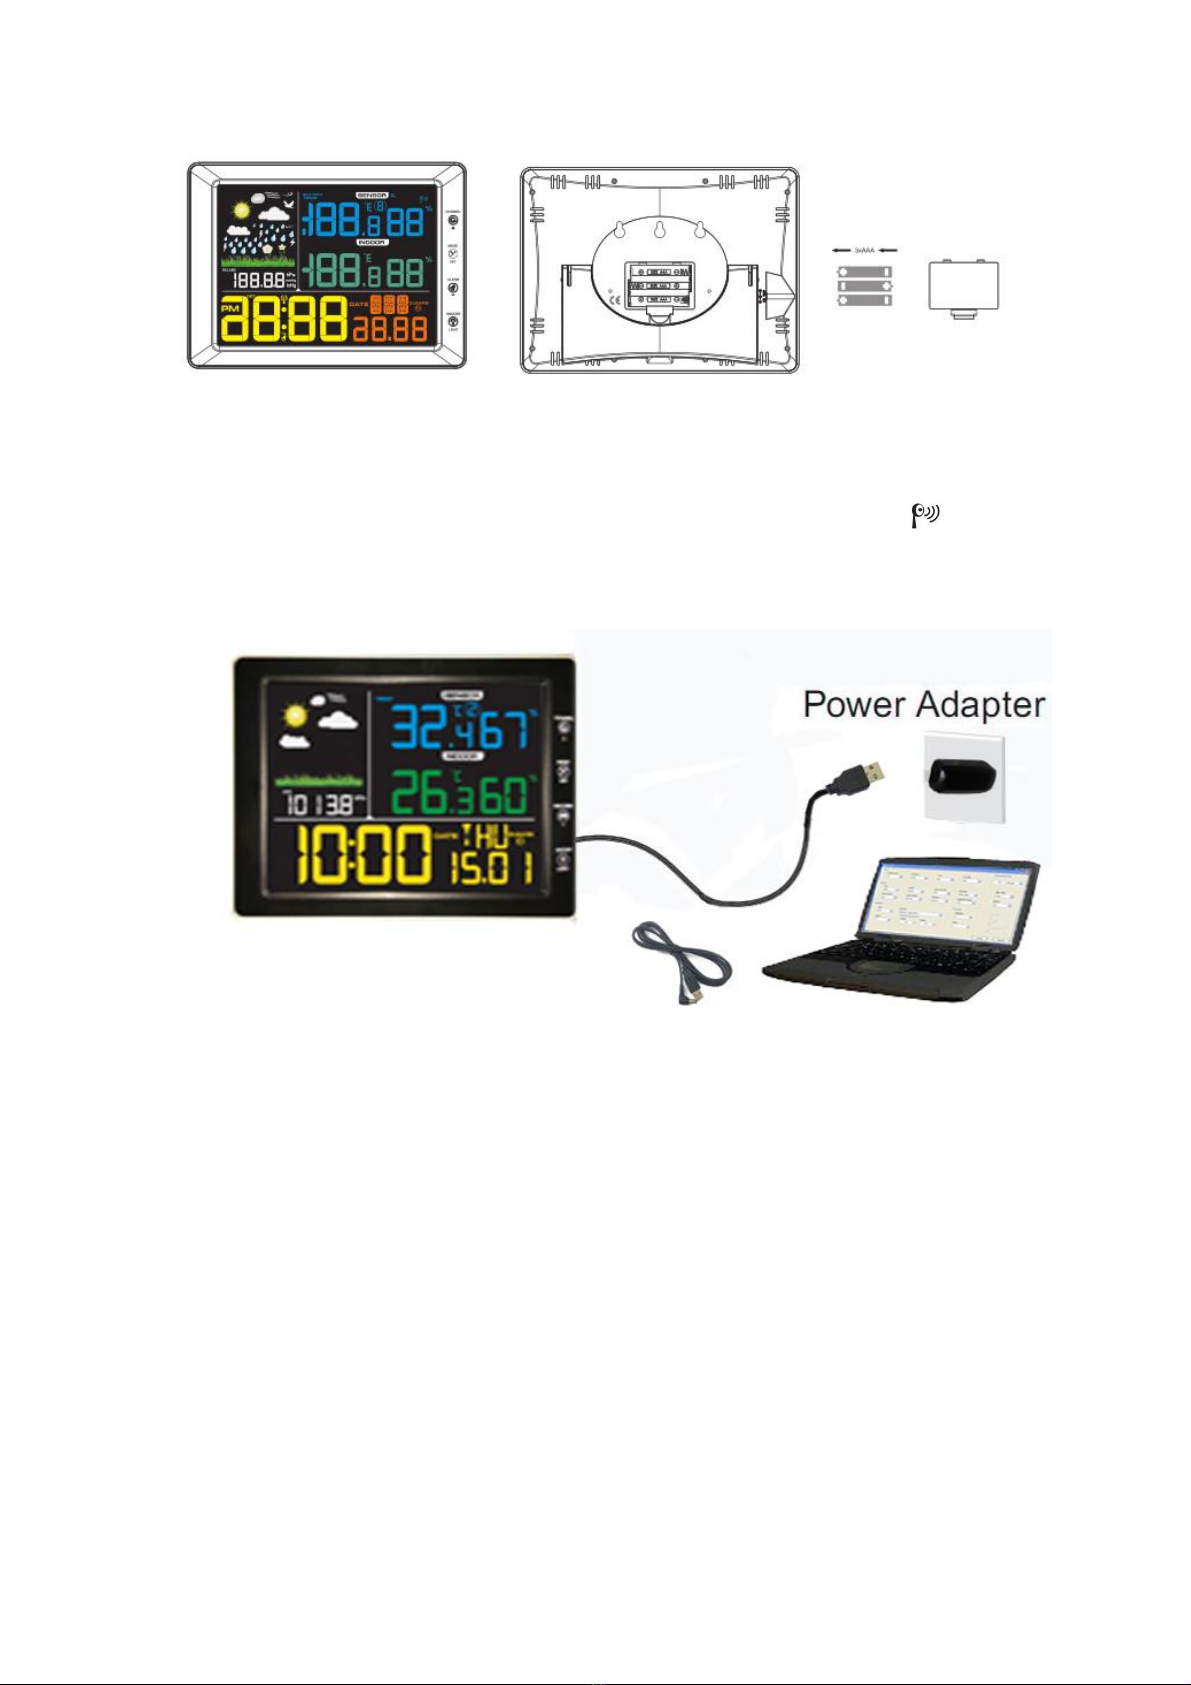
Figure 3
The screen will instantly display indoor temperature, humidity, pressure, weather tendency, and
time. The outdoor temperature and humidity will update on the display within a few minutes. Do
not touch any menu buttons until the outside transmitter reports in, otherwise the outdoor sensor
search mode will be terminated(While in the search mode, the remote search icon will be
constantly displayed). When the outdoor transmitter data has been received, the screen will
automatically switch to the normal mode from which all further settings can be well performed.
The USB power cord is to used to connect with USB power adaptor as shown in Figure 4.
Figure 4
3. Remote Sensor Installation
It is recommended that you mount the remote sensor outside in a shaded area. A north facing wall
is preferred because it is in the shade most of the day. Direct sunlight and radiant heat sources will
result in inaccurate temperature readings.
Although the sensor is water resistant, it is best to mount in a well protected area, such as under an
eve. Use a screw or nail (not included) to affix the remote sensor to the wall as shown in Figure 5.

Figure 5
4. Low Battery Icon
A low battery indicator icon will be shown on the screen when the remote sensor battery is about
to run out. When the icon appears (the battery voltage is lower than 2.4V), replace the batteries
in the sensor with fresh batteries. Be sure to never mix old and new batteries, and never mix
battery types such as alkaline and lithium together.
5. Screen Display Operation
There are total of 4 control buttons on the front of the machine: Channel/+,MODE/SET,
MIN/MAX/-, and LIGHT/SNOOZE.
5.1 Quick Display Mode
While in Normal Mode, touch (do not hold) the SET(MODE) to toggle between week/second,
outdoor temperature/Dew Point, ABS/REL pressure display, and normal time display/alarm time
display mode.
1. The First Touch: toggle between Week and Second display (default: week) : “Week” value
starts flashing, touch(do not hold) the MAX/MIN/- or CHANNEL/+ choose your desired display
mode. Press the SET(MODE) to accept the change and advance to the next display mode.
2. The Second Touch: toggle between outdoor temperature and DEW POINT(default:
temperature): “TEMP” starts flashing, touch(do not hold) the MAX/MIN/- or CHANNEL/+ to
choose Temperature or Dew Point displayed on the screen. Press the SET(MODE) to accept the
change and advance to the next display mode.
3. The Third Touch: toggle between ABS(Absolute Pressure) and REL(Relative
Pressure)(default: absolute): “ABS” starts flashing. Touch(do not hold) the MAX/MIN/- or
CHANNEL/+ to choose ABS value or REL displayed on the screen. Press the SET(MODE) to

accept the change and advance to the next display mode.
4. The Forth Touch: Touch(do not hold) the SET key once to view alarm time value. Press the
SET(MODE) to accept the change and end the whole setup process.
NOTE: No operation for 15 seconds the machine will return to normal display mode.
5.2 Set (Program) Mode
While in Normal Mode, Touch and Hold the SET(MODE) key for at least three seconds to enter
the Set Mode. The first setting will begin flashing. You can touch the SET(MODE) again to skip
any step, as defined below.
Note: In the Set mode, touch the [+] key or [-] key to change or scroll the value. Hold the [+] key
or [-] key for three seconds to increase/decrease rapidly.
Note: To exit the Set mode at any time, please touch the SNOOZE/LIGHT button on the unit.
1. 12/24 Hour Format (default: 24h):. touch the SET(MODE) again to adjust the 12/24 hour
format setting (FMT). touch the [+] key or [-] key to change between 12 hour and 24 hour
format.
2. Change Hour. Touch the SET(MODE) again to set the hour. Touch the [+] key or [-] key to
adjust the desired hour.
3. Change Minute. Touch the SET(MODE) again to set the minute. Touch the [+] key or [-]
key to adjust the desired minute.
4. Date Format (default: MM-DD): Touch the SET(MODE) again to enter the day/month
format mode. Touch the [+] key to switch between MM-DD-YY, DD-MM-YY.
5. Change Month . Touch the SET(MODE) key again to set the calendar month. Touch the [+]
key or [-] key to adjust the calendar month .
6. Change Day. Touch the SET(MODE) again to set the calendar day. Touch the [+] key or [-]
key to adjust the calendar day.
7. Change Year. Touch the SET(MODE) again to set the calendar year. Touch the [+] key or [-]
key to adjust the calendar year.
8. Hour Alarm (default: 12:00,off). Touch the SET(MODE) again to set the alarm hour(ALM).
Touch the [+] key or [-]key to adjust the desired alarm hour. In the meantime, touch and
hold for 3s the SET(MODE) and the alarm will turn on or off. The alarm icon will
appear when set, and disappear when disabled.
9. Minute Alarm. Touch the SET(MODE) key again to set the alarm minute (ALM). Touch
the [+] key or [-]key to adjust the desired minute.
10. Temperature Units of Measure (default: °C):. Touch the SET(MODE) again to change the
temperature units of measure (the UNIT SET icon will be displayed). Touch the [+] key or [-]
key to switch between °F and °C units of measure.
11. Barometric Pressure Display Units (default: hPa). Touch the SET(MODE) again to
change the pressure units of measure. Touch the [+] key or [-] key to toggle the pressure units
between mmhg, inHg or hPa.
12. Max/Min Clearing (default: ON). Touch the SET(MODE) again to set the max/min
clearing mode (CLR). The Max/Min can be programmed to clear daily (at midnight) or
manually. Touch the [+] key or [-] key to switch between “Clears 24h” and Clears Manually.
13. Weather Forecast Icon Setting (default: partly cloudy). Touch the SET(MODE) again to
set the weather forecast icon initial conditions (based on the current weather conditions).
Touch the [+] key or [-] to toggle weather icons between sunny, partly cloudy, cloudy, or rainy.
Press SET(MODE) again to accept the change and advance to the next display mode.
14. Pressure Threshold Setting (default level 2). Touch the SET(MODE) again to adjust the
Pressure threshold setting(the 2-4 will be displayed in the pressure field). Touch [+] key or [-]
key to adjust the pressure threshold setting up or down.
15. Storm Threshold Setting (default level 4). Touch the SET key again entering into the storm
threshold setting (the 3-9will be displayed in the pressure field). Touch the [+] key or [-] key
to adjust the storm threshold up or down. Touch SET(MODE) again or wait 15 seconds for
timeout to return to normal display mode.

5.3 Sensor Search Mode
To reacquire the lost signal, touch and hold the CHANNEL/+ button for 3 seconds to enter the
sensor search mode.
5.4 Snooze Mode
When the alarm goes off and alarm icon flashes, touch the SNOOZE/LIGHT key to
temporarily silence the alarm for five minutes.
The snooze icon will continue to flash , after five minutes, the alarm will go off again. This
will continue until the alarm is turned off. Touch any key (MODE/SET, Min/Max/-
,CHANNEL/+) to permanently exit the Snooze mode.
5.5 Max/Min Mode
In normal mode press MAX/MIN key once to view max records of temperature and humidity,
MAX icon will display. Press MAX/MIN key again to view min records of temperature and
humidity, MIN icon will display. Press MAX/MIN key the third time to return to normal mode.
NOTE: In normal mode, press and hold Min/Max key three second to switch between °F and °C
units of measure.
Note: In Max/Min mode, there is no response if press CHANNEL/+ or MODE/SET. Press
SNOOZE/LIGHT to return to normal mode.
5.6 Adjustable Backlight and Sound Control
Adjustable Backlight (high-light,mid-bright,low-bright)
There are three levels of brightness of the backlight.
When backlight is on, touch the SNOOZE/LIGHT key to choose from high, mid and low backlit
lighting.
Sound Control Mode
When the backlight is off, sound over 90 dB within one meter of distance will activate backlight
for 10 seconds.
5.6.1 Backlight Operation-Battery Power
1. Backlight lasts for 5s, press the SNOOZE/LIGHT once to reactivate it for another 5s.
2. To turn on the backlight for 30 minutes, touch and hold the SNOOZE/LIGHT for two seconds,
and BL ON icon will be displayed in the clock field.
Note: It is not recommended leaving the backlight on for a long period of time when operating on
batteries only, or the batteries will run down quickly.
5.6.2 Backlight Operation-USB Cable(optional)
1. To turn on the backlight permanently, press and hold the SNOOZE/LIGHT key for two
seconds, and BL ON icon will be displayed in the clock field.
2. To turn off the backlight at any time, press and hold the SNOOZE/LIGHT key for two seconds,
and BL OFF icon will be displayed in the clock field.
6. Other Display Features
The following section describes additional features and display icons
6.1 Weather Forecasting

Note: The weather forecast or pressure tendency is based on the rate of change of barometric
pressure. generally, when the pressure increases, the weather improves (sunny to partly cloudy)
and when the pressure decreases, the weather degrades (cloudy to rain).
The weather forecast is an estimation or generalization of weather changes in the next 24 to 48
hours, and varies from location to location. The tendency is simply a tool for projecting weather
conditions and is never to be relied upon as an accurate method to predict the weather.
6.2 Weather Icons
The following icons are displayed based on the rate of change threshold.
Condition
Icon
Description
Sunny
Pressure is rising and the
previous condition is partly
cloudy.
Partly Cloudy
Pressure is falling and the
previous condition is sunny or
Pressure is rising and the
previous condition is cloudy.
Cloudy
Pressure is falling and the
previous condition is partly
cloudy or
Pressure is rising and the
previous condition is rainy.
Rainy
Pressure is falling and the
previous condition is cloudy.
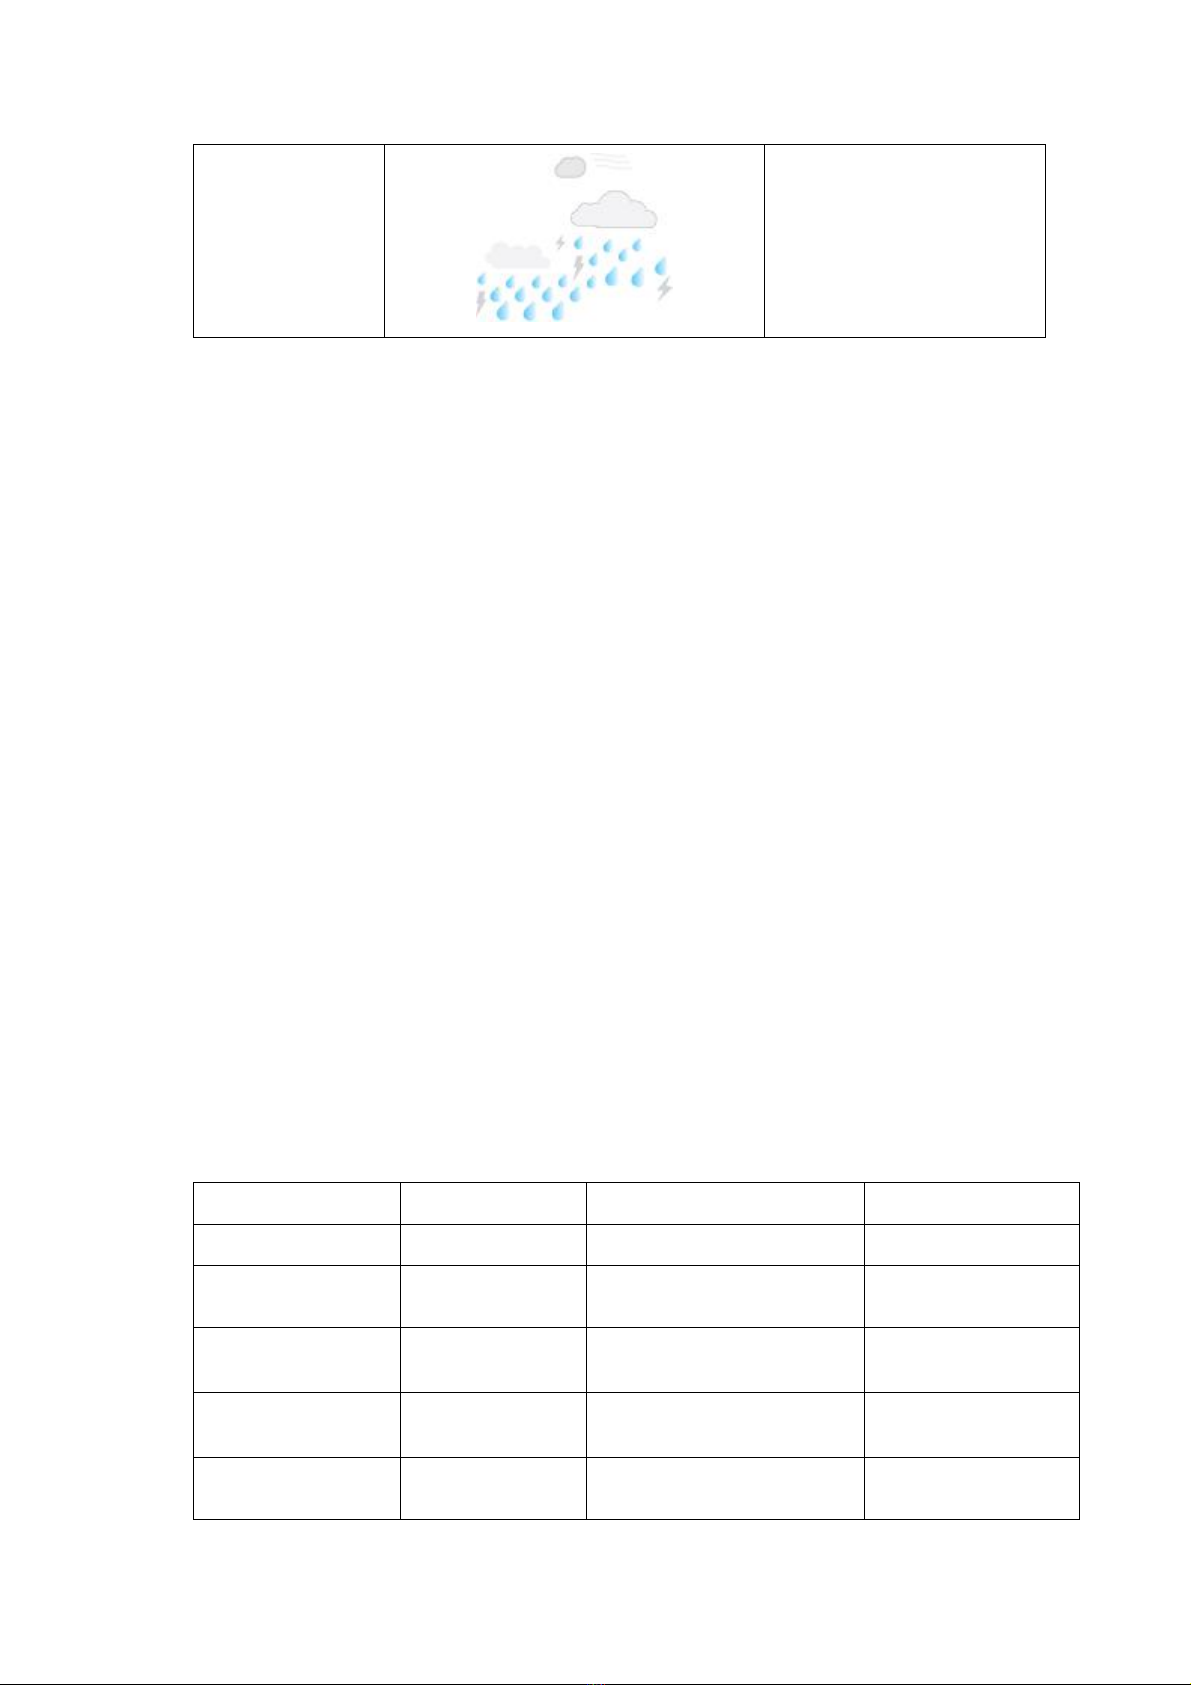
Storm
Pressure is falling and the
previous condition is rainy.
Cloudy and rainy icon will be
flashing
6.3 Storm Threshold Indicator
The storm threshold (the negative rate of pressure change signifying a storm is expected) can be
adjusted from 3 mbar/hour to level 9 mbar/hour (the default level 4 mbar/hour). The lower the
level pressure threshold setting, the higher sensitivity for weather forecast changes. Locations that
experience frequent changes in air pressure require a higher setting compared to locations where
the air pressure is typically stagnant.
When negative rate of change of pressure is exceeded for three hours, the storm warning indicator
will be activated, and the clouds with rain icon will flash for three hours, indicating the storm
warning feature is active.
6.4 Pressure Threshold Setting
The pressure threshold (the negative or positive rate of change of pressure signifying a change in
the weather) can be adjusted from 2 mbar/hour to 4 mbar/hour (default level 2 mbar/hour).
The lower the level pressure threshold setting, the higher sensitivity for weather forecast changes.
Locations that experience frequent changes in air pressure require a higher setting compared to
locations where the air pressure is typically stagnant.
7. Specifications
7.1 Wireless Outdoor Sensor Specifications
•Line of sight wireless transmission (in open air): 100 meter, 30m in an open ara
•Frequency: 433 MHz
•Update Rate: 60 seconds for remote sensor.
7.2 Measurement Specifications
The following table provides specifications for the measured parameters.
Measurement
Range
Accuracy
Resolution
Indoor Temperature
0 to 60 °C
± 1 °C
0.1 °C
Outdoor Temperature
-40 to 60 °C
± 1 °C
0.1 °C
Indoor Humidity
10 to 99 %
± 5% (only guaranteed
between 20 to 90%)
1 %
Outdoor Humidity
10 to 99%
± 5% (only guaranteed
between 20 to 90%)
1 %
Barometric Pressure:
300 to 1100 hpa
± 3 hpa
0.1 hpa

7.3 Power Consumption
•Indoor weather station : 3 x AAA 1.5V Alkaline or Lithium batteries (not included) or a
1.5M USB cable (included)
•Remote Sensor : 2 x AAA alkaline batteries or Lithium batteries (not included)
•Battery life: Minimum 12 months for base station with excellent reception. Intermittent
reception and multiple sensors may reduce the battery life.
Minimum 12 months for sensors (use lithium batteries in cold weather climates less than -
2°C)
8. Support
If you have any questions or concerns while using this weather station, please contact us at:
gblifebran[email protected]om
Table of contents
Other GBlife Weather Station manuals

Popular Weather Station manuals by other brands


Flytec
Flytec Windwatch PRO operating manual

Steinberg Systems
Steinberg Systems SBS-RS-40 user manual

Oregon Scientific
Oregon Scientific LW301 user manual

SmartLine
SmartLine SLW1 Installation and operating instructions

La Crosse Technology
La Crosse Technology WS6835 Quick setup guide

BALDR
BALDR B0360WST2H2PR-V1 user manual