GE 27950 User manual


Your telephone equipment is approved for connection to the Public Switched
Telephone Network and is in compliance with parts 15 and 68, FCC Rules and
Regulations and the Technical Requirements for Telephone Terminal Equipment
published by ACTA.
On the bottom of this equipment is a label indicating, among other information,
the US number and Ringer Equivalence Number (REN) for the equipment. You
must, upon request, provide this information to your telephone company.
The REN is useful in determining the number of devices you may connect to
your telephone line and still have all of these devices ring when your telephone
number is called. In most (but not all) areas, the sum of the RENs of all devices
connected to one line should not exceed 5. To be certain of the number of
devices you may connect to your line as determined by the REN, you should
contact your local telephone company.
A plug and jack used to connect this equipment to the premises wiring and
telephone network must comply with the applicable FCC Part 68 rules and
requirements adopted by the ACTA. A compliant telephone cord and modular
plug is provided with this product. It is designed to be connected to a compatible
modular jack that is also compliant. See installation instructions for details.
• This equipment may not be used on coin service provided by the telephone
company.
• Party lines are subject to state tariffs, and therefore, you may not be able to use
your own telephone equipment if you are on a party line. Check with your local
telephone company.
• Notice must be given to the telephone company upon permanent
disconnection of your telephone from your line.
• If your home has specially wired alarm equipment connected to the telephone
line, ensure the installation of this product does not disable your alarm
equipment. If you have questions about what will disable alarm equipment,
consult your telephone company or a qualied installer.

Should your equipment cause trouble on your line which may harm the
telephone network, the telephone company shall, where practicable, notify
you that temporary discontinuance of service may be required. Where prior
notice is not practicable and the circumstances warrant such action, the
telephone company may temporarily discontinue service immediately. In case
of such temporary discontinuance, the telephone company must: (1) promptly
notify you of such temporary discontinuance; () afford you the opportunity to
correct the situation; and () inform you of your right to bring a complaint to the
Commission pursuant to procedures set forth in Subpart E of Part 68, FCC Rules
and Regulations.
The telephone company may make changes in its communications facilities,
equipment, operations or procedures where such action is required in the
operation of its business and not inconsistent with FCC Rules and Regulations. If
these changes are expected to affect the use or performance of your telephone
equipment, the telephone company must give you adequate notice, in writing, to
allow you to maintain uninterrupted service.
This device complies with Part 15 of the FCC Rules. Operation is subject to the
following two conditions: (1) This device may not cause harmful interference; and ()
This device must accept any interference received, including interference that may
cause undesired operation.
This equipment has been tested and found to comply with the limits for a Class
B digital device, pursuant to Part 15 of the FCC Rules. These limits are designed
to provide reasonable protection against harmful interference in a residential
installation.
This equipment generates, uses, and can radiate radio frequency energy and, if
not installed and used in accordance with the instructions, may cause harmful
interference to radio communications. However, there is no guarantee that
interference will not occur in a particular installation.
Privacy of Communications may not be ensured when using this product.
If this equipment does cause harmful interference to radio or television reception,
which can be determined by turning the equipment off and on, the user is
encouraged to try to correct the interference by one or more of the following
measures:

• Reorient or relocate the receiving antenna (that is, the antenna for radio or
television that is “receiving” the interference).
• Reorient or relocate and increase the separation between the
telecommunications equipment and receiving antenna.
• Connect the telecommunications equipment into an outlet on a circuit different
from that to which the receiving antenna is connected.
If these measures do not eliminate the interference, please consult your dealer or an
experienced radio/television technician for additional suggestions. Also, the Federal
Communications Commission has prepared a helpful booklet, “How To Identify and
Resolve Radio/TV Interference Problems.” This booklet is available from the U.S.
Government Printing Ofce, Washington, D.C. 00. Please specify stock number
00-000-005- when ordering copies.
Notice: The changes or modications not expressly approved by the party
responsible for compliance could void the user’s authority to operate the equipment.
This telephone system meets FCC standards for Hearing Aid Compatibility.
Licensed under US Patent 6,7,009.
This equipment complies with FCC RF radiation exposure limits set forth for an
uncontrolled environment. This equipment should be installed and operated with
a minimum distance of 0 centimeters between the radiator and your body. This
transmitter must not be co-located or operated in conjunction with any other
antenna or transmitter.”
This telephone is compliant with the DECT 6.0 standard which
operates in the 1.9GHz to 1.9GHz frequency range.

5
EquipmEnt ApprovAl informAtion ...... 2
intErfErEncE informAtion .................. 3
HEAring Aid compAtibility (HAc) ...... 4
licEnsing .......................................... 4
fcc rf rAdiAtion ExposurE stAtEmEnt
4
informAtion for dEct product ....... 4
introduction .................................... 7
bEforE you bEgin ............................. 7
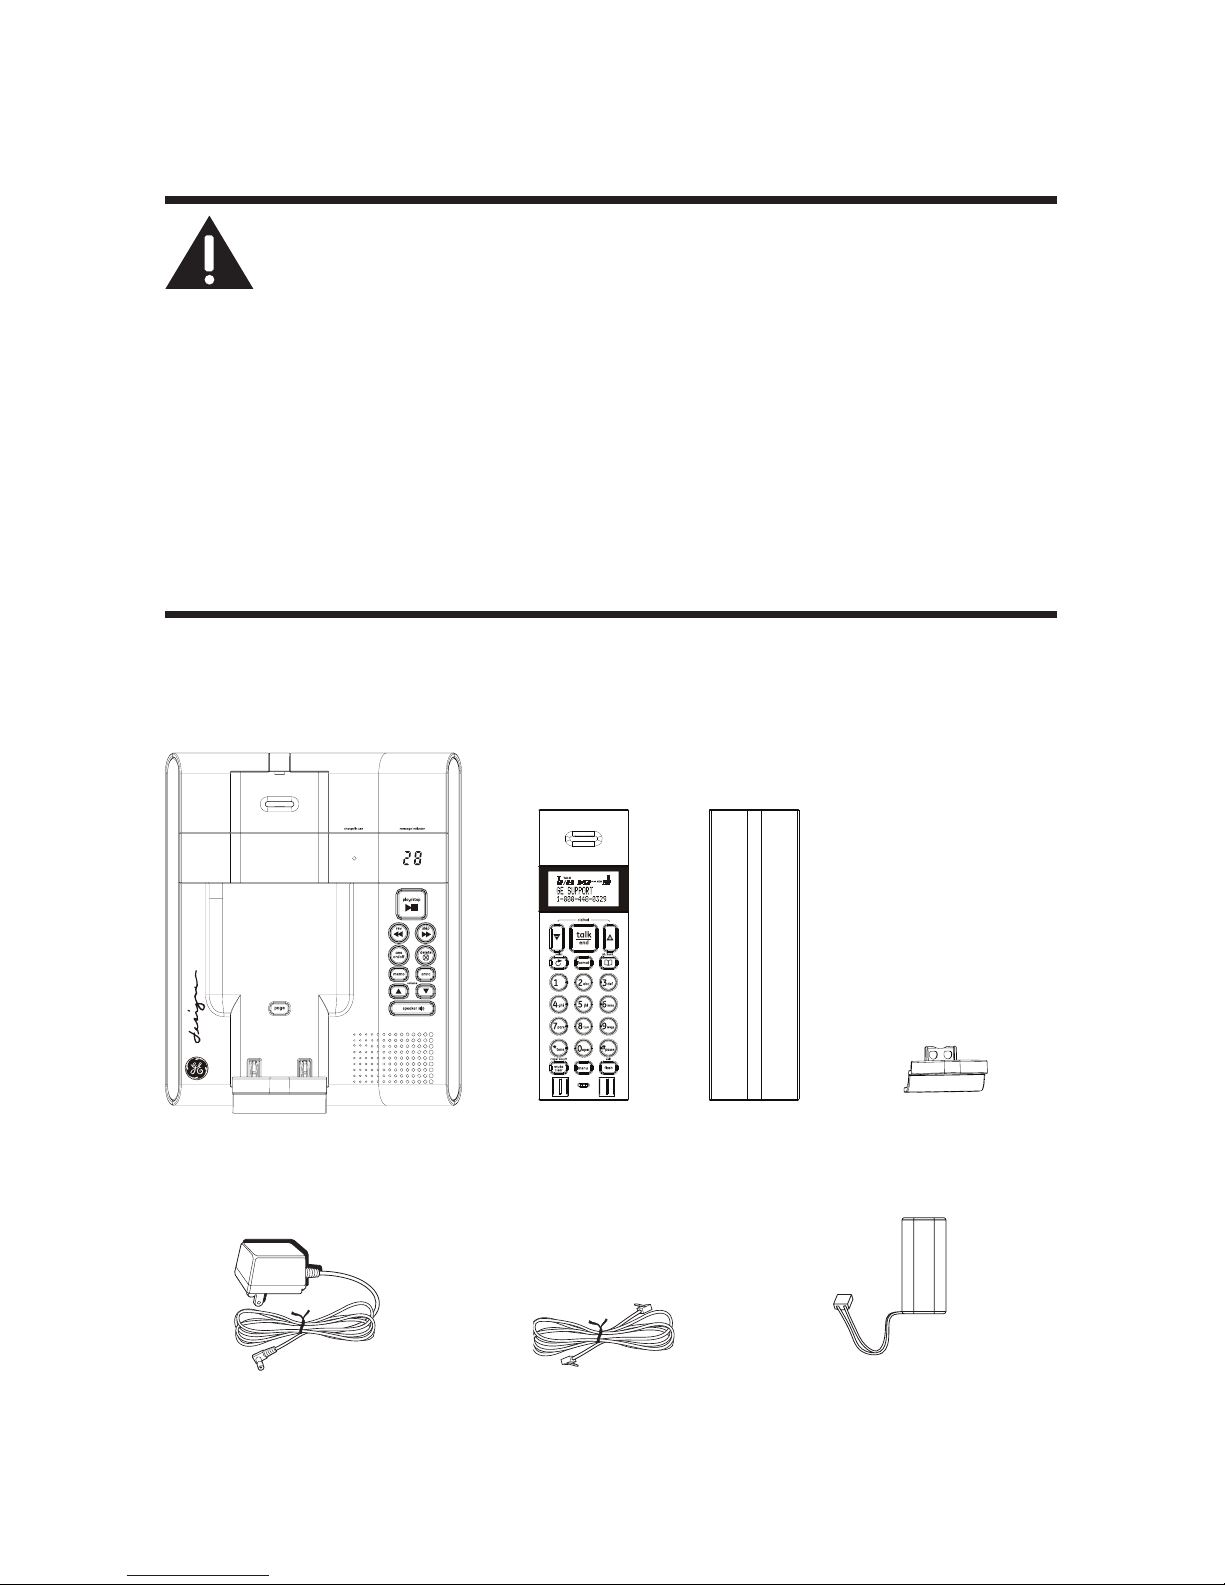
Parts CheCklist • 27950 .........................7
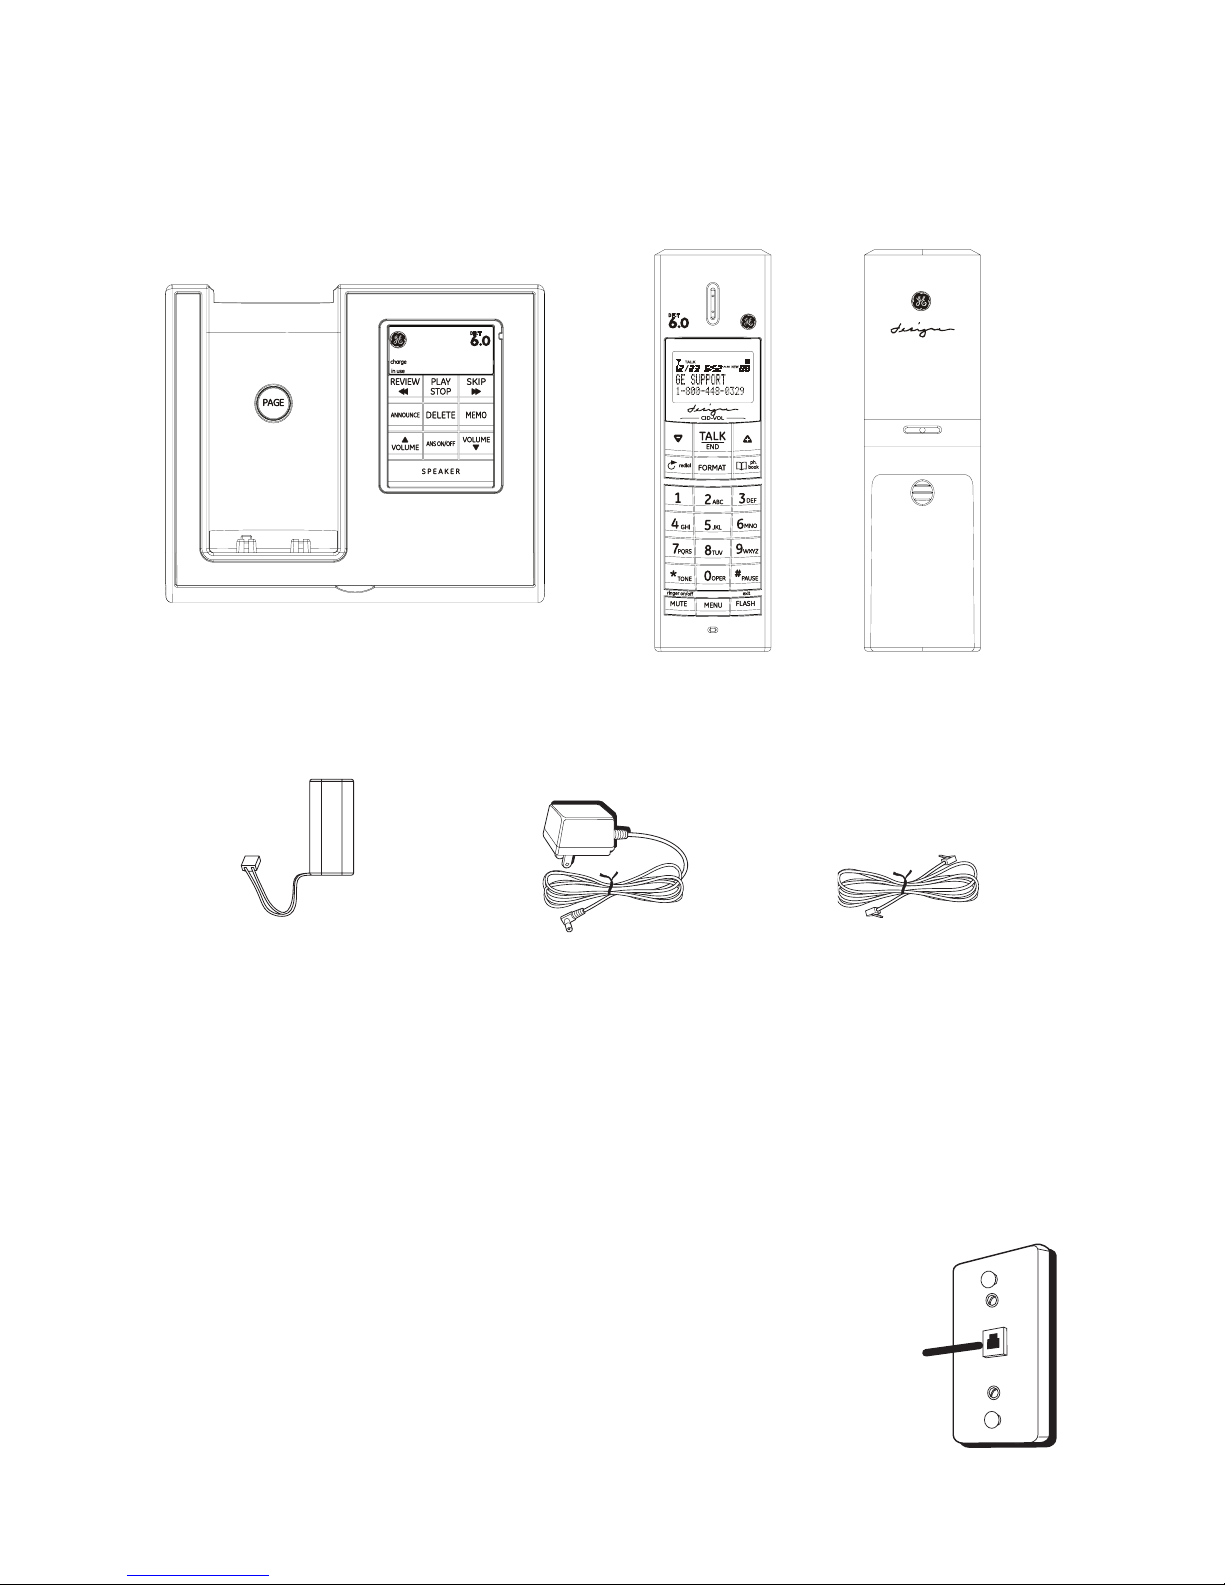
Parts CheCklist • 27951 .........................8
telePhone JaCk requirements ..................8
instAllAtion ..................................... 9
Digital seCurity system .............................9
imPortant installation guiDelines ...........9
HAndsEt lAyout ..............................10
bAsE lAyout ....................................11
instAlling tHE pHonE .......................12
Base station.............................................. 13
installing the hanDset Battery ............ 12
dsl filtEr instAllAtion ..................14
Wall mounting (aPPliCaBle only for
moDel 27950) ................................ 15
AnswEring systEm sEtup .................16
reCorDing the outgoing announCement ..
16
sPeaker Volume ....................................... 16
VoiCe instruCtions ................................... 16
progrAmming tHE tElEpHonE ...........17
ansWer on/off ......................................... 24
ansWer system ......................................... 24
area CoDe ................................................. 21
auto talk .................................................. 20
Base station setuP .................................. 21
Date/time .................................................. 22
De-register ............................................... 24
Dial moDe ................................................. 22
hanDset name ..........................................20
hanDset setuP.......................................... 18
language ................................................... 18
Programming funCtions ......................... 17
register ..................................................... 23
registration .............................................. 23
ring to ansWer ........................................ 25
ring Volume ............................................. 18
seCurity CoDe ........................................... 25
stanDBy sCreen ........................................ 17
tones ..........................................................19
VoiCe language ........................................ 25
tElEpHonE opErAtion ......................26
ansWering Calls ...................................... 26
auto stanDBy............................................ 30
Call timer ................................................. 29
Charge/in use inDiCator on Base ........ 26
Deleting all reDial reCorDs................. 29
Deleting a reDial reCorD ...................... 29
eDiting a reDial reCorD Before Dialing ...
28
flash .......................................................... 30
hanDset to hanDset interCom Call .....31
inserting a Pause in the Dialing sequenCe
27
interCom oPeration ................................. 31
making a Call .......................................... 26
mute ........................................................... 30
Page............................................................ 31
reCeiVer Volume Control ...................... 31
reDial ......................................................... 27
ringer on/off .........................................30
storing a reDial reCorD in Phone Book ..
28
three-Way ConferenCing........................ 32

6
cAllEr id (cid) ..............................33
Call Waiting Caller iD..........................33
Deleting a CiD reCorD .......................... 37
Deleting all CiD reCorDs..................... 37
Dialing a CiD numBer ............................35
formatting a CiD numBer Before
Dialing .......................................................35
reCeiVing CiD reCorDs ...........................34
reVieWing CiD reCorDs .......................... 34
storing CiD reCorDs (in CiD memory).....
34
storing CiD reCorDs into Phone Book ....
36
pHonE book .................................... 38
aDDing Phone Book entries .................. 38
Chain Dialing from Phone Book .......... 40
Deleting a Phone Book reCorD ............ 39
Dialing a Phone Book reCorD .............. 40
eDiting a Phone Book reCorD............... 39
reVieWing Phone Book reCorDs ........... 38
AnswEring systEm opErAtion ..........41
ansWering system remote aCCess ........43
leaVing a memo ........................................ 44
memory full ............................................. 44
message inDiCator ................................... 41
messages PlayBaCk .................................. 42
cHAnging tHE bAttEry .....................44
bAttEry sAfEty prEcAutions ............45
displAy mEssAgEs ............................46
HAndsEt sound signAls ..................47
troublEsHooting guidE ...................48
Battery....................................................... 50
Caller iD solutions ................................50
telePhone solutions ............................... 48
gEnErAl product cArE ...................51
cAusEs of poor rEcEption ...............51
Warranty assistanCe .............................. 52
AccEssory informAtion ...................57
indEx .............................................58

7
Make sure your package includes the items shown here.

8
Make sure your package includes the items shown here.
To use this phone, you need an RJ11C
type modular telephone jack, which
might look like the one pictured here,
installed in your home. If you don’t have
a modular jack, call your local phone
company to nd out how to get one
installed.

9
Your cordless phone uses a digital security system to protect
against false ringing, unauthorized access, and charges to your
phone line.
• Avoid sources of noise and heat, such as motors, uorescent
lighting, microwave ovens, heating appliances and direct sunlight.
• Avoid areas of excessive dust, moisture and low temperature.
• Avoid other cordless telephones or personal computers.
• Never install telephone wiring during a lightning storm.
• Never install telephone jacks in wet locations unless the jack is
specically designed for wet locations.
• Never touch non-insulated telephone wires or terminals, unless
the telephone line has been disconnected at the network interface.
• Use caution when installing or modifying telephone lines.

10
6
6
5
5

11
56
56

1
1. Locate battery which is packaged inside a plastic bag and is
separate from the handset.
. Locate the battery compartment on the back of the handset.
. Plug the battery pack cord into the jack inside the
compartment.
. Insert the battery pack.
5. Close the battery compartment by placing the handset back
cover slightly higher than the handset and then sliding the
cover down into position.

1
1. Choose an area near an electrical outlet and a telephone wall
jack (RJ11C), and place your cordless telephone on a level
surface, such as a desktop or tabletop
. Plug one end of the telephone line cord into the TEL LINE jack
on the base and the other end into a modular jack.
. Plug the AC power adaptor into the electrical outlet and the DC
connector into the jack on the bottom/back of the base.
. Place the handset in the base cradle. The charge/in use
indicator turns on, verifying the battery is charging.
5. Allow the phone to charge for 1 hours prior to rst use. If
you don’t properly charge the phone, battery performance is
compromised.

1
If you subscribe to DSL service through your telephone line you will
need to connect a DSL lter between your phone and the wall jack.
(refer to drawing for correct connection.) You may order the lter
from our Accessories Information Section.

15
1. Fully extend the handset wall mount latch and rotate 180°
. Insert the handset wall mount cradle into the socket at the
back of the base. (To uninstall the wall mount cradle, turn over
the base, press and hold the button on the bottom of the base
and pull out the cradle at the same time.)
. Plug the AC power adaptor into the electrical outlet and the DC
connector into the jack on the bottom of the base.

16
. Plug one end of the straight telephone line cord into the jack on
the bottom of the base.
5. Feed the line cord through the groove and plug the end into the
modular telephone jack.
6. Slip the mounting holes (on the bottom of the base) over the
wall plate posts and rmly slide the unit down into place.
This section shows you how to set up your answering system to
receive incoming calls. Before you begin the set up process, you
must turn on the answering system.
• Press the button to turn the answering system
on and off. The Message Indicator lights when the answering
system is on. The indicator blinks when you have new
messages.
If you need additional assistance; while in standby mode, press the
button on the base and follow the voice instructions.
Use the (5 or 6) buttons to adjust speaker volume
on the base to a comfortable level. L1 is the minimum speaker
volume and L8 is the maximum.
For best results when recording, you should be about nine inches
from the microphone, and eliminate as much background noise as
possible.
1. Press and hold the button on the base until the
speaker announces “RECORD ANNOUNCEMENT AFTER TONE".
. Begin speaking after you hear the beep.

17
. Release the button when you nish your
announcement.
The handset displays the handset name, date, time, signal and
battery status.
The system uses a menu structure to give you access to all of the
built-in features. You may program the following items in main
menu: Intercom, Setup HS, Setup BS, Date/Time, Registration and
Answer system.

18
1. Make sure your phone is (not in talk mode).
. Press the button to go to the main menu.
. Press ( + or -) button to scroll to Setup HS.
. Press button to conrm and you may program the
following items: Ring Volume, Tones, Auto Talk, Handset Name
and Language.
1. Press the ( + or -) button to scroll to the Language
sub-menu.
. Press button to enter the menu.
. Use the ( + or -) button to select English, Français or
Espanol. The default setting is English.
. Press the button to save your selection.
There are volume levels for your selection. They are Volume 1 to
and Ringer off respectively.
1. Press the ( or ) button to scroll to the Ring Volume
sub-menu.

19
. Press button to enter the menu. Use the ( + or
-) button to scroll to your selection. The default setting is VOL 3.
. Press the button to save your selection and Saved shows
in the display.
1. Press the ( + or -) button to scroll to the Tones sub-
menu.
. Press button to conrm and you may program the
following items: Low Battery, No Coverage and Key Tone.
. Use the ( + or -) button to scroll to the item you want
to program and press button to enter.
You may set the warning beep to “On” when your
handset battery is low, so as to alert you to charge the battery.
Press the ( + or - ) button to scroll to On or Off, then
press button to save the setting. The default setting is
On.
You may set the warning beep to “On” or “Off”
when the handset is out of range. Press the ( or )
button to scroll to On or Off, then press button to save
the setting. The default setting is On.
Searching
UnavailableSearching

0
You may set the key tone to “On” or “Off” when you
press buttons. Press the ( + or - ) button to scroll to On
or Off, then press button to save the setting. The default
setting is On.
This option allows you to pick up the handset from base to answer
an incoming call without pressing the button.
From the Setup HS Menu:
1. Press the ( + or - ) button to scroll to the Auto Talk sub-
menu.
. Press button to enter the menu. Use the ( + or
- ) button to scroll to your selection. The default setting is On.
. Press the button to save your selection.
1. Press the ( + or - ) button to scroll to the Handset
name sub-menu.
. Press button to enter the menu. The default setting is
Handset.
. Use the touch-tone pad to enter a name (up to 1 characters).
More than one letter is stored in each of the number keys. For
example, to enter Bill Smith, press the key twice for the letter
B. Press the key times for the letter I. Press the 5 key times
for the letter L. Press the 5 key times for the second letter
L, and press the 1 key to insert a space between the rst and
last name. Press the 7 key times for the letter S; press the 6
key once for the letter M; press the key times for the letter
I; press the 8 key for the letter T; press the key twice for the
letter H.
Other manuals for 27950
1
This manual suits for next models
1
Table of contents
Languages:
Other GE Handset manuals