GE RGJ515GEH Installation instructions

o
0
0
‘owtOgetYour
the best from
Built-In Oven
Contents
Aluminum Foil
12
Appliance Registration
2
Baking, Baking Guide
7, 8
Broiling, Broiling Guide
10
Care and Cleaning
11-14
Clock/Timer
5
Continuous Cleaning Care
11
Door Removal
12
Features 4
Light; Bulb Replacement
6, 13
Model and Serial Numbers
2
Problem Solver
15
Repair Service
15
Roasting, Roasting Guide
9
Safety Instructions
2,3
Shelves 6
Thermostat Adjustment
13
Warranty Back Cover
GE Answer
Center@
800.626.2000
Use
and Care of
gas models
RGJ515GEH
RGJ616GEH
tmPoINr

Help us help you... IMPORTANT
Read this book carefully.
It is intended to help you operate
and
maintain your new oven
properly.
Keep it handy for answers to your
questions.
If
you don’t understand something
or need more help, write (include
your phone number):
Consumer Affairs
Hotpoint
Appliance Park
Louisville. KY 40225
Write down the model
and serial numbers.
You’ll find them on a label located
inside the oven on the left side.
See page 4.
These numbers are also on the
Consumer Product Ownership
Registration Card that came with
your oven. Before sending in this
card, please write these numbers
here:
Model Number
Serial Number
Use these numbers in any
correspondence or service calls
concerning your oven.
If you received
a damaged oven . . .
Immediately contact the dealer (or
builder) that sold you the oven.
Save time and money.
Before you request
service . . .
Check the Problem Solver on
page 15. It lists causes of minor
operating problems that you can
correct yourself.
FOR YOUR SAFETY
If you smell gas:
1. Open windows,
2. Don’t touch
electrical
switches:
3. Extinguish any
open flame.
4. Immediately call
your gas supplier.
*Don’t turn electric switches
on or off because sparks may
ignite the gas.
FOR YOUR SAFETY
Do not store or use
gasoline or other
flammable vapors and
liquids in the vicinity
of this or any other
appliance.
SAFETY
INSTRUCTIONS
Read all instructions
before using this
appliance.
IMPORTANT
SAFETY NOTICE
The California Safe Drinking
Water and Toxic Enforcement
Act requires the Governor of
California to publish a list of
substances known to the state
to cause cancer and requires
businesses to warn customers
of potential exposure to such
substances.
Gas appliances can cause
minor exposure to three of these
substances, namely benzene,
formaldehyde and soot, caused
primarily by the incomplete
combustion of natural gas or LP
fuels. Properly adjusted burners,
indicated by a bluish rather than
a yellow flame, will minimize
incomplete combustion. Exposure
to these substances can be
minimized further by venting
with an open window or using
a ventilation fan or hood.
When You Get Your Oven
●
Have the
installer show you
the location of the oven gas cut-
off valve and
how to shut it off
if necessary.
●
Have your oven installed
and properly grounded by a
qualified installer,
in accordance
with the Installation Instructions.
Any adjustment and service should
be performed only by qualified
gas range installers or service
technicians.
2

●
Plug
your
oven into a 120-volt
grou~ded
outlet only.
Do not
remove the round grounding
prong from the plug. If in doubt
about the grounding of the home
electrical system, it is your
personal responsibility and
obligation to have an ungrounded
outlet replaced with a
properly-
grounded three-prong outlet in
accordance with the National
Electrical Code. Do not use an
extension cord with this appliance.
●
Be sure all packing materials
are removed from the oven
before operating it, to prevent
fire or smoke damage should
the packing material ignite.
●
Be sure your oven is correctly
adjusted by a qualified service
technician or installer for the
type of gas (Natural or LP) on
which it is to be used.
Your oven
can be converted for use on either
type of gas. See Installation
Instructions.
Using Your Oven
●
Don’t leave children alone or
unattended where an oven is
hot or in operation.
They could
be seriously burned.
●
Don’t allow anyone to climb,
stand or hang on the door or
broiler compartment.
They
could damage the oven or cause
severe personal injury.
●
CAUTION: ITEMS OF
INTEREST TO CHILDREN
SHOULD NOT BE STORED
IN CABINETS ABOVE AN
OVEN-CHILDREN CLIMBING
ON THE OVEN TO REACH
ITEMS COULD BE SERIOUSLY
INJURED.
s
Never wear loose fitting or
hanging garments while using
the appliance. Flammable
material could be ignited if
brought in contact with flame or
hot oven surfaces and may cause
severe burns.
. Never use your
appliance
for
warming or heating the room.
Prolonged use of the oven without
adequate ventilation can be
hazardous.
.
Do
not
use water
on grease
fires. Flame in oven can be
smothered by completely
closing door and turning
OVEN TEMP to OFF.
s
Do not store flammable
materials in an oven.
●
Do not let cooking grease
or other flammable materials
accumulate in or near the oven.
.
Do
not use oven
for a storage
area.
●
Stand away from the oven
when opening oven door.
The
hot air or steam which escapes
can cause burns to hands, face
and/or eyes.
●
Keep oven free from grease
buildup.
.
place
oven shelves
in
desired
position while oven is cool.
.
Wliing
out shelf to the shelf
stop is a convenience in lifting
heavy foods. It is also a precaution
against burns from touching
hot surfaces of the door or oven
walls.
●
Don’t use aluminum foil
anywhere in the oven except as
described in this book.
Misuse
could result in a fire hazard or
damage to the range.
●
Don’t heat unopened food
containers in the oven. Pressure
could build up and the container
could burst causing an injury.
●
Use only glass cookware that
is recommended
for use in gas
ovens.
●
when
using cooking or
roasting bags in oven,
follow
the manufacturer’s directions.
●
When cooking pork, follow the
directions exactly and always
cook the meat to an internal
temperature of at least
170”F.
This assures that, in the remote
possibility that trichina may be
twesent
in the meat. it will be killed
;nd
meat will be safe to eat.
●
Always remove broiler pan
from broiler compartment as
soon as you finish broiling.
Grease left in the pan can catch
fire if oven is used without
removing the grease from the
broiler pan.
●
When broiling, if meat is too
close to the flame, the fat may
ignite.
Trim excess fat to prevent
excessiveflare-ups.
●
Make
sure broiler
pan is in
place correctly
to reduce the
possibility of grease fires.
●
If you should have a grease
fire in the broiler pan,
turnoff
oven, and keep drawer closed to
contain fire until it burns out.
●
Clean only parts listed in this
Use and Care Book.
●
Keep oven clean and free of
accumulations of grease or
spillovers
which may ignite.
If You Need Service
●
Read
“The Problem solver”
on page 15 of this book.
●
Don’t attempt to repair or
replace any part of your oven
unless it is specifically
recommended in this book.
All
other servicing should be referred
to a qualified technician.
SAVE THESE
INSTRUCTIONS
3

Features of Your Oven
@-
Q9Q
*
I
/.
9, 3 9
,,6.’
@
.-— —————— ——.
Mode1RGJ515GEH
Model RGJ616GEH
Feature Index Explained on page
RGJ515GEH RGJ616GEH
1 Minute Timer
5
● ●
2 Automatic Oven Timer
5
●
3 Radial Electric Clock
5
●●
4 Oven Light Switch
6
●●
5 Oven Set Knob
5
●
6 Oven Temp Knob 5,6
●●
7 Oven Interior Light
6, 13
●
●
8 Oven Shelves
6, 13
●●
9 Oven Shelf Supports
6
●●
10 Removable Oven Bottom
12
●●
11 Removable Oven Door
12
●
●
12 Removable Broiler Compartment Door
12
●
13 Broiler Pan and Rack
10, 13
●●
14 Model and Serial Numbers
2
●●
15 Continuous-Cleaning Oven Interior
11
●
16 Broiler Compartment
10, 13
●
●
4

Minute Timer, Automatic Oven Timer and Clock
Minute Timer The Clock
Model
RGJ515GEH
The Minute Timer has been
combined with the oven clock. Use
it to time
all
your precise cooking
operations. You’ll recognize it as
the pointer which is different in
color than the clock hands.
Minutes are marked up to 30 and
hours are marked up to 4 on the
center ring of the clock.
To set the Clock,
push the knob in
and turn the clock hands to the
right to the correct time. Then let
the knob out and continue turning
to OFF.
Automatic Oven Timer
Model RGJ616GEH
This Timer will automatically start
and stop your oven for you. Here’s
what you do:
1.
Make sure both your oven clock
and the START dial show the correct
time of day. When the START knob
is pushed in and turned, it will “pop”
into place when the time shown on
the oven clock is reached.
Model RGJ616GEH
The Minute Timer has been
combined with the oven clock. Use
it to time all your precise cooking
operations. Minutes are marked up to
60 on the center ring of the clock.
To
set the
Minute Timer,
turn the
knob to the left,
without pushing in,
until the pointer reaches the number
of minutes you want to time.
At the end of the time set on either
Minute Timer, a buzzer sounds to
tell you time
k
up.
Turn the knob,
withcuapushing
in,
until the pointer
reaches OFF and the buzzer stops.
2. Set the START control. Push in
and turn the START knob to the
time you want the oven to turn itself
on. (If you want it to start cooking
immediately, do not set the Start
time. )
3. Set the
SlX3P
control. Push in
and turn the STOP knob to the time
you want the oven to turn itself off.
Note: There must beat least a half
hour difference between the START
and
STOP
dials for the automatic
control to work.
nn
o
c
.
ti(iiiy
41ili:
●
4. Set the OVEN SET knob to
AUTO OVEN.
5. Set the OVEN TEMP knob to
the desired cooking temperature.
Now the oven will turn itself on
immediately or at a later Start time
that you set, cook at the temperature
you selected and turn itself off at
the Stop time you selected.
After taking food out of the oven,
be sure to turn the OVEN TEMP
control to off and the OVEN SET
knob to the MAN. OVEN setting
where it should be kept for normal
oven use.
5

Using Your Oven
Automatic Ignition
The oven and broiler burners on
your oven are lighted by electric
ignition eliminating the need for
standing pilot lights with constantly
burning flame.
CAUTION: DO
NOI!
MAKE ANY
ATTEMPI TO OPERATE THE
ELECTRIC IGNITION OVEN
DURING AN ELECTRICAL
POWER FAILURE. Resumption
of electrical power when OVEN
TEMP control is in any position
other than OFF will result in
automatic ignition of the oven
burner and could cause severe
burns if, at the time, you were
attempting to light the burner with
a match.
To Light the Oven Burner
Turn the OVEN TEMP knob to the
desired temperature. The burner
should ignite within 60 seconds.
Air Adjustment
An air adjustment shutter for the
oven burner regulates the flow of air
to the flame.
Remove the broiler pan and rack,
pull the broiler compartment drawer
out to the
“stot)”
tmsition
or remove
screw and rotate the shutter to allow
more or less air into the burner tube
as needed.
When the right amount of air
flows into the burner,
the flame
should be steady, with approximately
l-inch blue cones and should not
extend out over the baffle edges.
Before Using Your Oven
1.
Look at the control. Be sure you
understand how to set it properly.
2. Check the inside of the oven.
Look at the shelves. Practice
removing and replacing them
while the oven is cool.
3. Read the
infbrrnation
and tips
on the following pages.
4. Keep this book handy where you
can refer to it—especially during
the first few weeks of getting
acquainted with your oven.
Oven Temperature Control
The OVEN TEMP control is
located on the upper oven control
panel.
the broiler cornp~rtment shelf and
you’ll find the shutter against the
back wall of the compartment.
Simply turn the knob to the desired
cooking temperatures, which are
marked in
25°F.
increments on the
dial. It will normally take 30 to 60
seconds before the flame comes on.
After the oven reaches the selected
temperature, the oven burner cycles
off completely, then on with a full
flame to keep the oven temperature
controlled.
Oven Shelves
The shelves arc designed with
stop-loclcs
so when placed correctly
on the shelf supports, they
will
stop
before coming completely out of
the oven and
will
not tilt when you
are removing food or placing food
on them.
When placing cookware on a shelf,
pull
the shelf out to the “stop”
position. Place the cookware on
the shelf, then slide the shelf back
into the oven. This will eliminate
reaching into the hot oven.
To remove the shelves from the oven
for cleaning, pull out to stop
position, lift upon front and pull
them out.
Shelf Positions
The oven has four shelf
sumorts-
A (bottom), B, C and D
(t(~p).
Shelf
positions for cooking arc suggested
on Baking
and
Roasting
pages.
Oven Moisture
As your oven heats up, the
temperature change of the air
in the oven may cause water
droplets to form on the door
glass. To prevent this, open the
oven door for the first minute
of oven heat-up to
let
the moist
air out.
Oven Light
To adjust the flow
of
air to the
burner,
Iooscn
the Phillips head
6
Use switch on control panel to turn
light on and off.

Baking
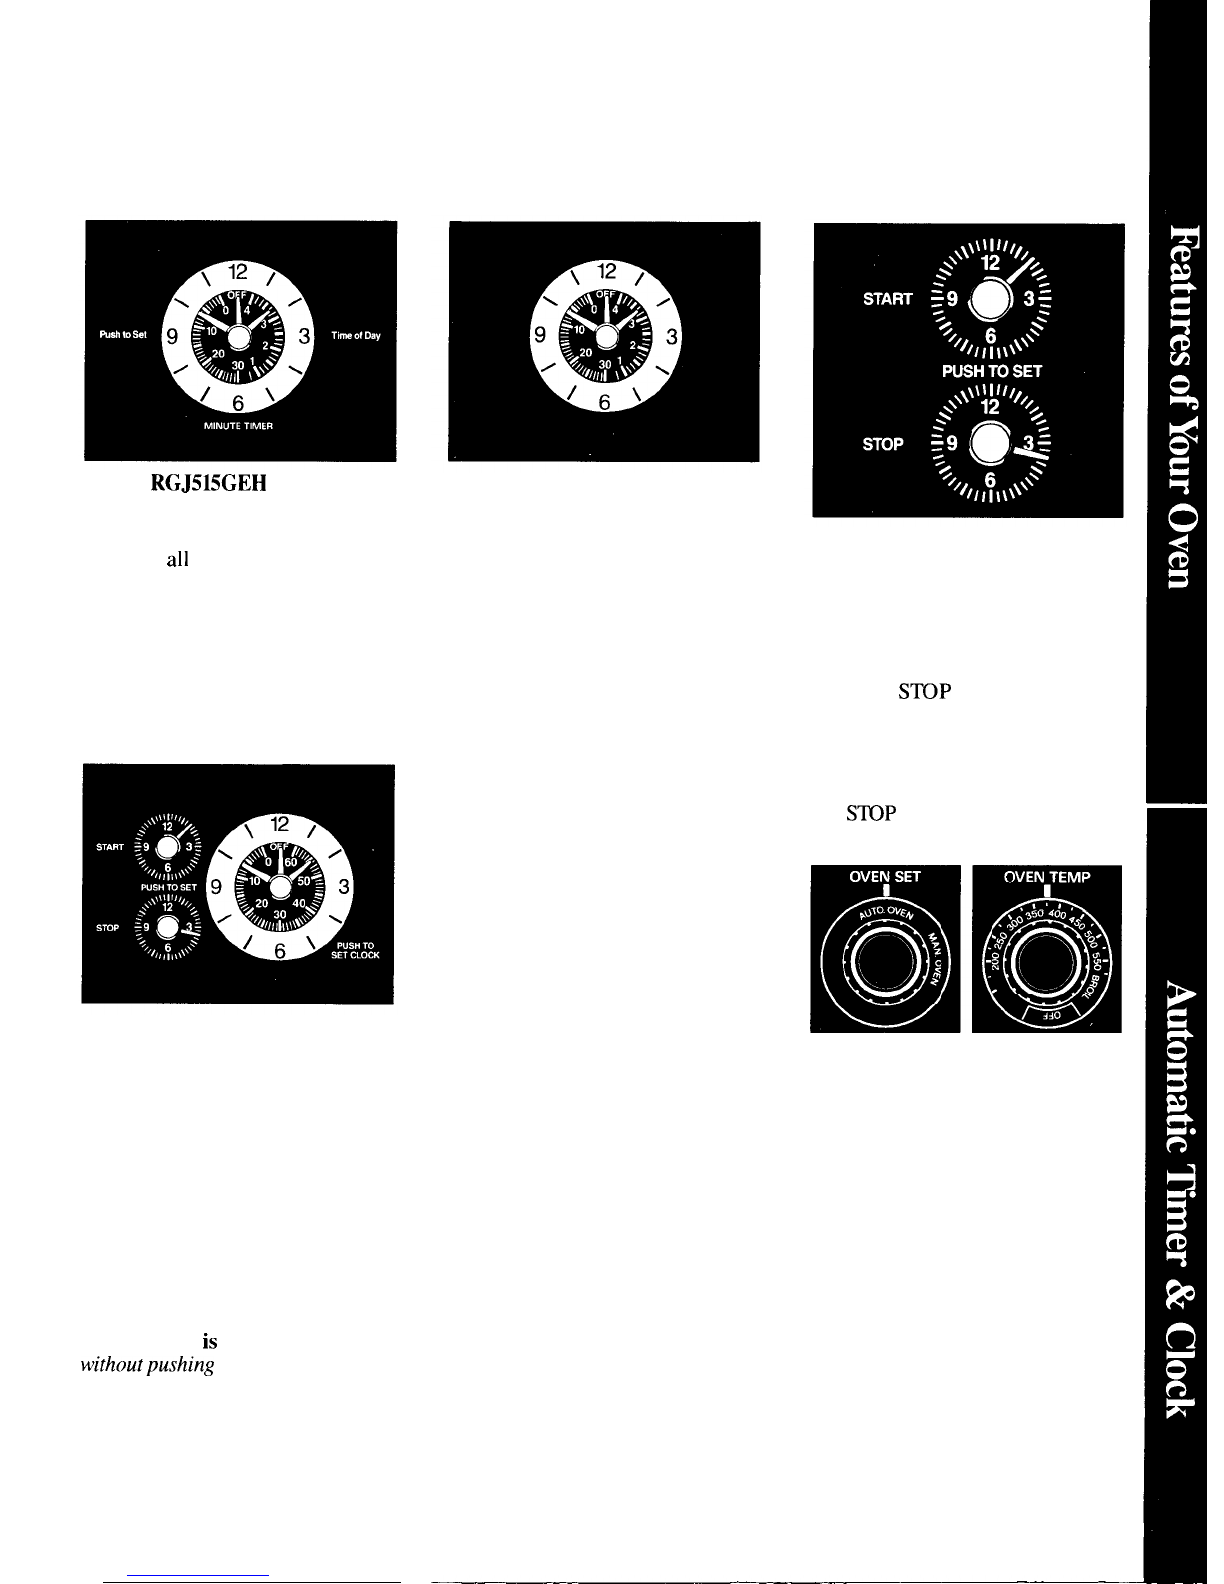
How to Set Your Range
for Baking
1.
Position the shelf or shelves in
the oven.
2. Close oven door. Turn OVEN
TEMP knob to desired temperature.
Preheat
oven
for
at
least
10
minutes
if preheating is necessary.
3.
Place
fbod
in oven on center
of shelf. Allow
at
least
an
inch
between edge of
bakeware
and oven
wall or adjacent cookware.
If cooking on two shelves at the
same time, place shelves about 4
inches apart and stagger food on
them.
4. Check food for doneness at
minimum time on recipe. Cook
longer if necessary. Switch off
heat and remove food.
Preheating
Preheating is very important when
using temperatures below
225”F.
and when baking foods such as
biscuits, cookies, cakes and other
pastries.
Preheating is not necessary when
roasting or for long-time cooking of
whole meals.
Shelf Positions
Most baking is done on the second
shelf position (B) from the bottom.
When baking three or four items,
use two shelves positioned on the
second and fourth sets of supports
(B& D) from bottom of oven.
Bake angel
fbod
cakes on first shelf
position (A) from bottom of oven.
Baking Tips
●
Follow a tested recipe and
measure the ingredients carefully.
If you are using a package mix,
follow label directions.
●
If moisture is noticeable on the
front of the oven or on the oven
window when first turning on the
oven, leave the oven door ajar for a
few minutes or until the oven is warm.
●
Do not open the oven door during
a baking operation—heat will be lost
and the baking time might need to
be extended. This could cause poor
baking results. If you must open the
door, open it partially–only
3
or4
inches—and close it as quickly as
possible.
●
Do not disturb the heat circulation
in the oven with the use of aluminum
foil. If foil is used, place a small
sheet of it, about 10 by 12 inches at
the most, on a lower shelf several
inches below the food. Do not place
foil on the oven
bottolm.
Common Baking Problems
and Possible Solutions
PIES
Burning around edges
●
Oven too full; avoid overcrowding.
●
Edges of crust too thin.
. Incorrect baking temperature.
Bottom crust soggy and unbaked
●
Allow crust and/or filling to cool
sufficiently before filling pie shell.
●
Filling may be too thin or juicy.
. Filling allowed to stand in pie shell
before baking. (Fill pie shells and
bake immediately.)
●
Ingredients and proper measuring
affect the quality
of
the crust. Use a
tested recipe and good technique.
Make sure there are no tiny holes or
tears in a bottom crust. “Patching”
a piecrust could cause soaking.
Pie filling runs over
●
Top and bottom crust not well
sealed together.
●
Edges of piecrust not built up
high enough.
●
Too much filling.
●
Check size of pie plate.
Pastry is tough; crust not flaky
●
Too much handling.
●
Fat too soft or cut
~n
too fine.
Roll dough lightly and handle as
little as possible.
7
CAKES
Cake rises higher on one side
●
Batter spread unevenly in pan.
●
Oven shelves not level.
●
Using warped pans.
●
Incorrect pan size.
Cakes cracking on top
●
Oven temperature too high.
c
Batter too thick, follow recipe
or exact package directions.
●
Check for proper shelf position.
●
Check pan size called for in recipe.
● Improper mixing of cake. -
Cake falls
●
Too much shortening, sugar or
liquid.
●
Check leavening agent, baking
powder or baking soda to assure
freshness. Make a habit to note
expiration dates of packaged
ingredients.
s
Cake not baked long enough or
at incorrect temperature.
●
If adding
oil
to a cake mix, make
certain the oil is the type and
amount specified.
Crust is hard
●
Check temperature.
●
Check shelf position.
Cake has soggy layer or streaks
at bottom
●
Undermining ingredients.
c
Shortening too soft for proper
creaming.
●
Too much liquid.
COOKIES & BISCUITS
Doughy center; heavy crust on
surface
. Check temperature.
●
Check shelf position.
●
Follow baking instructions
carefully as given in reliable recipe
or on convenience food package.
. Flat cookie sheets will give more
even baking results. Don’t overcrowd
foods on a baking sheet.
●
Convenience foods used beyond
their expiration date.
Browning more noticeable on
one side
●
Oven door not closed properly,
check gasket seal.
●
Check shelf position.

Baking Guide
1. Preheating is very important
2.
Aluminum pans conduct heat
3. Dark or non-shiny finishes, also
when using temperatures below
quickly. For most conventional glass and
Pyroceram”
cookware,
225”F. and when baking foods
baking, light, shiny finishes give generally absorb heat which may
such as biscuits, cookies, cakes
best results because they help result in dry, crisp crusts. Reduce
and other pastries. Preheat the
prevent overbrowning. For best oven heat 25”F. if lighter crusts are
oven for at least 15 minutes. browning results, we recommend desired. Rapid browning of some
Preheating is not necessary when dull
bott~m
surfaces for cake pans
foods can be achieved by preheating
roasting or for long-time cooking and pie plates. cast iron cookware.
of whole meals.
Shelf
Oven Time,
Food
Cookware Positions Temperatures Minutes Comments
Bread
Biscuits
(Y,-in.
thick) Shiny Cookie Sheet
B, C 400°-4750
15-20
Canned, refrigerated biscuits
take
2 to 4
Coffee
cake
minutes less time.
Shiny Metal Pan with
B, A
350”-400° 20-30
satin-finish
bottom
Corn bread or muffins Cast Iron or Glass
Pm
B
400°-4500 20-40 Preheat cast iron pan
fbr
crisp crust.
Gingerbread Shiny Metal Pan with
B
350°
45-55
satin-finish bottom
Muffins Shiny Metal Muffin Pans A, B 400°-4250 20-30 Decrease
about
5 minutes for muffin mix.
Popovers
Deep Glass or Cast Iron Cups
B
375°
45-60 Or bake at 450”F. for 25 minutes,
then
at
350”F.
for 10 to 15 minutes.
Quick loaf bread Metal
or
Glass Loaf Pans
B
350°-3750
45-60 Dark metal or
glass
gives deepest
Yeast bread (2 loaves) Metal or Glass Loaf Pans A, B
375°-425”
45-60 browning.
Plain rolls Shiny Oblong or Muffin Pans
A, B
375°-425”
Sweet rolls
10-25
For thin rolls, Shelf B
may
be used.
Shiny Oblong or Muffin Pans
B, A 350”-375°
20-30 For thin rolls, Shelf B may be used.
Cakes
(without shortening)
Angel food
Aluminum Tube Pan
A
325”-375° 30-55
Two piece
pan
is convenient.
Jelly roll Metal Jelly Roll Pan
Sponge
B
375°-4000
10-15
Line pan with waxed paper.
Metal
or
Ceramic Pan
A
325°-350” 45-60
Cakes
Bundt
cakes
Metal or Ceramic
l%
A, B
325°-3500
45-65
Cupcakes Shiny Metal Muffin Pans
B
350°-3750
20-25 Paper liners produce more moist crusts.
Fruitcakes Metal or Glass Loaf
or
A, B
n50-3oo”
2-4 hrs.
Use
300”F.
and
Shelf B for
small
or
Tube Pan
Layer Shiny Metal Pan with individual cakes.
B
350°-3750 20-35
satin-finish bottom
Layer, chocolate Shiny Metal Pan with
B
350°-3750
25-30
satin-finish bottom
Loaf Metal or Glass Loaf’
F%ns
B
350° 40-60
Cookies
Brownies Metal or Glass Pans
B, C 325”-350” 25-35
Bar cookies
from
mix use same time.
Drop Cookie Sheet
B, C
350°-400”
10-20
Use Shelf C and increase temperature
25 to 50”F. fur more browning
Refrigerator Cookie Sheet
B, C
400°-4250
6-12
Rolled
or sliced Cookie Sheet
B, C 375°-4000
7-12
Fruits,
Other Desserts
Baked apples Glass or Metal Pans A, B, C
350”-400”
30-60
Custard Glass Custard Cups or
B
300°-3500
30-60
Reduce temperature to
300°F.
for
large
Casserole (set in
pan
of
hot water)
Puddings, rice Glass Custard Cups or custard.
B
325”
50-90 Cook bread or rice pudding with custard
and custard Casserole base 80 to
90
minutes.
Pies
Frozen Foil Pan on Cookie Sheet
Meringue
A
400°-4250
45-70
Large pies use
400°F.
and increase
time.
Spread
to
crust edges
B, A 325°-3500
15-25
To quickly
bruwn
meringue usc
400”F.
for
8
to 10 minutes.
One crust Glass or Satin-finish Metal Pan A, B 400°-4250 45-60 Custard fillings require lower temperature,
Two crust Glass or Satin-finish Metal Pan
B
400°-4250 40-60
Innger
time.
Pastry shell Glass or Satin-finish Metal Pan
B
450°
12-15
Miscellaneous
Baked potatoes Set
on
Oven Shelf A, B, C
325°-4000
60-90 Increase time for large amount or
size.
Scalloped dishes Glass or Metal Pan A, B, C
325°-3750
30-60
Snuffles
Glass
Pan
B
300°-350”
30-75
8

Roasting
Roasting is cooking by dry heat.
Tender meat or poultry can be
roasted uncovered in your oven.
Roasting temperatures, which
should be low and steady, keep
spattering to a minimum. When
roasting, it is not necessary to sear,
baste, cover, or add water to your
meat. Roasting is easy, just follow
these steps:
Step
2:
Check weight of roast.
Place meat fat-side-up or poultry
breast-side-up on roasting rack in a
shallow pan. The melting fat will
baste the meat. Select a pan as
close to the size of meat as possible.
(Broiler pan with rack is a good
pan for this.)
Step
3:
Turn OVEN TEMP control
to desired temperature. Check the
Step 1.
Position oven shelf at Roasting
Gui~e
for temperatures
second from bottom position (B) for and approximate cooking times.
.
.
small size roast (3 to-5
lbs.
) and” at
bottom position (A) for larger
roasts.
Roasting Guide
Step
4: Most meats continue to
cook slightly while standing after
being removed from the oven. For
rare or medium internal doneness,
if meat is to stand 10 to 20 minutes
while making gravy or for easier
carving, you may wish to remove
meat from oven just before it is
done. If no standing is planned,
cook meat to suggested
temperature.
Frozen Roasts
Frozen roasts of beef, pork,
lamb, etc., can be started without
thawing, but allow 10 to 25 minutes
per pound additional time (10
minutes per pound for roasts under
5 pounds, more time for larger
roasts).
Thaw most frozen poultry before
roasting to ensure even doneness.
Some commercial frozen poultry
can be cooked successfully without
.
thawing. Follow directions given
on packer’s label.
Oven Approximate Roasting Time
~pe
Internal
Temperature Doneness in Minutes per Pound
Temperature “F
Meat
3
to
5-lbs. 6 to 8-lbs.
Tender cuts; rib,
bigh
quality
325° Rare:
24-30
18-22
1 30°-1400
sirloin tip, rump or top round* Medium:
30-35
22-25
150°-1600
Well Dmx:
35-45 28-33
170°- 185°
Lamb
leg
(jr
bum-in shoulder*
325” Rare: 21-25 20-23
1 30°- 140”
Medium: 25-30 24-28
150°- 160°
Well Done:
30-35 28-33
170°- 185°
Veal
shoulder,
leg
or loin*
325°
Well Done:
35-45
30-40
170°- 180°
Pork loin, rib or
shuulder*
325°
Well Dune:
35-45
30-40
170°-1800
HiOTI,
pre-cooked
325° To Warm:
10 minutes per lb. (any weight)
125”-130°
Under 10 Ibs.
10
to
15-lbs.
Han,
raw
325”
Well Done: 20-30
17-20
170°
*For
bone]css
rol]cd
roasts
over 6-inches
thick,
add
5 to 10 minutes per lb. to times
given
above.
Poultry
3 to 5-lbs.
Over 5 Ibs.
Chicken or Duck
325°
Well Done: 35-40
30-35
Chicken pieces
375°
185°-1900
Well
Done: 35-40
185°-1900
10
to 15-lbs.
Over 15 Ibs.
Inthigh:
Turkey 325°
Well
Done:
20-25 15-20 185°-1900
9

Broiling
Broiling Tips
●
Use tongs to turn meat
over—
pierced meat loses juices.
Broiling is cooking food by direct
heat from above the food. Your
range has a convenient compartment
below the oven for broiling. It also
has a specially designed broiler pan
and rack that allow dripping fat to
drain away from the foods and be
kept away from the high heat of
the gas flame.
●
Steaks
and
chops should be at
least 1 inch thick
for best broiling
results. Pan broil thinner ones.
Broiling Guide
M
Side
Time,
4inutes
3
Yl
9-10
Quantity
and/or
Thickness
!nd
Sidf
Time,
Minutes
Distance from the heat source may
be changed by positioning the broiler
pan and rack on one of three shelf
positions in the broiler
compartment—
A (bottom of broiler compartment),
B (middle) and C (top).
Both the oven and broiler
compartment doors should be
closed during broiling.
Shelf
Position
Food
Comments
Bacon
Y-lb. (about
8
thin slices)
c
3
Y2
7-8
7
5-6
8-Y
6-7
12-14
16-18
25-30
Arrange
in
single
layer
Ground Beef
Well Dune l-lb.
(4
patties)
l/z
to
%in.
thick
Space
evenly. Up to
8
patties
take
abnut
same time.
c
Beef
SteaLs
Rare
Medium
Well Done
l-in. thick
(1-1
Y2
Ibs.
)
A
A
A
A
A
A
A
9
12
13
10
15
25
30-35
2-3
3-4
13-16
5
Steaks less than l-in.
c[mk
through before browning.
Pm frying is recommended
Slash fat.
Rare
Medium
Well Dnne
Chicken (450°)
I%-in. thick
(2-2%
Ibs.
)
How to Broil
I whole
(2 to 2
‘Y-lbs.
),
split lengthwise
Reduce
times
abnut
5-10 min.
per side
for
cut-up chicken.
Brush each side with
melted
butter.
Broil
with skin side down
first
wrd
broil
with door
clused.
1.
If meat has fat or gristle near the
edge, cut vertical slashes through it
about 2 inches apart, but don’t cut
into meat. We recommend that you
trim fat to prevent excessive
smoking, leaving a layer about
l/8-inch thick.
Bakery Products
Bread (Toast)
or
Toaster Pastries 2-4 slices
I pkg. (2)
2-split
2-4
c
c
B
c
1/2-1
Do not
turn
uver.
5
Space evenly. Place English
muffins cut-side-up and brush
with butter if desired.
Cut through back of shell, spread
open. Brush with melted huttcr
before
and
alter
half
time.
Handle and turn very carefully.
Brush with
lemnn
butter
bet’orc
and
during
cnokirrg
if desired.
Preheat broiler to increase
browning.
2. Remove broiler pan and rack
from broiler compartment and
place food on rack.
English
Muf’fins
Lobster tails
(6
to
8-02. each)
3. Pull out broiler drawer or broiler
shelf and position broiler pan in
compartment. Placing food closer to
flame increases exterior browning
of food, but also increases
spattering and the possibility of fats
and meat juices igniting.
Fish
l-lb, fillets
‘A
to
‘Y-in. thick
Ham slices
(450°
Precnuked l-in. thick
B8
Incrcasc
times 5-10 min. per
side
for
1
Win. thick
or
hmne
curd.
Pork chops
Well Dnne
2
(’/2
inch)
2 (Win. thick),
fibout
1 lb.
10
13
8
10
10
17
6
4-5
10-12
4-7
10
4-6
12-14
I -2
Slash
fat.
4. Close broiler door and, for most
foods, turn OVEN TEMP knob to
BROIL. Exceptions are chicken
and ham which are broiled at a
lower setting in order to cook food
through before overbrowning it.
A
A
B
B
B
B
Lamb chops
Medium
Well Done 2 (1 inch)
~b(wt
10-12
oz.
2
(1
1/2
inch),
~bout
1
lb.
Medium
Well Done
5. Turn most foods once during
cooking; (the exception is thin fillets
of fish; oil one side, place that side
down on broiler rack and cook without
turning until done). Time foods for
about one-half the total cooking
time, turn food, then continue to
cook to preferred doneness.
[f
desired. split sausages in half
lengthwise; cut into 5
tn
6-in.
pieces.
l-lb. pkg. ( 10)
c
Wieners,
similar
prccouked
sausages,
bratwurst
6. Turn OVEN TEMP knob to
OFF. Remove broiler pan from
compartment and serve food
immediately. Leave pan outside
compartment to cool.
10

Care and Cleaning
Proper care and cleaning are
important so your oven will give
you efficient and satisfactory
service. Follow these directions
carefully in caring for it to help
assure safe and proper maintenance.
BE SURE ELECTRIC POWER
IS OFF BEFORE CLEANING
ANY PART OF YOUR OVEN.
Special Care of
Continuous-Cleaning
Oven Interior
Model RGJ616GEH
Your oven has a Continuous-
Cleaning interior that cleans itself
while cooking.
The inside of the
oven—top, sides, and back—is
finished with a
special coating
which cannot be cleaned in the
usual manner with soap, detergents,
commercial oven cleaners, coarse
abrasive pads or coarse brushes.
Use of such cleaners and/or the use
of oven sprays will cause permanent
damage.
The special coating is a porous
ceramic material
which is dark in
color and feels slightly rough to the
touch. If magnified, the surface
would appear as peaks, valleys, and
sub-surface “tunnels?’ This rough
finish tends to prevent grease
spatters from forming little beads
or droplets which run down the
side walls of a hard-surface oven
liner leaving unsightly streaks that
require hand cleaning. Instead,
when spatter hits the porous finish
it is dispersed and is partially
absorbed. This spreading action
increases the exposure of oven
soil to heated air, and makes it
somewhat less noticeable.
Soil may not disappear completely
and at some time after extended
usage, stains may appear which
cannot be removed.
The special coating works best on
small amounts of spatter.
It does
not work well with larger spills,
especially sugars, egg or dairy
mixtures.
The special coating is not used
on oven shelves.
Shelves should be
cleaned
outside the oven,
to
avoid
damage to the special coating.
To Clean the
Continuous-Cleaning Oven:
Model RGJ616GEH
1.
Let oven parts cool before
handling. It is recommended that
rubber gloves be worn when
cleaning oven parts manually.
2. Remove shelves and cookware.
3. Soil visibility maybe reduced by
operating the oven at 450”F. Close
the door and turn OVEN TEMP
knob to 450”F. Time for at least 4
hours. Repeated cycles may be
necessary before improvement in
appearance is apparent.
REMEMBER : DURING THE
OPERATION OF THE OVEN, THE
DOOR, WINDOW
AND
~HER
SURFACES WILL GET
H~
ENOUGH
TO
CAUSE BURNS. 1)0 NOT
TOUCH.
LET THE OVEN COOL BEFORE
REPLACING SHELVES.
4. If a spillover or heavy soiling
occurs on the porous surface, as
soon as practical after the oven has
cooled, remove as much of the soil
as possible using a small amount of
water and a stiff bristle nylon
brush. When using water, use it
sparingly and change it frequently,
keeping it as clean as possible, and
be sure to blot it up with paper
towels, cloths, or sponges. Do
not
rub or scrub
with paper towels,
cloths or sponges, since they will
leave unsightly lint on the oven
finish. If water leaves a white ring
on the finish as it dries, apply water
again and
blot
it
with a clean sponge,
starting at the edge of the ring and
working toward the center.
Do not use soap, detergent,
commercial oven cleaner, silicone
oven sprays, coarse steel pads or
coarse brushes on the porous
surface.
These products will spot,
clog and mar the porous surface
and reduce its ability to work.
11
Do not scrape the porous surface
with a knife or spatula—they
could
permanently damage the finish.
To Clean the
Porcelain Oven Interior
Model
RGJ515GEH
With proper care, the porcelain
enamel walls will retain their
good-
-looking finish for many years.
Soap and water will normally do
the job. Heavy spattering or
spillovers
may require cleaning
with a mild abrasive cleanser.
Soapy, wet pads may also be used.
Do not allow food spills with a high
sugar or acid content (such as milk,
tomatoes, sauerkraut, fruit juices
or pie filling) to remain on the
surface. They may cause a dull spot
even after cleaning.
Household ammonia may make
the cleaning job easier. Place 1/2
cup in a shallow glass or pottery
container in a cold oven overnight.
The ammonia fumes will help loosen
the burned-on grease and food.
If necessary, you may use a caustic
cleaner. Follow the package
directions.
Cautions about using
spray-on oven cleaners:
Be careful where the oven cleaner
is sprayed.
●
Do not
spray on the electrical
controls and switches (on models
so equipped) because it could cause
a short circuit and result in
sparking or fire.
. Do not allow a film from the
cleaner to build up on the
temperature
sensing bulb—it could cause the
oven to heat improperly. (The bulb
is located at the top of the oven. )
Carefully wipe the bulb clean after
each oven cleaning, being careful
not to move the bulb as a change in
its position could affect how the
oven bakes.
.
Do not
spray any oven cleaner
on the oven door, handles or any
exterior surface of the oven, wood
or painted surfaces. The cleaner
can damage these surfaces.
(continued next page)

Care
and
Cleaning
(continued)
Removable Oven Door
The oven door is removable to
make cleaning the oven easier.
To remove the door, open it a few
inches to the special stop position
that will hold
~he
door dp;n. Grasp
firmly on each side and lift the door
straight up and off the hinges. (Due
to the large amount of insulation
and the construction of the door, it
is heavy.)
Note:
Be careful not to place hands
between the spring hinge and the
oven door frame. The hinge could
snap back and pinch fingers.
Wash with hot, soapy water. For
stubborn spots, use a solution of
ammonia and water. Do not
immerse the door in water.
To replace the door,
position slots
in bottom of door over the hinges
that are in the “out” position. Then
lower the door slowly and evenly
over both hinges at the same time.
If hinges snap back against the oven
frame, pull them back out.
Model RGJ616GEH also has a
removable broiler compartment
door which may be removed for
cleaning.
Removable Oven Bottom
The raised section of the oven
bottom is removable for cleaning.
Take it out of the oven and you can
apply effective cleaners to clean
up excessive spillovers or remove
baked-on soil—cleaners that should
never be used near the special
porous ceramic oven interior.
To remove the oven bottom:
1.
Remove the oven shelves.
2.
Lift upward on shelf supports.
Swing bottom of supports toward
center of oven and remove.
3.
Remove the two knurled
hold-
down screws at each front corner.
If screws are too tight to remove by
hand, use a screwdriver.
4. Place your fingers in the slots in
the bottom and lift up the front
edge of the oven bottom until it is
clear of the oven front frame.
12
—.
———
5.
Pull the bottom forward and out
of the oven, keeping the rear of the
oven bottom gliding on the bottom
of the lowest shelf glide. This keeps
it from catching on the burner igniter
shield. To replace the bottom, just
reverse this procedure, making sure
the two tabs on the rear of the oven
bottom go into the slots at the rear.
The oven bottom has a porcelain
enamel finish. To make cleaning
easier, protect the oven bottom
from excessive spillovers. This is
particularly important when baking
a fruit pie or other foods with high
acid content. Hot fruit fillings or
foods that are acid in content such
as milk, tomato or sauerkraut, and
sauces with vinegar or lemon
juice, may cause pitting and damage
to the porcelain enamel surface.
To protect the oven bottom surface,
place a piece of aluminum foil
slightly larger than the baking dish
or
small
cookie sheet on a lower
rack or under the baking dish to
catch any
boilovers.
It should not
completely cover the rack as this
would cause uneven heat in the
oven. Aluminum foil should not
be placed on the oven bottom.
If a spillover does occur on the
oven bottom, allow the oven to cool
first. You can clean the bottom with
soap and water, a mild abrasive
cleanser, soap-filled abrasive pads,
or caustic oven cleaner following
manufacturer’s directions.
When applying oven cleaner,
be careful not to get it on the
countertop, floor,
continuous-
cleaning oven parts or any other
surface.
Note: Porcelain oven door liner and
oven bottom may be cleaned with a
commercial oven cleaner. They
must be removed and cleaned away
from the oven to prevent damage to
the continuous-cleaning oven liner.

Oven Shelves
Oven shelves may be cleaned with
a mild abrasive cleanser following
manufacturer’s directions. After
cleaning, rinse the shelves with
clean water and dry with a dry cloth.
To remove heavy, burned-on soil,
soapy metal pads may be used
following manufacturer’s directions.
After scrubbing, wash with soapy
water, rinse and dry.
Broiler Pan & Rack
After broiling, remove the broiler
rack and carefully pour off the
grease. Wash and rinse the pan
and rack in hot, soapy water.
If food has burned on, sprinkle
the broiler rack while hot with
detergent and cover with wet paper
towels or a dish cloth. That way,
burned-on foods will soak loose
while the meal is being served.
Do not store a soiled broiler pan
and rack in the oven or broiler
compartment.
Oven Light Bulb
Replacement
Before replacing any light bulb,
disconnect electric
Dower
to the
Adjusting the
Oven Thermostat
The temperature control in your
new oven has been carefully adjusted
to provide accurate temperatures.
However, if this oven has replaced
one you have used for several years,
you may notice a difference in the
degree of browning or the length
of time required when using your
~
favorite recipes. Oven temperature
controls have a tendency to “drift”
over a period of years and since
this drift is very gradual, it is not
readily noticed. Therefore, you
may have become accustomed to
your previous oven which may
have provided a higher or lower
temperature than you selected.
Before attempting to have the
temperature of your new oven
changed, be sure you have followed
the baking time and temperature of
the recipe carefully. Then, after
you have used the oven a few times
and you feel the oven is too hot
or too cool, there is a simple
adjustment you can make yourself
on the OVEN TEMP knob.
Pull the knob off the control shaft
and look at the back side. There is
a disc in the center of the knob skirt
with a series of notches on the inner
Note which notch the pointer is
located in. To make an adjustment,
carefully loosen (approximately
one turn), but do not completely
remove the two screws that hold the
skirt to the knob. Hold the knob in
one hand and with the other hand
carefully tilt the skirt until the notch
in the disc clears the pointer on the
knob shaft.
To raise the oven temperature, turn
the
dial
in the direction of the
arrow for
“Raise~’
To lower the
temperature, turn the
dial
in the
direction of arrow for “Lower?’
Each notch will change the oven
temperature approximately 25°F.
We suggest that you make the
adjustment one notch from the
original setting and check oven
performance before making any
additional adjustments.
After the adjustment is made, make
sure the pointer on the knob shaft
is aligned with the notch in the disc.
Press skirt and knob together and
retighten screws so they are snug,
but be careful not to overtighten.
Re-install
knob on range and
check performance. Note: After
an adjustment has been made the
“Off” and “Broil” positions will
not line up with the indicator mark
range at the main
f~se
or circuit
edge next to the knob shaft. One of
breaker panel.
Let the bulb cool these notches is positioned over a
completely before removing it. Do
pointer on the side of the knob shaft.
not touch a hot bulb with a damp
cloth—the bulb will break.
The light bulb in your oven is
located in the upper right corner.
Reach in and unscrew it after taking
precautions mentioned above.
Replace it with a high-temperature
appliance bulb of the same wattage.
Note position of
pointer to notches
@
before adjustment
‘sE-m
,$+
@
%*’
‘
+%
L
&
‘ER
W
Loosen only the
locking screws
on the control panel as they
previously did. This condition
is normal and will not create
a problem.
(continuecf
next page)
13

Cleaning Guide
Note: Let range parts cool before cleaning.
PART
MATERIALS
‘IO
USE GENERAL DIRECTIONS
Broiler Pan
and
Rack
●
Soap and Water Drain fat, cool pan and rack slightly.
(Do
not let soiled pan and
rack
stand in broiler
● Snap-Filled Scouring
Pad
compartment
to
cool. ) Sprinkle on detergent. Fill the pan with warm water
and
spread
● Commercial Oven Cleaner
cloth or paper towel over the
rack.
Let pan and rack stand for a few minutes.
Wash;
scour
if necessary, Rinse and dry. OfT]ON: The broiler pan
and
rack
may alsn be cleaned in
a
dishwasher.
Control Knobs
●
Mild Soap and Water Pull off knobs. Wash gently but do not
soak,
Dry
and
return controls to range making sure
to match flat area
on
the knnb and shaft.
Outiide Glass Finisb
● Snap
and
Water
Clean
outside
of
cooled black glass door with
a
glass cleaner that dries not
cnntain
ammonia. Wash nther glass with cloth dampened in
snapy
water. Rinse and polish with a
dry cloth, If
knnbs
are iemnved, do not allow water to run dnwn inside the surface of
glass
while cleaning.
Metal, including
Q
Soap and Water Wash, rinse and then polish with a dry clnth. DO NOT USE steel wnol, abrasives,
Side Trims and
ammonia, acids, or commercial riven cleaners which may damage the finish.
Trim Strips
Porcelain Enamel
●
Paper
Towel
Avoid
cleaning powders or harsh abrasives which may scratch the enamel. If acids should
Finisb
● Dry Clnth
spill on the range while it is hnt, use a dry paper towel
nr
clnth
tn
wipe up
rigbt
away.
●
Soap and Water When the surface has cooled, wash and rinse. For nther spills, such
as
fat smatterings, etc..
wash witb soap and water when
conled
and then rinse.
Pulish
with dry clnth.
Painted Surfaces
●
Soap and Water Use a mild solution of soap and water.
Dn
nnt use any harsh abrasives or cleaning powders
which may scratch
or
mar
surliice,
Inside Oven Door*
● Soap and
Water
To
clean
oven door, remove by ripening
a
few inches and grasping door at sides. Lift
doclr
● Soap-Filled Scouring
Pad
up and away from hinges. Clean with any and all mentioned materials. Replace by
● Commercial Oven Cleaner
grasping dour at sides and lining up donr with hinges. Push donr firmly into
place.
Continuous-Cleaning
● Stiff Bristle Nylon Brush
Cuol
before
cleaning.
Dven
lnterior*—
rep, Sides and Back
If heavy soiling has occurred
on
theporou.$
,w@v,
remove as much
of
the soil as possible
[Model
RGJ616GEH)
using a small amnunt of water and a stiff bristle
nylnn
brush. Use
water
sparingly and
CAUTION: When in
change it frequently, keeping it
as
clean
as possible, and be sure
tn
blnt
it up with paper
tuwels,
cloths or sponges.
Jse,
light bulbs
can
EM
nor
rub
or
.scrufr
with paper towels, cloths or sponges.
since
xcomc
warm enougb to they will leave unsightly lint
nn
the oven finish. If water leaves a white ring
nn
the finish as
weak if touched with it dries, apply water again and
hlo(
it with a clean sponge, starting at the edge
of
the ring
moist clnth or towel. and working
tnward
the center.
When cleaning, avoid
For
special cleaning instructions, see page H.
ouching
warm lamps
,vith
cleaning cloths. )
Oven
Liner*
●
Snap and Water
Conl
before cleaning.
Model
RGJ515GEH)
●
Soap-Filled Scouring Pad
,CAUTION:
When in
FOR LIGHT SOIL: Frequent wiping with mild soap and water (especially after cooking
● Commercial Oven Cleaner
Jse,
light bulbs can meat) will prnlnng the time between majnr cleaning. Rinse thoroughly. NOTE: Soap
Ictt
>ecome
warm enough [n on liner causes additional stains
when
oven
is reheated.
>rcak
if”
tnuched
with FOR HEAVY SOIL: Cboose a nonabrasive cleaner and
follnw
label
instructions,
using
noist cloth or towel.
thin layer
tsfcleaner.
Use
n!
rubber
glnves
is recommended. Wipe or
ruh
lightly on
tvhen
cleaning,
avoid
stubborn spots. Rinse well. Wipe off any oven cleaner that gets nn thermostat bulb.
When
nuching
warm
Iarnps
rinsing oven after cleaning alsn wipe thermostat bulb.
with
cleaning cloths if
amp cover is
remnved.
)
lemovable
Oven
●
Soap and Water The oven bottom panel can
bc
rcmovcd
for easy cleaning (see
page
12).
USC
the
same
Bottom
● Soap-Filled
Scnuring
Pod
directions
fbr
cleaning m
expl:iincd
ab(wc
Ii)r
Pnrcckiin
Enamel Finish.
(Non-metallic)
$helves
●
Swip
and
Water Rcmovc
shelves and clean them outside 01’
the
nvcn
to
avoid damaging the
specially
c(xitwl
●
Snap-Filled Scouring Pad oven top, sides and
back
nn
model
RGJ616GEH.
Use any and all
mcntiorwd
materials.
● Commercial Oven Cleaner Rinse thoroughly
to
rcmovc
all materials after cleaning. NtXE:
Sonw
commeru
lal
cwen
clcimers
cause darkening and
discolt)ratinrr.
When
using
ti~r
first time,
tmt
cleaner
(m
small part {f
shelf
and
check
li)r
discoloration
beti)re
c{)mplctely
cleaning.
*Spillage
ti’
nmrinadcs.
t’ruit
juices.
and
basting materials containing
acids
n]ay
cause
cfisc{~k)ra[ion.
Spilkwers
shtmlct
he
hlotted
up
in)nvxiiately’,
with care
heing
taken
not
tu
touch any hot
porti(m
t)f
the
(wen.
When the surface is
cnol,
clean
and
rinse.

a
QUeStiOIIS?
~
Use This Problem Solver
---
PROBLEM
OVEN WILL
N~
WORK
OVEN LIGHT DOES
N~
WORK
FOOD DOES NOT
BROIL PROPERLY
FOOD DOES
NOT
ROAST
OR BAKE PROPERLY
MOISTURE INSIDE AND
OUTSIDE OVEN
POSSIBLE CAUSE AND REMEDY
. Plug on range is not completely inserted into the outlet receptacle.
●
Circuit breaker in house has been tripped, or fuse has been blown.
●
Oven controls are not properly set.
●
Light bulb is loose.
●
Bulb is defective. Replace.
●
Switch which operates oven light is broken. Call for service.
●
OVEN TEMP knob not set at BROIL. Broiler will not operate if OVEN
TEMP knob is turned past BROIL.
●
Food is being cooked on hot pan.
●
Utensils are not suited for broiling.
●
OVEN SET knob not set on
AU’N3
OVEN when using Automatic Oven
Timer.
● OVEN TEMP knob not set correctly.
●
Shelf position is incorrect. Check Roasting and Baking pages.
●
Oven shelf is not level.
●
Wrong cookware is being used. When roasting, pan is too small.
●
Foil tent not used when needed to slow down browning during roasting.
●
Be
sure oven vent duct is not blocked or covered.
If you need more help.. call, toll free:
GE Answer Center”
800.626.2000
consumer information service
If You Need Service
To
obtain service, see your warranty
on the back page of this book.
We’re proud of our service and
want you to be pleased. If for some
reason you are not happy with the
service you receive, here are three
steps to follow for further help.
FIRST, contact the people who
serviced your appliance. Explain
why you are not pleased. In most FINALLY, if your problem is still
cases, this will solve the problem. not resolved, write:
NEXT, if you are still not pleased, Major Appliance
write all the details—including Consumer Action Panel
your phone number—to: 20 North Wacker Drive
Manager, Consumer Relations Chicago, Illinois 60606
Hotpoint
Appliance Park
Louisville, Kentucky 40225

YOUR HOTPOINT RANGE
WARRANTY
Save proof of original purchase date such as your sales slip or cancelled check to establish warranty period
WHAT IS COVERED
FULL ONE-YEAR WARRANTY
This warranty is extended to
For one year from date of original
the original purchaser and any
purchase, we will provide, free of
succeeding owner for products
charge, parts and service labor purchased for ordinary home use
in your home to repair or replace in the 48 mainland states, Hawaii
any part of the range
that fails
and Washington,
D.C.
In Alaska the
because of a manufacturing defect. warranty is the same except that it is
LIMITED because
you
must
pay
to
ship the product
to~he
service
shop
or for the service technician’s travel
costs to your home.
All warranty service will be provided
by our Factory Service Centers or
by our authorized Customer
Care”
servicers during normal working
hours.
Look in the White or Yellow Pages
of your telephone directory for
HOTPOINT FACTORY SERVICE,
GENERAL
ELECTRIC-HOTPOINT
FACTORY SERVICE or HOTPOINT
CUSTOMER CARE@ SERVICE.
WHAT IS
N~
COVERED “
Servicetripstoyour
hometo
teach you how to use the product.
Read your Use and Care material.
If you then have any questions
about operating the product,
please contact your dealer or our
Consumer Affairs office at the
address below, or call, toll free:
GE Answer Center”
800.626.2000
consumer information service
. Improper installation.
If you have an installation problem,
contact your dealer or installer.
You are responsible for providing
adequate electrical, gas, exhausting
and other connecting facilities.
● Replacement of house fuses or
resetting of circuit breakers.
. Failure of the product if it is used
for other than its intended purpose
or used commercially.
. Damage to product caused
by accident, fire, floods or acts
of God.
WARRANTOR IS
NOT
RESPONSIBLE
FOR CONSEQUENTIAL DAMAGES.
Some states do not allow the exclusion or limitation of incidental or consequential damages, so the above limitation or exclusion
may not apply to you. This warranty gives you specific legal rights, and you may also have other rights which vary from state to state.
To know what your legal rights are in your state, consult your local or state consumer affairs office or your state’s Attorney General.
Warrantor: General Electric Company
If further help is needed concerning this warranty, write:
Manager—Consumer Affairs, GE Appliances, Louisville, KY 40225
ttmPoINr
RGJ515GEI
RGJ616GEI
I3-s9
This manual suits for next models
1
Table of contents
Other GE Oven manuals