GE 29579 User manual

Model 29579
Desktop Caller ID
Speakerphone with
Amplied Volume and
Tone Control User’s Guide

Important Information
NOTICE: This product meets the applicable Industry Canada
technical specications.
Operation is subject to the following two conditions: (1) This
device may not cause interference, and () This device must
accept any interference, including interference that may
cause undesired operation of the device.
The equipment must be installed using an acceptable
method of connection. The customer should be aware that
compliance with the above conditions may not prevent
degradation of service in some situations.
Repairs to certied equipment should be made by an
authorized Canadian maintenance facility designated by
the supplier. Any repairs or alterations made by the user to
this equipment, or equipment malfunctions, may give the
telecommunications company cause to request the user to
disconnect the equipment.
Users should ensure for their own protection that the
electrical ground connections of the power utility, telephone
lines and internal metallic water pipe systems, if present,
are connected together. This precaution may be particularly
important in rural areas.
CAUTION: Users should not attempt to make such
connections themselves, but should contact the appropriate
electric inspection authority, or electrician, as appropriate.
NOTES: This equipment may not be used on coin service
provided by the telephone company.

Interference Information
This equipment generates and uses radio frequency energy
which may interfere with residential radio and television reception
if not properly installed and used in accordance with instructions
contained in this manual. Reasonable protection against such
interference is ensured, although there is no guarantee this will
not occur in a given installation. If interference is suspected
and veried by switching this equipment on and off, the user is
encouraged to try to correct the interference by one or more of
the following measures: Reorient the radio/television receiver’s
antenna, relocate the equipment with respect to the receiver, plug
the equipment and receiver into separate circuit outlets. The user
may also wish to consult a qualied radio/television technician for
additional suggestions. This equipment has been fully tested and
complies with all limits for Class B computing devices pursuant to
part 15 FCC Rules and Regulations.
Telephone Network Information
Should your equipment cause trouble on your line which may
harm the telephone network, the telephone company, where
practicable, may notify you that temporary discontinuance of
service may be required. Where prior notice is not practicable and
the circumstances warrant such action, the telephone company
may temporarily discontinue service immediately.
The telephone company may make changes in its
communications facilities, equipment, operations or procedures
where such action is required in the operation of its business. If
these changes are expected to affect the use or performance
of your telephone equipment, the telephone company will
likely give you adequate notice to allow you to maintain
uninterrupted service.

Notice must be given to the telephone company upon
termination of your telephone from your line.
REN Number
On the bottom of this equipment is a label indicating, among
other information, the Ringer Equivalence Number (REN) for the
equipment.
The REN is useful in determining the number of devices you
may connect to your telephone line and still have all of these
devices ring when your telephone number is called. In most
(but not all) areas, the sum of the RENs of all devices connected
to one line should not exceed 5. To be certain of the number
of devices you may connect to your line as determined by the
REN, you should contact your local telephone company.
REN Number is located on the cabinet bottom.
Hearing Aid Compatibility (HAC)
This telephone system meets FCC/Industry Canada standards
for Hearing Aid Compatibility.
Licensing
Licensed under US Patent 6,7,009.

5
Table of Contents
Important InformatIon ........ 2
Interference InformatIon .... 3
telephone network
InformatIon ................... 3
ren number ...................... 4
hearIng aId compatIbIlIty
(hac) ........................... 4
lIcensIng ............................ 4
IntroductIon ...................... 7
before you begIn ............... 8
Parts CheCklist ....................8
telePhone JaCk
requirements ....................8
InstallatIon ....................... 9
imPortant installation
Guidelines .........................9
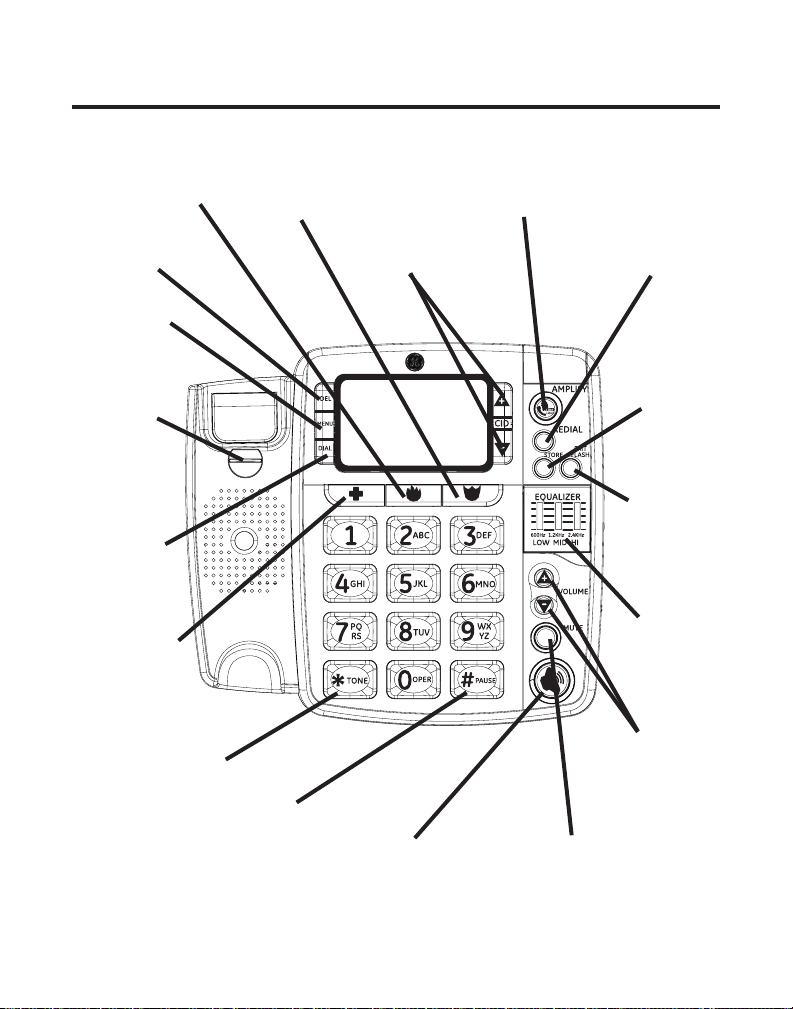
base layout ......................10
back & sIde VIews ............11
InstallIng the phone .........12
installinG BaCkuP
Batteries .........................12
ConneCtinG the
telePhone ......................13
settinG uP the user
menu ...............................15
Wall mountinG.................16
disPlay lanGuaGe ..............17
Contrast .............................17
loCal area Code ...............18
telephone operatIon ........19
sPeakerPhone .....................19
PlaCinG a Call ...................20
handset .........................20
sPeakerPhone ................20
ansWerinG a Call ........20
handset .........................20
sPeakerPhone ................21
Volume ................................21
amPlified audio .................22
tone equalizer ..................23
neCklooP ............................24
mute ....................................24
ViBratinG alert ..................24
flash ...................................25
redial ..................................25
caller Id (cId) ................26
Call WaitinG Caller id 27
reCeiVinG Cid reCords ..27
storinG Cid reCords ....28
reVieWinG Cid reCords 28
dialinG a Cid numBer ...29
Caller id disPlay

6
Table of Contents
messaGes ..........................30
storinG Cid reCords in
internal memory ............31
to rePlaCe a stored Cid
reCord ..............................32
deletinG a Cid reCord .32
deletinG all Cid
reCords ............................32
memory ............................ 33
storinG a numBer in
memory ...........................33
addinG a Pause to the
dialinG sequenCe ..........34
ChanGinG a stored
numBer ...........................34
dialinG a numBer from
memory ...........................34
dialinG the emerGenCy
quiCk dial numBers .....34
Chain dialinG from
memory ...........................35
troubleshootIng guIde .....36
general product care .....38
warranty .........................39
accessory InformatIon ..... 41
Index ................................42

7
Introduction
CAUTION: When using telephone equipment,
there are basic safety instructions that
should always be followed. Refer to the
IMPORTANT SAFETY INSTRUCTIONS provided
with this product and save them for future
reference.
This phone is designed for those individuals with mild to
severe hearing loss. The unit is designed to control the
volume of the phone as well as the frequencies that best t
your hearing. It has three pitch control buttons allowing you
to customize the phone to your desire. The equalizer is set at
600Hz, 1.KHz and .kHz.
The phone is designed with unique feature to protect the
hearing in your family. You will be able to switch between
automatic and manual amplication modes to protect your
hearing from being exposed to dangerous sound levels.
Please read this manual very carefully before using your
9579 and keep it for future references. If you have any
question or problems, consult the Troubleshooting Tips for
the solution.

Before You Begin
Parts Checklist
Make sure your package includes the items shown here.
Telephone Jack Requirements
To use this phone, you need an RJ11C type
modular telephone jack, which might look
like the one pictured here, installed in your
home. If you don’t have a modular jack,
call your local phone company to nd out
how to get one installed.
Base Handset Telephone
line cord
Handset
cord
Power
Supply
Vibrating
Alert
Modular
telephone
line jack
Wall plate

9
Installation
Important Installation Guidelines
• Avoid sources of noise and heat, such as motors,
uorescent lighting, microwave ovens, heating
appliances and direct sunlight.
• Avoid areas of excessive dust, moisture and low
temperature.
• Avoid other cordless telephones or personal computers.
• Never install telephone wiring during a lightning storm.
• Never install telephone jacks in wet locations unless the
jack is specically designed for wet locations.
• Never touch non-insulated telephone wires or terminals,
unless the telephone line has been disconnected at the
network interface.
• Use caution when installing or modifying telephone lines.

10
Base Layout
HOSPITAL
button
EXIT/
FLASH
button
REDIAL
button
STORE
button
speaker
button
Tone
Equalizer
FIRE
button AMPLIFY
button
ALARM
button
MUTE button
VOLUME
(p/q)
buttons
#/PAUSE
button
*/TONE
button
DEL
button
MENU
button
DIAL
button
CID
(p/q)
buttons
DESK/
WALL
MOUNT
tab

11
Back & Side Views
(BACK VIEW)
(SIDE VIEW)
LINE jack
DATA jack
AMPLIFY Override
Switch
RINGER VOL
(HIGH/LOW/OFF)
switch
RINGER PITCH
(HIGH/LOW)
switch
NECKLOOP
VIBRATING
ALERT

1
Installing the Phone
Installing Backup Batteries
CAUTION: Disconnect the phone cord from
the wall outlet before installing or replacing
the batteries.
In case of a power outage, the phone uses AA alkaline
batteries for backup power for incoming voice amplication
and visual ringer functions.
NOTE: If no batteries are installed, the low
battery icon will ash.
1. Unplug the power
adaptor and the
telephone line before
installing batteries.
. Carefully turn over the
phone, and release
latch on battery
compartment and
remove cover.
. Insert AA-size
alkaline batteries as shown on the diagram in the battery
compartment.
. Snap the battery compartment door back into place.
5. Re-attach the power adaptor and the telephone line cord
to the unit .

1
NOTE: Remove the batteries if storing the unit
for over 30 days to prevent damage in the event
of leaking batteries.
Connecting the Telephone
NOTE: The unit is shipped from the factory for
placement on a level surface.
1. Choose an area near a telephone wall jack (RJ11C), and
place your cordless
telephone on a
level surface, such
as a desktop or
tabletop, or you
may mount it on
the wall.
. Plug the AC power
adaptor into the
electrical outlet and
the DC connector into the jack on the back of the base.
CAUTION: To reduce risk of personal injury,
re, or damage use only the 5-2784 power
adaptor listed in the user’s guide. This power
adaptor is intended to be correctly orientated
in a vertical or oor mount position.
. You can stretch out the kick-stands on the bottom of the
base for a better viewing angle when placed on desktop.

1
. Connect one end of the coiled handset cord to the jack on
the handset.
5. Plug the other end of the coiled handset cord to the jack
on the base.
6. Make sure the DESK/WALL MOUNT tab is rotated to the
DESK position and place the handset into the cradle.
7. Adjust the RINGER VOLUME switch to the desired setting:
HI, LOW or OFF.

15
Setting Up the User Menu
NOTE: You should not plug the telephone into
the modular jack while setting up the User
Menu.
1. Press the MENU button, to access the menu feature
conguration mode.
# 1. >ENG FRA ESP (Default English)
# . CONTRAST (default level is ).
# . LOCAL AREA CODE
. Press the MENU button to scroll through the menu
screens.
. Use the CID
(p or q)
buttons to select the desired setting.
NOTE: You have 20 seconds following an entry
before the phone returns to the Summary
Screen.
. Plug one end of the telephone line cord into the LINE jack
at the back of the base and the other end into a modular
jack.
5. If you have another device (example, an additional
auxiliary phone or data modem) need to be connected to
the unit, please connect it to the DATA jack on the back of
the unit.
The unit is properly installed if you pick up the handset and
hear the dial tone. If you don’t hear a dial tone recheck all
the installation steps.

16
Wall Mounting
1. Plug the AC power adaptor into the electrical outlet and
the DC connector into the jack on the back of the base.
. Plug one end of the straight telephone line cord into the
jack on the bottom of the
base.
. Close the kick-stands on
the bottom of the base
unit if you’ve opened
them before.
. Feed the line cord
through the groove
and plug the end into
the modular telephone
jack. Excess telephone
line can be stuffed into
the recess area on the
bottom of the Base Unit.
5. Slip the mounting holes (on the bottom of the base) over
the wall plate posts and rmly slide the unit down into
place.
6. Make sure the DESK/WALL MOUNT tab is rotated to the
WALL position.

17
Display Language
This adjustment allows you to display the Caller ID prompts
in English, French, or Spanish.
1. Press the MENU button until ENG FRA ESP appears in the
display.
. Use the CID
(p or q)
button to select ENG, FRA, or ESP.
. Press MENU button again to save.
Contrast
This adjustment allows you to adjust the contrast of the
display.
1. Press the MENU button until CONTRAST shows in the
display.
. Use the CID
(p or q)
button to select level 1, , , or .
. Press MENU button again to save.

1
Local Area Code
The telephone uses the programmed area codes to
determine the number format to display when a valid Caller
ID signal is received. Numbers that match the local area
code are displayed as seven digits and are used for dialing
back previous numbers. Entering your local area code will
also help you immediately know if the call is local or long
distance when viewing the CID records in the display.
NOTE: If you make a mistake and want to start
over, press the DEL button to delete all of the
digits.
1. Press the MENU button until LOCAL AREA CODE shows in
the display.
. Use the CID
(q)
button to select the correct number or
enter directly by using the number pad.
. Use the CID
(p)
button to move to second and third digit
locations to make your selections.
. Press the MENU button to save.

19
Telephone Operation
Speakerphone
For hands-free operation and convenience, this unit is
equipped with a speakerphone.
For best speakerphone performance, avoid the following:
• Areas with high background noise. (The microphone
might pick up these sounds and prevent the
speakerphone from going into the receiving mode when
you nish talking.)
• Surfaces affected by vibration.
• Recessed areas such as in a corner, under a cupboard, or
next to a cabinet, which can generate an echo effect.
Note the following guidelines when using the
speakerphone:
• The speakerphone works similar to a two-way radio in
that you can only listen or talk at one time.
• Stay reasonably close to the phone so that you can be
clearly heard by the person to whom you are talking.
• You can adjust the speaker volume by adjusting the
VOLUME
(p or q) buttons while the speakerphone is in
use
.
• The speakerphone indicator illuminates when the
speakerphone is in use.

0
Placing a Call
Handset
1. Pick up the handset and listen for a dial tone.
. Dial the number you want to call.
. When nished, hang up the handset.
Speakerphone
1. Press the speaker button on the base and listen for a dial
tone.
. Dial the number you want to call.
. When nished, press the speaker button to hang up.
Answering a Call
NOTE: Make sure the ringer switch is set to HI
or LO, or the phone will not ring. The visual ring
indicator will ash at all settings.
Handset
1. When the phone rings, pick up the handset.
. When nished, hang up the handset.
Other manuals for 29579
1
Table of contents
Languages:
Other GE Telephone manuals