GE 05GP008 User manual

•_. _,_,_I_S_¸ .... . •

IMPORTANT SAFETY INFORMATION
A This symbol indicates "dangerous voltage"
inside the product that preserits a risk of
electric shock or personal injury.
CAUTION: To prevent
.electric shock, match wide
blade of plug to wide slot,
funy inserL
ATTENTION: Pour _viter les
A.chocs _lectriques, introduire
This symbol indicates important instructions la lame la plus large de la
de p ee
[Warning ]
To reduce the risk of fire or shock hazard, do not expose this TV to rain or
moisture.
Caution
FCC Regulations state that unauthorized changes or modifications to this equipment may
void the user's authority to operate it.
Note To Cable TV Installer
This reminder is provided to call your attention to Article 820-40 of the National Electrical
Code (Section 54 of the Canadian Electrical Code, Part 1)which provides guidelines for
proper grounding and, in particular, specifies that the cable ground shall be connected to the
grounding system of the building as close to the point of cable entry as practical.
PRODUCT REGISTRATION
Please fill out the product registration card and return it immediately. Returning this card
allows usto contact you if needed.
Keep your sales receipt to obtain warranty parts and service and for proof of pumhase.
Attach it here and record the serial and model numbers in case you ever need them. The
numbers are located on the backof the TV.
Model No.
Serial No.
Purchase Date:
Dealer/Add ress/Phone:

INTRODUCTION
I
Your television is designed to give you hours of enjoyment and high
quality performance. To get the most out of your new purchase, we
suggest that you take a few minutes right now to read through this
instruction manual.
The first section shows you how to install and set-up the TV; next, it
discusses the television controls, followed by sections describing
AC/DC power and mounting the TV.
Ifyou have any questions or problems, consult the Table of Contents
or the Troubleshooting Guide for the solution.
TABLE CONTZNTS
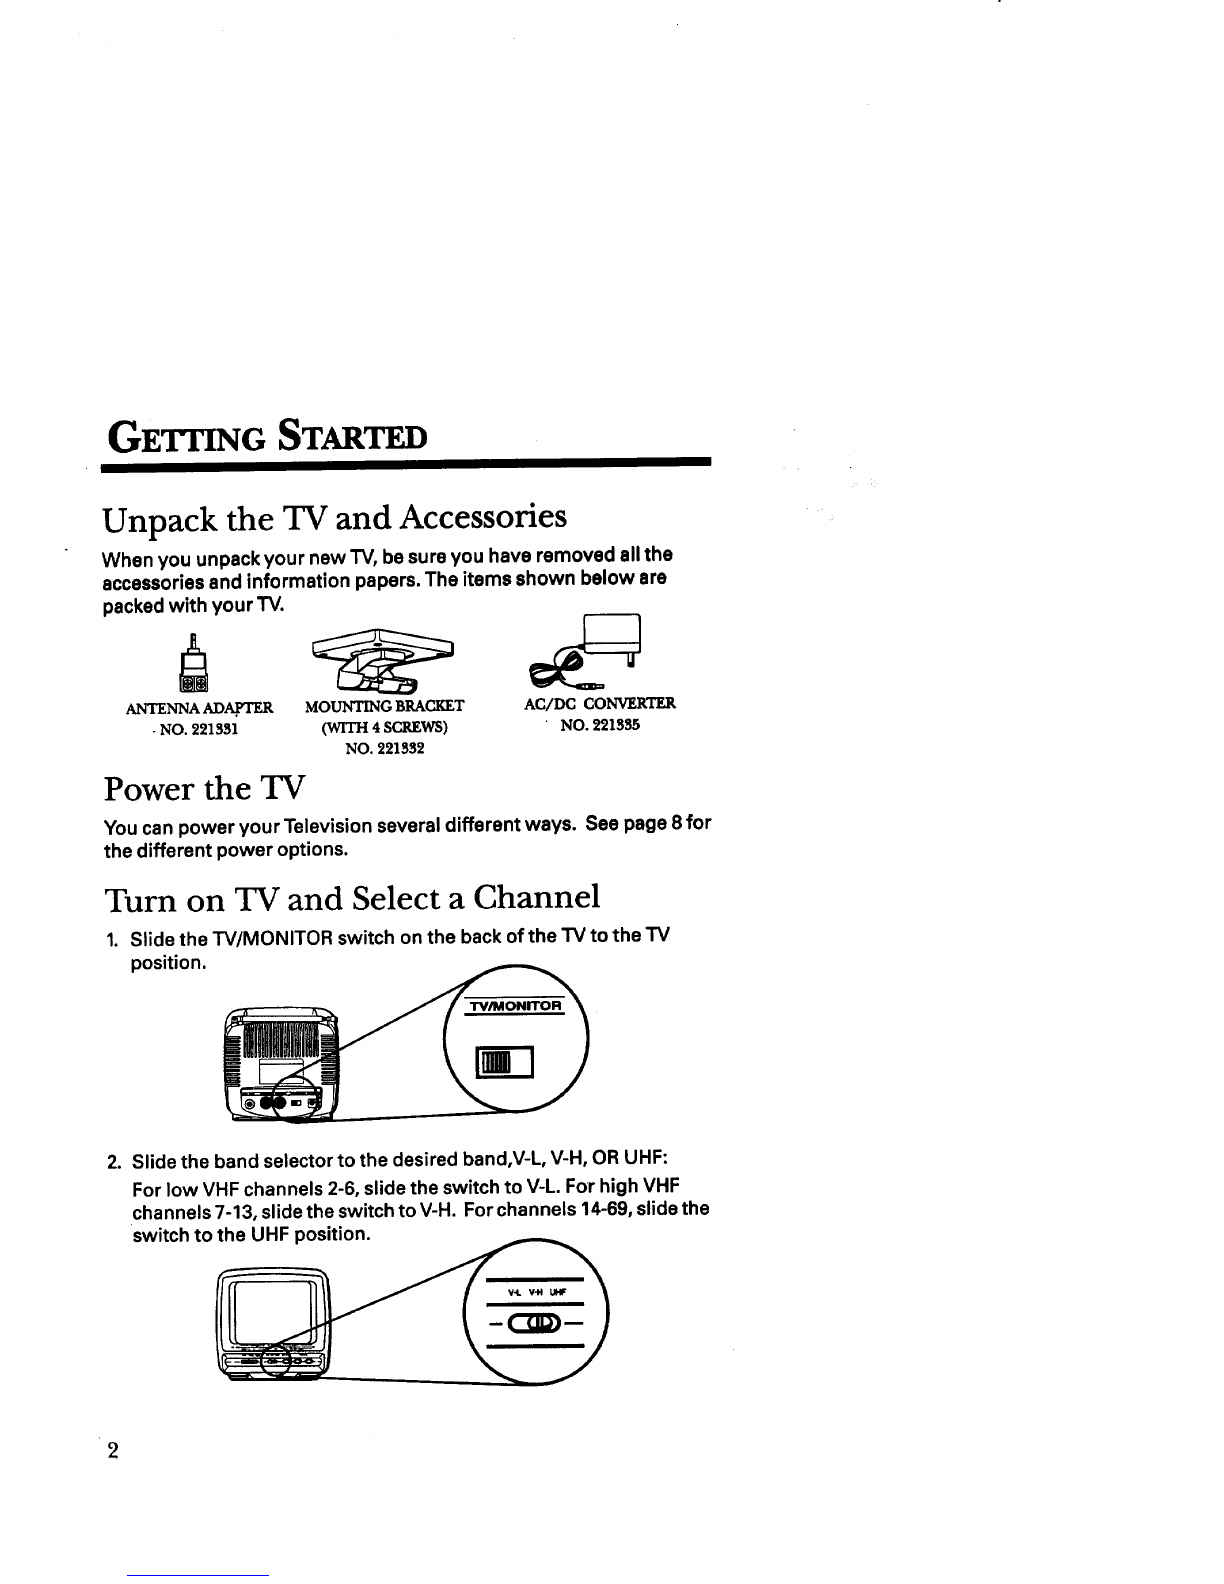
GETTING STARTED ............................................................ 2
UNPACK THE TV AND ACCESSORIES ............................... 2
POWER THE TV .............................................................. 2
TURN ON TV AND SELECT A CHANNEL ............................ 2
ADJUST THE VOLUME ..................................................... 3
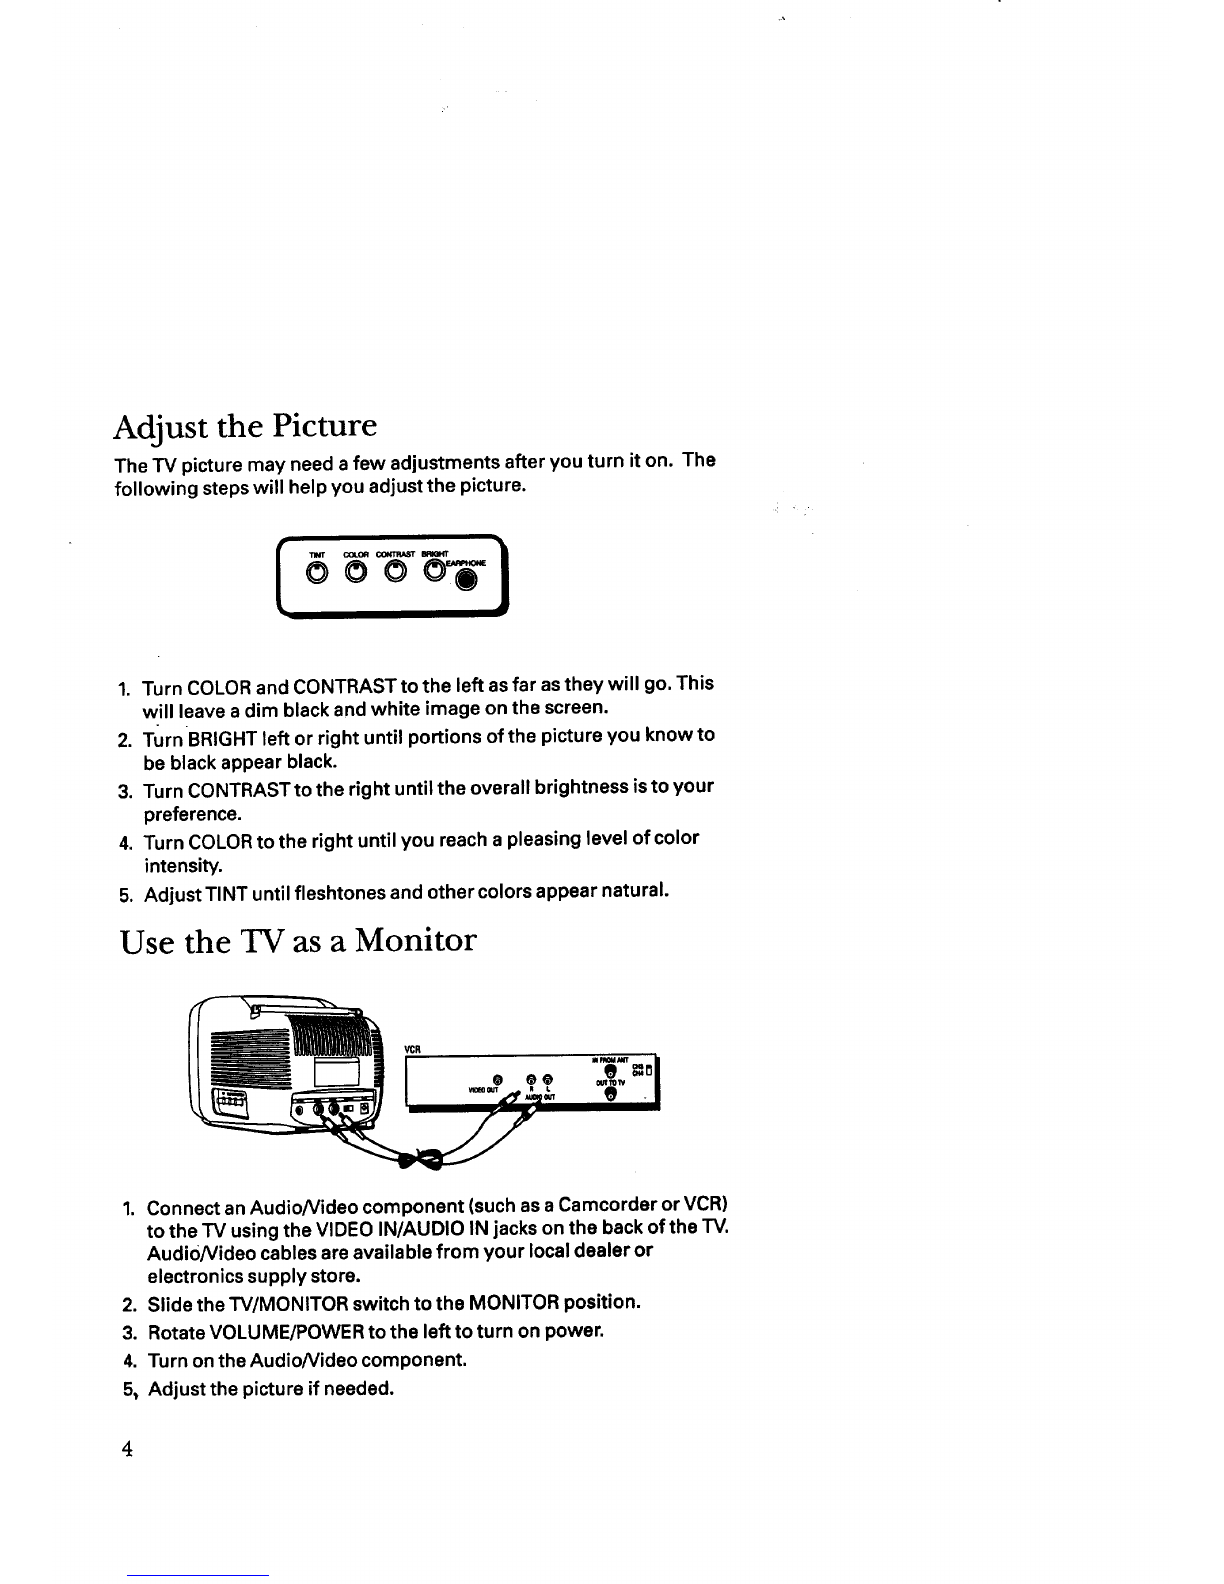
ADJUST THE PICTURE .................................................... 4
USE THE "IV AS A MONITOR ............................................ 4
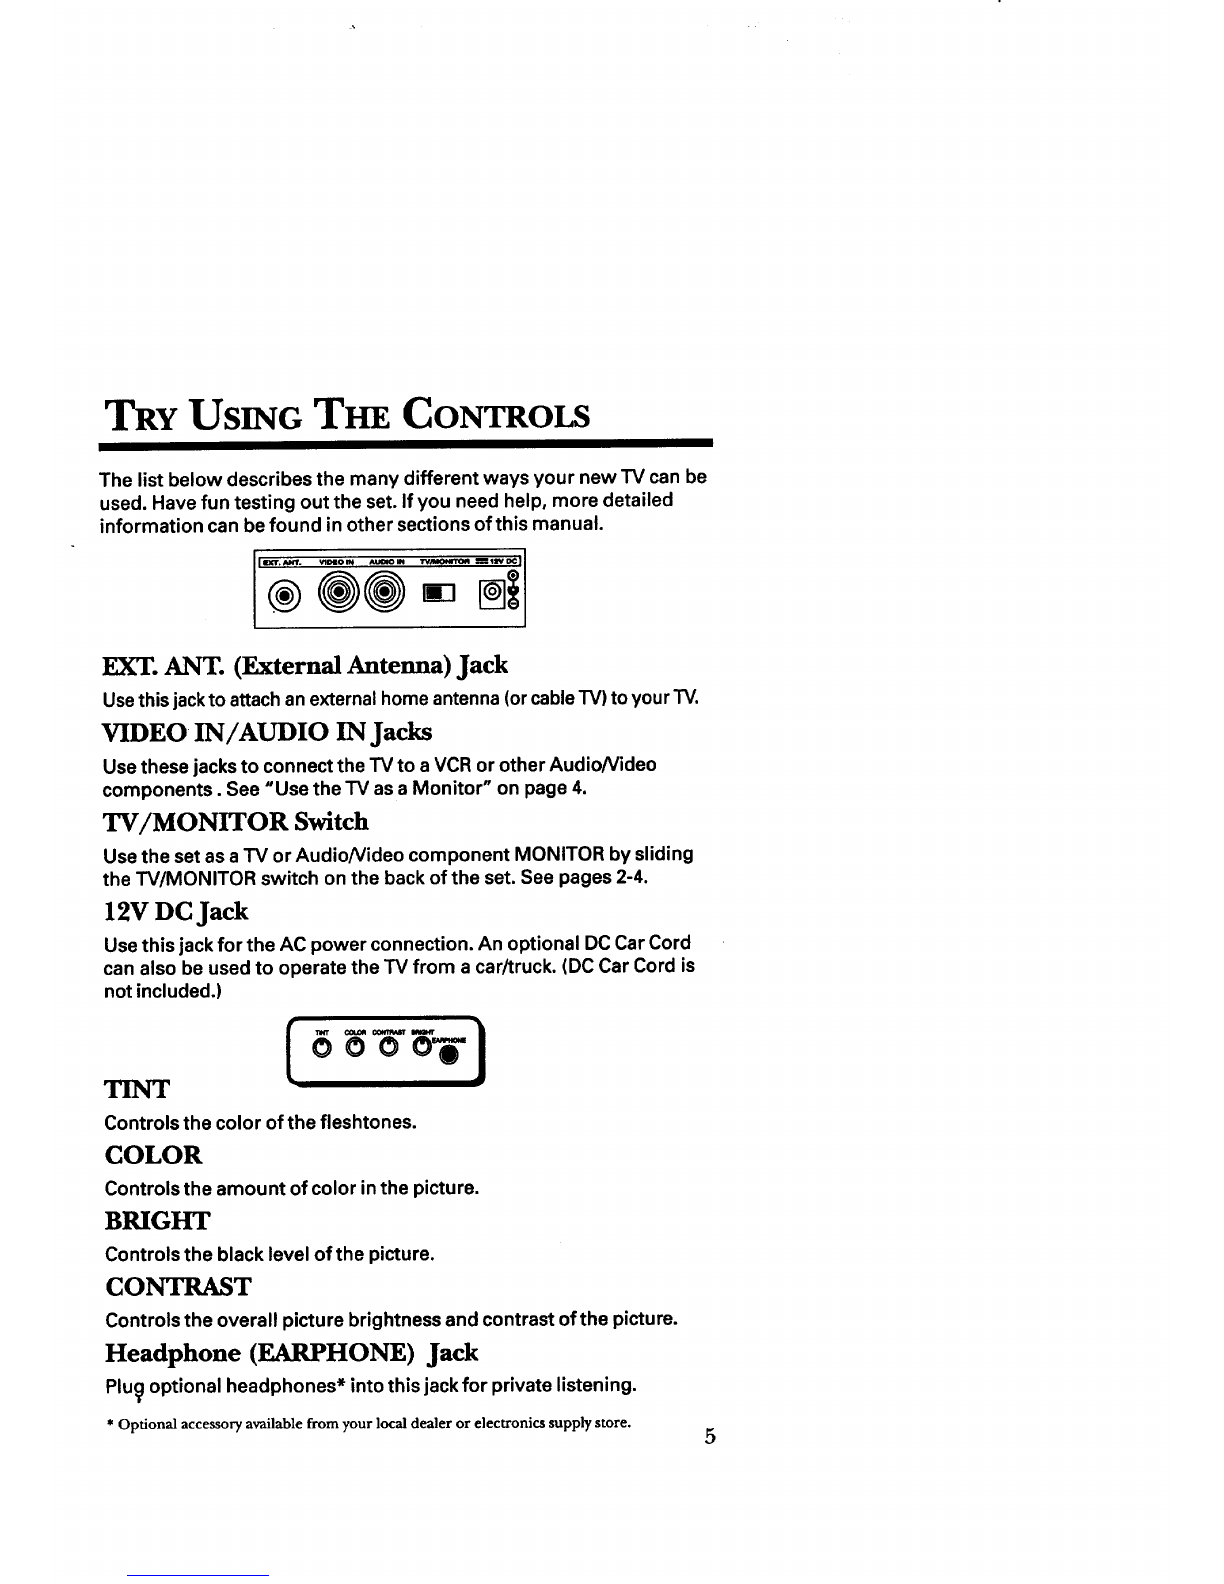
TRY USING THE CONTROLS ............................................... 5
EXT. ANT. (EXTERNAL ANTENNA) JACK ........................ 5
VIDEO INIAUDIO IN JACKS ......................................... ,5
TVIMONITOR SWITCH ................................................. 5
12V DC JACK ............................................................. 5
TINT .......................................................................... 5
COLOR ...................................................................... 5
BRIGHT ..................................................................... 5
CONTRAST ............................................................... 5
HEADPHONE (EARPHONE) JACK ................................. 5
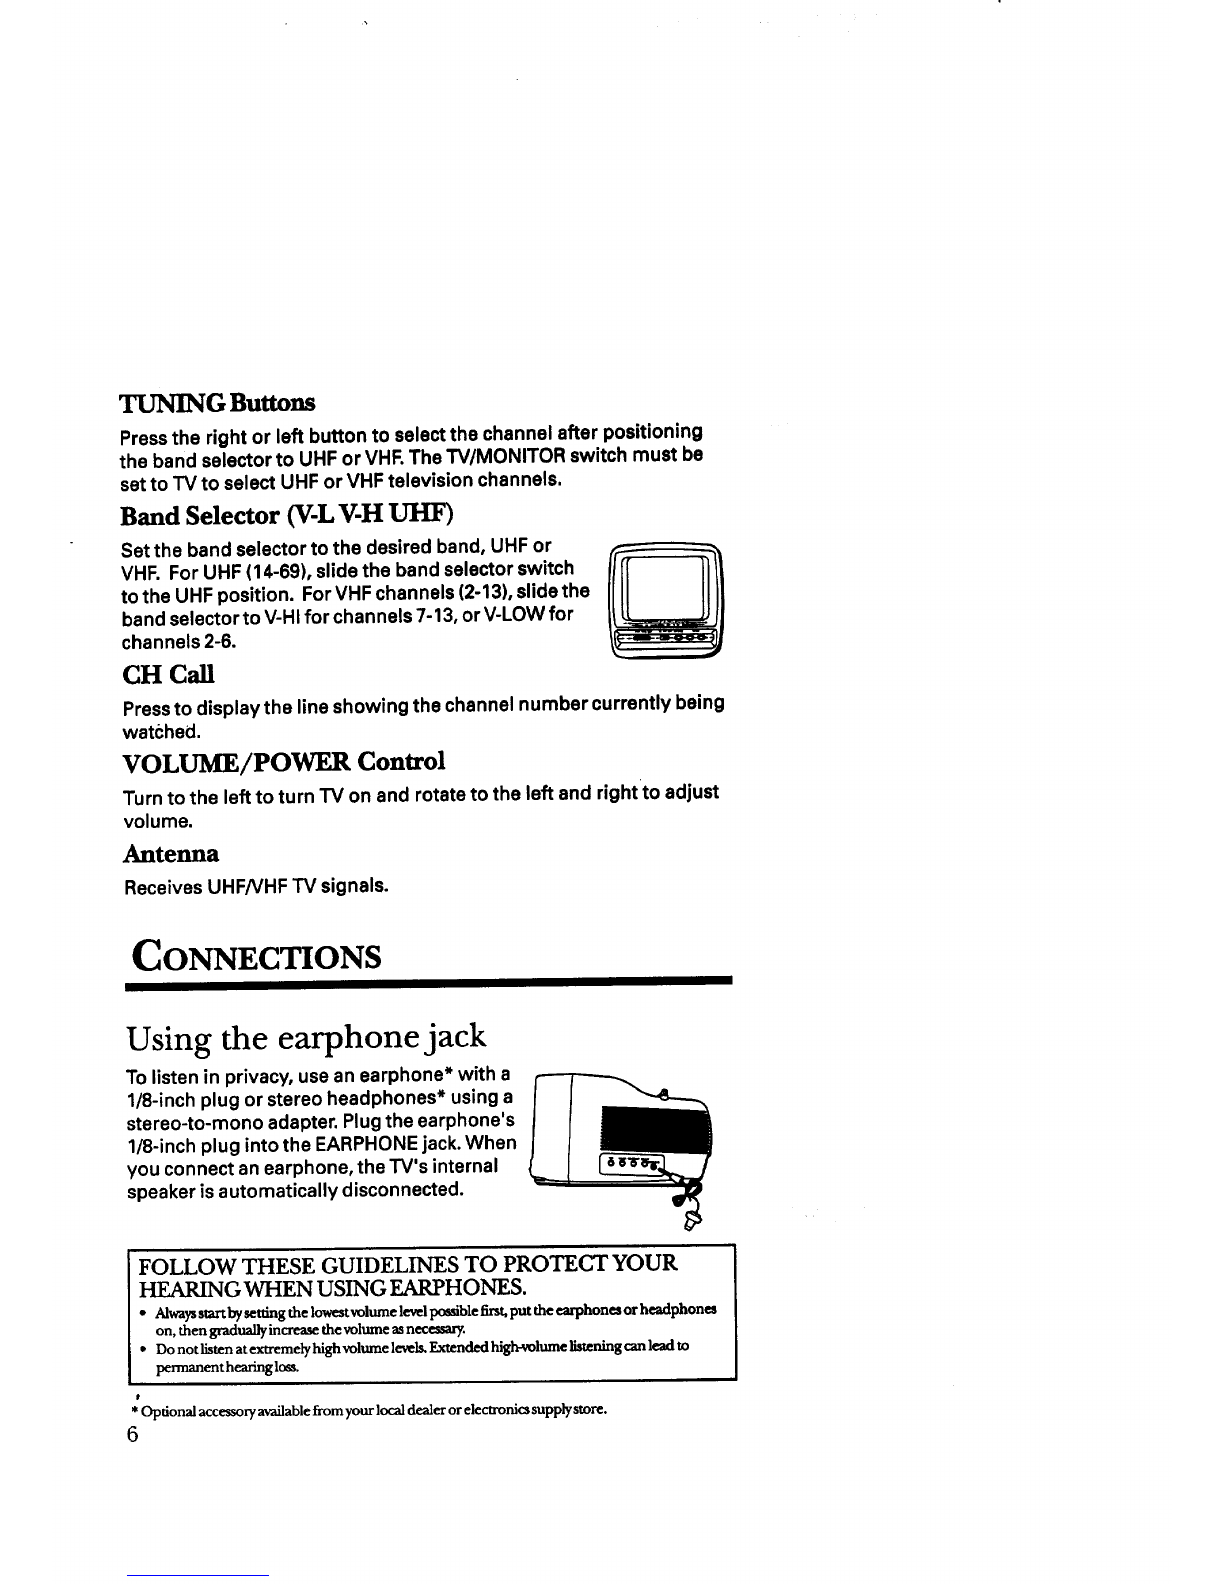
TUNING CONTROL ..................................................... 6
BAND SELECTOR ......................................................... 6
CH CALL...'. ............................................................... 6
VOLUME/POWER CONTROL ........................................ 6
ANTENNA ................................................................... 6
CONNECTIONS .................................................................. 6
USING THE HEADPHONE JACK ........................................ 6
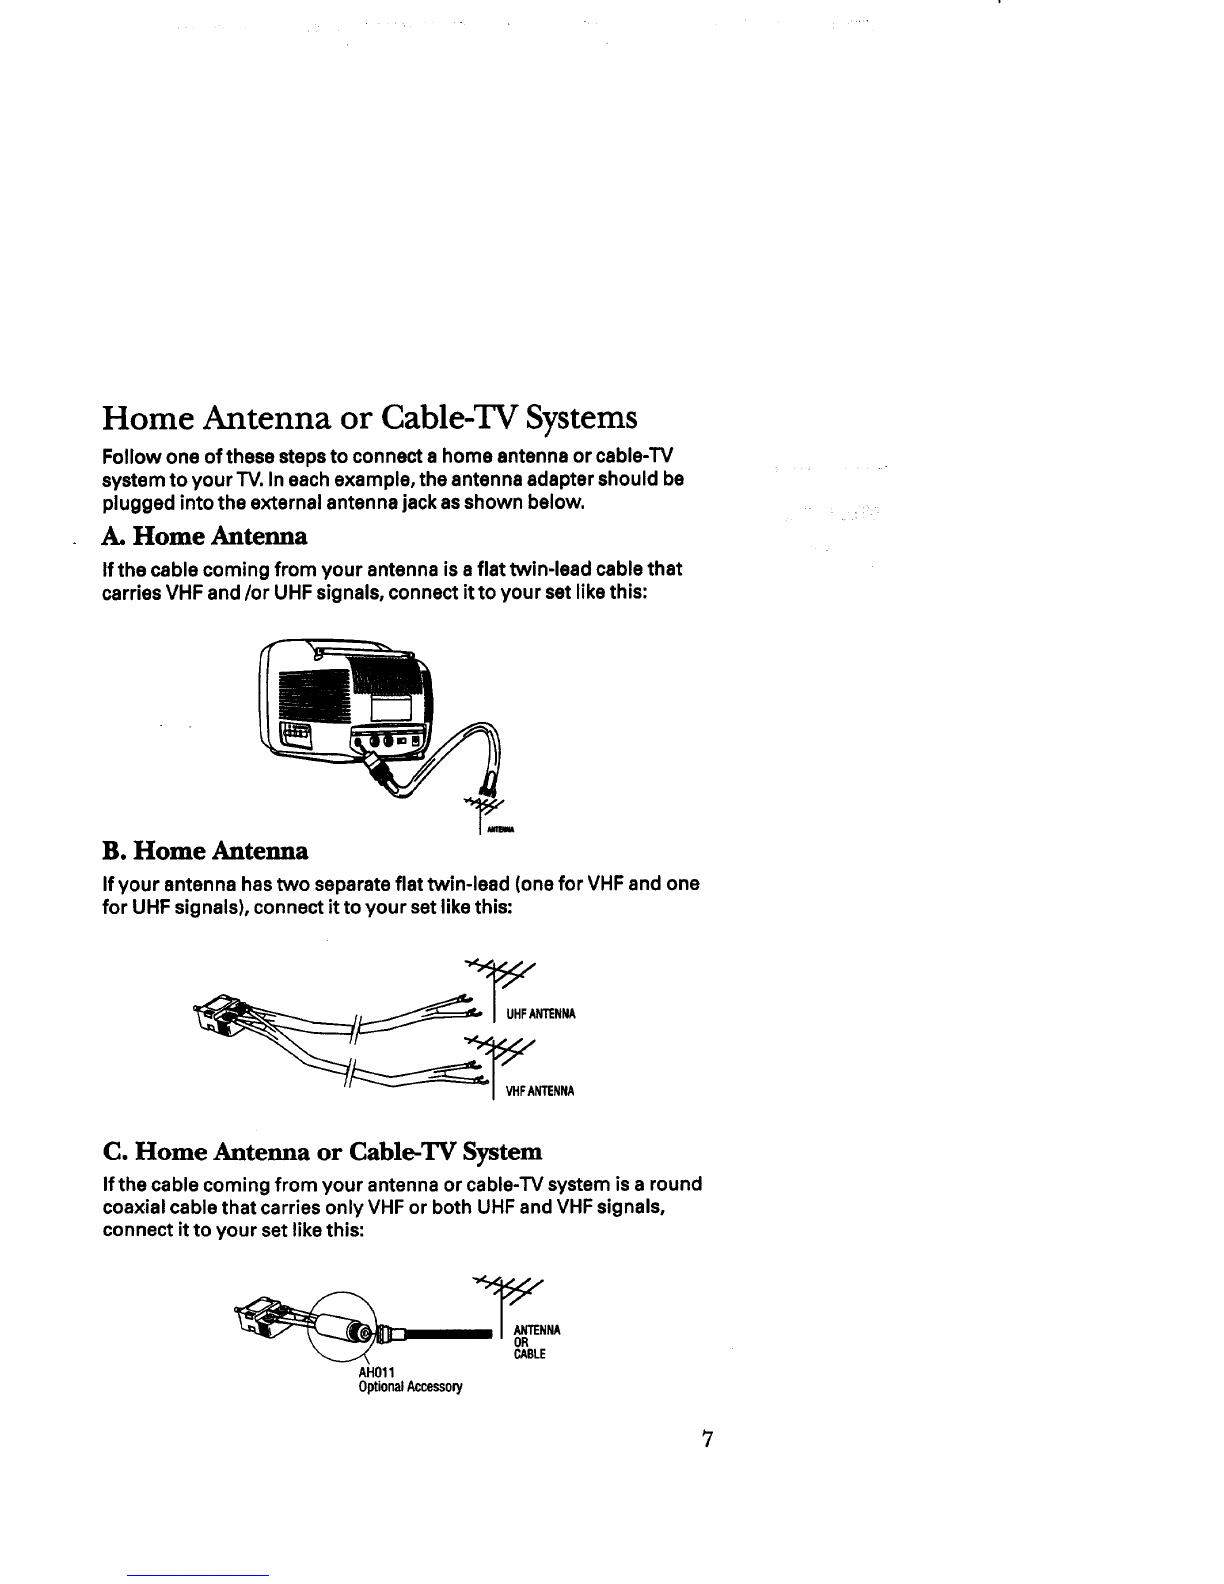
HOME ANTENNA OR CABLE-TV SYSTEMS ......................... 7
POWERING YOUR TELEVISION ............................................ S
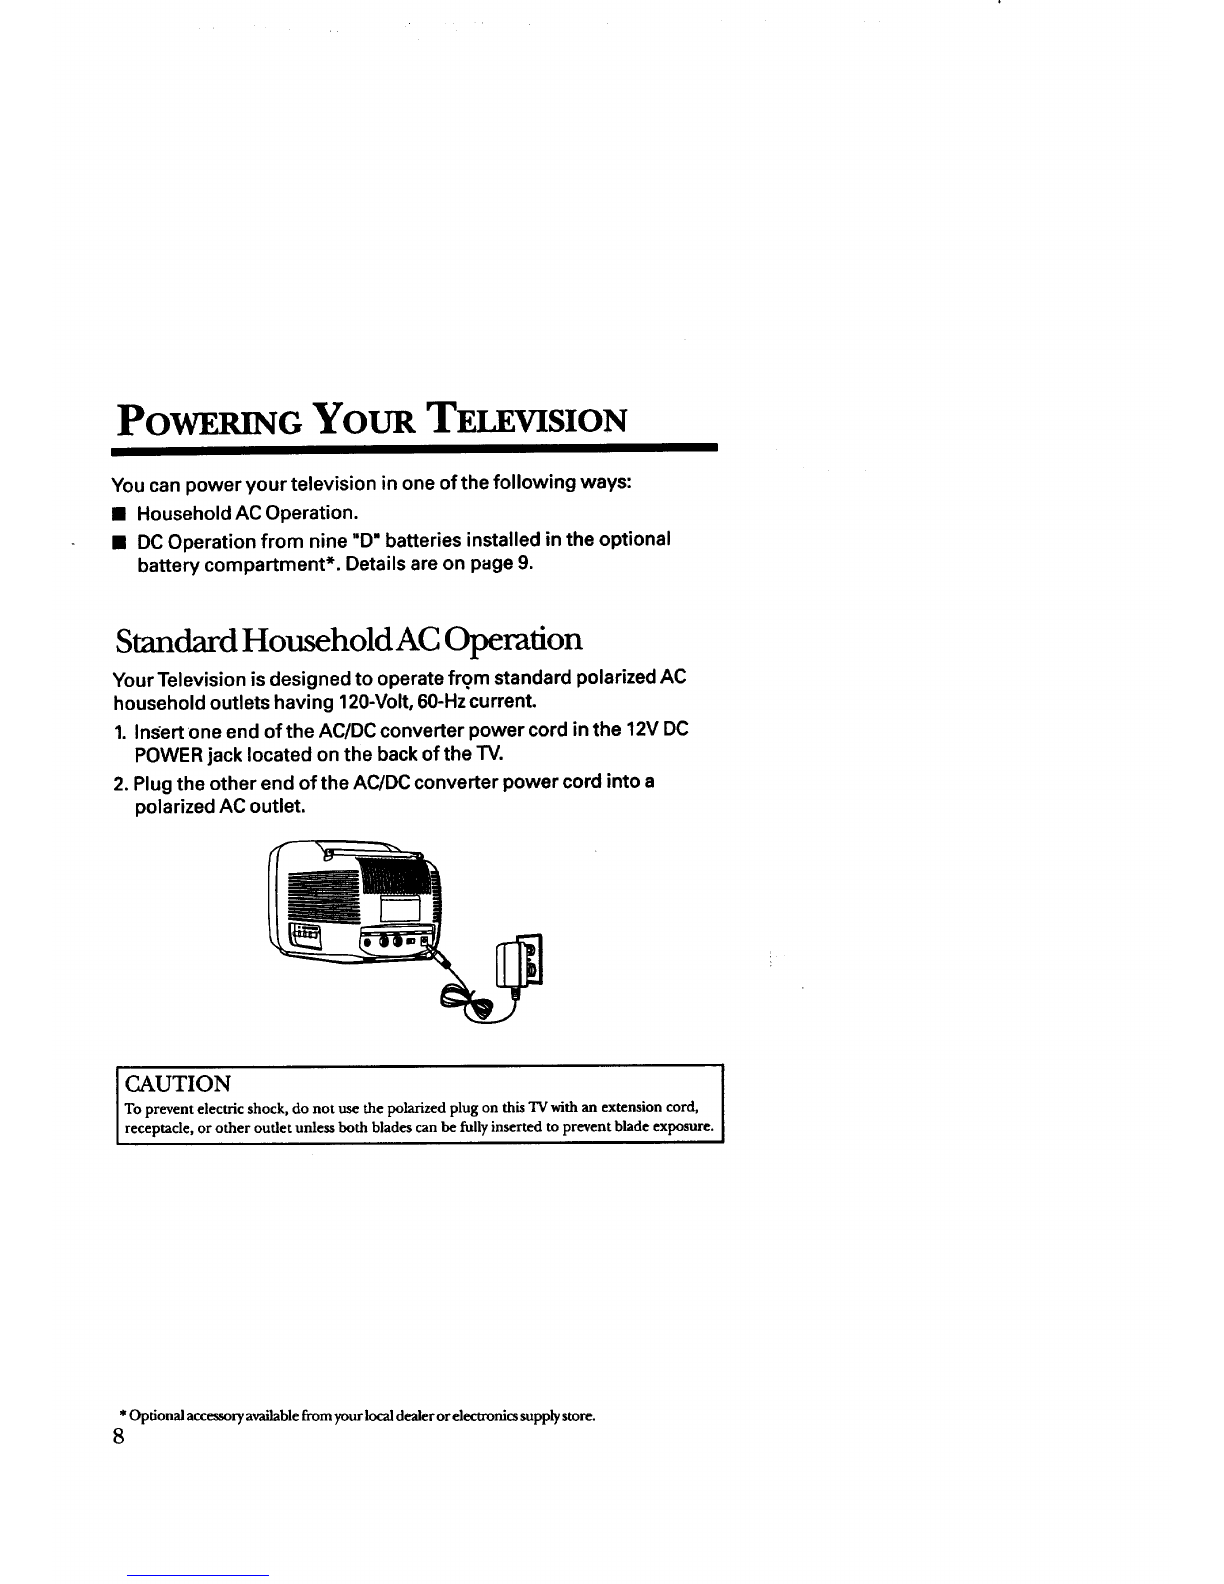
STANDARD HOUSEHOLD AC OPERATION ......................... 8
DC OPERATION FROM NINE "D" BATTERIES ...................... g
INSTALLING THE OPTIONAL BATTERY COMPARTMENT .... 9
MOUNTING YOUR TELEVISION. ......................................... 10
TOOLS REQUIRED ..................................................... I 0
MOUNTING CONSIDERATIONS ..................................... 10
MOUNTING INSTRUCTIONS ............................................ I 1
APPENDIX A: LIMITED WARRANTY ..................................... ! 3
APPENDIX B: OPTIONAL ACCESSORIES ............................. 14
O_RDERI NG ................................................................... | 5
APPENDIX C: TROUBLESHOOTING GUIDE .......................... 17

GETTING STARTED
Unpack the TV and Accessories
When you unpack your new TV, be sure you have removed all the
accessories and information papers. The items shown below are
packed with your TV.
ANTENNA_a)._rZR
- NO. 221331
MOUNTING BRACKET
(WrfH4SCOWS)
NO.221332
AC/DC CONVERTER
NO. 221335
Power the TV
You can power your Television several different ways. See page 8 for
the different power options.
Turn on TV and Select a Channel
1. Slide the TV/MONITOR switch on the back of the TV to the TV
position.
.Slide the band selector to the desired band,V-L, V-H, OR UHF:
For low VHF channels 2-6, slide the switch to V-L. For high VHF
channels 7-13, slide the switch to V-H. For channels 14-69, slide the
switch to the UHF position.
2

3. Rotate the VOLUME/POWER control dial to the left to turn on the TV.
4. Press the TUNING buttons until the channel indicator aligns with
the channel you wish to select on the TV dial.
-O-O-
5. Adjust antenna to receive best picture.
Adjust the Volume
• Rotate VOLUME/POWER to the right to decrease the volume level.
•Rotate VOLUME/POWER to the left to increase the volume level.
3

Adjust the Picture
The TV picture may need a few adjustments after you turn it on. The
following steps will help you adjust the picture.
1. Turn COLOR and CONTRASTto the left asfar as they will go. This
will leave a dim black and white image on the screen.
2. TurnBRIGHT left or right until portions of the picture you knowto
be black appear black.
3. Turn CONTRASTto the right until the overall brightness isto your
preference.
4. Turn COLOR to the right until you reach a pleasing level of color
intensity.
5. Adjust TINT until fleshtones and other colors appear natural.
Use the TV as a Monitor
1. Connect an AudioNideo component (such as a Camcorder or VCR)
to the TV using the VIDEO IN/AUDIO IN jacks on the back of the TV.
Audi0Nideo cables are available from your local dealer or
electronics supply store.
2. Slide the TV/MONITOR switch to the MONITOR position.
3. Rotate VOLUME/POWER to the left to turn on power.
4. Turn on the Audio/Video component.
5, Adjust the picture if needed.
4

TRY USINg Tim CONTROLS
The list below describes the many different ways your new TV can be
used. Have fun testing out the set. If you need help, more detailed
information can be found in other sections of this manual.
EXT. ANT. (External Antenna) Jack
Use this jackto attach an external home antenna (or cable TV) to your TV.
VIDEO IN/AUDIO IN Jacks
Use these jacks to connect the "IV to a VCR or other AudioNideo
components. See "Use the TV as a Monitor" on page 4.
TV/MONITOR Switch
Use the set as a TV or AudioNideo component MONITOR by sliding
the TV/MONITOR switch on the back of the set. See pages 2-4.
12V DC Jack
Use this jack for the AC power connection. An optional DC Car Cord
can also be used to operate the TV from a car/truck. (DC Car Cord is
not included.)
Controls the color of the fleshtones.
COLOR
Controls the amount of color in the picture.
BRIGHT
Controls the black level of the picture.
CONTRAST
Controls the overall picture brightness and contrast of the picture.
Headphone (EARPHONE) Jack
Plu_ optional headphones* into this jack for private listening.
*Optional accessory available from your local dealer or electronics supplystore. 5

TUNING Buttons
Press the right or left button to select the channel after positioning
the band selector to UHF or VHF. The W/MONITOR switch must be
set to TV to select UHF or VHF television channels.
Band Selector (V-L V-H UHF)
Set the band selector to the desired band, UHF or
VHF. For UHF (14-69), slide the band selector switch
to the UHF position. For VHF channels (2-13), slide the
band selector to V-HI for channels 7-13, or V-LOW for
channels 2-6.
CH Call
Press to display the line showing the channel number currently being
watched,
VOLUME/POWER Control
Turn to the left to turn TV on and rotate to the left and right to adjust
volume.
Ante_a
Receives UHFNHF TV signals.
CONNECTIONS
Using the earphone jack
To listen in privacy, use an earphone* with a
1/8-inch plug or stereo headphones* using a
stereo-to-mono adapter. Plug the earphone's
1/8-inch plug into the EARPHONE jack. When
you connect an earphone, the TV's internal
speaker is automatically disconnected.
FOLLOW THESE GUIDELINES TO PROTECT YOUR
HF_ARJNG WHEN USING EARPHONES.
•Alwaysstart bysettmgthe]owe*tvolumelevelpossiblefirst,put theearphone, orheadphone,
on, then gradually increase the volume as necessary.
• Do not listen atextremely high volume ]e_ds. Extended high-volume lbtening can lead to
permanent hearing lo_s.
t
*Optional accessoryavailablefromyour local dealerorelectronicssupplystore.
6

Home Antenna or Cable-TV Systems
Follow one of these steps to connect ahome antenna or cable-TV
system to your TV. In each example, the antenna adapter should be
plugged into the external antenna jack as shown below.
A. Home Antenna
If the cable coming from your antenna is aflat twin-lead cable that
carries VHF and/or UHF signals, connect it to your set like this:
B. Home Antenna
If your antenna has two separate flat twin-lead (one for VHF and one
for UHF signals), connect it to your set like this:
_UHF ANTENNA
VHFANTENNA
C. Home Antenna or Cable-TV System
If the cable coming from your antenna or cable-TV system is a round
coaxial cable that carries only VHF or both UHF and VHF signals,
connect it to your set like this:
CABLE
AH011
OptionalAccessory

PO G YOUR TELEVISION
You can power your television in one of the following ways:
•Household AC Operation.
•DC Operation from nine "D=batteries installed in the optional
battery compartment*. Details are on page 9.
Standard Household AC Operation
Your Television is designed to operate from standard polarized AC
household outlets having 120-Volt, 60-Hz current.
1. InSert one end of the AC/DC converter power cord in the 12V DC
POWER jack located on the back of the TV.
2. Plug the other end of the AC/DC converter power cord into a
polarized AC outlet.
CAUTION
To prevent electric shock, do not me the polarized plug on this TV with an extension cord,
receptacle, or other outlet unless both blades can be full)' inserted to prevent blade exposure.
* Opfonal accessory available from your local dealer or electronics supply store.
8

DC Operation from Nine "D" Batteries*
Installing the Optional Battery Compartment
You can operate your Television from DC power by installing an
optional battery compartment*.
1. Insert nine "D" batteries into the battery compartment as
indicated by the diagram inthe battery compartment.
2. Attach the battery cover by inserting the bottom tabs into the
slots located onthe bottom of the TV, then snap into place.
3. Insert the battery compartment power cord into the 12V jack on
the back of the TV.
4. To remove the cover of the battery compartment gently press
do.wnon the two locking tabs and pull the battery compartment
away from the TV.
NOTE
Replace the batteries if the TV picture shrinks or becomes unstable. Alkaline batteries are
recommended and will provide more hours of operation. They also reduce the possibility
of leakage.
Remove the batteries from the unit if they are not going to be used for along time
because leakage could occur and corrode the unit.
*Optional accessoryavailablefrom your localdealer or dectronicssupplystore. 9

MOUNTINGYOURTELEVISION
Follow these instructions ifyou want to moqnt your TV under s cabinet:
Tools Required:
• Rule ortape measure
•Phillips screwdriver
•Pencil
•Blade screwdriver
•Drill and 1/4" drill bit
•DrilICountersinkAttachment(Optionai)
Mounting Considerations:
• Make sure the bottom of the cabinet you select is strong enough
to support a TV.
•Allow adequate room for ventilation, room to swivel, access to
control knobs and space for the antenna.
•Mount TV near an AC outlet.
•Do not use area directly beneath TV for cooking.
•Before mounting, turn the set on to check reception in the area you
have selected (if reception is poor try another location).
CAUTION to RV Owners ]
Themounting bracketprovidedisnotdesignedformountinginRV'sormotorhomes.The[
"IVmaydislodgefromthe bracketwldlethevehicleisinmotion,causingdamageorinjury.[
10

Mounting Instructions:
1. Prepare cabinet by removing items from counter and cleaning
underside of cabinet where TV isto be mounted.
MOUNTING BRACKET
NOTE
The "IV must be slightly below the cabinet overhang when installed in the bracket. Some
clearance is necessary so the TV can be easily rotated to the desired viewing angle or
removed for portable use.
2. Use the Mounting Bracket to trace a guide for drilling the holes.
Measure the area you wish to drill carefully before proceeding.
3. Drill 1/4" diameter holesthrough the underside of the cabinet.
4. Position the mounting bracket under the cabinet as shown and
match the screw holes.
5. Hold the bracket in place and insert the screws and washers
from inside the cabinet down into the bracket.
Position mo.unting
bracket directly under
cabinet as shown,
ICAUTION
Minimum thickness of shelf should be 1/4" (S/8" or more preferred).
11

6. Slide TV onto mounting hook of the bracket and push it all the way
back until the two back hooks on the bracket lock into the back of
theTV.
7. Attach the AC Power Cord to the 4-prong connector on the back of
the TV. Extend the cord and plug it into an electrical outlet.
8. To remove the TV, lift the TV up and gently pull forward.
NOTE
Cordhooks are available from your local electronics supply store and can be used to keep
the cord out of the way.
12

APPENDIXA: LIMIT WARRANTY
What your warranty covers:
• Any defect in material or workmanship.
For how long after your purchase:
• 90 days for labor charges.
•One year for parts.
•Two years for picture tube. (The warranty period for rental units begins with the
first rental.)
What we will do:
•Pay any Authorized GE Television Servicenterthe labor chargesto repair your
television.
• Pay any Authorized GE Television Servicenter for the new or, at our option,
rebuilt replacement parts and picture tube required to repair your television.
How you get service:
•Take your television to the Authorized GETelevision Servicenter of your choice.
To identify your nearestAuthorized GETelevision Servicenter, ask your dealer,
look in the Yellow Pages, or call 1-800-447-1700.
• Show the Authorized Servicenter Representativeyour salesreceipt or other
evidence of purchasedate.
•Pick up your television when repairsare completed.
What your warranty does not cover:
•Customer instruction. (Your Owner's Manual clearly describes how to install,
adjust, and operate your television. Any additional information should be
obtained from your Dealer.)
• Installation and related adjustments.
•Signal reception problems not causedby your television.
• Damage from misuse or neglect.
•Batteries.
• A television that hasbeen modified or incorporated into other productsor is
used for institutional or other commercial purposes.
•Customer-replaceable fuses.
• A television purchasedor serviced outsidethe USA.
•Acts of GOd, such asbut not limited to lightning damage.
How state law relates to this warranty:
• This warranty gives you specific legal rights, and you may also have other rights
which vary from stateto state.
If you purchased your product outside the United States:
• Contact your dealer for warranty information.
13

APPENDIXB: OPTIONALA R
Your Television isa highly versatile piece of equipment. The accessories
shown below letyou take full advantage of that versatility.
Accessory
StereoHeadphone& Adapters
3-5750
Description
Lightweightstereoheadphoneswith
3.5mmstereoplug.Includesthetwo
HeadphoneAdaptersshownatnoextra
cost.
The 1/4-inchadapterallowsyou touse
theheadphoneshownwithstereo
productsthat havea 1/4"headphonejack.
The 3.5 adapterletsyou usethe head-
phoneshownwith mono productsthat
havea 3.5ramheadphonejack. These
adaptersautomaticallycomewiththe
StereoHeadphoneshownatno extracost.
DC CarCord
221328
BatteryCompartment
221334
MountingBracketandHardware
221332
Transformer
AH011
ThisCarCordplugsinto acigarettelighter
andallowsyouto poweryourTelevision
froma caror truck. Keeponein eachof
yourvehicles.
Poweryour Televisionforabout2 to
2-1/2 hourswithfully chargedbatteries.
Mountingbracketallowsyoutomount
your televisionundera cabinet.
Transformerallowsyoutoconnectcable
to yourAntennaAdapter.
14

Ordering
Unlted 8tat_ Orders
Toplace your order byphone, have
your Visa or MasterCerd readyand
call the toll-free number listed
belowbetween 8am and 8pm
EasternStandardTime. Usethis
number onlyto place an order for
accessoryitems listedon this
orderform.
1-800-338-0376
Mosttimes your order will be
shippedUPS within 72 hours of
receipt.If ever it Isnotpossible to
shipwithin 30 days, we will notlfy
youwith.an update onyour order
and an option tocancel.
Toplace your order by mail, detach
and mailthe completed order form
with creditcard information,
moneyorder,orcheckinU.S.
currency(made payableto
Thomson ConsumerElectronics)
tothe following address:
VideoAccessories
P.O.Box8419
Ronks,PA17573
Forinformation on theseaccesso-
ries (orcurrent prices),write to the
following address:
VideoAccessoriesCustomerService
ThomsonConsumerElectronics
Distribution&SpecialProducts
2000ClementsBridgeRd.
Depfford,NJ08096-2088
Canadian Orders
For Canadian inquiries, please call
one of these toll-free numbers for
information about accessories:
English:1-800-668-5518
French:1-800-668-5507
International Orders
This offer isvalid only in the 50
United States. For international
orders, please send your request
for quotation (not an order) to:
InternationalCustomer Service
Thomson ConsumerElectronics
Distribution&Special Products,
2000 Clements BridgeRd.
Deptford, NJ 08096-2088 USA
Customer:.Cutalong Dotted Line
AccessoriesOrder Form
Part # Description Price Qty. Total
No. AHOll Transformer $1.90
Fusefor
No. 175857 DC cord $3.15
No. 221328 DC Car Cord $13.95
Antenna $7.25
No. 221531 Adapter
No. 221S32 Mounting $39.q6
Bracket
No. 221334 Battery
Compartment $9.95
AC/DC $13.95
No. 221335 Converter
Stereo and
No..._-5750 Headphone $17.95
Adapters
Price subject to change without notice
Total Merchandise(S10 minimum order) $.__
Sales Tax $.
We are required by law to collect
the appropriate sales tax for
each individual state, county and
locality to which the merchan-
dise is being sent.
Shipping, Handling, and Insurance $. 5.00
Total Amount Enclosed $.__
Please make sure that thisform has been filled out
completely on both sides.
15

FOR CREDIT CARD PURCHASES
Yourcomplete charge card number, expiration date and
signature are necessary to process all charge orders.
Copyyour complete account number from
your VISACard.
Copy your complete account number
from your
L[ILI
[_ 111 [1
Copy the number aboveyour
name on yourMamet_ml.
Authorized Signature
Use VISA or Ma*terCard preferably. Money order
or check mint be in U.S. currency only. No COD
or CASH.
Aft_rle_ aremhject toav_ability.Where
applicable, we will ship a superseding model.
This is your return label. Please print clearly.
To:
Name
Address
Apu
City
State ZIP
Please make sure that this form has been filled
out completely on both side,.
16 Customer. Cut along Dotted Line

APPENDIX C: TROUBLF_SHOOTING GUmE
Trouble Check Adjust
No Pictureorsound Besurepower cordispluggedin.
(ACpower). BesureTV isturnedon.
Nopictureorsound
(batterypower).
SoundOK; poorpicture.
PictureOK; poorsound.
Poorreception.
Linein picture.
Picturerollsvertically.
No color or poorcolor.
Ghosts(multipleimages).
Blurrypicture.
Backgroundnoise;
interference.
Tryanotherchannel(stationtrouble).
Checkantennaconnections.
Be_re TV isturnedon.
Batterypowercord mustbe
pluggedintoTV.
Maybebatteriesare weak.
Maybebatterypackisweak.
Checkantennaconnections.
Tryanotherchannel(stationtrouble).
Checkantennaconnections.
May be localinterference.
Tryanotherchannel(stationtrouble).
Checkantennaposition.
May be localinterference.
Tryanotherchannel(stationtrouble).
Checkantennaposition.
Maybe local interference.
Tryanotherchannel(stationtrouble).
Checkantennaposition.
Maybe local interference.
Tryanotherchannel(stationtrouble).
Maybe local interference.
Tryanotherchannel (stationtrouble).
Checkantennaposition.
May be local interference.
Maybebatteriesare weak.
Try anotherchannel(stationtrouble).
Checkantennaposition.
May be local interference.
Installnewbatteries.
RecharBebattery pack.
Adjustantenna.
Adjust BRIGHTNESS.
Adjust CONTRAST.
Adjust antenna.
Adjust voLuME.
Adjust antenna.
Adjust antenna.
Adjustantenna.
Adjustantenna.
AdjustTINT andCOLOR.
Recha_e battery pack.
Installnew batteries.
Adjust antenna.
May be localinterference.
Trymovin8antenna.
Trymovin8antenna.
Tryanotherchannel(stationtrouble).
17

For your nearest GE Dealer or
Authorized Servicenter call
toll,free in the U.S.A.
1-800-447-1700
Canadian Consumers-
Your toll-free numbers are:
English: 1-800-522-0338
French: 1-800-522-0445
If your TV needs service,
please contact your dealer or
the nearest servicenter from
the yellow pages. Please do
not send any products to the
Indianapolis address listed in
this manual or on the carton.
This will only add delays in
service for your product.
to_1NOMSON ¢ONSUIIEII KIb'IIOMCS
10330 N. Meridian St.
Indianapolis, IN 46290
©1994 Thomson Consumer Electronics, Inc.
Trademark(s) ®Registered
Marca(s) Registrada(s)
Printed in Malaysia
Tocom #15072580
Table of contents
Other GE TV manuals