GE VG4275 User manual


WARNING
Toreducerisk of fire or
shock hazard, do not
exposethis product
to
rain
or moisture,
Cautions Caution:To
prevent
electricshock,
matchwidebladeof plug
to wideslot,
fullyinsert.
Attention: Pour
6viterleschocs6lectriques,introduirelalame
la
plus
largedela
fiche
dansla
bornecorrespondantede
la
prise
et pousser
jusq0
au
fond.
Referto the identification/rating
labellocatedonthe back
panel
of yourproduct
for its
proper
operatingvoltage.
FCCRegulations
statethat unauthorizedchangesor modificationsto this
equipmentmay
voidthe user'sauthorityto operateit.
Cable
TV
Installer:Thisreminderis
provided
to call
your
attention
to Article
820-40ofthe National
ElectricalCode
(Section
54of theCanadianElectrical
Code,
Part1)which
provides
guidelines
for propergrounding
and,
inparticula4
specifies
thatthecable
ground
shallbeconnectedto thegrounding
systemof the building
asclose
to the point
of cableentry
as
practical.
Useasoftcloth
orthe dustingattachmentof your
vacuumcleanerto dust
your
VCR.Remove
dust
from
theventilation
holes.
Plasticsurfaces
areeasily
scratched
andcanbemarred
byalcohol
andvarious
solvents.
Avoidexcessive
useof oil-based
furniture
polishes
sincethe materials
usedin
thecabinetwillaccumulate
more
dust.
A nonabrasive,
antistaticcleaner/
polisher
isrecommended.
Careand Cleaning:
VCRPlus+and PlusCode
areregistered
trademarks
of GemstarDevelopment
Corporation.
TheVCRPlus+
systemismanufacturedunder the licensefrom Gemstar
Development
Corporation.
RISK
OFELECTRICSHOCK
DO
NOTOPEN
TO REDUCE
THE RISKOFELECTRICSHOCI( DO NOT
REMOVECOVER(ORBACK). NO USERSERVTCEABLE
PARTSINSIDE.REFERSERVICINGTO QUALIFIED SERVICE
PERSONNEL.
This
symbol
indicates
important
instructions
accompanying
the
product.
This
symbol
indicates
"dangerous
voltage"insidethe product
that
presents
a riskof electric
shockor
personal
injury.
Product Registration
Pleasefill out the product
registration
cardandreturn
it immediately.Returningthecardallowsusto contact
youif needed.
Keep
your
salesreceiptto obtainwarranty
parts
andservice
andfor proof
of purchase
Attachit here
andrecordtheserialandmodel
numbersincase
youneed
them.
The
numbersarelocated
onthe backof theproduct
ModelNo VG4275
Serial
No.
Purchase
Date:
Dealer/Address/Phone:

First Things First ,...,..3
Use
the
OuickSet
Guide
for InitialSetup.......................
5
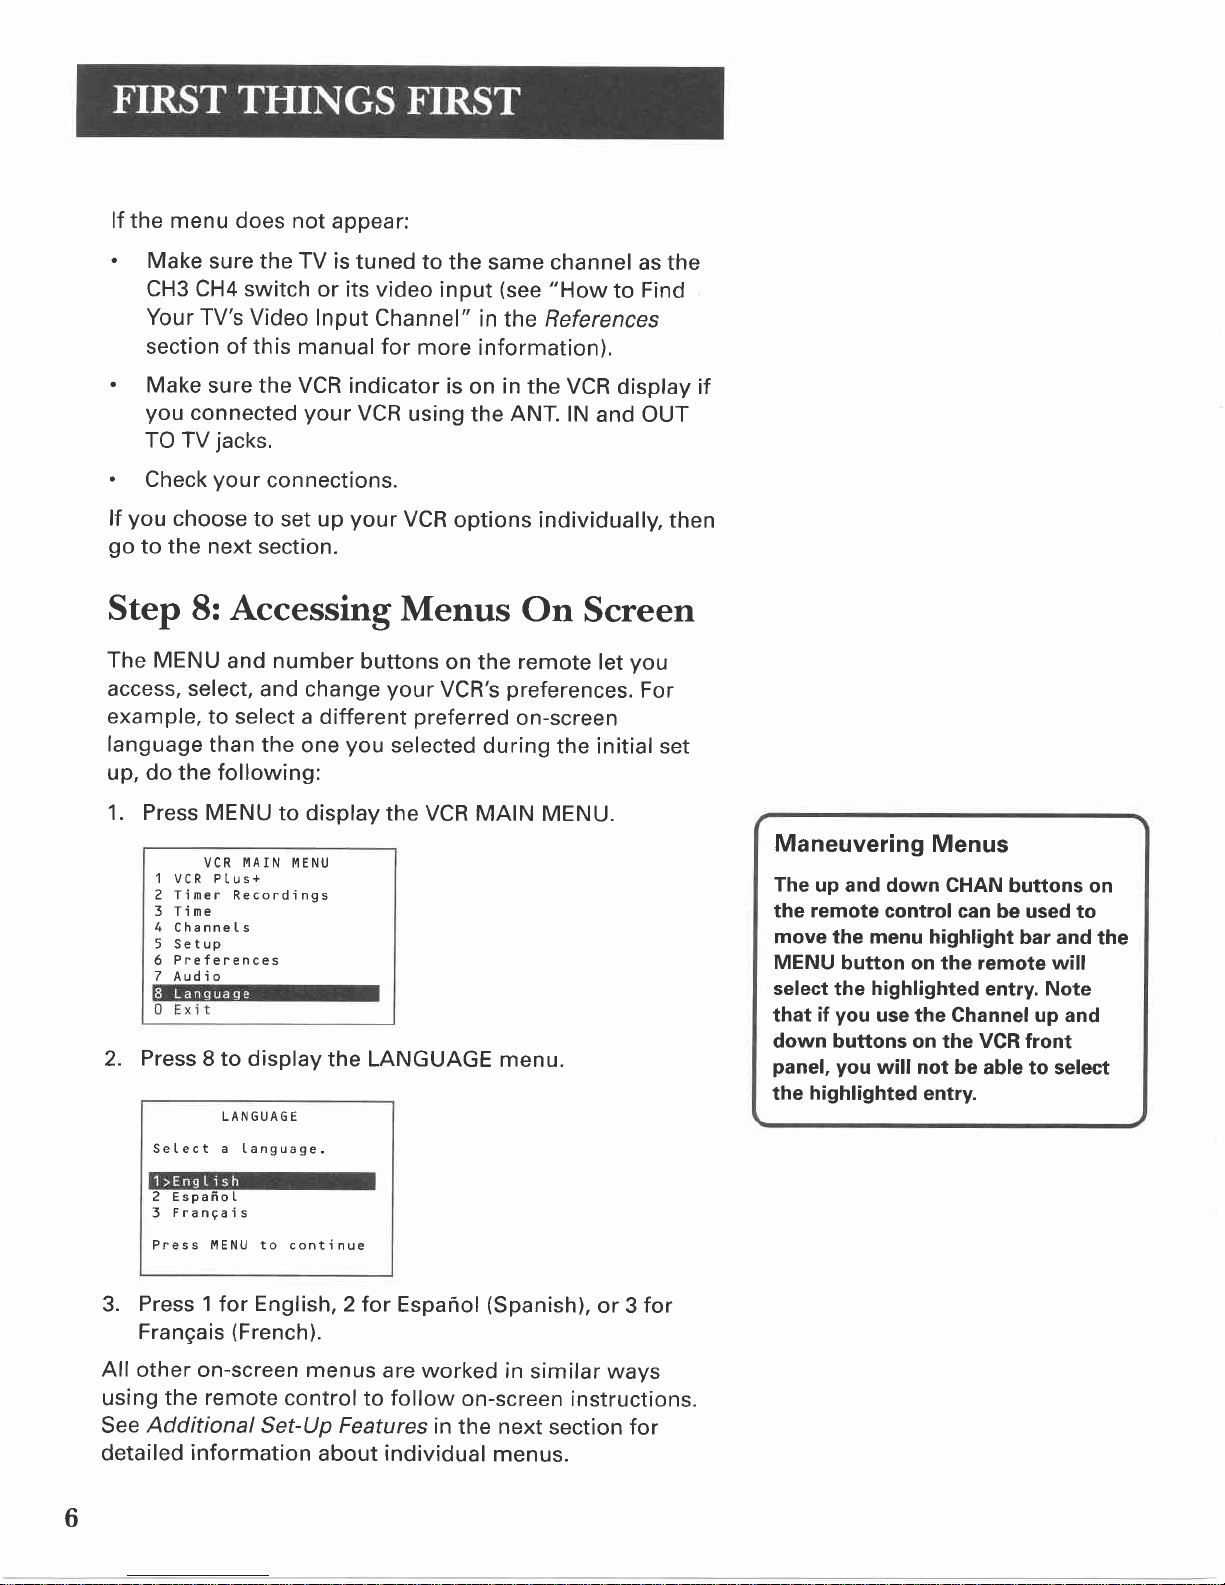
Setting Up the VCR .....,.............7
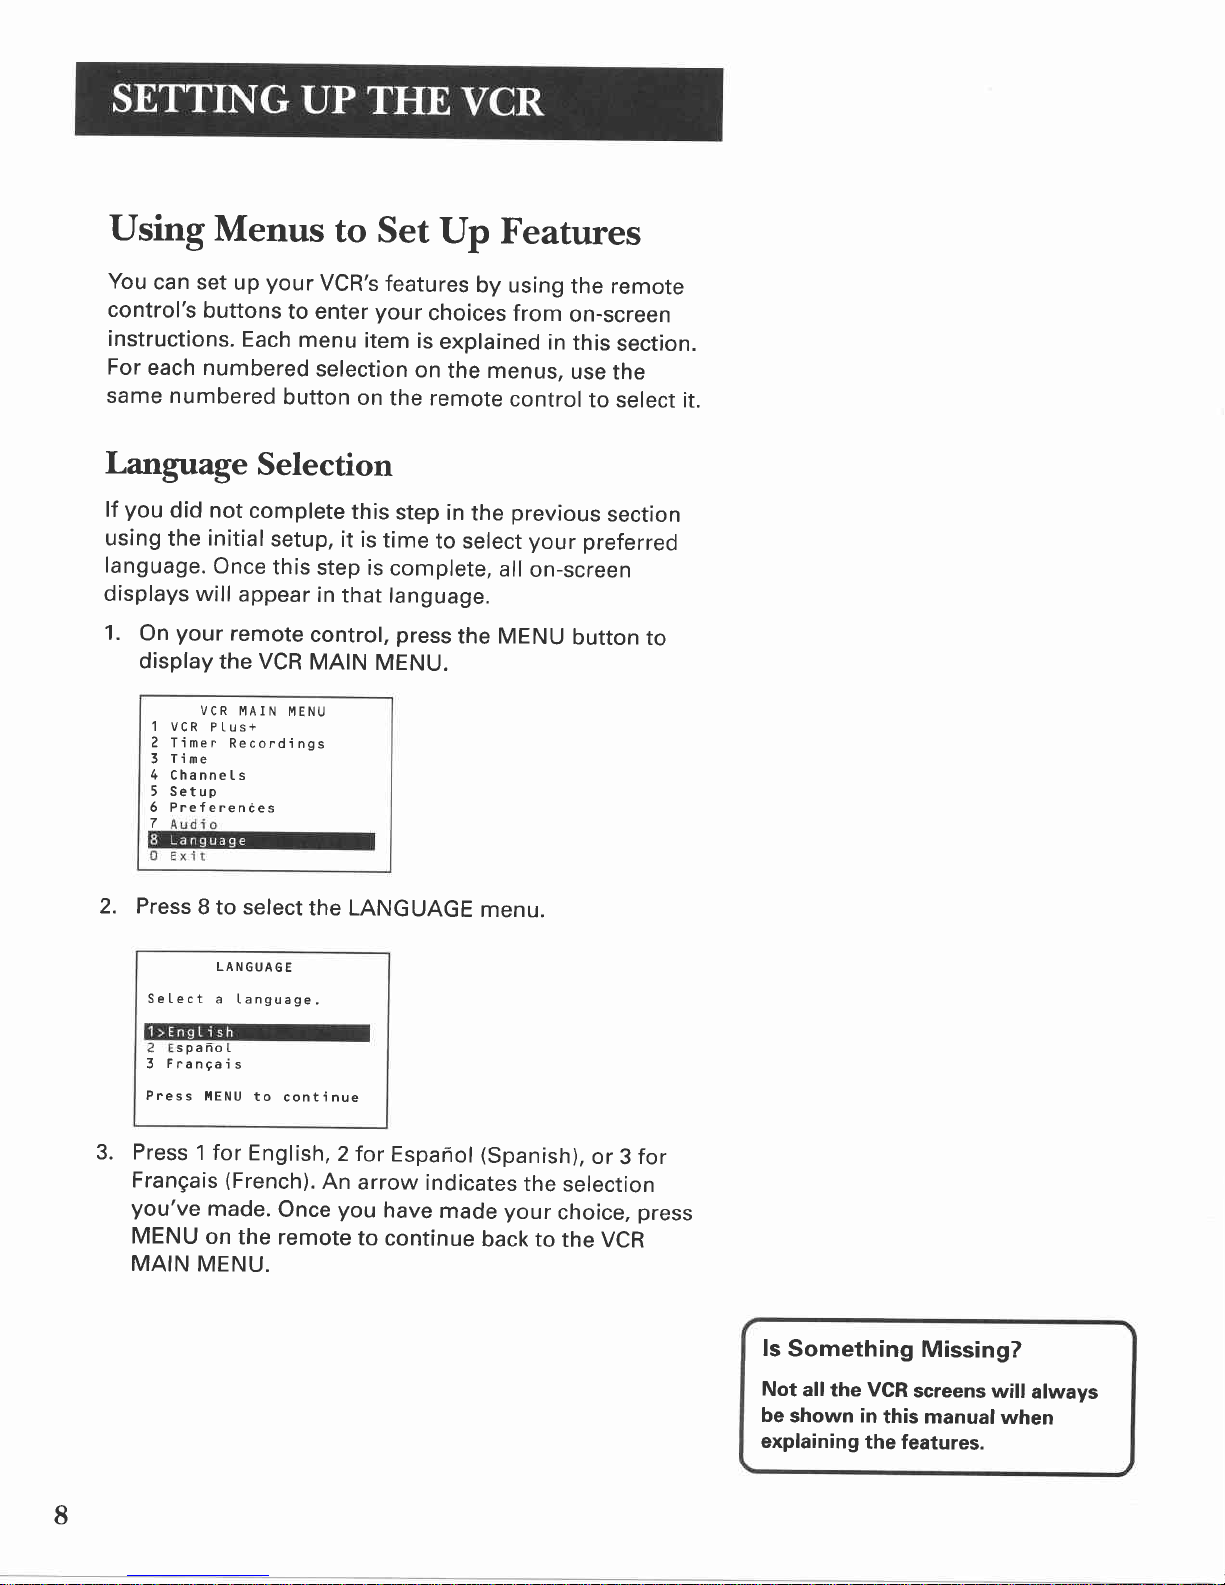
Using
Menus
to Set
UpFeatures...................................8
LanguageSelection ...............8
Cable
Box
Setup ....................I
VCR
Channels
List... .............10
Auto
ChannelSearch .....10
ChangingtheSignal
Type......... ......
11
Adding
or RemovingChannels........................11
Timeand
Date......... .............12
Auto
ClockSet
Feature............... .....12
Settingthe
Time
Zone ..................12
Setting
Daylight-Savi
ng
Time
........................13
Settingl-imeandDate
Manually
......................
13
VCR
Plus+
SystemChannels ................15
VCRPlus+
SystemWorksheet
..........................16
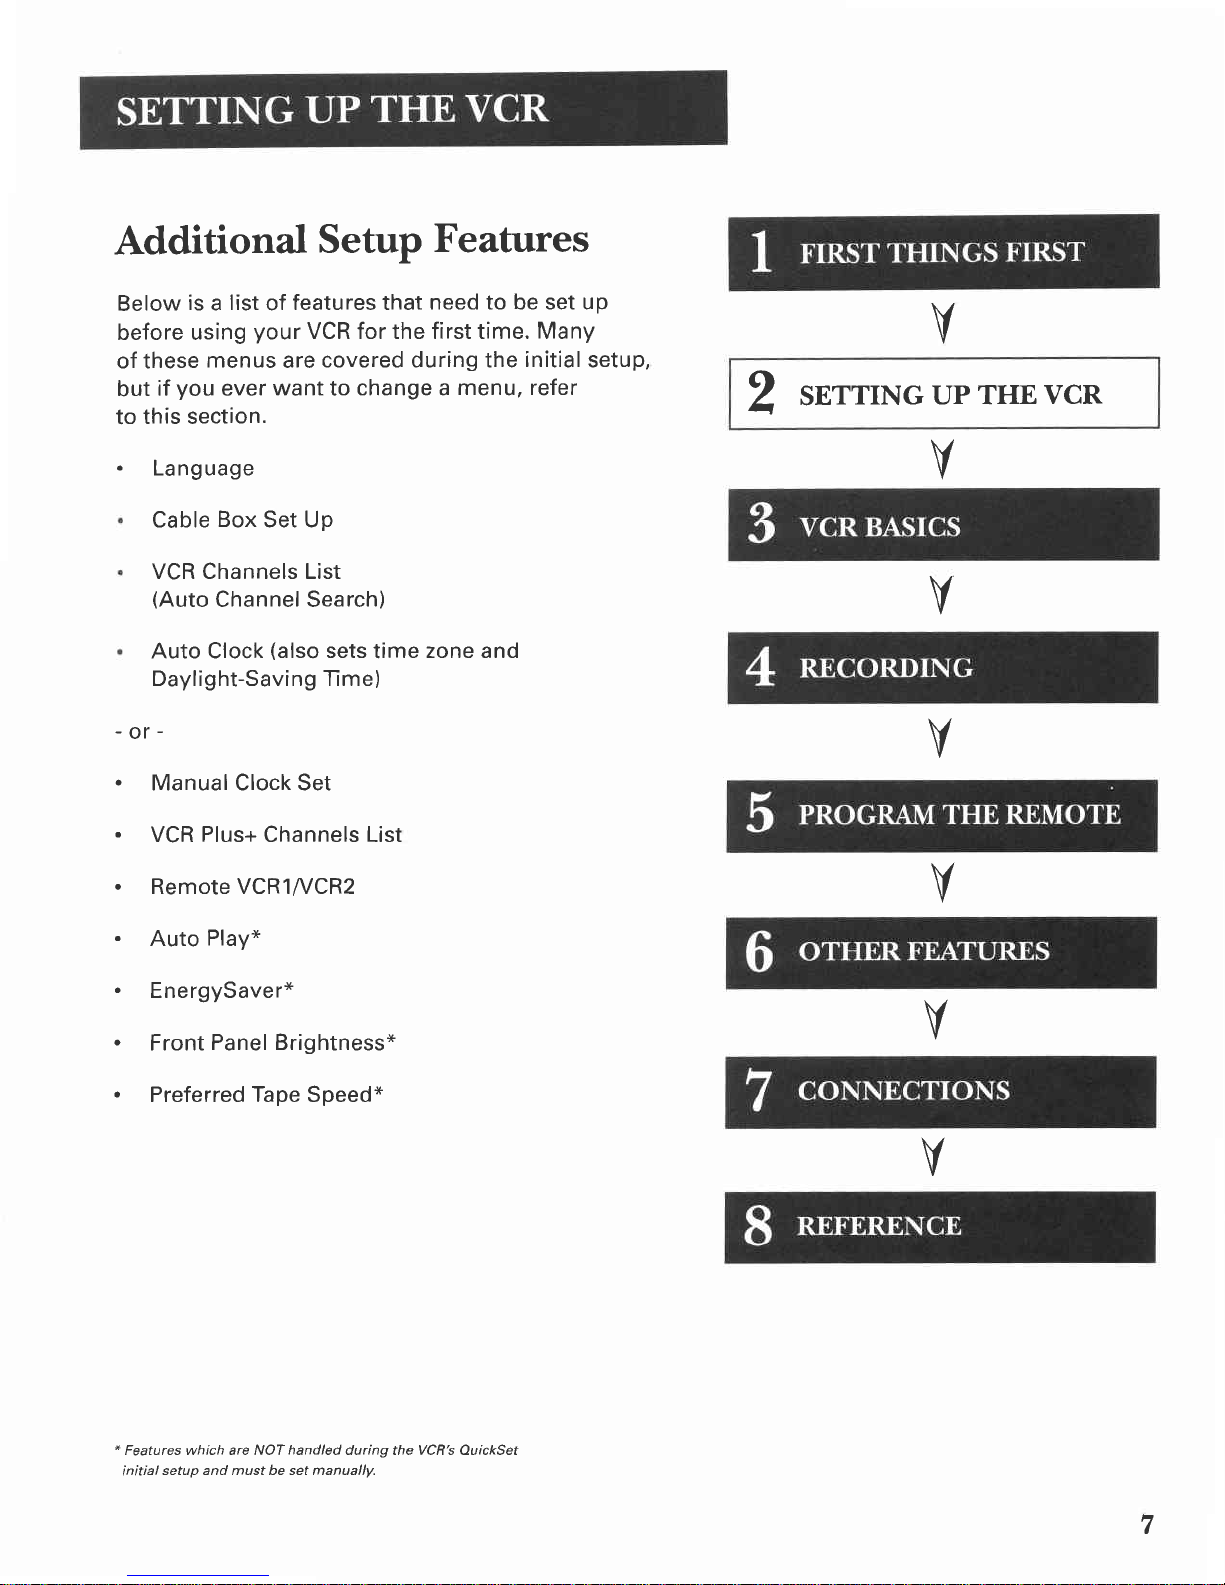
Additional
Set-UpFeatures... ................17
RemoteVCR1^/CR2
Option ............17
AutoPlay ......18
AutoTVA/CR............ .......
18
EnergySaver............. ......19
FrontPanelBrightness
(VCR
Display)..............19
PreferredTape
Speed.............. ........19
SetAutoRepeat .............19
VCR Basics.... .............21
RemoteButtons .......22
Component
Buttons ............22
VCR
Function
Buttons............... ............22
TVFunctionButtons ............23
Playing
a
Tape ..........24
Recording .................25
Recording .............. .....27
Recording
Features ...................28
ExpressRecording
(XPR) ....28
TimerRecording ..................29
TimerRecording
withVCR
Plus+
System........30
Setting
UptheChannelList
...........................
30
Using
the
VCR
Plus+
System .......
30
Stopping
aTimerRecording ...........32
Reviewingand
Clearing
Programs...............
....
32
Recording
Broadcast
StereoTV
or SAP
(Second
AudioProgram) .....................32
RecordingAudio
On|y..,...... ..................
33
Copying
andEditingTapes .......
34

Program the Remote.......,.. .....
35
AboutProgrammingtheRemote ...............36
Programming
the
Remote
to Controla
TV,.........,.
36
Operating
the
TV...... ............
36
Other Features .........39
PictureSearchOptions .............40
Forward
and
Reverse
Search ................40
SlowMotion .......40
FrameAdvance ....................
40
Index
Search ......41
Zero
Search............... ...........41
Commercial
Scan
(SEARCH
Button) ....42
Tracking ....................42
Pro-TectPlusrMLocking
Feature .................42
TimeCounter............ .................43
On-Screen
Displays ...................43
AudioSetupFeatures ................44
Reception ............44
Tape
Playback........... ...........45
Gonnections ..............47
Thingsto KnowBefore
ConnectingComponents......47
Connecting
YourVCR......... .......48
Jacksand
Cables
.............. .....................48
RFJacksand
CoaxialCables
(F-type)
..............48
Audiol/ideoJacks
andCables
(RCA-typ")
......48
Choosinga VCR
Connection.............,................,,..49
Advantages
of
Audioffideo
Connections........49
TVwithRFJack
On|y......... ..............50
TVwithAudio&ideoJacks .............51
TVwithAudioffideo
Jacksand
CableBoxto
Unscramble
Pay
ChannelsOn1y......................
52
Reference.............. .....53
Front
Panel ...............54
DisplayPanel ...........55
BackPanel................ ..................56
Howto FindYourTV'sVideoInput
Channel...............57
TroubleshootingTips.......... .......58
Specifications........... ..................62
CleaningtheVCR .....62
LimitedWarranty .....
63
lndex .......64
,

Welcometo your newVCR...
Tohelp
youget
started
using
your
VCR
with
aslittlereading
as
possible,
we've
put
allthe
basic
information
neededin
thefirst
three
sections.
Tohelp
youalong,there's
evenaQuickSetfeature
the
first
time
you
turn
onyour
VCR,which
walks
you
through
severalsetup
steps
atonce.
Getting Started
Before
this
first
step,
though,
learning
about
thetimeanddate,
your
remote
control'sfeatures,
workingwith
channels,
andbasicvideo
tape
operationsare
essential
to get
all
you
can
out
oftheVCR.
Once
youarecomfortable
withthese
features,
feel
free
to refer
to other
sections
because
theycoverthemore
detailedinformation.
What Remains?
Thefinal
sections
ofthismanual
contain
playback
andrecording
information,
adetailed
connectionssection,
and
a reference
sectionincluding
troubleshooting
tips,warranty
information,
andan
index.
1 FIRST
THINGSFIRST
V
README!
Thesenote boxes give you tips for
your new video cassetterecorder.

Step l: What'sfn the Box?
The
following
itemscome
packed
in
thebox:
. VCR
. Remotecontrol
. RF
coaxialcable
Step2:Install Batteriesin the
Remote Control
Follow
thesestepswhenever
youneed
to install
orchange
thebatteriesinyour
VCR's
remote:
1. Removethe
coverofthebatterycompartment.
2. Place
thebatteries
into
theremote's
back
panel.
Match
the
positive
(+)
and
negative
(-)
endsof
eachbatteryto
thediagraminside
the
batterycompartment.
3. Replace
thecover.
Step3:ConnecttheVCR
lf
you
connect
your
VCR
toyour
home
antenna
orcable
system
andthento your
TV,
use
the
VCR'sANT.
lNand
OUT
TOTV
jacks
foragoodsignalasshown
totheright.
lfyou have
aTVwith AUDIO|/IDEO
jacks,
usethe
jacks
for
a better
connection.Refer
to thesection,Connections,
towardthebackofthemanual,foradditional
connection
options.
Step4: Plug in the VCR
YourVCR's
power
cordhas
a plastic
band
strungthrough
theblades.
Remove plastic band before plugging the
cord into the power outlet. To
removeband,
cut
with a
pair
ofscissors
and
pull
itfree
of
the
blades.
Once
the
plastic
isremoved,match
thewide bladeofthepower
cordto the
wideslot
in
theAC
outlet.
Be
sureto insertthe
plug
completely.
CABLE,CABLEBOX,ORO""W
"""
1*6
6-,6_,@ | "r,,y:.
E o-o-
"o li'd6
4

Step5:Tune the TV
Tune
the
TV
tothe
VCRviewing
channel.
TheVCR
viewing
channel
is
channel3or4orthe
TV's
videoinput.
. lf
you
connect
your
VCR
usingthe
ANT.lN
andOUT
TO
TV
jacks
with RF
coaxialcable,settheCH3CH4switch
to channel3 orchannel
4- thechannel
you
want
to
useonyour
TV.
. lf
you
connect
your
VCR
usingtheAUDIOA/IDEO
jacks
withaudio/videocables,selectthe
TV'svideoinput
withtheremote'sTV
and
INPUT
buttonsto seethe
signal.
See
"How
to FindYourTV'sVideo
Input
Channel"
in
theReferences
sectionofthismanual
for
more
information
about
video
lineinput.
Step 6: Turn on the VCR
PressPOWER
ontheVCR's
frontpanel
orVCRonthe
remote
toturnonthe
VCR.
Thefirst
time
you
turnthe
VCR
on,a menu
screenappears.Thisis
thestart
ofaninitial
setup
whichhelps
you
set
differentoptionsfor
your
VCR.
Step7:Usethe QuickSet Guide for
Initial Setup
Thefirston-screen
menuduring
theinitial
setupasks
whichlanguage
youprefer
to useforyour
VCR.
Usethe
remote
control'snumber
buttonsto select
options.
Setect a Ianguage.
Seteccione un idioma.
Choisissez une Iangue.
2 EspaffoI
3 Frangais
1. Press1forEnglish,2for
Espanol
(Spanish),
or3
for
Frangais
(French).
Theremainingmenus
throughout
thesetupwillappearin
thechosen
language.
Justfollow
the
step-by-step
questions
untilthesetup
is
complete' continuedonNext
pase
VCRViewingChannel
Whenusing
the ANT.IN
andOUT
TO
TVjacksto connect the VGR,
tune
the TVto channel3 or 4 (whichever
isn'tusedfor local
broadcasting).
TheCH3CH4switch on the backof
the VGR
determineswhich TV
channelis usedto seethe VGR's
output. Use
the samechannelthat
the TV istunedto.
Whenusing
the Audio/Video
jacks
to connectthe VGR,
tune the TVto
its videoinput channel
using
the
INPUT
button onthe VCR's
remote
control(make
sure
you have
sefected
"TY" on the remote first).
Formoreinformation
aboutthe TV's
videolineinput,
see,'How
to Find
the TV's
VideoInputChannel"inthe
Reference
section of this manual.
CH3CH4
switch A1Vinput/output jacks
5

lfthemenudoesnot
appear:
. Make
suretheTVis
tunedto
thesamechannel
asthe
CH3CH4switch
oritsvideo
input
(see
"How
to Find
YourTV'sVideo
Input
Channel"
in
theReferences
sectionofthismanualfor more
information).
. Make
suretheVCRindicator
is
on in
theVCR
displayif
you
connected
your
VCR
using
the
ANT.
lN
andOUT
TOTV
jacks.
. Check
your
connections.
lf
you
choose
tosetup
your
VCR
optionsindividually,
then
goto the next
section.
Step 8:Accessing
Menus On Screen
TheMENU
and
number
buttons
onthe
remote
let
you
access,select,
andchange
your
VCR's
preferences.
For
example,
to selecta different
preferred
on-screen
language
thanthe
one
you
selected
during
theinitialset
up,dothefollowing:
1. PressMENU
to display
theVCR
MAINMENU.
VCR MAIN MENU
1 VCR Plus+
2 Timer Recordings
3 Time
4 ChanneIs
5 Setup
6 Preferences
Z Audi o
2. Press
8to display
theLANGUAGE
menu.
LANGUAGE
Setect a Ianguage.
2 EspafioI
3 Frangais
Press I\4ENUto conti nue
3. Press1
forEnglish,
2for Espanol
(Spanish),
or3
for
Frangais
(French).
Allotheron-screenmenus
areworked
in
similarways
using
theremote
control
tofollow
on-screeninstructions.
See
AdditionalSet-UpFeatures
inthe nextsectionfor
detailed
information
about
individual
menus.
Maneuvering
Menus
Theup anddown CHAN
buttonson
the remote control can be usedto
movethe menuhighlightbarandthe
MENUbutton onthe remotewill
select
the highlighted
entry.Note
that ifyou usethe Channelup and
down buttons on the VCRfront
panel,you will not be ableto select
the highlighted
entry.
6

Additional SetupFeatures
Below
is
alist
offeaturesthatneedto besetup
beforeusing
your
VCRforthefirsttime.Many
ofthese
menus
are
coveredduringthe
initial
setup,
but
if
you
ever
want
tochangea menu,refer
tothissection.
. Language
Cable
Box
SetUp
VCRChannelsList
(Auto
ChannelSearch)
AutoClock
(also
sets
time
zoneand
Daylight-SavingTme)
-or-
. ManualClockSet
. VCR
Plus+
ChannelsList
. RemoteVCRl//CR2
. Auto Play*
. EnergySaver*
. Front
PanelBrightness*
. PreferredTapeSpeed*
* Featureswhich are NOT handled during the VCR'sQuickSet
initial setup and must be setmanually.
2 SETTING
UP
THEVCR
V
V
V
V
V
V
V
7

Using Menusto SetUp Features
You
canset
up
your
VCR's
features
byusing
theremote
control's
buttons
toenter
your
choices
from
on-screen
instructions.
Each
menu
item
is
explained
in
this
section.
For
eachnumbered
selection
on
themenus,
use
the
samenumbered
button
on
theremote
control
toselectit.
LanguageSelection
lfyoudid not
complete
this
step
in
theprevious
section
using
the
initial
setup,
itis
time
toselect
your
preferred
language.
Once
this
stepis
complete,
all
on-screen
displayswillappear
in
thatlanguage.
1. On
yourremote
control,
press
theMENU
button
to
display
theVCR
MAIN
MENU.
1
z
3
4
5
6
7
VCR MAIN MENU
VCR PLus+
Timer Recordings
I I me
ChanneIs
Setup
Preferences
2. Press
8to select
theLANGUAGE
menu.
LANGUAGE
Setect a Ianguage,
spanoI
3 Franga is
Press l,lENU
to cont i nue
Press
1forEnglish,2
forEspafrol
(Spanish),
or3
for
Frangais
(French).
An arrow
indicates
the
selection
you've
made.
Once
you have
made
your
choice,
press
MENU
onthe remote
to continue
backtotheVCR
MAIN
MENU.
3.
lsSomething
Missing?
Not allthe VCR
screens
will always
beshown in this manual
when
explaining
the features.
8

CableBox Setup
Thisset
up
applies
only when
all
channels
are
received
through
a
cablebox.
In
thiscase,
the
VCRwill
automatically
enter
the
channelused
toviewcablebox
programming.
Your
VCRwillusethischannelfor
all
future
timer
recordings.
1. PressMENU
to displaythe
VCR
MAINMENU.
VCR MAIN I{ENU
1 vCR Ptus+
2 Timer Recordings
3 Tine
6
7
8
0
Preferences
Audio
Langua9e
Exi t
2. Press
4
to display
theCHANNELSmenu.
CHANNELS
1 Auto Channet Search
2 Add/Remove Channets
3 Signal- Type: CABLE
VCR Pl-us+4 VCR Ptus+ Chann ist
Press5to displayCABLE
one
ofthe
three
choices.BOX
SETUP.Then
select
CABLE BOX SETUP
Do you use your cabte
box to receive ALL
channets or onty S0llE
channets?
nl.y S0ME channets
3 CanceI setup
lf
you
selectedALL
Channels,
enterthe
outputchannel
of
your
cable
box
(usually
03
or04),orpress
the
INPUT
buttonontheVCR'sremote
to selecttheVCR'svideo
input
channel
if
youused
the
AUDIOI/IDEO
jacks.
ChoosingtheRightSetupfor
YourCableBox
lf you use
yourcable
boxto receive:
ALL
channels-entertwo numbers
for the output channelof your cable
box or press
INPUTif you connect
your cablebox with AUDIO/VIDEO
jacks.
OnlySOMEchannels-choose
this
optionifyou only usethe cablebox
to unscramble
premiumchannels.
Cancel
setupwill takeyou to a
screenstatingyour VCRwill not
controlthe cable
boxchannelduring
timer recordings.
4.
CABLE BOX SETUP
0n what channeI does
the VCR receive signaLs
f rom the cabIe box?
(usuaIly 3,4, or Video)
Enter 01-13 or INPUT
Press MENU to canceI
CABLE BOX SETUP
0n t,,hat channeI does
the VCR receive signats
f rom the cabte box?
(usuatLy 3, 4, or video)
U4
Press CLEAR to cofrect
Press MENU to continue
I
Continued on NextPage

5. Once
you
completethesetup,theVCR
confirmsthat
the
VCRwill nowreceive
allsignals
onthedesignated
channel.
CABLE BOX SETUP
The Cabte Box Setup
is comptete.
The VCR witl- N0T controI
the cabte box channeI
during timer recordings.
Press MENUto continue
VCR ChannelsList
lfyou useacable
box
for allchannels,
thisstep
isnot
necessary.
Your
VCRmay
come
with achannellist
preset
atthe
factory,
but
you maywant
to add
ordeletesome
channelsdepending
on
whether
theyare
active.
Auto Channel Search
1. PressMENU
todisplay
the
VCR
MAINMENU.
2. Press4to displaytheCHANNELSmenu.
CHANNELS
2 Add/Remove Channets
3 SignaL Type: CABLE
4 VCR PLus+ ChanneL List
5 Cabl-e Box Setup
U EXlI
3. Press1to
displaytheAUTOCHANNEL
SEARCHmenu.
AUTO CHANNEL
SEARCH
v'lhat type of signaI
ane you using?
l CabLe TV
2 Antenna
0 CanceI
4. Select
one
ofthethreeAUTOCHANNEL
SEARCH
options.
Thecurrentchoice
is
highlighted
withan
arrowsymbolattheleft.
. Cable
fl/searches
forcablestations
broadcast
from
singlechannel.
. Antennasearchesfor local
broadcaststations
on all
channels.
l0

. Detect
Automaticallymakesthis determination
without
assistance.
AUTO CHANNELSEARCH
Now scanning channet 14
Press any key to canceL
TheVCR
scans
foravailablechannelswhich
takesabout
one-to-twominutes.When
thescaniscomplete,
the
VCR
tunestothe
lowest
channelnumber
available.At
this
point,pressing
CHANup
ordownontheVCR
or remote
control
should
onlyselecttheactive
channels.
Changing the SignalType
1. PressMENU
to display
theVCRMAIN
MENU.
2. Press4
to display
theCHANNELS
menu.
3. Press3
to changetheSignalType
between
CABLEand
ANTENNA.
Adding or Remooirg Channels
Youmaywant
to add
or remove
channels
after
youAuto
ChannelSearch,especially
ifsome
ofthe
channels
have
weaksignals
or
you
don'twant
towatch
them.
1. PressMENU
todisplay
the
VCR
MAIN
MENU.
2. Press4
to display
theCHANNELS
menu.
3. Press2
to displaytheADD/REMOVE
CHANNELS
screen.UseCHAN
upordown
or number
buttonsto
go
tothe
channels
to be
removed
oradded.
Auto ChannelSearch
Usethe Auto ChannelSearch
featureto place
allavailable
channelsin memory.
lf you everchangecableor antenna
signals,
you may needto Auto
ChannelSearchagain.
DetectAutomatically
A strongcableor antennasignal
in
your areamay causeAuto Detectto
mis-detect.lfthis shouldhappen,
sefect1or 2lor the system
you
have.
ADD/REIIOVE CHANNELS
ChanneL ll5
is presentLy ADDED
Press CLEAR to remove
Press MENU to exit
ADD/REMOVE
CHANNELS
Channe[ 115
i s present Ly REI'l0VED
Press INF0 to add
Press MENU
to exit
4. Follow
theon-screen
instructions
to finishthisset
up.
ll

Time and Date
The
VCR
gives
you
two waystoset
thetime
and
date:
the
AutoClock
Featureor manually.The
AutoClockFeature
enables
the
VCRto update
theclock
each
timetheVCR
is
turned
off.
AutoClockis
advantageous
becauseit updates
the
timeautomatically.
Beforesettingthe
time
and
date,
setthe
Auto
DST
(Daylight-Saving
Time)feature
to ONorOFF
for
your
area.
Auto Clock Set Feature
TheAutoClock
Setfeatureissetto ONatthe
factory.In
the
ONsetting,the
VCRlooksfor
achannelcarrying
XDS
(Extended
DataServices)
information.
XDSupdatesthe
clockusing
theCoordinatedUniversalTime.
There
are
certainstepsthat
arerequired,such
as
AutoChannel
Search,
settingthe
TlmeZone,
and
Daylight
Saving
feature
beforethe
AutoClockfeatureworks.
Setting the Time Zone
1. PressMENUontheremoteto displaythe
VCR
MAIN
MENU.
VCR MAIN I'IENU
1 VCR Pl-us+
4 Channets
5 Setup
6 Preferences
7 Audio
8 Language
0 Exit
2. Press
3to displayTIMEmenu.
TIME
1 Set Time and Date
2 Auto Ctock Set: 0N
et Day ght Savrngs
XDS Time Data was
found on channe[ 20,
U EX]T
Selecting
Channels
TheChannelup
anddown buttons
accessthosechannels
activein
your VCRchannellist.
You
can
stillaccess
channelsnot in
thechannellistbyusingthe
numberbuttons on the remote.
r2
3. Press
3again
to displaytheSET
TIMEZONE
menu.

SET TI!IE ZONE
l.Jhat is your Time Zone?
1 Eastern
2 CentraI
3 Mounta i n
4 Paci f i c
5 Ataska
6 HaHa i i
Press ltlENUto cont i nue
1.
2.
3.
4. Select
the
correcttime
zone.
lf "Automatic"
isselectedasthe
timezone,the
VCR
setsthe
clockusingthe
firstCoordinatedUniversal
Time
informationitfinds
in
abroadcast
signal.
lf
the
timeisnotcorrect,selectanothertime
zoneorsetthe
timeand
datethroughthemenusystem.
Setting Daylight-SavingTime
Press
MENUto displaytheVCRMAINMENU.
Press3to displaytheTIMEmenu.
Press
4
to display
the
SET
DAYLIGHTSAVINGS
menu.
SET DAYLIGHT SAVINGS
Does your area observe
Dayl-ight Savings Time
fnom ApriI to 0ctober?
1 Yes, DST is observed
2 No
Press MENU to continue
4. Select
oneoftheoptions.
. DSTis
the
acronymfor DaylightSaving
Time.
. lfyouchoseAUTOMATIC,
the
VCRsetstheclock
using
the
DSTinformationbroadcastin
the
signal
(channel).
Setting Time and Date Manually
lfthe
Auto
Clock
Setwas
unsuccessful,settheclock
throughthe
menu
option.
TheAuto
ClockSet
featureisset
to OFF
automatically
when
you
settheclockthis
way.
1. PressMENUto displaythe
VCRMAIN
MENU.
Auto Clock
Information
With a cable
box,the VCRwill not
resetthe clockafter a power outage
unless
the cablebox isturned on to
the channelcarryingthe XDSsignal.
lf Auto ClockSet is unsuccessful,try
tuning
theVGR
(or
cablebox)to a
channel
carryingthe broadcast
information(usually
PBSI,
then turn
the vcR off. lf the time does not set
within ten minutes,setthe time and
datemanuallythroughthe menu.
Check
your localcable
system
or TV
stations
for availability
of channels
with XDS.
Continued on NextPage
l3

VCR MAIN MENU
1 VCR Ptus+
4 Channets
5 Setup
6 Preferences
7 Audio
8 Language
0 Exi t
2. Press
3to display
theTIMEmenu.
3 Set Tine Zone
4 Set Daytight Savings
XDS Time Data was
found on channe [ 20,
0 Exi t
3. Press1
to display
theSETTIMEANDDATE
menu.
SET TIME AND DATE
Ti me --: --
(hh:mm)
Date --/--l--
Press MENU to canceI
Enterthe
datausingthenumber
buttons.Press
0
beforesingle-digitnumbers
andfollow
theon-screen
directions.
SET TII'IE AND DATE
Ti me 12=34 P?4
Date 11/18199 Thursday
Press CLEAR to correct
Press I{ENU to set
SpringForward;FallBack
lnthe Spring,DaylightSaving
Time
beginson the first Sundayin April.
Because
the clock
automatacally
changes
from 2:00AM to 3:00
AM
(forward one hour), remember to
includethe extrahourfor timer
recording
fallingwithin this time
frame.
Inthe Autumn, DaylightSavingends
onthe last
Sunday
in October.The
VGRclockautomatically
changes
from2:00AM to 1:00AM (back
one
hour).Therefore,
this can
also
affect
timed recordinglength.
4.
L4

VCR Plus+@
System Channels
Using
the
VCR
Plus+system
makes
programming
timer
recordings
forcable
oroff-air
antenna
easier,
but
you
haveto put
ina littletimeright
nowto setupa
channel
list. A worksheet
andabbreviated
codes
fortypical
cable
services
in
the
U.S.andCanada
are
provided.
1. Press
MENUto display
the
VCRMAINMENU.
VCR I'IAIN I'IENU
1 VcR P(us+
2 Timer Recordings
5 | I me
Setup
6 Preferences
7 Audi o
8 Language
0 Exi t
2. Press
4
to displaythe
CHANNELS
menu.
CHANNELS
Auto ChanneI Search
Add/Remove Channets
0 Exi t
3. Press
4
to displaythe
VCRPlus+Channel
Listscreen.
VCR+ channeI My channet
5 --
4 --
3->->->--
2 --
Use CH +l- to seLect
Press 0-9 to change
Press li'IENU to save
Enter
thedata
followingtheon-screen
your
worksheet
(see
next
page). directions
using
vCR+ channe I tttly Channe L
5 46
+ --
3->->->23
2 --
Use CH +/- to seIect
Press 0-9 to change
Press MENU to save
Screenis for an example only.
VCB
PIus+and
PlusCodeare
registered
trademarksof Gemstar
Development
Corporation.
TheVCR
Ptus+Svstem
ismanufactured
underthe
license
fromGemstar
Development
Coryoration.
Two-Digit
VCR
Plus+
SYstem
Channel
Numbers
for
Cable
TV
(Canadian
List)
35 American Movie Classics
39 Arts &-Entertainment
57 Black
Entertainment
54 Bravo
42 CableNews Network
45 Cinemax
98 Cinemax
2
37 The DiscoveryChannel
53 The Disney
Channel
63 Entertainment Television
34 ESPNSports Network
47 The FamilyChannel
33 Home Box Office
95 Home Box Office 2
96 Home Box Office 3
51 The Learning
Channel
46 Lifetime
58 The Movie Channel
48 Music Television
49 The Nashville Network
38 Nickelodeon
64 Nostalgia Television
99 Quality Value Cable
41 Showtime
97 Showtime 2
59 Sports Channel
52 Turner Network Television
44 USA-Network
62 Video Hits 1
93 Viewer's Choice1
94 Viewer's Choice
2
55 WGN Chicago
43 WTBS
Atlanta
60 WWOR-New York
5eenextpage for Canadian List
VCR
Plus+System
Channel
List
Referto your localtelevision
listfor a
complete
VCRPlus+
channel
listfor
yourviewing area
or contact
your
cablecompany.
Usingthe list maY
save
you some
time.
4.
l5

Broadcast
or
Cable-TVStationName VCR
Plus+
ChannelNumber**
ChannelNumber
You
Receivethe
StationOn*
HBO 33
E'PN ,4
VCR Plus+ System
Worksheet
*Check
your localor cablelistingfor the channelnumberyou receive
this station on.
*"Checkyour locallistingfor broadcastor VCR
Plus+channelnumber assigned,
Two-Digit
VCR
Plus+
System
Channel
Numbers
for
Cable
TV
(Canadian
List)
67 Allarcom Pay Television/
Superchannel
44 Arts & Entertainment
72 Cable News Network-
Headline News
61 Cable News Netvvork
70 Canadian Home Shopping
Network
56 Canal Famille
69 Cathaylnternational
Television Inc.
68 Chinavision Canada Corp
60 Country Music Television
63 Family Channel
62 First Choice
96 First Choice Two
97 First Choice Three
99 First Choice Four
90 House of Commons
91 La Chaine Francaise
51 The Learning Channel
65 MeteoMedia/TheWeather
Network
48 MuchMusic Network
55 MusiquePlus
52 Nashville Network
73 Newsworld/CBC
53 Le Reseau des Sports
43 The Sports Network
64 Super Ecran
37 Super Ecran B
98 Super Ecran C
56 Telatino Network
46 TV5 Montreal
92 Viewer's Choice 1
93 Viewer's Choice 2
94 Viewer's Choice 3
95 Viewer's Choice 4
71 Vision TV: Canada's
Faith Network
38 Youth TV, Canada Inc.
l6

Additional Set-UpFeaturesin the
PREFERENCES
Menu
Thefeatures
in
thissectionareallaccessed
through
the
PREFERENCES
menu.
1. PressMENU
todisplaythe
VCR
MAINMENU.
1
z
3
VCR I'IAIN MENU
VCR PIus+
Timer Recordings
Tirne
Channets
5
Audi o
8
0Language
txr t
2. Press
6
to displaythe
PREFERENCES
menu.
3
4
6
Auto P[ay: 0N
AUtO TV/VCR: ON
EnergySaver: 2:00
Front Panet: AUTo
Tape Speedr SLP
Set Auto Repeat
0 Exi t
Now
you
are
ready
toselectan
itemfrom
themenu
tosetup.
RemoteVCRI /VCRZ Option
lfyou own acompatible
GE,
RCA,
or PROSCANremote
that
hasaVCR2,VCR2.LD,
or
VCR2.DVD
button,this
featureallows
youto setthisVCRto respond
to that
butto
n.
Press
1
to selecttheRemote
Controlitem.Then
press
the
VCR2,
VCR2.LD,
orVCR2.DVD
buttonto change.
PREFERENCES
uto PLay:
3 AUtO TVlVCR: ON
4 Energysaver: 2:00
5 Front Panet: AUTo
6 Tape Speed: SLP
7 Set Auto Repeat
3 Auto TVlVCR: 0N
4 EnergySaver: 2:00
5 Front Panet: AUTo
6 Tape Speed: SLP
7 Set Auto Repeat
U tsX1I Remote
ControlOption
Changingthe remoteoption to VCR2
disablesthe remote
that camewith
your VCR.
Continued on NextPage
t7

The
VCRwillonlyrespond
tothecompatibleremote's
VCR2,
VCR2.LD,
orVCR2.DVD
button.
lfyouchangethe
remotesettingtoVCR2,theremote
thatcamewith
your
VCRwill nolongercontrolit.
Usethe
compatibleremote
to change
theremote
setting
back
toVCR1.Display
the
PREFERENCES
menu,
press
1,
and
thenpress
VCR
ontheVCR'sremote.
Auto Plav
Thisfeature
allows
theVCR
to automatically
start
playing
when
you
insert
atape
with
thesafetytabremoved.In
the
PREFERENCESmenu,
press
2to switchbetweenONorOFF.
. SelectONifyouwantatapewith its
safetytab
removed
to start
playing
automaticallywhenthetape
isinserted.
. SelectOFF
ifyoudo nof
wantatapewith its
safetytab
removed
to start
playing
automatically.
Auto TVIVCR
Thisfeature
controls
whether
theTV^/CR
switch
changes
automatically
totheVCRmode.Press
3
to switch
between
ON
andOFF.
. Select
ONifyouwant
the
VCR
to switch
to the
VCR
mode
when
the
VCR
is
turnedonoracassetteis
inserted.This
onlyapplies
if youconnect
the ANT.lN
and OUT TO TV
jacks of your VCRto your TVand
watch your VCR
on channel3 or 4 of your TV.
. SelectOFF
if
you
wanttheVCR
to remain
intheTV
mode.
Thisisusefulifyouwatch
your
VCR
onthe
TV's
videoinput
and
you
don'twant
your
antenna/cable
signal
interrupted
bythe
VCR.
Referto the Connections
section.towardtheback
of
themanual.
Auto Play
Foratapeto beable
to startplaying
automatically,
it must have
the
safetytab removed.
All rented
moviesandpurchased
movies
shouldhavethistab removed.
AutoTV/VCR
Pressing
TV.VCR
will stillswitch
between
the VCRandTV mode.
VCRmode:VCRindicatorin the
display
panel
lights.
TVmode:VCRindicator
turns off.
l8
Other manuals for VG4275
1
Table of contents
Other GE VCR System manuals