GEENI QUICKPEEK Guide

QUICKPEEK
START GUIDE
ENGLISH

1
Contents
Product Diagram 2-3
Download & Register 4-5
Install 6-9
Connect: QR Code Mode 10-13
Settings 14-15
Live View & Playback 16-17
FAQs 18-19
Troubleshooting & Specs 20
Notices & Support 21
What’s in the Box
Get Ready
Smart Wi-Fi Doorbell
Mounting Bracket
Wireless Chime
Rechargeable Battery
2 Wall Anchors
2 Mounting Screws
Security Release Tool
Security Screw
User Manual
3M Adhesive Backing
• Know your Wi-Fi network and password
• Locate a suitable mounting location, but do
NOT mount until setup is complete
• Geeni app requires a mobile device running iOS
9 or higher or Android 5.0 or higher
• Operates on a 2.4GHz Wi-Fi network
• A microSD card is required to record footage
Thank you for purchasing
your Geeni smart home product.
Get started using your new devices by
downloading Geeni, one convenient app that
manages everything straight from your phone
or tablet. Easily connect to your home Wi-Fi
and control multiple devices from the touch
of your fingertips.
Support:
If you encounter any issues, please call (888) 232-3143
(Toll Free) or go to support.mygeeni.com for help.
Support is available seven days a week.
A
F
A
B
H
I
J
G
C
D
D
CB
E
E F
QUICKPEEK
START GUIDE
I
H
G
J

3
2
Camera
FRONT LEFT RIGHT
Microphone
Call Button
LED Indicator
light
Speaker
Motion
Sensor
microSD
Card Slot
Micro USB
Charging
Port
Reset
Button
RESET USB
Product Diagram Product Diagram
Re

5
4
Register a Geeni account:
enter your mobile phone number or email address.
Download the Geeni app. Enter the verification code and create a password.
Download & Register1
STEP 2
STEP 3
STEP 4
STEP 1
Enter your information to log in.

7
6
Please be sure to
charge the battery to
100% using the micro
USB charging port.
Before use you will
need to remove the
battery tab.
2 METHODS TO INSTALL
Align the Mounting Bracket to where you
would like to mount it, and mark the location
of the screw holes.
Drill 2 holes on the marked locations.
If you are mounting to stucco, brick, or
concrete, use the wall anchors to make sure
your Bracket will be securely mounted.
Then, screw in the Mounting Bracket.
Use the included 3M adhesive backing to simply
stick the Mounting Bracket to the desired location.
Install2
STEP 1STEP 2
Open the cover of the QUICKPEEK
3M ADHESIVE
1
2
REMOVE
BEFORE
USE
RESET USB
METHOD 2
METHOD 1

9
8
Setting up the Wireless Chime:
Plug it in and choose between 18 different chimes
and 4 volume levels + mute.
Its that easy!
Please Note: Refer to Step 7 on pg. 13 if your
QUICKPEEK and chime don’t autimatically pair.
Install (cont’d)2
STEP 3
STEP 4
STEP 5
With the cover still off press and hold the
reset button until you hear the “sytem reset”
prompt from the doorbell speaker.
RESET
Insert microSD
card into the
microSD port
QUICKPEEK
MOUNTING BRACKET
VOLUME
BUTTON
CHIME
BUTTON
OPTIONAL:
Insert your MicroSD card into the microSD port.
This is not necessary for live view, but is required
to record and play back footage.
Close the cover and use the security screw to
lock down the cover and attach QUICKPEEK
to the mounting bracket.
Your QUICKPEEK is now ready to
connect via the Geeni App.

11
10
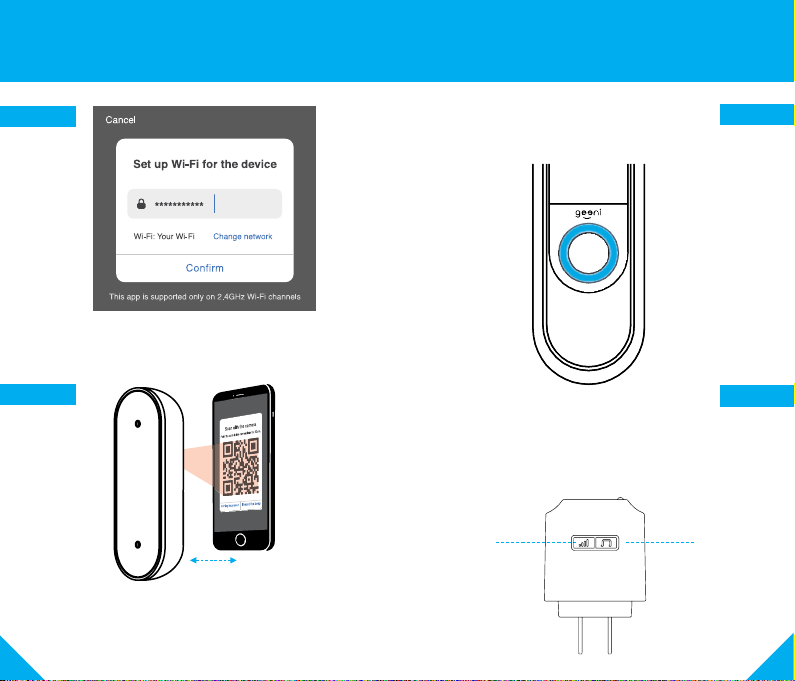
Connect to Geeni App:
QR Code Mode3
STEP 1Make sure the indicator light is blinking.
If it’s not, use the reset button following the
instructions on page 8.
STEP 3
STEP 2
Choose “QR Code”.
In the Geeni app, on the top corner of the Devices
screen, click (+). Choose “Video Doorbell”.
QR Code
13
12
Connect to Geeni App:
QR Code Mode (cont’d)3
STEP 4
Enter your Wi-Fi network and password.
NOTE: Geeni only works with 2.4GHz networks.
STEP 5
Use the QUICKPEEK’s camera to scan
the QR code on your smartphone.
STEP 6
The light will turn blue once the
QUICKPEEK connects to the Geeni app.
4”- 8”
STEP 7
When the chime is plugged into the wall, it will ring when the
doorbell is pressed.
If the chime doesn’t ring when the doorbell is pressed, press
and hold the volume button for 3 seconds. This will reset and
pair the chime with the doorbell.
VOLUME
BUTTON
CHIME
BUTTON

15
14
Settings
Access Camera Settings: From your main device
list, click on your QUICKPEEK. Next, press the “•••“
button on the top right for advanced settings.
Device Name: Press to rename your device to
something like “Front Porch” or “Backyard”.
Device Sharing: Let friends, spouse, roommates,
or family keep an eye on what your QUICKPEEK
sees. Whether it’s a garden or an anticipated
piece of mail, you can decide who gets to check in,
access the camera, interact with guests, and get
notifications.
Remove Device: Delete the QUICKPEEK from your
account. It will remain linked to your account unless
it is deleted.
Time Watermark: Turn the Time Watermark on
to always see a timestamp of when video is taking
place.
Motion Detection: When turned on, you’ll
receive notifications to your phone whenever the
DOORSCREEN senses motion. Press to turn Motion
Detection off or adjust sensitivity.
Format SD Card: Press to erase your microSD
Card.
Night Vision: The QUICKPEEK will automatically
activate Night Vision in the dark. Toggle here to
manually turn night vision on or off.
Front DoorbellBack
Standard
Signal : 99 %
17
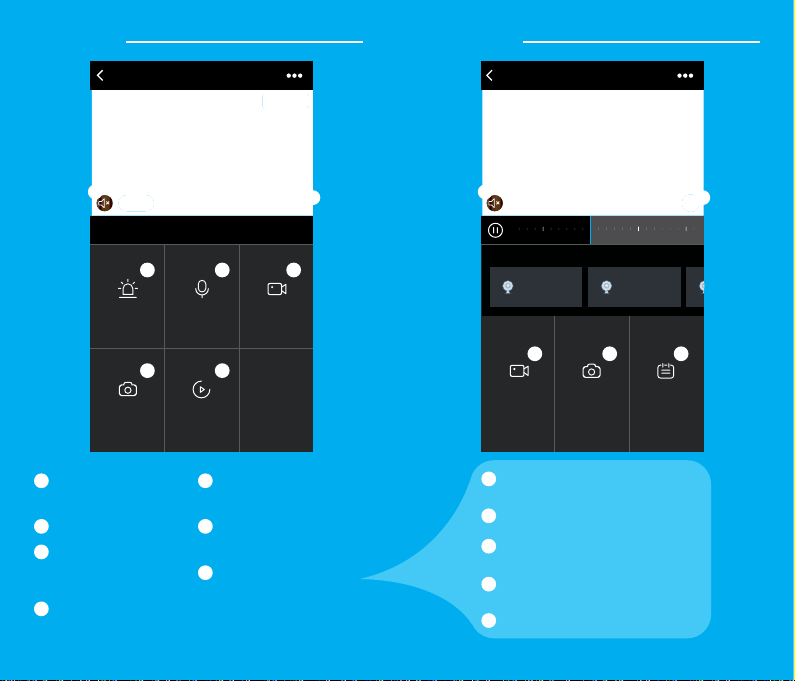
16
Front DoorbellBack
Standard
Motion Alerts Press to Speak Record
Playback
Signal : 99 %
Screenshot
Live View
Hear what’s
happening around
the doorbell camera
Full screen
Activate push
notifications to
be notified of any
movement
Press to activate
the microphone and
speak through the
doorbell camera.
Save the live camera
footage onto your phone
memory
Save a screenshot of live
video onto your phone
memory
Play back recorded
footage (microSD card
required)
1
1
5
5
2
2
6
3
3
7
7
4
4
6
Front DoorbellBack
10:00 11:00 12:00 13:00
21:27:17
Front Doo r...
2018 –06– 08
21:25:38
Front Doo r...
More
Record Screenshot Calendar
Playback
Hear what’s happening
around the doorbell camera
Save a screenshot of playback
footage onto your phone memory
Full screen
Save the playback footage
onto your phone memory
Change date of video playback
1
1
5
5
2
2
3
34
4
This manual suits for next models
1
Other GEENI Accessories manuals


