1716
FCC Notice:
This device complies with Part 15 of the FCC Rules. Operation is subject to the two following
conditions:
1. This device may not cause harmful interference.
2. This device must accept any interference received, including interference that may cause
undesired operation.
Note: This equipment has been tested and found to comply with the limits for a Class B digital
device, pursuant to Part 15 of the FCC Rules. These limits are designed to provide reasonable
protection against harmful interference in a residential installation.
Important Information:
Before installing, read and follow all precautions, including the following:
CAUTION: RISK OF ELECTRIC SHOCK OR FIRE
CURRENT must be installed and used in accordance with the National Electric Code. Please
consult a licensed electrician if you are uncomfortable or unfamiliar with electrical work.
Disconnect power before installing or modifying this product.
CAUTION: Suitable for indoor use only.
Support:
If you encounter any issues, please call (888) 232-3143 (Toll Free)
To explore our full selection of products, visit us at: www.mygeeni.com
© 2019 Merkury Innovations • 45 Broadway 3rd FL, New York NY 10006.
The illustrated product and specifications may differ slightly from those supplied. Geeni is a trademark of
Merkury Innovations LLC. iPhone, Apple and the Apple logo are trademarks of Apple Inc., registered in the U.S.
and other countries. App Store is a service mark of Apple Inc. Galaxy S is a registered trademark of Samsung
Electronics Co., Ltd. Google, Google Play, and related marks and logos are trademarks of Google LLC. iOS is a
registered trademark of Cisco in the U.S. and other countries and is used under license. Amazon, Alexa and all
related logos are trademarks of Amazon.com, Inc. or its affiliates. All other trademarks and trade names are
those of their respective owners.
Made in China
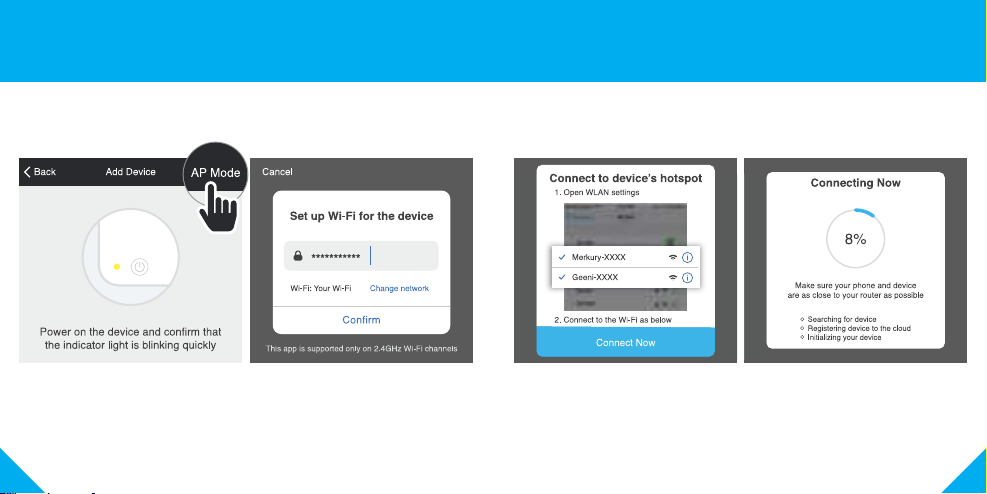
Troubleshooting
Can’t connect to Wi-Fi?
Make sure you entered the correct Wi-Fi password during the Wi-Fi setup.
Check whether there are any Internet connection problems. If the Wi-Fi signal is
too weak, reset your Wi-Fi router and try again.
Reset the device
Reset CURRENT by pressing and holding the button for 3 seconds until the
indicator light is flashing rapidly.
- Reset one time (press and hold) to reach Easy mode (Fast blinking blue, 2x per
second)
- Reset again (press and hold) to reach AP Mode (Slow blinking blue, every 3
seconds)
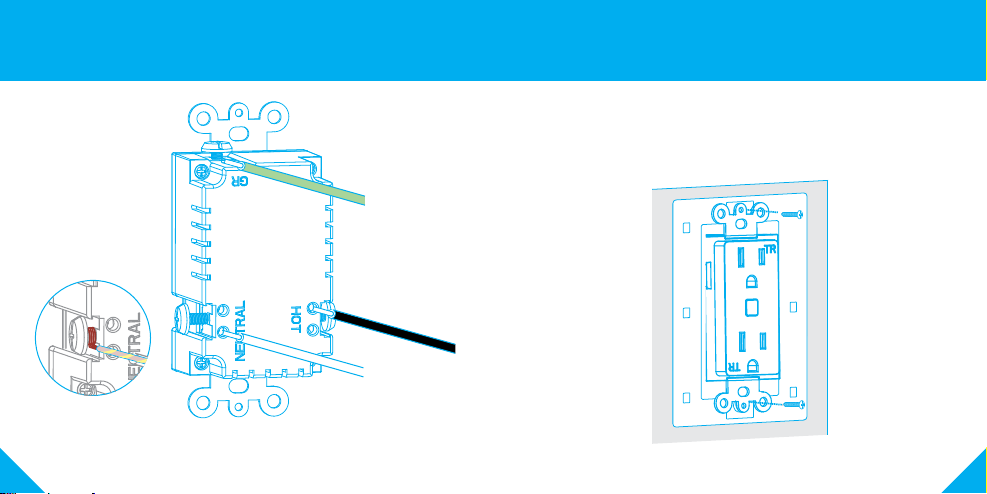
System Requirements
• Mobile device running iOS®9 or higher or Android™ 4.1x or higher
• Existing 2.4GHz Wi-Fi network (not compatible with 5GHz Wi-Fi networks)
• Existing outlet box; the box should be more than 2 inches deep
• Geeni app
IMPORTANT: Please consult a licensed electrician if you are unfamiliar with
electrical installations.
Technical Specications
• Input: 100V-130V, 60HZ
• Single Output 15A Max / outlet
• Total Output 15A Max