General tools CM880 User manual

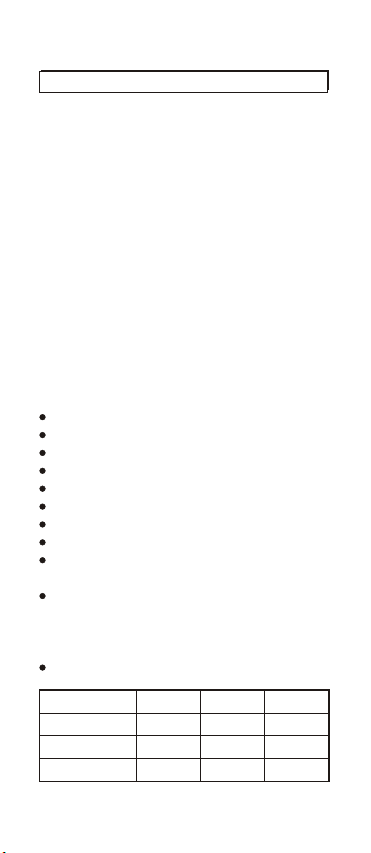
Congratulations on your purchase of
the Hygro-Thermometer ! This unique
instrument is portable, battery operated
in Temperature./Relative Humidity/Dew
Point / Wet Bulb temperature in a
compact measuring device. There are
3 models available for selection.
The Hygrometer is ideal for HVAC/R
technicians measuring Temperature ,
Humidity, Though you might have seen
Dew Point or Wet Bulb .. these are not
available for model 8701, and Wet bulb
function is only available for model
8705. Please contact the store or the
place you purchased .
Features :
Dual LCD digital display .
Data Hold to capture readings.
Pocket size , easy to fit in pocket.
Low battery indication.
Fast response .
Accurate reading .
Maximum record function .
Minimum record function.
Dew Point calculated in seconds.
(model 8703,8705 only)
Wet bulb calculated in seconds.
(model 8705 only) Calculate WB, no
water , twirling or conversion chart /
reading chart needed.
Microprocessor circuitry for reliability.
Model
8701 8703
8705
Temp/RH
V V V
Dew Point V
V
Wet Bulb
V
1
INTRODUCTION
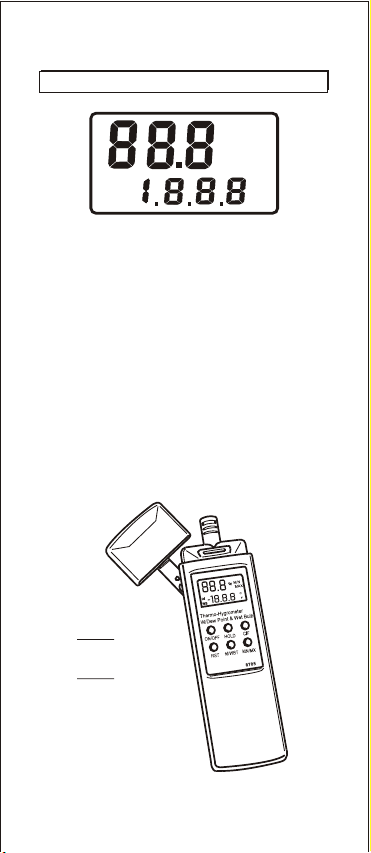
1.
2. "-" .Minus pressure display.
3. MAX Maximum recorded.
4. MIN Minimum recorded.
5. HLD Hold current reading.
6. td Dew Point measurement.
. WB
. CCelsuis unit
9. F Farenheit unit
%Relative humidity unit
Primary Data Screen displays
pressure value.
7Wet Bulb temperature
measurement .
8
10.
2
%
HLD
MIN
MAX
C
F
td
WB
8701 without
td/WBT key
8703 td/WBT
key without
printing WBT.
CONTROLS AND INDICATORS

Fig. A
3
Unit will turn itself off after 20 minutes
(Sleep mode) To override Auto Power
Off function (Non-Sleep Mode) press
ON/OFF and MIN/MAX button simul-
taneously. After the full display appears
release ON/OFF button first,the display
will show " n" in left side. When " n"
appears (See Fig.A) then release MIN/
MAX button. Unit will now be in Non-
Sleep Mode.
(1) Remove protective sensor cover.
(2) Turn meter on by pressing ON/OFF
button.(See Fig.B)
(3) Press C/F key to convert reading
to desired range. Both temperature
and relative humidity measurement
will display simultaneously.(See
Fig.C)
%
C
Fig. C
Fig. B
%
F
AUTO POWER OFF (SLEEP
FUNCTION)
MODE OPTIONS
Press and hold (td/WBT) button until
"td" appears on left side of display.
Unit will now display Dew Point Temp.
See Fig.E
Press "HOLD" button until (HLD)
appears in display.
The current reading is now being held
and will not change until Hold function
is cancelled. (See Fig.D)
Press "RST" button to cancel Hold
function. Hold function can be used
for temperature, Humidity, Dew-point
& Wet bulb.
Press and hold (td/WBT) button until
WB appears on left side of display.
Unit will now display Wet Bulb temp-
erature. Intermittent flashing of WB (
See Fig.F) indicates that current read-
ing is being calculated and updated
due to constant changes in humidity &
temperature in environment.
%
HLD
C
%
C
td
%
C
WB
Fig. F
Fig. E
Fig. D
4
DATA HOLE FUNCTION
DEW POINT FUNCTION
WET BULB FUNCTION

(1) Press and hold MN/MX button until
(MIN) appears on display.(See
Fig.G) Display is now showing
minimum humidity and temperature
reading in memory.
(2) Press and hold MN/MX button again
until (MAX) appears on display.
(See Fig.H) Display is now showing
maximum humidity and tem-
perature readings in memory.
(3) To return to current temperature
and humidity readings press and
hold MN/MX button until Min or Max
disappear from display.
(4) To clear current MIN and MAX
reading from memory press and
hold. Reset button until entire
display flashes.
Fig. G %MIN
C
Fig. H
%
MAX
C
LOW-BATTERY
The entire display flashing is the signal
to replace batteries at once. Failure to
replace batteries will have an effect on
the accuracy of the readings received
from the hygrometer.
Note: Remember Low Batteries will
tend to give inaccurate readings, so
make sure you have good batteries.
5
MIN./MAX. FUNCTION

6
The meter is calibrated in house
before shipping.
To maintain the meter in the good
condition for use , recommend to
calibrate the meter after long time
using.
Cleaning:
Use a damp cloth and mild soap to
clean the case of the meter, do not
use harsh detergents or abrasives
as these may mar the finish or
damage the unit's case with an
adverse chemical reaction.
Caution: Please do not immerse probe
into liquids as this will cause permanent
damage to the sensor.
The calibration performace is only
available for the calibration code was
not delected before shipment.
And there are 2 calibration method :
one is Manual calibration , another one
is Automatic calibration.
Manual Calibration :
Turn off the meter , then plug the meter
probe into the 33% salt bottle and then
power on the meter by pressing " ON
/OFF button and the C/F button at the
same time. When LCD screen shows
a full display, release the ON/OFF key.
You will see the display of Cand F
at the lower right corner of LCD screen
, then release the C/F button. The LCD
will display only the default setting of
temperature unit Cor F. Press "RST"
key and you will see a "% MIN" display
on the right upper corner.
MAINTENANCE
CALIBRATION MODE

If you want to calibration 75% , please
remove the meter probe from the 33%
salt bottle and plug it into the 75% salt
bottle. Then press the "MN/MX" button,
you will see a %MAX display on the
LCD.(See Fig.I)Then leave the meter in
the 75% bottle for another 40 minutes.
When the 75% calibration is completed,
the screen shows MIN and MAX ,(See
Fig.J) press C/F button to save the
calibration value of 75%. The LCD will
show "s" (See Fig.K) for 2seconds and
then resume to the normal measuring
mode. You can remove the meter from
the 75% bottle now .
%MIN
C
Fig. H
%MIN
MAX
C
Fig. I
%
MAX
C
Fig. J
See Fig.H ,please leave the meter in
the bottle for at least 40 minutes and
the meter will start the calibration
process. When the calibration for 33%
is done ,you will see a MIN and MAX
display on the LCD screen.
Press C/F button to save the calibration
of 33% . The LCD shows "s" in 2
seconds (See Fig.K) and then resume
normal measurement. Turn off the
meter, the calibration of 33% is
completed .
7
Fig. K

Automatic Calibration :
Turn off the meter , then plug the meter
probe into the 33% salt bottle and then
power on the meter by pressing " ON
/OFF button and the C/F button at the
same time. When LCD screen shows
a full display, release the ON/OFF key.
You will see the display of Cand F
at the lower right corner of LCD screen
, then release the C/F button. The LCD
will display only the default setting
of temperature unit Cor F. Press
"RST" key and you will see a "% MIN"
display on the right upper corner. (See
Fig.H) ,please leave the meter in the
bottle for at least 40 minutes and the
meter will start the calibration process
automatically. When the calibration for
33% is done ,you will see a MIN and
MAX display on the LCD screen.
You may turn off the meter to finish 33%
low humidity calibration or keep going
for 75% high humidity calibration.
Remove the meter probe from the 33%
salt bottle and plug it into the 75% salt
bottle.
Then press "MN/MX" button, you will
see a " % MAX" display on the LCD.
(See Fig.I)Then leave the meter in the
75% bottle for next 40 minutes.
When the 75% calibration is completed,
the screen shows MIN and MAX ,(See
Fig.J) ,it means the 75% calibration is
completed , and the meter resume to
the normal measuring mode.
You can remove the meter from the
75% bottle now .
8
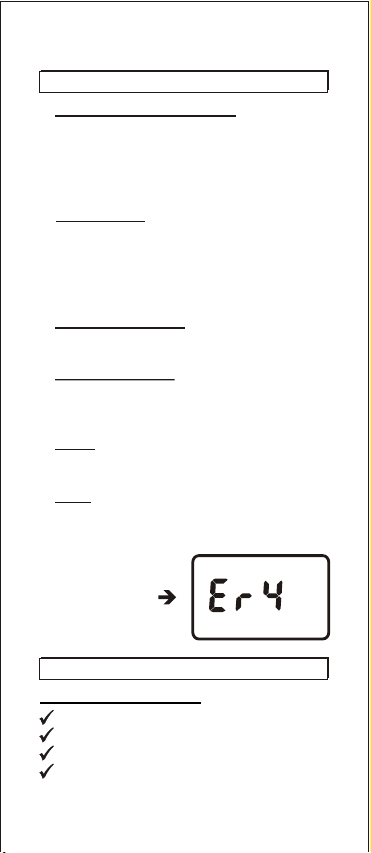
?Power on but no display. Check the
battery are in place and making good
contact or correct polarity , replace a
new battery or attach optional AC
adaptor for the weak battery caused.
No Display. Make sure battery is not
empty , if the display disappear ,
check sleep mode is active. Refer to
the Disable sleep mode function for a
long time using the measurement.
?
Screen flashing. Battery low , the
batteries need to be replaced.
?
Er 1, Er 3 ,E r 4 . Circuit error , return
the unit to the store for repairing.
See Fig.L as an example.
?
Er 2 . Improper calibration; Probe
managed.
?
Er 5. Sensor damaged, send back
the unit to the store you bought for re
-pairing , Humidity reference needs
to be changed.
?
The meter x 1
Battery x 2 (AAA size )
Operation manual
Gift /plain white box x 1
This package contains:
Fig. L
MATERIAL SUPPLIED
9
TROUBLESHOOTING
This manual suits for next models
5
Table of contents
Other General tools Thermometer manuals


