Genexis Platinum-6820 User manual

Platinum
Residential Gateway
Full Installation Guide

Revision 1.5. - May 2018
Copyright © 2018 Genexis B.V. All rights reserved.
Genexis assumes no responsibility for any inaccuracies in this document.
Genexis reserves the right to change, modify, transfer, or otherwise revise this publication without notice.
Contents
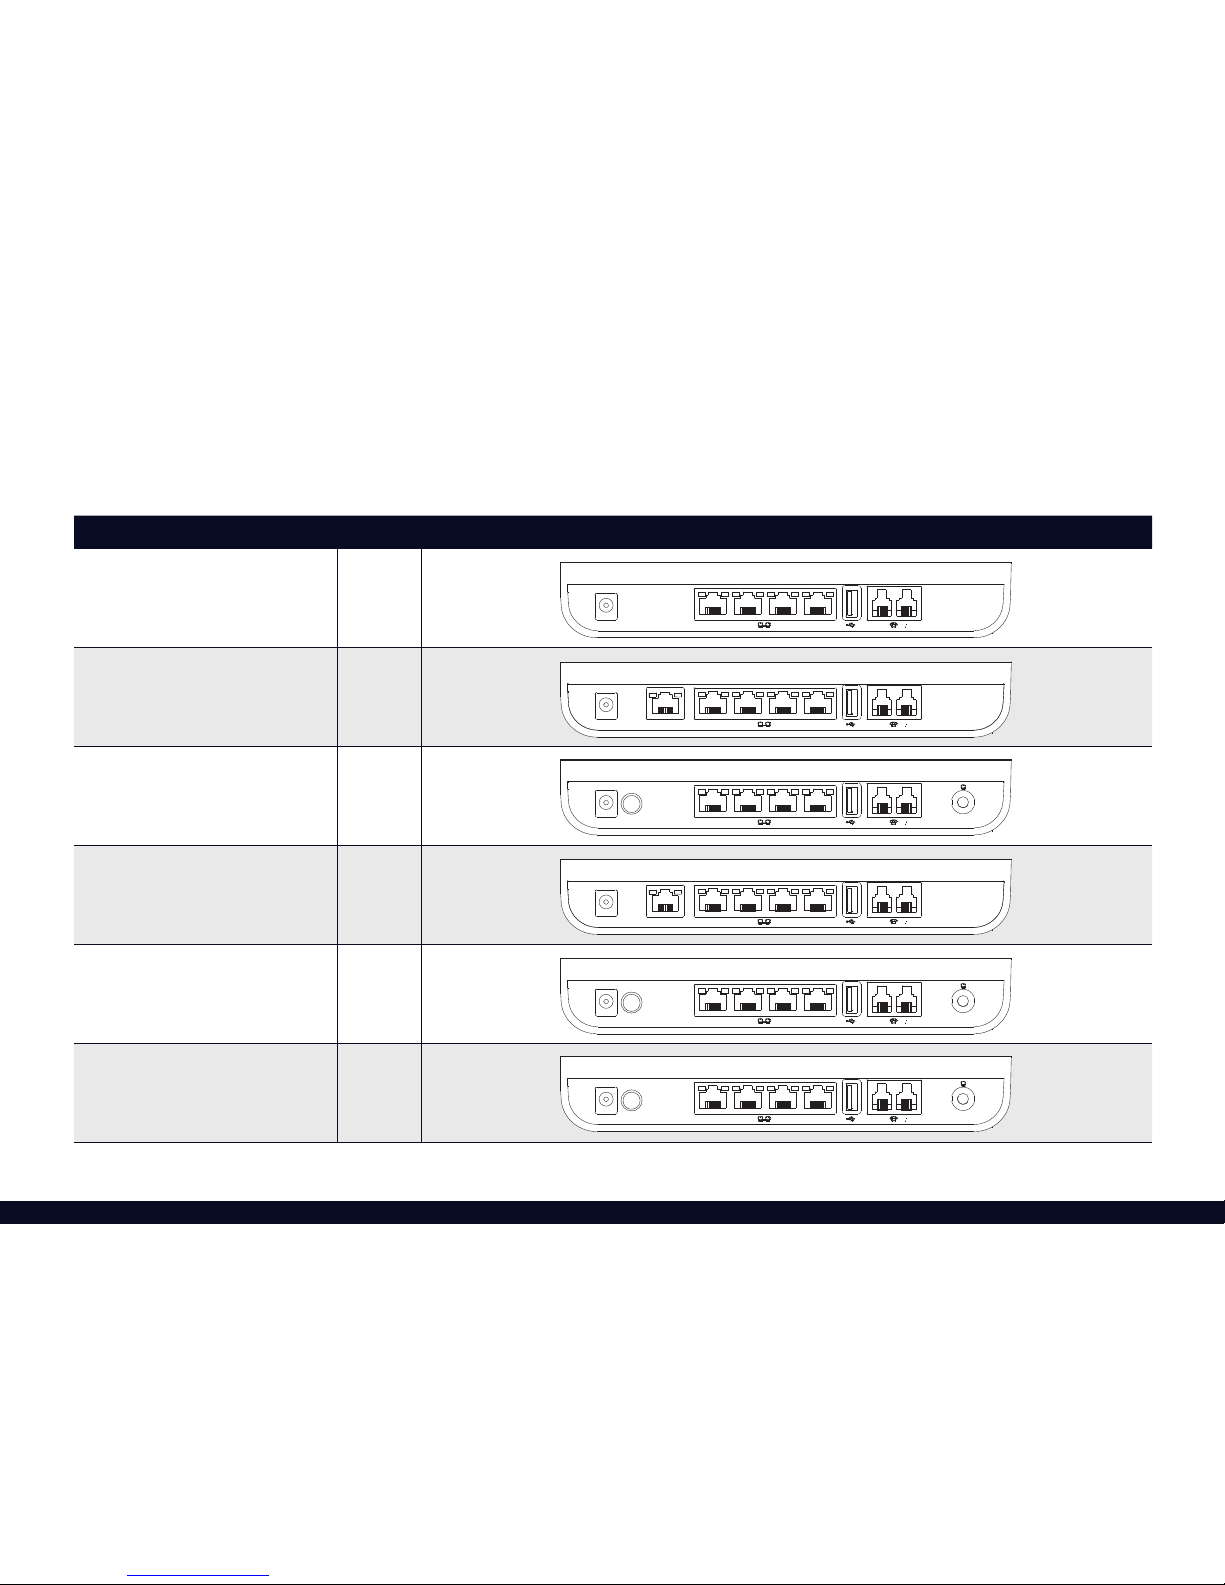
Models supported............................................................................................................................................................3
Box Content .....................................................................................................................................................................4
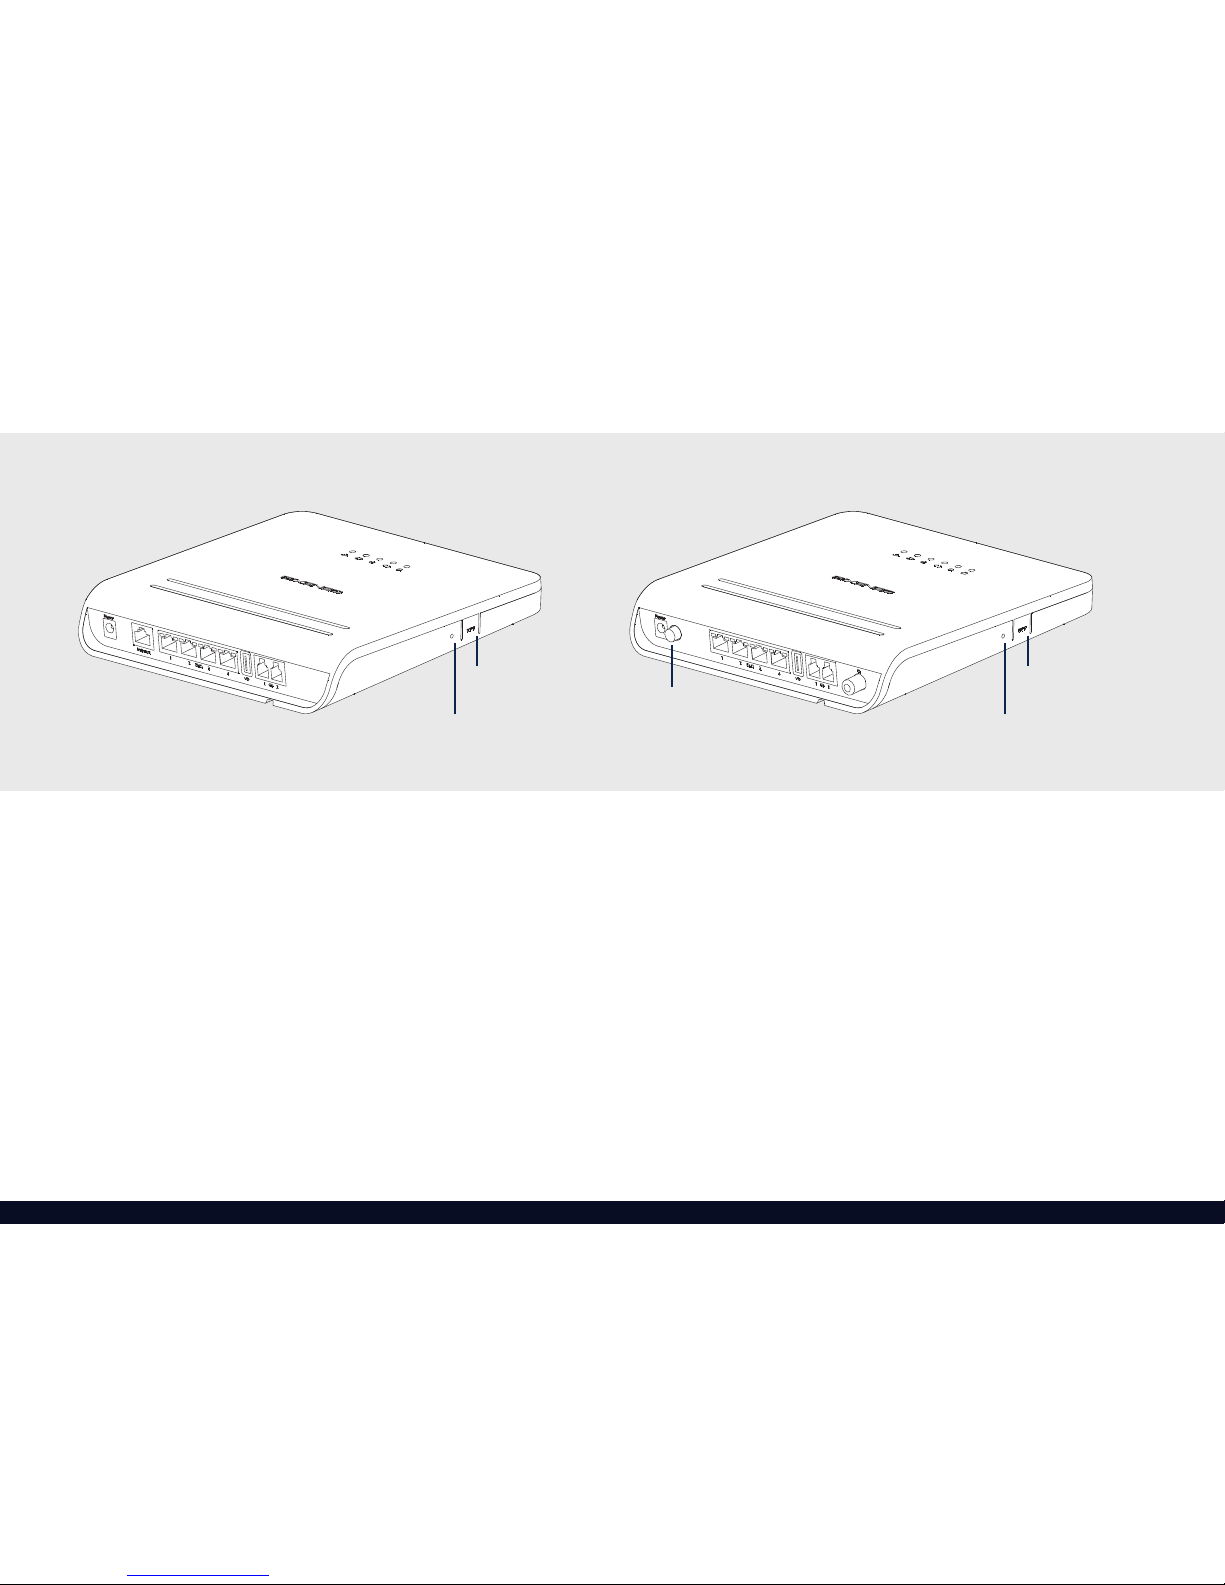
Button Overview...............................................................................................................................................................6
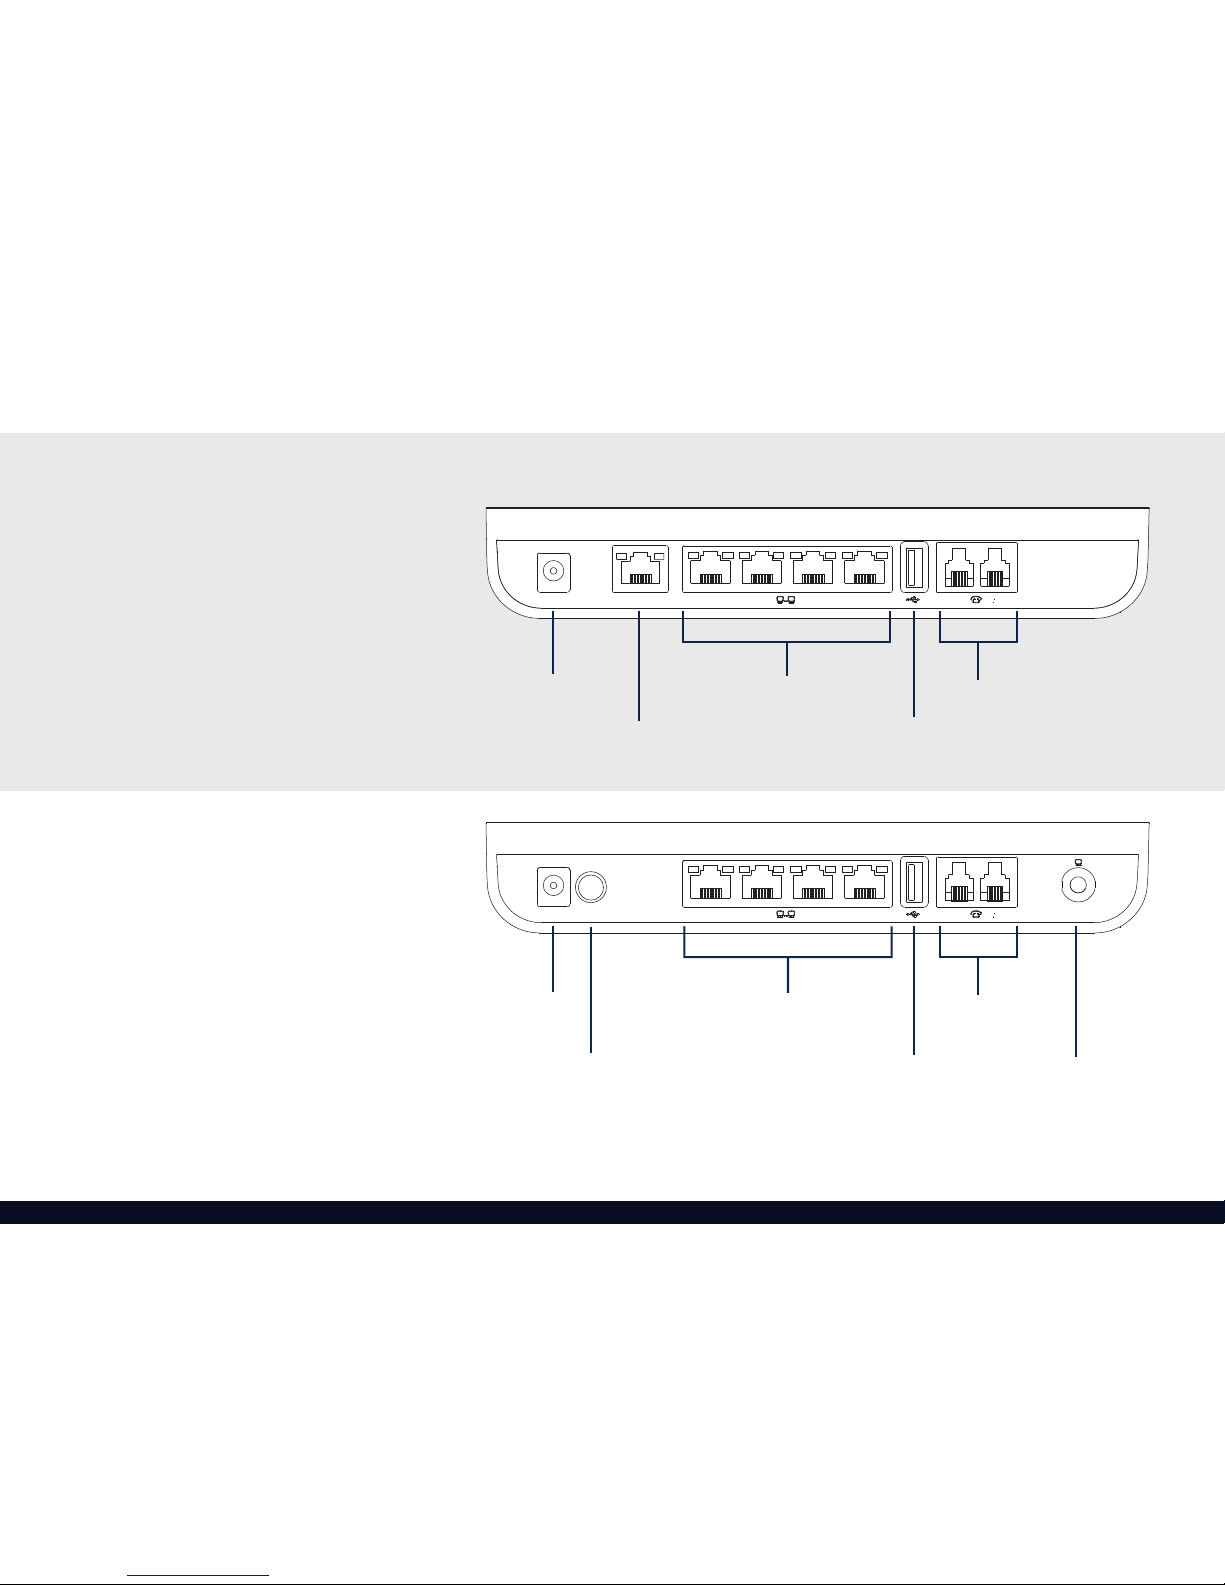
Port Overview...................................................................................................................................................................8
Installation ......................................................................................................................................................................10
LAN (Network) Setup......................................................................................................................................................13
Wireless Setup................................................................................................................................................................15
LED Status ......................................................................................................................................................................18
Troubleshooting .............................................................................................................................................................20
Advanced Conguration ................................................................................................................................................21
Safety and Care ..............................................................................................................................................................21
Appendix: Installing an SFP............................................................................................................................................22
Notes..............................................................................................................................................................................23

3
Model CATV Port overview
Platinum-6820 No
Platinum-6840 No
Platinum-6880 Yes
Platinum-7840 No
Platinum-7870 Yes
Platinum-7880 Yes
Models supported
On the label at the back of your platinum (as shown on page 5) you can look up your Platinum model.
In the table below you see a full overview of all the models.
Power
1 2 3 4 1 2
Power
1 2 3 4 1 2
Internet
Power
1 2 3 4 1 2
Internet
Power
1 2 3 4 1 2
Power
1 2 3 4 1 2
Power
1 2 3 4 1 2

4
Power adapter
A power adapter is included. This will be used to power your Platinum.
Ethernet cable
The Ethernet cable that is included will be used to connect your
Platinum to your internet modem.
*Not available on all models
Box Content
Power adapter Ethernet cablePlatinum
Platinum
The main product in your package is your Platinum.
*
*

http://router
*********
*************
*********
5
Information label
The information on this label is needed when con guring your
Platinum. On the label you can nd information on how to access the
web interface of the router and what the login credentials are.
There are two labels included in de box these are copies of the label on
the bottom of your Platinum (as shown on page 9).
It is important you keep one label somewhere safe as it contains
information essential to con gure your device. You can place your
spare label on page 23.
The second label may be retained by the device installer.
Rubber feetInformation label
Rubber feet
Four self-adhesive rubber feet are included with your Platinum.
These can be removed from the backing paper and stuck to the base of
your Platinum. This helps protecting the surface on which your Platinum
is located on.

Reset button
WPS button
Power button
Reset button
WPS button
6
Button Overview
WPS button
The WPS button is located at the side of your Platinum. It enables easy
conguration with other wireless devices.
Reset button
The reset button is located at the side of your Platinum. This button
enables you to reset and preform factory resets of your Platinum.
You can press this button with a small pin or paperclip.
Platinum Platinum with CATV
Power button
The power button is located at the back of your Platinum with CATV
connector. It enables you to turn your Platinum on or off.

7
Button Function
Power Press the button
Reset Press and release to reboot
Factory Reset Press and hold for more than 5 seconds. Once the LEDs start ashing, release the button
WPS Press and release to initiate WPS

Power
1 2 3 4 1 2
Internet
Power connector Telephone jacks
USB 2.0 port
LAN ports
Internet port
Power
1 2 3 4 1 2
Power connector Telephone jacks
USB 2.0 port
LAN ports
Power button CATV connector
8
Platinum
Platinum with CATV
Port Overview

LabelFiber port (SFP)
9
Fiber port
Access to this port is gained by removing the plastic cover.
Instructions for installing a SFP in this port can be found in the
Appendix on page 22*.
* WARNING: This cover is only to be removed by an ofcial installer.

10
Installation
1. Connect to your internet modem
Make sure your Platinum is connected to your internet modem.
You should have either a ber optic cable connected via the ber port
(shown on page 9) or an Ethernet cable connected to the Internet
port (shown on page 8).
Once the device is powered on, the LED indicates if this cable is
connected properly or not (shown page 18).
Placement
The Platinum has two placement options on a desk or mounted on a
wall. If desired, it is possible to mount your Platinum on a wall using the
two wall mount points on the back of the device.
The Drilling Template can be downloaded from the Genexis website at:
https://genexis.eu/download-portal/#platinum
Scanning the QR code above will take you directly to that web page.

11
2. Connect to the power
Connect the supplied power adapter to your Platinum and then plug
the adapter into an AC power socket.
The Platinum will now start up.
3. Connect to your computer
Connect your computer or laptop to one of the LAN ports (as shown on
page 13) using an Ethernet cable.

12
4. Connect to your telephone
A standard analogue telephone handset can be connected to the
active voice port(s) using a telephone cable with an RJ-11 connector.
The LED indicates if the voice services is enabled and if the device
has successfully registered with a SIP server.
LED indicates if the voice services is enabled and if the device
The
LED indicates if the voice services is enabled and if the device
Installation
5. Connect to your television
This step is only relevant if you have a Platinum with a CATV connector.
Connect your television to the CATV connector using a coaxial cable
with a male F-connector.
The LED indicates if the CATV is enabled and operating correctly.
You may need to retune your television if required for the CATV service.

13
LAN (Network) Setup
1. Check your connection
Open a web-browser on your computer and try to visit a web page.
For example, load your usual home page or favourite search engine.
If the web page loads, your connection is working properly.
If the web page does not load continue with step 2. Check your
network settings.
2. Check your network settings
You need to make sure your computer network settings are set to:
›Use IPv4
›Obtain an IP address automatically (DHCP)
›Obtain DNS server(s) automatically
On a Windows computer choose:
›Open “Start”
›Select “Control Panel”
›Select “Network and Internet”
›Go to “Network Connection”
›Select “Change Adapter Settings”
›Double click on the correct network adapter and click on
Properties.
›Select the “Internet Protocol Version 4 (TCP/IPv4)”option and
choose Properties.
›Ensure “Obtain an IP address automatically” is selected.
›Ensure “Obtain DNS server address automatically” is selected.
›Close all the control panel windows.

14
LAN (Network) Setup
3. Test connection
Try reloading the web page in your browser. If the connection is still
not working, please refer to the troubleshooting section (as shown on
page 20).
On Mac OS :
›Open System Preferences
›Click on Network
›Click on the Ethernet Adapter in the left hand panel.
›Ensure “Con gure IPv4” is set to “Using DHCP”.

http://router
*********
*************
*********
15
Wireless Setup
Wireless networking can be con gured using two different methods.
1. WPS
Press and hold the WPS on the side of the Platinum longer than 5
seconds. The location of the WPS button is shown on page 6.
The LEDs on your Platinum will begin to ash.
Follow the instructions on the network device e.g. modem, printer to
complete the connection.
2. Manually
Setting up WiFi manually requires two pieces of information:
1. The SSID of your Platinum
2. The WPA key for your Platinum
This information can be found on the label on the back of the device.
If you can no longer access the back of your device, it can be found
on the label included in the box as described on page 5.
WPS button

16
On Windows:
›Open “Start”
›Select “Settings”
›Select “Network and Internet”
›Go to “Network and Sharing Center”
›Choose “Setup a new connection or network”
›Click on “Connect to the Internet” and click “Next”
›Click on “Wireless”
You will then be presented with a list of wireless networks that your
computer has detected.
›Choose the network which name matches the SSID on the back
of your Platinum.
›When prompted for the “network security key”, the WPA key
exactly as printed on the label.
Your computer will now connect to the wireless network!
Once successfully connected, the Network and Sharing Center window
will change to re ect the new connection status.
Wireless Setup

17
On Mac OS :
›Open System Preferences
›Click on Network
›Click on Wi-Fi in the list of interfaces on the left.
If necessary, switch Wi-Fi on.
›In the “Network Name:” drop down box, select the SSID that
matches the SSID on the back of your Platinum.
›When prompted for the WPA2 password, enter the WPA key
exactly as printed on the label.
You are now connected!

18
LED Status
Activity Description
On (green) Powered up successfully
On (red) System error
On ( ashing) System initialising
Off No power
On Uplink cable connected
Flashing Link is initialising or a rmware upgrade is in progress
Off Uplink cable disconnected
On Internet connection established
Flashing Internet connection initialising
Off No connection established
On Voice service enabled and registered
Flashing Voice service initialising
Off Voice service disabled or SIP registration failed
On WiFi enabled
Flashing WPS active
Off WiFi disabled

19
Activity Description
(LAN Ports)
Green 1000 Mbps connection
Yellow 100/10 Mbps connection
Blinking Network activity
On (green) CATV on, signal received
Off CATV disabled, no signal received
*Not available on all models
*

20
Troubleshooting
*Not available on all models
Web interface is not reachable
Make sure your Platinum is switched on and the cable from your computer is plugged into the right LAN port on your Platinum.
Perform factory reset
Press and hold the reset button for more than 5 seconds. Once the LEDs start ashing, release the button.
If none of these actions resolves your problem, or if the problem persists, please contact your service provider.
Issue Action
LED is off Make sure you are using only the provided power adapter and have it connected to a working power outlet
and the power button is in on posistion.
LED is red or ashing Turn the device off by removing the power adapter from the power socket.
Wait 1 minute and plug it back in.
LED is off There is a problem with the cable connecting your Platinum to your internet modem.
Make sure the cable (either a ber optic or Ethernet cable) is plugged in fully at both ends.
LED is off or blinking The Platinum has been unable to establish a connection to your service provider.
Try resetting the device by pressing and releasing the reset button (see page 6).
LED is off The voice service is either not enabled or is not fully con gured.
If voice functionality is part of your subscription, contact your service provider.
LED is off Use the Platinum’s web interface to enable WiFi functionality.
LED is off CATV is disabled. Please contact you service provider if a CATV signal is expected.
LED is red CATV is enabled but no signal is detected. Please contact your service provider if a CATV signal is expected.
*
This manual suits for next models
5
Table of contents
Other Genexis Gateway manuals