GET DHMD025 User manual

USER INSTRUCTIONS FOR 0.25 LITRE
MINI DEHUMIDIFIER - MODEL NO. DHMD025
THANK YOU FOR CHOOSING YOUR NEW DEHUMIDIFIER. BEFORE USING THE UNIT READ
THESE INSTRUCTIONS FULLY AND RETAIN THEM FOR FUTURE REFERENCE

THIS DEHUMIDIFIER IS INTENDED FOR DOMESTIC USE ONLY.
SAFETY NOTES
1. This dehumidifier must only be used with the power adapter that is supplied with the unit.
2. Do not connect the power adapter to any AC socket outlet that is damaged *.
3. Ensure hands are not wet when inserting the plug into the power socket.
4. Do not use in the following locations:-
Next to a source of fire.
An area where oil is likely to splash.
An area exposed to direct sunlight.
An area where water is likely to splash.
Near a bath, shower or a swimming pool.
In a greenhouse.
An area where flammable gases or liquids are present.
5. Never insert your finger or any foreign objects into the air outlet. Take special care to warn children of these
dangers.
6. Always unplug the unit before cleaning.
7. Do not cover the unit.
8. Do not obstruct the air inlets/outlets of the appliance.
9. Do not allow children to play with the unit
10. If a fault develops or if servicing is required, this must only be carried out be a qualified service engineer.
11. If the supply cord of this appliance becomes damaged, it must be replaced by a qualified engineer.
12. This power adapter is fitted with an approved BS 1363 13A 3 pin plug and a 3A BS 1362 fuse. In the event of
either requiring replacement ensure that equivalent rated and approved components are used. See plug
replacement details below.
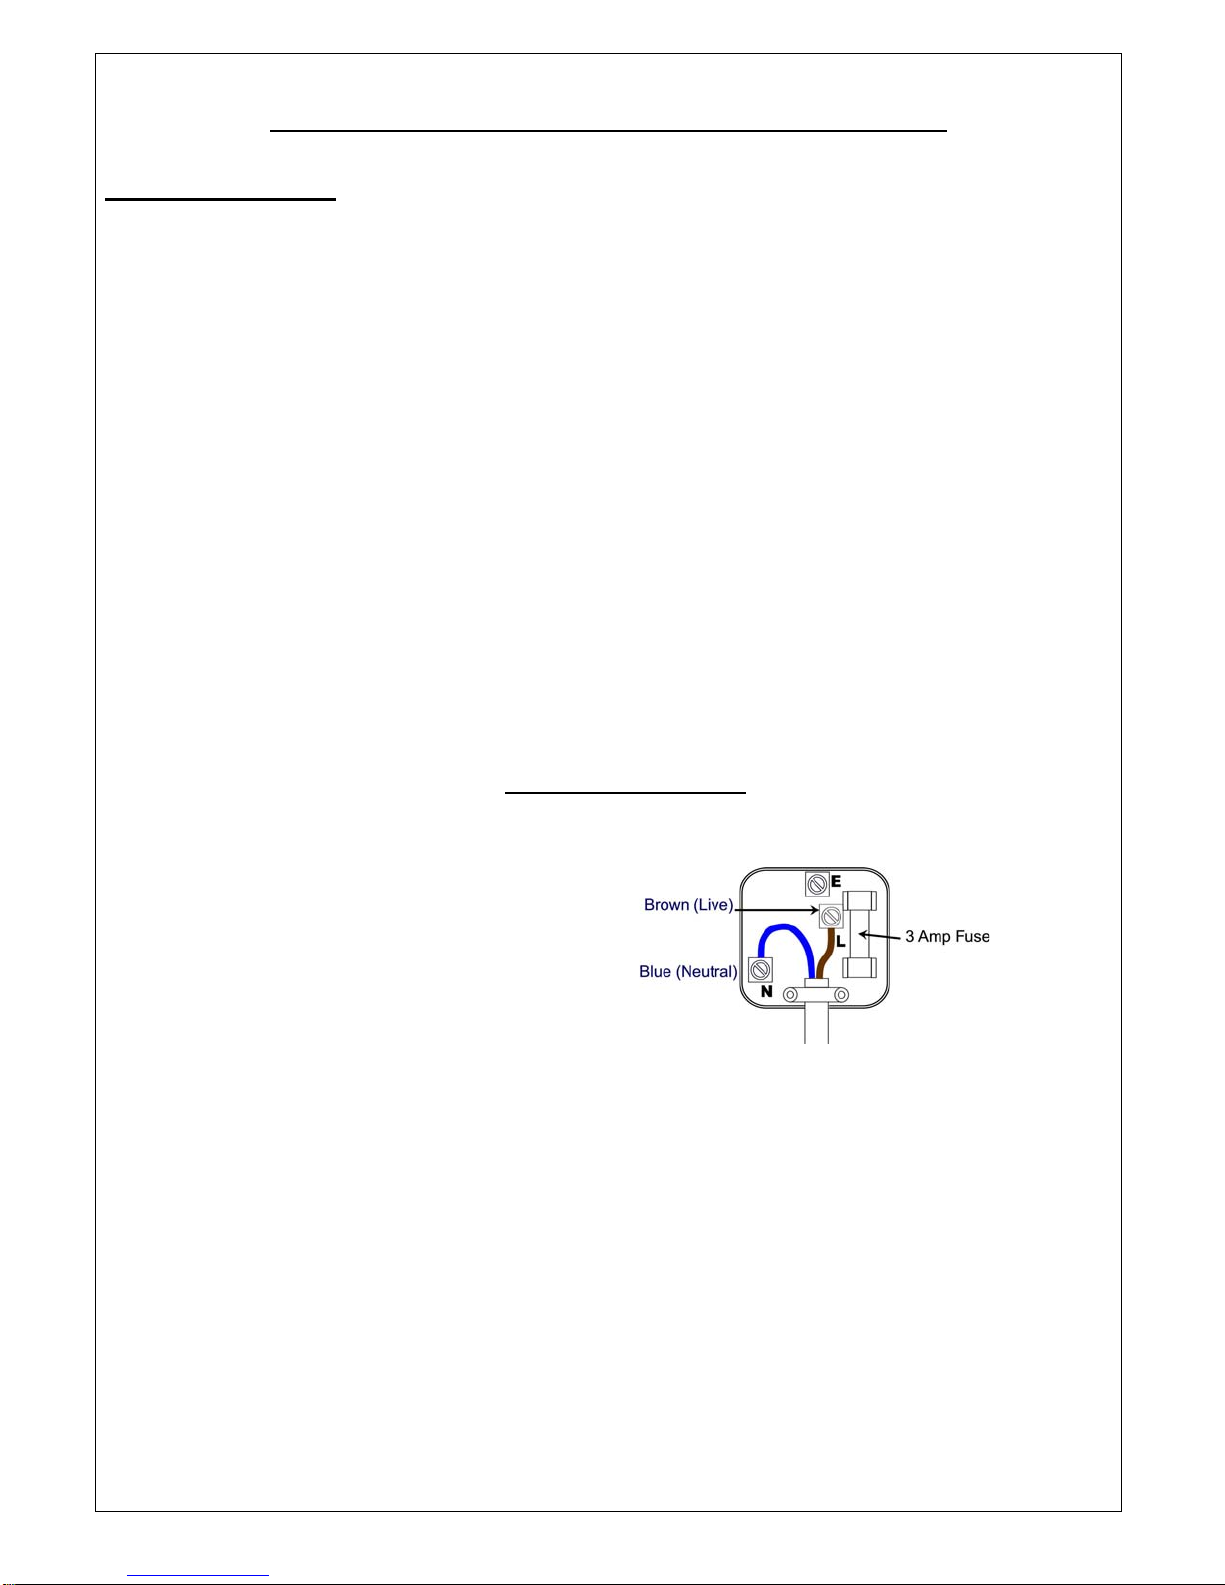
PLUG REPLACEMENT
If the plug is damaged and requires replacement, follow the wiring instructions supplied with the new plug.
1. The blue wire must be connected to the terminal
marked with the letter N.
2. The brown wire must be connected to the terminal
marked with the letter L.
3. A 13 amp plug to BS 1363 must be fitted a 3 Amp
fuse to BS 1362.

IDENTIFICATION OF PARTS
Item Description Item Description
1
ON /OFF Switch
8
Rubber Feet
2
“ON” indicator (Green LED)
9
AC / DC Power Adapter
3
“TANK FULL” indicator (Yellow LED)
10
DC Power Connector
4
Air inlet
11
AC Mains Plug
5
Removable water tank
12
Tank Drainage Hole / Bung
6
Dry Air Outlet
13
Water Tank
7
DC Power Socket
14
Switch Operating Float

OPERATING INSTRUCTIONS
1. Ensure that the small plug on the mains lead is plugged into the input socket on the power adapter.
2. Insert the small plug on the output lead of the power adaptor into the socket on the back of the dehumidifier.
3. Insert the mains plug into a working power socket.
4. It is important to ensure that the water tank is correctly positioned within the unit and that it is not full of water. If
the “Tank Full” indicator is illuminated when the unit is plugged in for the first time, pull the water tank out of the
unit slightly and push it back into it’s proper position.
5. Press the “On/Off” switch to the “On” position (as shown in Fig. 1 below) and the unit will begin to operate. The
green LED will be illuminated and it will be possible to notice (and hear) air blowing from the dry air outlet.
6. Any moisture in the air that is drawn into the unit will form as water droplets on the condenser surface within the
machine. These water droplets will eventually collect in the water tank in the front of the machine. The rate at
which the water is collected in the tank is dependant on a number of factors, such as the room temperature, the
size of the room and the source of the humidity. It is a known fact that at low room temperatures the extraction
rate is also low.
7. To switch the unit off, press the “On/Off” to the “Off” position, (as shown in Fig. 2 below).
8. When the water tank is full the machine will stop and the yellow “Tank Full” LED will illuminate. The water tank
should be carefully removed from the machine by sliding it outwards from the front of the machine and it should be
emptied. When the empty tank is replaced properly into the machine, the machine will start up and run normally.
Note: When the “Tank Full” LED is on after the machine has been running for
some time, the water should be emptied out from the tank. If the tank is not
emptied and replaced properly into the machine, the appliance will not operate.

MAINTENANCE
IMPORTANT
Make sure the power adapter is un-plugged from the power socket before carrying out any cleaning or servicing.
CLEANING THE CASE
1. Wipe the case of the unit with a soft, clean and dry cloth.
2. If the cabinet is very dirty, use a mild detergent applied with a damp cloth. Do not use harsh abrasives or
solvents. Wipe off the detergent with a clean damp cloth and then wipe with a dry cloth.
3. Do not wash the machine with water, as water could enter the machine and cause a fault or create an electric
shock hazard.
AIR FILTER CLEANING
The built in air filter removes dust particles and impurities from the air passing through the machine. When the filter
begins to become clogged with dust, the efficiency of the unit is reduced and the filter should be cleaned. The intervals
between cleaning will depend on how much dust is in the environment where the dehumidifier is used.
To remove the filter, first switch the machine off and then remove the air outlet grille by unclipping it from the top of the
machine. The filter is attached to the inside of the air outlet grille.
If the filter is heavily contaminated it should be cleaned first with the aid of a vacuum cleaner. The filter should then be
washed with warm water and a mild detergent, rinsed with clean water and allowed to dry before placing back in the
machine.
CAUTION
1. When you have finished using the Mini Dehumidifier it should be switched off by pressing the “On/Off” switch to
the “Off” position.
2. Do not use the AC/DC power adapter in wet or damp conditions.
3. Ensure that the grilles on the front and top of the machine are not blocked by materials such as clothing, plastic
bags or papers.
4. Keep the unit upright to avoid water leakage.
STORAGE OF THE UNIT
If the unit is not going to be used for some time it should be stored in a cool dry place and covered to protect the unit
from dust.
SERVICING
If a fault develops or if servicing is required DO NOT attempt to do this yourself. This should ONLY be
carried out by a qualified service engineer.

SPECIFICATION
MODEL
DHMD025
MAINS POWER
100-240V / 50Hz, 23.4W
POWER INPUT TO UNIT
9V d.c. 2.6A
MOISTURE REMOVAL (MAX)
0.25 L/D (30°C 80% RH)
REMOVABLE TANK
500ml
OVERALL SIZE (H x W x D)
218 x 154 x 130mm
WORKING ENVIROMENT
>15°C and >40%RH
NOTE:
Waste electrical products and products containing refrigerants should
not be disposed of with household waste.
Please recycle where facilities exist.
Check with your local authority or retailer for recycling advice.
GET Plc., Key Point, 3 – 17, High Street, Potters Bar, Herts. EN6 5AJ
Helpline Telephone No. 0121 565 7770
AR1135 Ed.A
Table of contents
Other GET Dehumidifier manuals