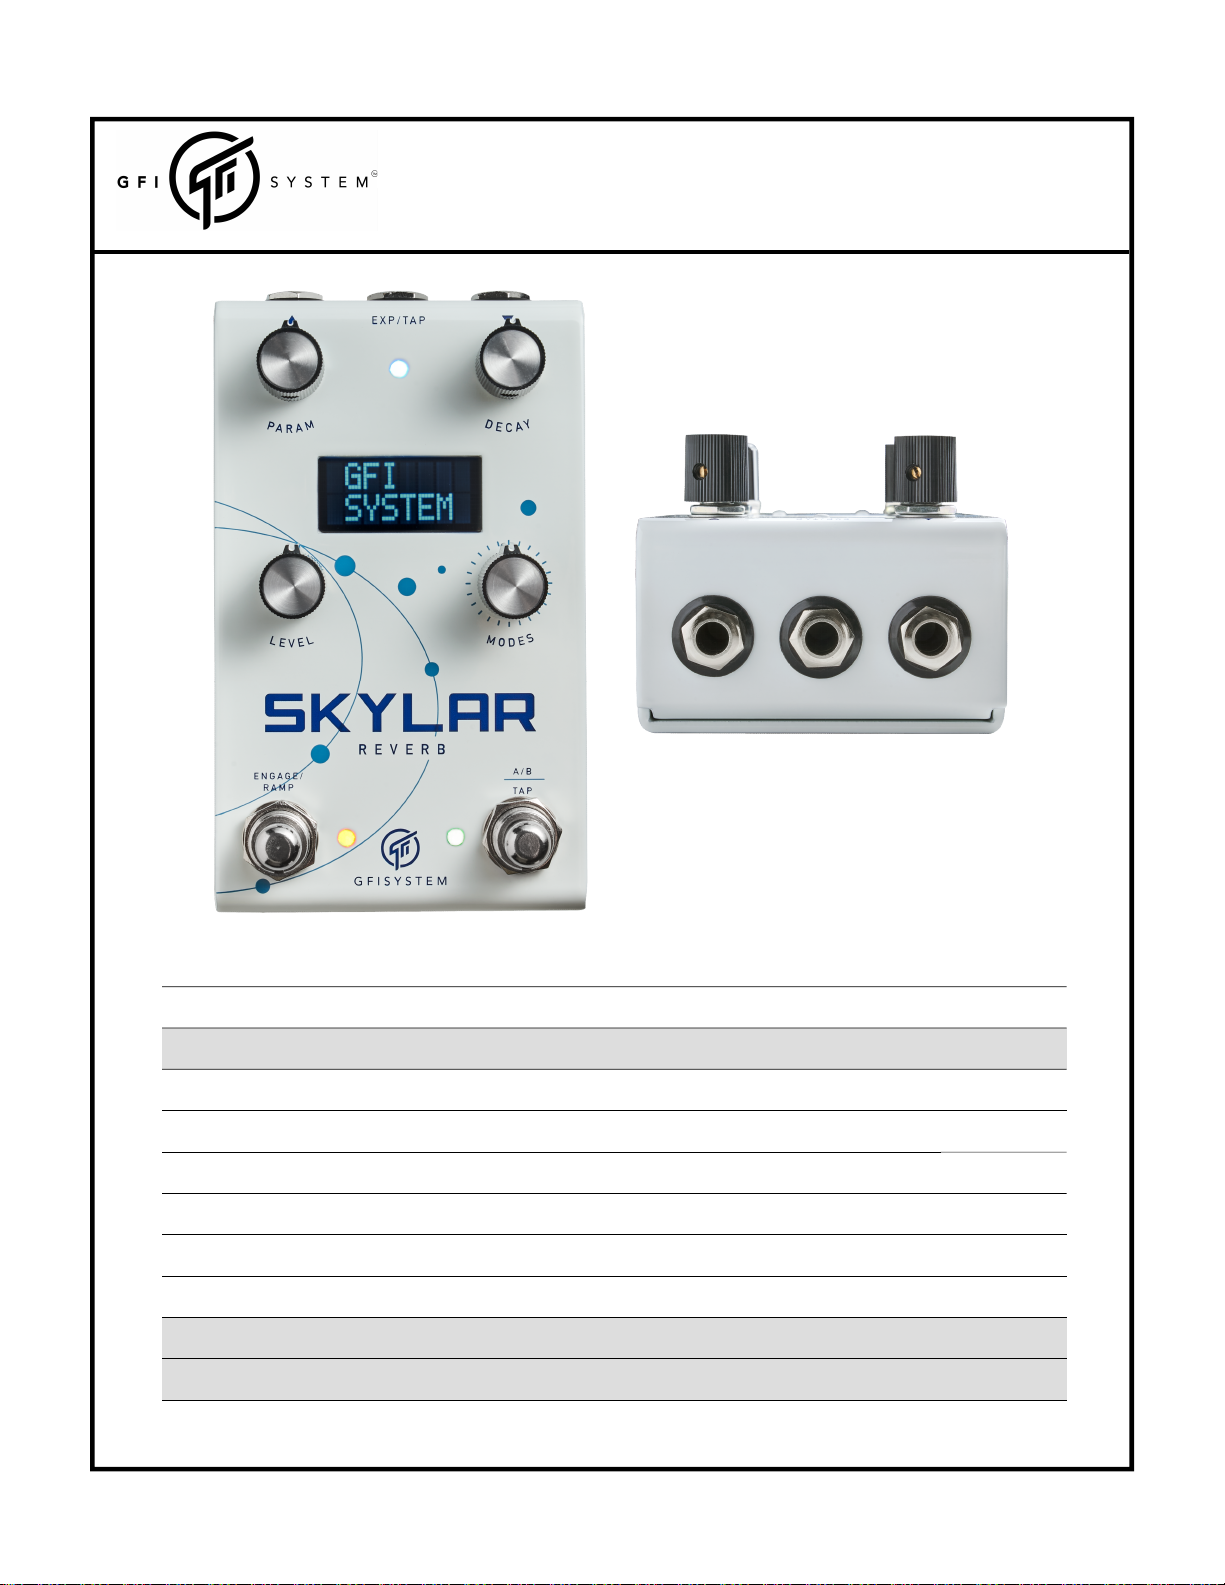
GFI System SKYLAB REVERB User manual

User Manual
SKYLAR
REVERB
Table of Contents
1 Inputs Page 1
2 Outputs 1
3 Expression Input 1
4 Tap-Tempo Input 2
5 Knobs and Buttons 3
6 Footswitches and LEDs 4
7 Saving Presets 5
8 Options 5
9 Global Settings 6
10 Expression / Ramping Setup 7
11 Factory Reset 8
USER MANUAL

1
User Manual
SKYLAR
REVERB
USER MANUAL
1. Inputs
Skylar accepts mono input or stereo inputs. For mono input operation use a standard mono (TS)
patch cable and for stereo operation use a stereo (TRS) cable. If the stereo input signals come from
an equipment that has separate Left and Right channel output jacks you will need to use a splitter
cable like this:
TRS
TS
TS
To obtain the optimal sound quality, depending whether you use Mono or Stereo inputs,
the pedal must be configured accordingly. This is done in Global Settings.
Hold the MODES button for 2 secs to enter global setting.
Globals
1. Input
> MONO
> STEREO
2. Outputs
Skylar may be used for mono output or stereo outputs. For mono output use a standard mono (TS)
patch cable and for stereo outputs use a stereo (TRS) cable. If the stereo output signals are fed to
an equipment that has separate Left and Right channel input jacks you will need to use a splitter
cable like the one pictured above.
You do not need to configure anything for using mono or stereo outputs.
Set to MONO when using mono input.
Set to STEREO when using stereo input.

2
User Manual
SKYLAR
REVERB
USER MANUA L
OUTPUT
EXPRESSION
MONO IN
STEREO IN
TAP TEMPO
< use TRS cable >
< use TS cable >
MONO OUT
STEREO OUT
< use TRS cable >
< use TS cable >
3. Expression Input
An expression pedal may be used to control any one of the primary parameters, alternatively a tap
tempo pedal may be used to remotely send tap tempo signal to the pedal.
INPUT
wiper
Tip
Ring
Expression Pedal requirement.
Some expression pedal on the market has its
wiper connected to the Ring instead, this will
not work with Skylar. Make sure you get the
suitable type : Wiper-to-Tip.
Wiper resistance value should be 10 to 20
KOhm.
4. Tap Tempo Input
A tap-tempo pedal may be connected to the EXP/TAP input to remotely tap in the tempo. The
switch contact must be ‘Normally-Opened’ (NO) type.
TS cable & plug
TAP
PEDAL
Resistance value
10K Ohm
to
25K Ohm
Auto detection
Upon power up Skylar will automatically detect the presence (or absence) of an expression
pedal or a tap-tempo pedal. Therefore, after plugging/unplugging the external gear you need
to reboot Skylar to let it detect the changes.

3
User Manual
Every knob is also a button. The following operations can be done on each knob :
TURN PUSH or TAP HOLD TWIST ( hold and turn )
Here’s a summary of what each knob and each switch does, this is just a quick reference, more detailed
explanation will be given in the next chapter.
Turn - adjust primary parameters.
Push - toggle expression mapping for the parameter.
Hold - enter expression heel/toe value setup.
Twist - Adjust secondary parameter (see table below).
Turn - select modes.
Push - Enter OPTIONS menu.
Hold - enter GLOBALS setting menu.
Twist - Adjust secondary parameter (see table below).
SKYLAR
REVERB
Primary Parameters Secondary Parameters
knob 1 knob 2 knob 3 knob 1 knob 2 knob 3 knob 4
SPATIUM Modulation Decay Level Lows Highs Predelay Panorama
SHIMMER Shimmer Decay Level Mode Highs Pitch Panorama
PLATE Modulation Decay Level Lows Highs Predelay Panorama
TREMBLE Trem Speed Decay Level Shape Highs Trem Depth Panorama
Modes
KNOB 1, 2, and 3
KNOB 4
5. Knobs and Buttons

ON/OFF LED PRESET LED
Orange: Preset A, Green : Preset B
4
User Manual
TEMPO LED
Momentary Operation
< when bypassed > ~ Holding the Engage/Ramp button down for at least 1/2 sec triggers mo-
mentary operation, i.e pedal will revert to bypassed state when footswitch is released.
Ramping
< when engaged > ~ Holding the button for at least 1/2 sec triggers ramping operation : a
mapped parameters is ramped from its initial value to pre-configured final value, and stays at
that final value for as long as the footswitch is held down. When switch is released the parame-
ter gradually returns to its initial value.
A/B - TAP switch Priority.
Priority for the AB/TAP footswitch can be reversed in Global setting (see page 6 for details).
A/B - TAP SWITCH
TAP
-> bypass / engage
HOLD (when bypassed) for > 500 ms
-> engages momentarily
HOLD (when engaged) for > 500 ms
-> start parameter ramping.
TAP
-> change preset (A <-> B)
HOLD for 1 second
-> enter tap-tempo mode: when
tempo LED stops blinking you may tap
in the new tempo*.
* Tap-tempo is applicable only in
Tremble mode.
SKYLAR
REVERB
ENGAGE / RAMP SWITCH
6. Footswitches and LEDs

User Manual
5
Save to:
A <-> B
Press and Hold both buttons
SKYLAR
REVERB
1
Tap the left button to save to preset A, or
Tap the right button to save to preset B.
2
~ release the hold when the screen reads:
If, after entering the Preset-Save scene, you change your mind and would like to exit
without saving any changes, you can do so by :
Holding both buttons again for 2 seconds.
OR
Doing nothing for 5 seconds, you will automatically return to the main scene.
8. Options
7. Saving Presets
Tap the MODES button to enter Options menu.
Use the MODES knob/button to navigate around the menu.
Options
1. Kill-Dry Off
On
2. Sub-Div 1:1 (speed = tapped speed)
1:2 (speed = 2x tapped speed)
1:3 (speed = 3x tapped speed)
1:4 (speed = 4x tapped speed)
- options settings are specified on per/preset basis.

User Manual
6
9. Global Setting
Press and hold the MODES button for 2 secs to enter Globals menu.
Use the MODES knob/button to navigate around the menu.
Globals
1. Input Mono
Stereo
2. Dry Out On
Off
3. Tempo Preset
Global
4. Priority A/B
Tap
: normal operation.
: dry signal is permanently off.
: use tempo as saved in preset.
: use global tempo.
: Changing preset is priority.
: Tap-tempo is priority.
: input signal is mono
: input signal is stereo.
The Priority setting determines how the A/B-Tap button behaves.
Priority set to A/B (default)
Tapping the A/B-Tap button toggles between preset A and preset B.
Holding the A.B-Tap button for 1 second enters tap-tempo mode where the button
functions as tap-tempo button. The button reverts back its normal function as preset-
change button after 2 seconds of non-activity on the button.
Priority set to Tap-Tempo
Tapping the A/B-Tap button sets a new tempo.
Holding the A.B-Tap button for 1 second toggles between preset A and preset B.
SKYLAR
REVERB

User Manual
7
Setting up the Heel and Toe values for expression pedal (and ramping function).
Suppose you want to map a parameter knob to the expression pedal or the ramping function :
Turn the knob until you find the desired Heel value.
Hold down the knob. After 2 seconds the screen will show the Heel / Toe information, keep
holding the knob down.
Now turn the knob (while still holding it down) to find the desired Toe value. When you find
it, release the knob.
The parameter is now mapped to the expression pedal and ramping function. Rocking the ex-
pression pedal will sweep the mapped parameter to any value within the range specified by Heel
and Toe values.
The Toe value set using the above procedure will also be the “end value” for the Ramping function.
Heel position Toe position
Changes to the Heel and Toe values are automatically saved into the current preset.
SKYLAR
REVERB
10. Expression / Ramping Setup
Heel 20
Toe 80
Up to 3 primary parameters may be mapped to the expression pedal / ramping function.
Push the knob’s button to toggle the parameter mapping.
Exp Pedl
mapped
Exp Pedl
unmapped
PUSH once
PUSH once

Specifications :
Input impedance : 1 MOhm.
Output impedance : 1K Ohm.
DAC / ADC resolution : 24 bits.
Current consumption : ~110 mA.
Weight : 0.6 Kg (1.6 lbs).
Dimension : 12 (L) x 7.2 (W) x 5.5 (H) cm
Power source : 9VDC (negative center).
Key Features :
2 presets.
4 select reverb algorithms.
Mono / Stereo input and output.
Expression pedal and tap-tempo input.
Momentary action supported.
Visit the product page at our website for more demo videos, sound clips, FAQs, and updates.
This product is designed and manufactured by :
User Manual
8
Email : info@gfisystem.com (inquiry)
[email protected] (support)
Web : www.gfisystem.com
GFI System
SKYLAR
REVERB
11. Factory Reset
Turn the MODES knob to select No / Yes, then push the MODES button
to confirm - factory reset will be performed and the pedal will start as
normal.
Press and hold the MODES button while powering up the pedal.
Keep holding until the screen reads: Reset?
NO YES
This manual suits for next models
2
Table of contents
Other GFI System Music Pedal manuals

GFI System
GFI System CABZEUS MONO User manual

GFI System
GFI System Equalisys User manual

GFI System
GFI System SYNESTHESIA User manual

GFI System
GFI System Jonassus User manual

GFI System
GFI System DUOPHONY User manual

GFI System
GFI System ORCA DELAY User manual

GFI System
GFI System CLOCKWORK V3 User manual

GFI System
GFI System SYNESTHESIA User manual

GFI System
GFI System SPECULAR TEMPUS User manual

GFI System
GFI System SYNESTHESIA User manual