GGM gastro HDVJ446 User manual
1
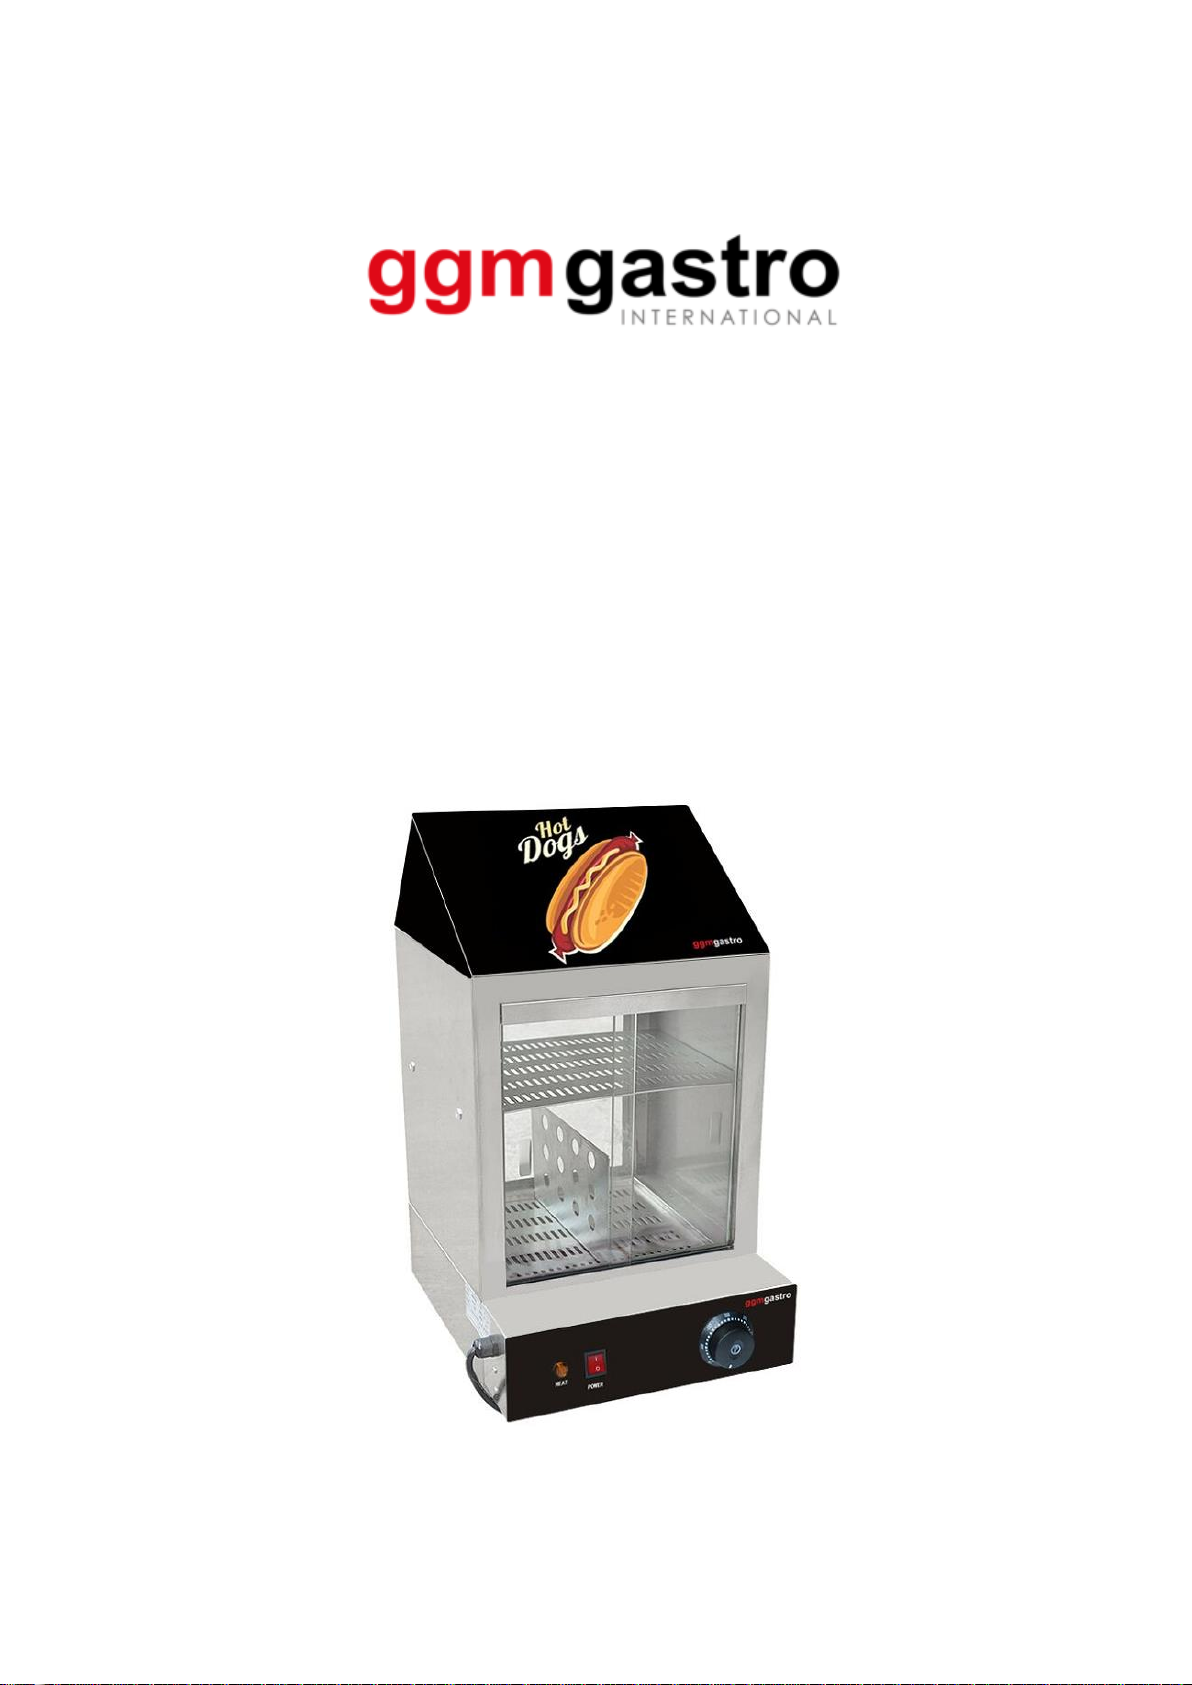
Hot Dog Steamer
User manual
HDVJ446

2
Thanks for your purchasing and using Hot Dog Steame. For making full use of
function of this product and reducing unnecessary damage and injure. Please
read this manual carefully before using this machine and keep it well for future
reference.
Warning ! Any refitting and wrong installation, adjustment and
maintenance can lead to property loss and causality. Please contact the
supplier if user needs to adjust it and all these should be done by trained
special professionals.
Warning ! For your safety sake, do not put or store any flammable
liquid, gas or other objects around the product.
Warning ! The shell of this equipment must be grounded for
Safety sake. Thanks for your cooperation!
Hot Dog Steamer is designed and developed by the company with combination of
the advantage of both foreign and domestic similar products and achieves
advantages such as fashionable design, reasonable structure and convenient
operation and maintenance and durability. The temperature of the Chip warmer
can be regulated in a certain scale according to different cooking requirements.
Mainly used for Keep hot dogs and bread warm , it is the first choice for the food

3
industry enterprises such as western food restaurants, fast food restaurants,
hotels and supermarkets and etc.
1. Product features:
This product is designed by our company absorbing the advantages of similar foreign products. It
has the characteristics of novel style, reasonable structure, convenient operation, fast heating speed,
uniform temperature, and energy saving. It is suitable for hotels, shopping malls, supermarkets, and
places with large passenger flow.
1.1 Chip warmer technical data sheet:
Name
Model
Voltage
Power
Temperature
controller
number
Temperature
range
Product outer
Dimension:
mm
Net
weight
Hot Dog
Steamer
HDVJ446
220V ~
240V
1.2KW
1
30~85℃
435*400*640
10.7KG
2. Instructions:
2.1 Do not damage, excessively bend, stretch, or twist the power cord, and do not place heavy objects or clamp
the power cord.
2.2 After use, the thermostat knob should be adjusted to the "0" position, and then pull out the
plug from the socket to avoid leakage or insulation aging vibration.
2.3 This product should be installed in a dry, clean, well-ventilated location, and placed in a
horizontal position.
2.4 In order to ensure safety, the product must be grounded and a leakage switch is installed to
ensure personal safety, otherwise it must not be used.
2.5 Please unplug it and wait for the product to cool down before moving, checking or cleaning.
2.6 Do not insert or unplug the plug with wet hands to avoid electric shock.
2.7 According to the production of different foods, adjusting the required temperature can make the
prepared foods get the desired effect.
3. Transport and storage:
During transportation, this product should be handled with care to prevent severe vibration.
The packaged product should generally be placed in a well-ventilated place to avoid
long-term open storage. It should be stored in a warehouse without corrosive gas. For

4
temporary storage, rain-proof measures should be adopted. Do not invert or stack the
product to prevent damage to the product.
4. Installation Precautions:
4.1 The power supply and voltage used by this equipment must be consistent with the power supply
voltage of the product power plate.
4.2 The user needs to install a sufficient amount of power switch or air switch or (fuse breaker and
leakage protector, etc.) near the equipment, and no debris is allowed in front of the switch for
easy operation.
4.3 There are grounding bolts at the back of this equipment, and no less than 2.5 copper core wires
should be used to reliably connect to the grounding wire that meets safety regulations during
installation.
4.4 The "Equipotential Connection Terminal" on the equipment shell can be used for repeated
grounding of the equipment, and the on-site installer decides whether to connect or not.
4.5 The power connection must be made by an electrical professional. The protection of this
machine against touching live parts is Class I, and a large-opening (contact distance of more
than 3mm), all-pole disconnection leakage protection switch must be installed in the power
supply line.
4.6 The "green/yellow two-color wire" in the power cord is a grounding wire, which must be reliably
connected to a protective conductor that complies with the national electricity safety
regulations.
4.7 Warning:It is strictly forbidden to connect the ground wire to the water pipe, gas pipe,
heating pipe and other pipes, otherwise it may cause a safety accident.
4.8 Warning:Pay attention to the high temperature of the equipment and do not touch the
equipment casually to prevent burns. You must wait until the temperature drops to dissipate
heat before the equipment can be moved or cleaned.
4.9 Warning:During installation, do not place appliances on certain surfaces close to walls,
partitions, kitchen equipment and the like unless they are made of non-combustible materials
or the surfaces are covered with non-combustible insulation materials, and pay attention to
waterproof regulations.
4.10 Warning:For people who have physical, sensory or intellectual defects, or lack of
experience and knowledge (including children), this manual is not applicable.

5
4.11"Equipotential Mark"-" "Instructions for use: scope of application: used in various
equipment, indicating those terminals that make each part of the equipment or system reach
the same potential after being connected to each other, which is not necessarily ground
potential, such as local interconnection lines
5. Safety precautions and use environment and use requirements:
5.1 This product should be placed in a stable place, the left and right sides should be more than
10cm away from incombustible materials, and the back should be more than 20cm away from
incombustible materials (such as brick walls).
5.2 This equipment must be safely grounded before use. Before starting the machine, check
whether the wiring is loose, whether the voltage used is correct, and whether the safety
ground connection is reliable. The shell of this machine must be grounded to ensure safety.
Thank you for your cooperation!
5.3 Whether the electrical components of the product are firmly connected and whether the safety
grounding is reliable.
5.4 If the power cord is damaged, in order to avoid danger, it must be replaced by professionals
from the manufacturer, its maintenance department or similar departments.
5.5 The installation and maintenance of the electrical connection of this product should be
performed by professionals with electrician operation certificates.
5.6 The power cord should be an oil-resistant sheathed cable, not lighter than ordinary neoprene or
other equivalent synthetic rubber sheathed cord H05RN-F.
5.7 The equipment cannot be stored and used in the open air, and cannot be used in places where it
is particularly humid or dripping with water.
5.8 The equipment must be fixed and placed before use to prevent the equipment from moving
during use.
5.9 If the appliances are placed close to walls, partitions, kitchen equipment, decorations, etc., it is
recommended that these equipment and facilities be made of non-combustible materials,
otherwise they should be covered with suitable non-combustible insulation materials, and pay
close attention to fire protection regulations.
5.10 should be operated by designated personnel, and be proficient in the use of machinery and
equipment.
5.11 The machine should not be touched by customers when it is working to avoid burns.
5.12 Be cautious when moving the machine, look for faults carefully, and do not knock.
6. Operation method:
6.1 Temperature controller is designed on front part of the machine, it is easier to set temperature
of the water in the tank, make sure to make tasty food.
6.2 Please put water in the tank, there is “MIN” and “MAX” inside the tank, make sure water will not
6
exceed “MAX” mark, turn on the power switch, power light will be on, then set temperature by
adjusting the temperature limiter, set the temperature you need, the orange light will be on, heating
element start to work, temperature controller will be power when temperature of the water reach
needed temperature, in the meantime orange light will be offer, heating element stop working.
Temperature controller will be power on when water temperature is lower than needed
temperature, orange light will be on, heating element start to work again, water temperature will go
up, the machine work like this to make sure there is constant temperature, please set needed
temperature to make sure get tasty food.
6.3 If abnormal situation happens during work, pls power of the machine immediately, it can only
continue to work after checked and problem has been fixed.
6.4 Warning: After finishing work every day, all power supplies of the equipment must be cut off.
Don't forget to turn off the power.
6.5 Warning: When the appliance with multiple power supplies fails to be repaired, ensure the
safe maintenance operation process. All working power supplies must be cut off before the
maintenance operation can be carried out.
7. Cleaning and maintenance:
7.1 During cleaning and maintenance, the power supply should be cut off to prevent accidents.
7.2 After working every day, use a wet towel that does not contain corrosive detergents to clean the
surface of the body and the surface of the power lead. It is strictly forbidden to rinse with
water to avoid damage to the electrical performance. Cause a leakage accident.
7.3 During the cleaning process, clean the water in the oil basin in time to prevent overflow.
7.4 Note: Appliances must not be cleaned with water jets or immersed in water to prevent electrical
leakage caused by splashing.
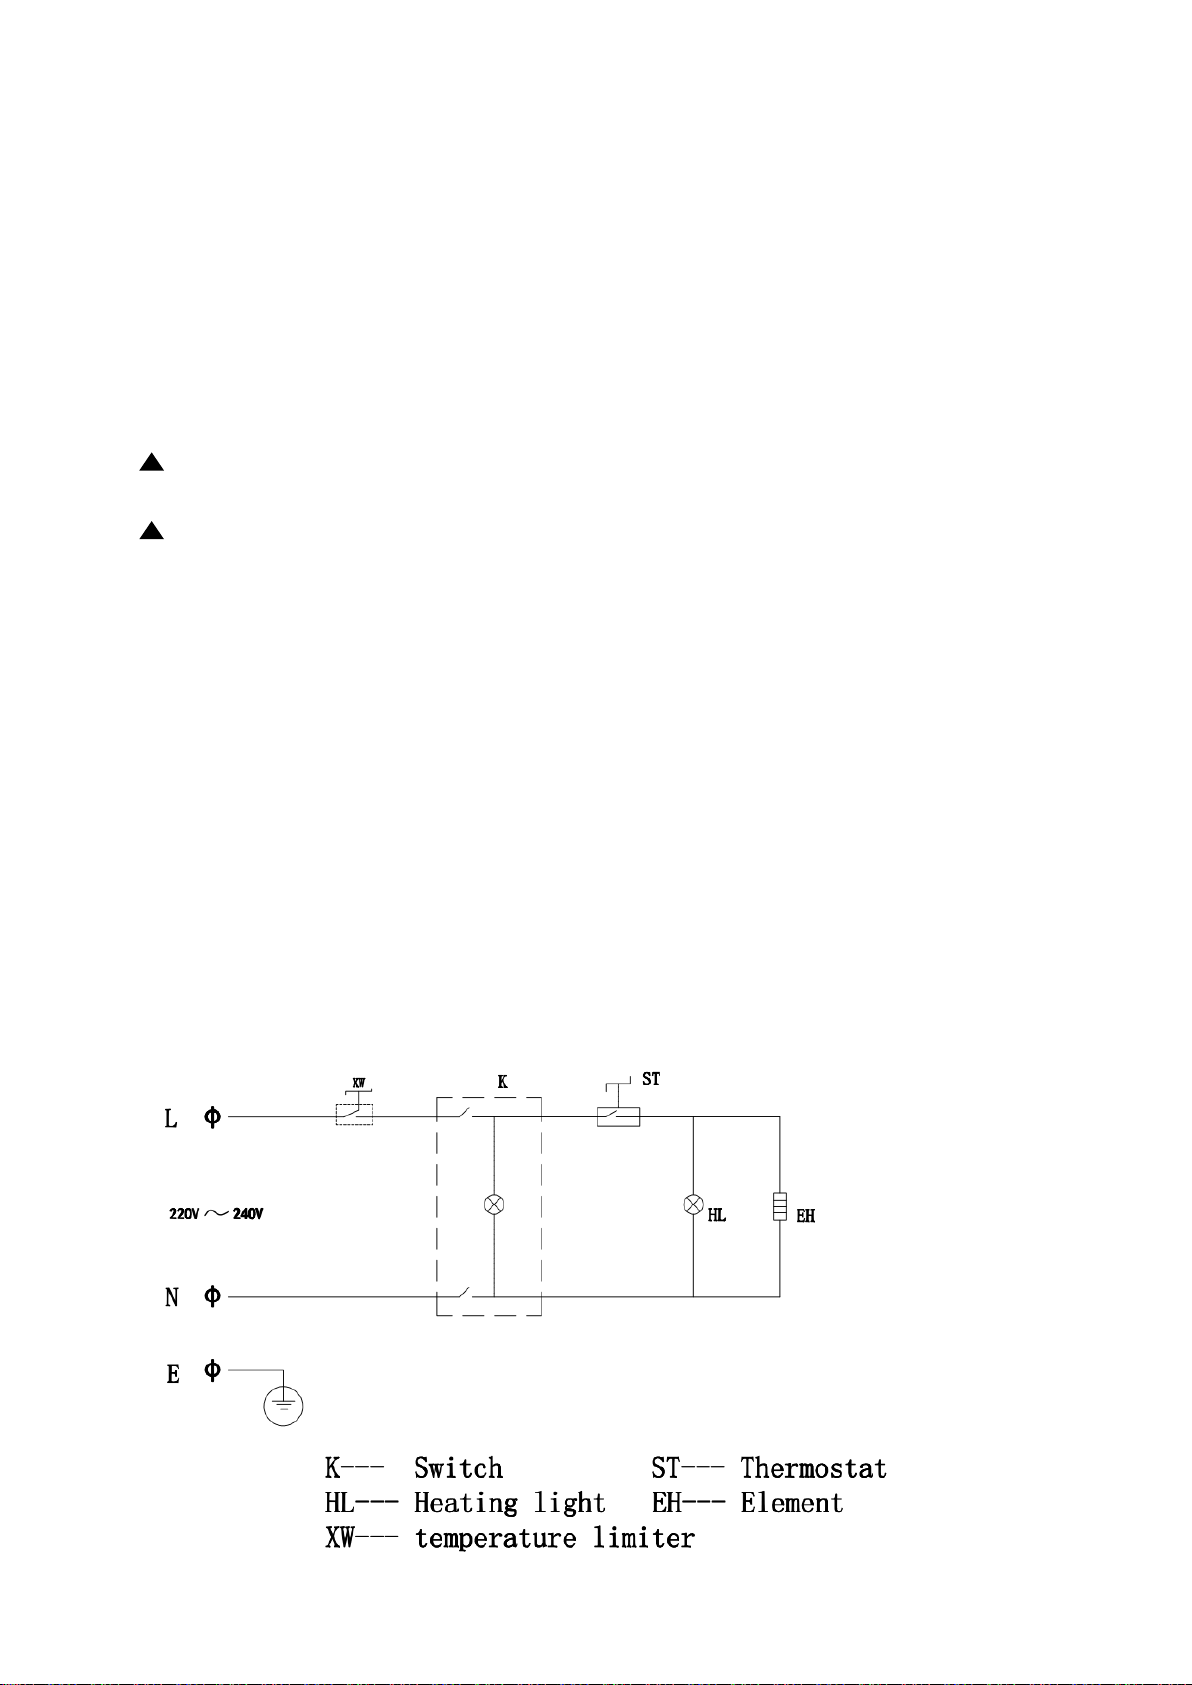
8. Product electrical schematic diagram:

7
9. General troubleshooting methods:
Fault phenomenon
The reason
Elimination method
1. Turn on the power switch, power
light is not on
1. Power switch broke
2.Wires are in wrong
connection
1. Change new Power switch
2. Check and make sure all
wires are connected correct
2、The orange indicator light does
not go out, and the temperature
rise is not controlled
1、Thermostat malfunction
1、Change thermostat
3、The orange indicator light is off,
and the temperature control is
normal
1、Bad connection of
indicator light
2、Burn out of indicator light
1、Fix the wire
2、Change indicator light
4、Orange indicator light is on, but
not heating
1、Wrong indicator wiring
2、Heating tube is broken
1、Correct the wire
2、Change heating tube
5. Turn on power switch and
temperature controller, power light and
heat light are not on, heating element
do not work
1. Temperature limiter work
2. Temperature controller
do not work
1. Press “Reset” button on the
machine after it has cool down
2. Change new temperature
controller
8
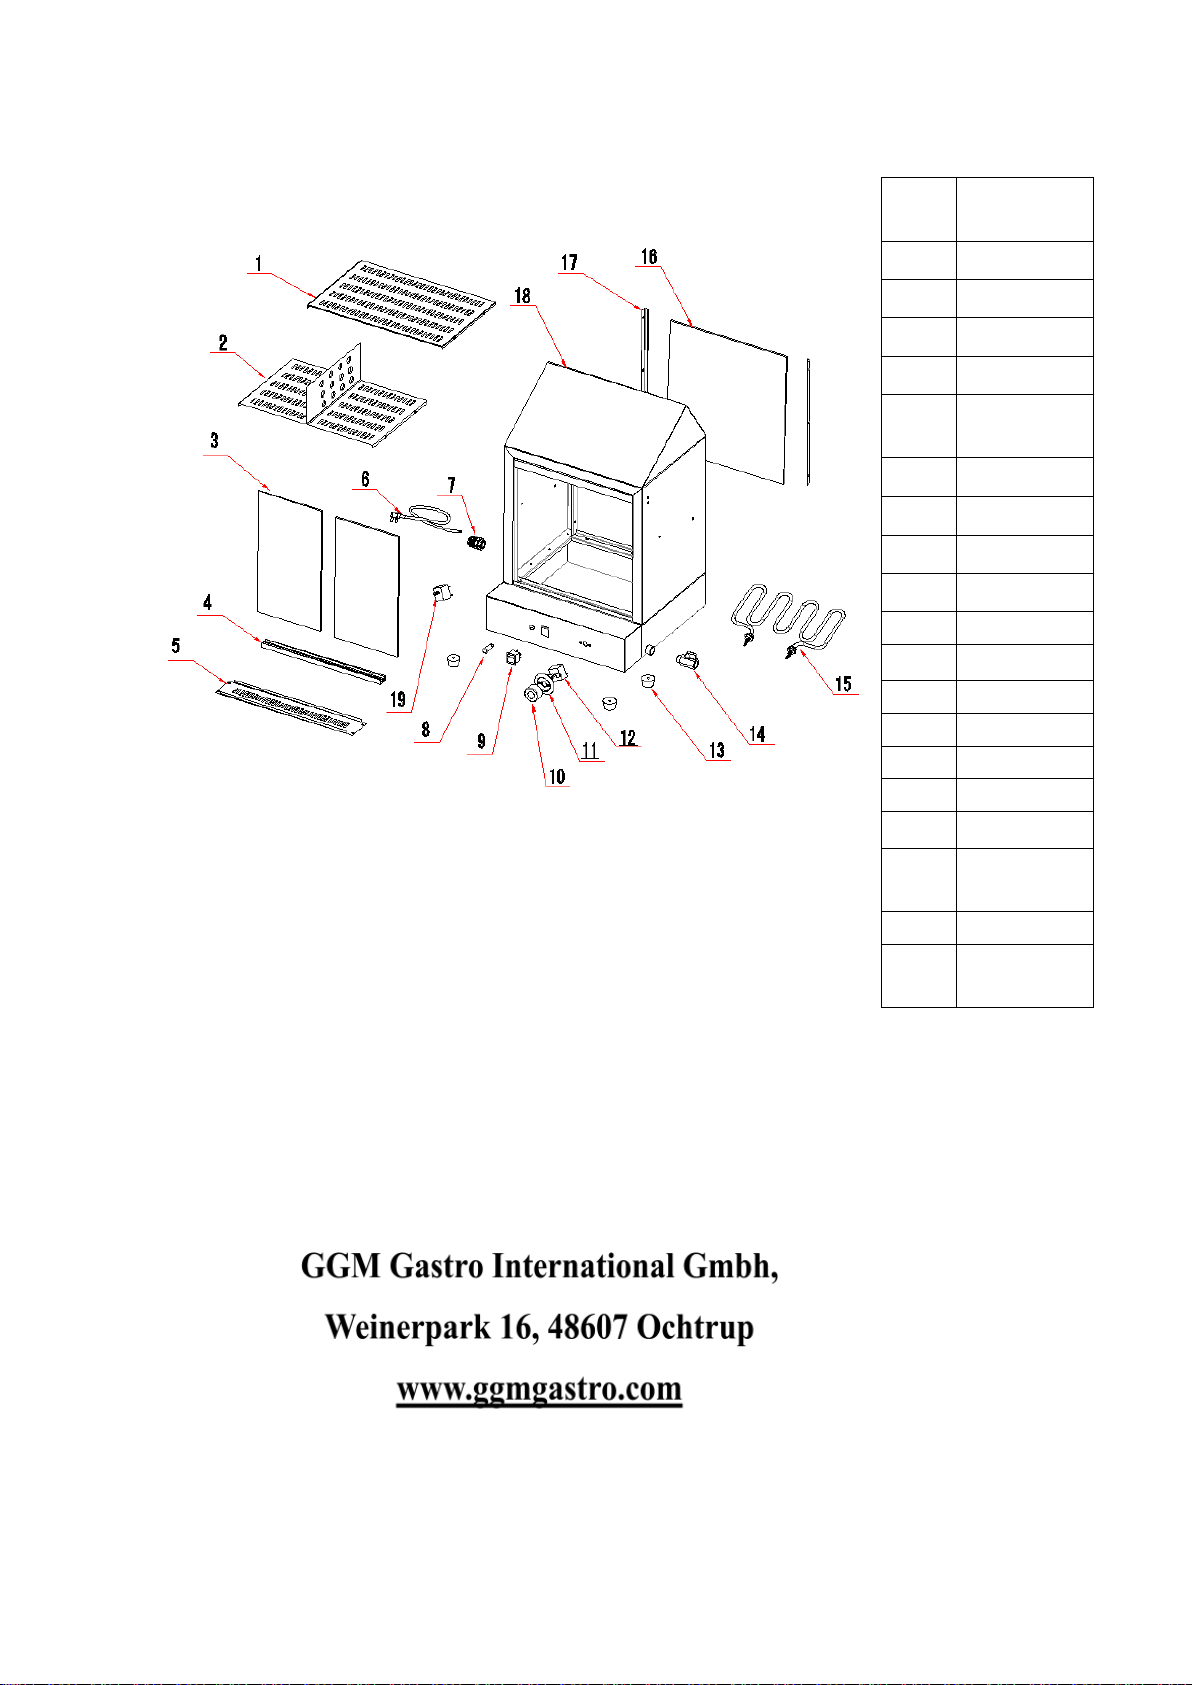
10. Product exploded drawing
No.
Spare parts
name
1
Middle shelf
2
Bottom shelf
3
Glass door
4
Guide groove
5
Device box
seal plate
6
Wire
7
Wire clip
8
Light
9
Switch
10
Knob
11
Dial
12
Thermostat
13
Foot
14
Water tap
15
Element
16
Back glass
17
Glass fixed
board
18
Box frame
19
Temperature
limiter
Other GGM gastro Kitchen Appliance manuals

GGM gastro
GGM gastro FMFC550 User manual

GGM gastro
GGM gastro STPOE930N User manual

GGM gastro
GGM gastro ECTA80 User manual

GGM gastro
GGM gastro ZWJ950 User manual

GGM gastro
GGM gastro DSA80S Operation instructions

GGM gastro
GGM gastro AMVH350 User manual

GGM gastro
GGM gastro EMP.NS.10 User manual

GGM gastro
GGM gastro EHK500 User manual

GGM gastro
GGM gastro EMP.AYR.40 User manual

GGM gastro
GGM gastro GKS330N User manual


