ITIT
I - 2
- Agganciare le due prolunghe rigide (13 e
14 Fig. 9), facendo coincidere i due riferi-
menti (A Fig. 9).
- Agganciare alle prolunghe rigide (14
Fig.10) l’accessorio voluto (bocchet-
ta di aspirazione, spazzola a pennello,
bocchetta a lancia, bocchetta pavimenti
ecc..
NOTA:
Tramite l’impugnatura è possibile regolare la
forza di aspirazione agendo sulla ghiera (15
Fig.11).
Aprendo la nestrella (16 Fig.11) si ha una
minore azione aspirante.
Aspiraliquidi
Per apparecchi dotati di adeguati accessori.
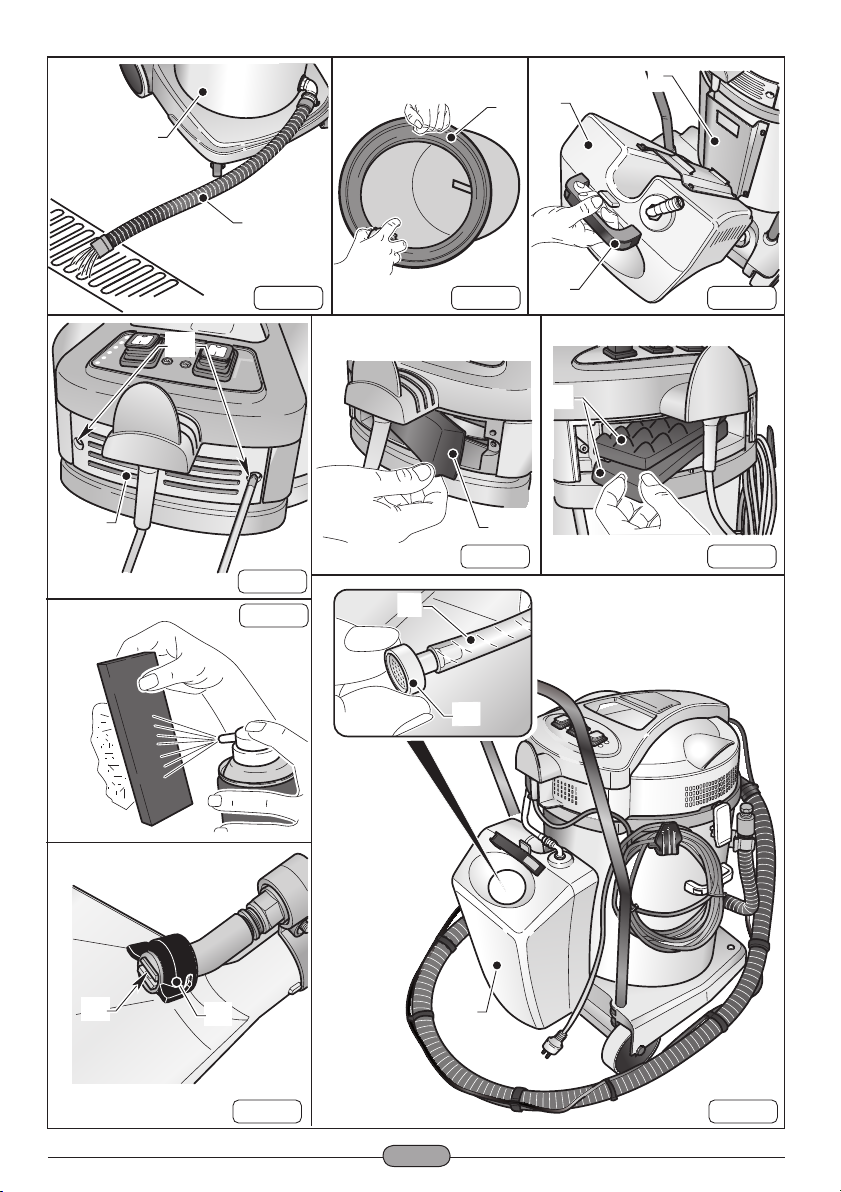
- Sganciare le leve (1 Fig.1) e rimuovere
il coperchio (2 Fig.2) completo di gruppo
motore.
- Rimuovere il filtro (3 Fig.3) in poliestere
se presente.
- Rimuovere il sacchetto in carta (4 Fig.3)
se presente.
- Rimontare il coperchio (2 Fig. 2) e bloc-
carlo tramite le leve (1 Fig.1).
- Introdurre, fino a finecorsa, il manicotto
(9 Fig. 6) del tubo di aspirazione nella
bocchetta (10 Fig. 6) presente sul fusto.
- Per sganciare il manicotto (9 Fig. 7) spo-
stare la levetta (11 Fig. 7) in senso orario
quindi tirare verso l’esterno il manicotto
(9 Fig. 7).
- Agganciare all’impugnatura (12 Fig.8) del
tubo flessibile la prolunga (13 Fig.8).
- Agganciare le due prolunghe rigide (13 e
14 Fig. 9), facendo coincidere i due riferi-
menti (A Fig. 9).
- Agganciare alle prolunghe rigide (14
Fig.10) l’accessorio voluto (bocchetta pa-
vimenti ecc..)
NOTA:
Tramite l’impugnatura è possibile regolare la
forza di aspirazione agendo sulla ghiera (15
Fig.11).
Aprendo la nestrella (16 Fig.11) si ha una
minore azione aspirante.
Lavaggio ad estrazione
- Introdurre, fino a finecorsa, il manicotto
(17 Fig. 12) del tubo di aspirazione nella
bocchetta (10 Fig. 12) presente sul fu-
sto.
- Per sganciare il manicotto (17 Fig. 12)
spostare la levetta (11 Fig. 7) in senso
orario quindi tirare verso l’esterno il mani-
cotto (17 Fig. 12).
- Collegare il tubo (18 Fig. 13) di mandata
detergente al raccordo rapido (19 Fig.13);
per sganciarlo spingere il raccordo rapido
(19 Fig.13) verso l’interno.
- Collegare il tubo (20 Fig. 14) di aspira-
zione detergente al raccordo rapido (21
Fig.14); per sganciarlo spingere il raccor-
do rapido (21 Fig.14) verso l’interno.
- Introdurre la bocchetta tessuti (22 Fig.15)
nel tubo flessibile (23 Fig.15).
- Collegare il tubo del detergente (24
Fig.15) al raccordo rapido (25 Fig.15)
presente nel tubo flessibile; per sganciar-
lo spingere il raccordo rapido (25 Fig.15)
verso il tubo.
- Versare nel serbatoio (26 Fig. 16) il de-
tergente necessario per il lavaggio.
NOTA:
Per il dosaggio del detergente fare riferimen-
to alle istruzioni del produttore.
USO DELL’APPARECCHIO
- L’apparecchio è dotato di ruote e quindi
durante l’utilizzo può essere trascinato
tramite il tubo flessibile, oppure spinto
tramite il maniglione (27 Fig. 17)
- Per il suo sollevamento inserire le dita
della mano nell’apposita maniglia (28
Fig.18) ricavata sulla parte superiore del
coperchio per la versione motore singolo
oppure in due persone tramite le maniglie
(29 Fig. 17)
Avviamento dell’apparecchio
- Inserire la spina (30 Fig.19) nella presa di
corrente.