GHL Mitras LX7 User manual

Mitras LX7
Instruction Manual
Valid from Firmware Version 1.00
As of 2016-12-27

Instruction Manual Mitras LX7
EN 2016-12-27 2
Table of Contents
1SAFETY INSTRUCTIONS ...................................................................................................................................... 4
1.1 SAFETY OF CHILDREN AND VULNERABLE PERSONS.........................................................................................................5
1.2 INTENDED USE.......................................................................................................................................................5
2GENERAL ........................................................................................................................................................... 5
2.1 ABOUT THIS MANUAL .............................................................................................................................................5
2.2 FEATURES .............................................................................................................................................................5
2.3 SCOPE OF DELIVERY ................................................................................................................................................5
2.4 IMPORTANT OPERATING INSTRUCTIONS......................................................................................................................6
3CONNECTIONS OF THE MITRAS LX7 ................................................................................................................... 8
3.1 GENERAL ..............................................................................................................................................................8
3.2 CONNECTION OVERVIEW .........................................................................................................................................8
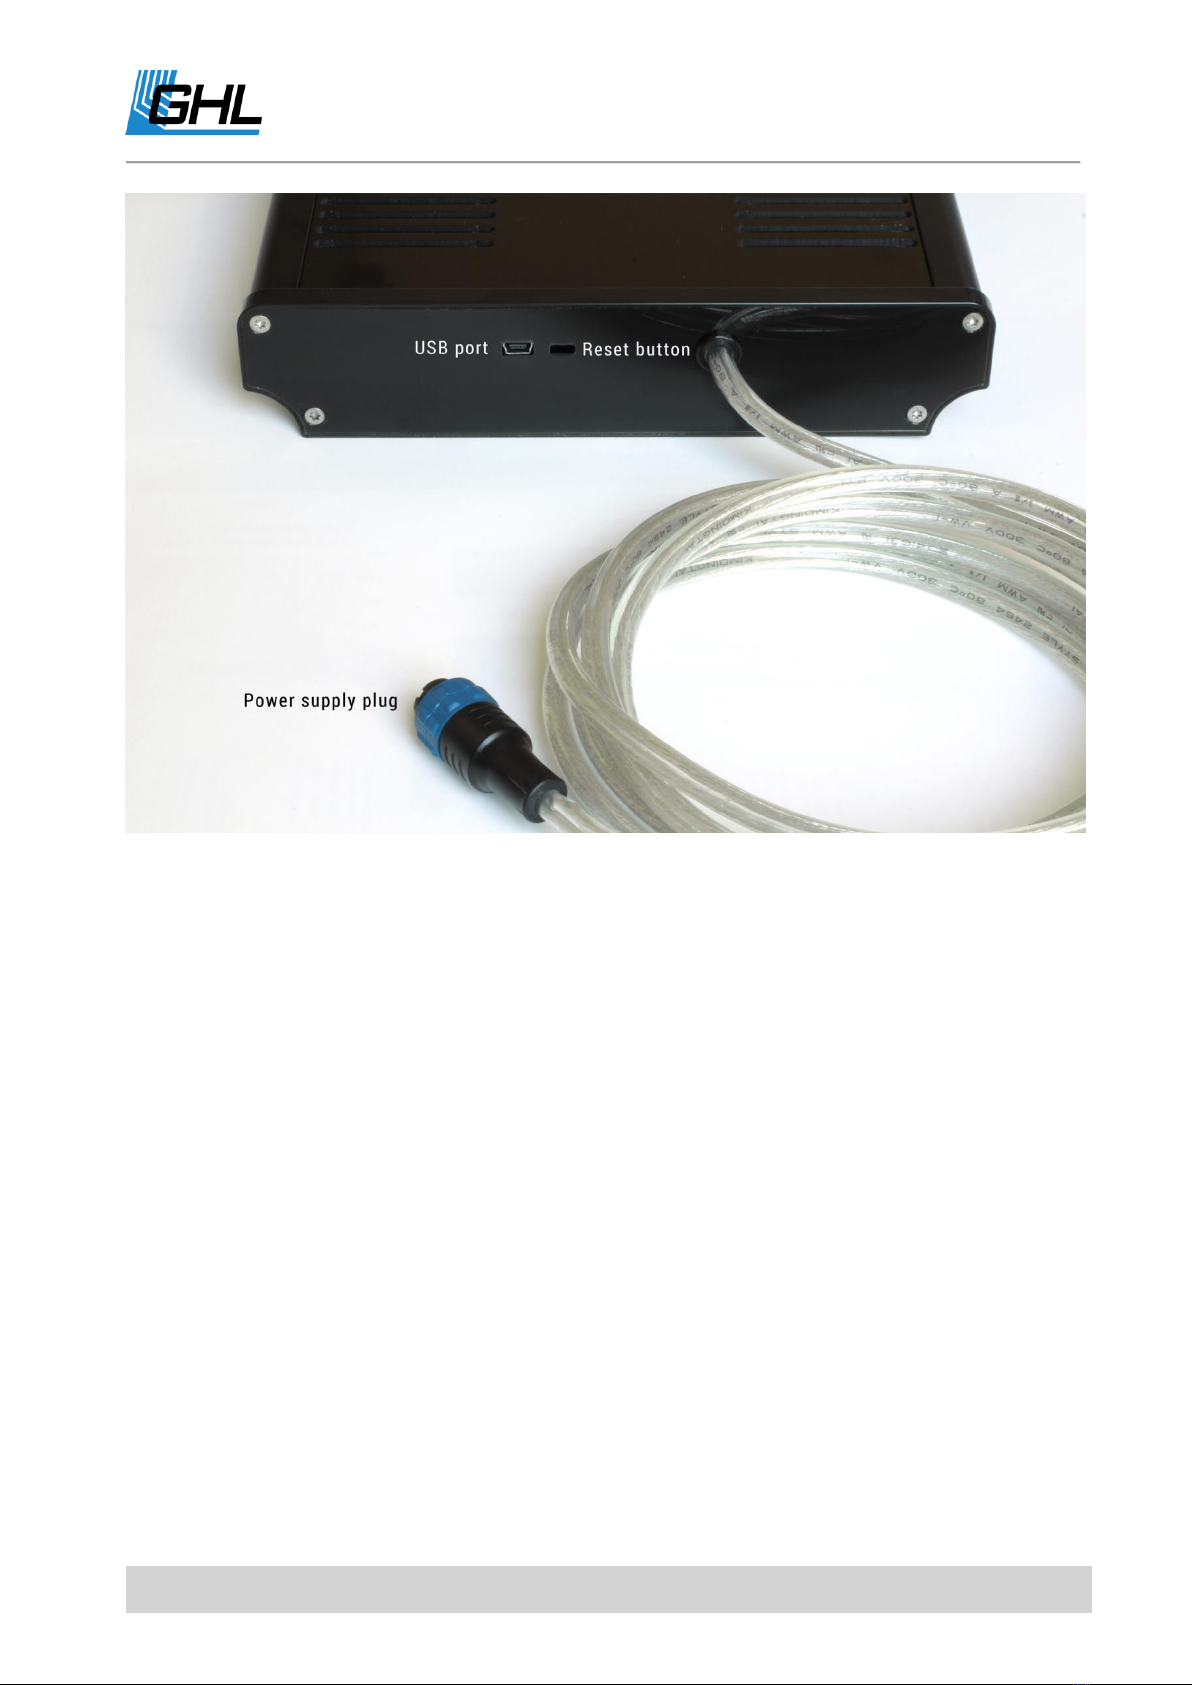
3.2.1 USB Connection .........................................................................................................................................9
3.2.2 Power Supply Connection ..........................................................................................................................9
4FUNCTIONS OF THE MITRAS LX7........................................................................................................................ 9
4.1 FUNCTIONS ...........................................................................................................................................................9
5ACTIVATION .................................................................................................................................................... 10
5.1 INSTALLING THE MITRAS LX7..................................................................................................................................10
5.2 CONNECTION TO THE POWER SUPPLY /SWITCHING ON THE MITRAS LX7........................................................................12
6OPERATION ..................................................................................................................................................... 13
6.1 OPERATION ON THE DEVICE....................................................................................................................................13
6.1.1 Menu Structure........................................................................................................................................15
6.1.2 Display Indications...................................................................................................................................16
6.2 OPERATING THE DEVICE VIA THE SOFTWARE GCC.......................................................................................................16
6.2.1 Requirements ..........................................................................................................................................17
6.2.2 GCC General Information ........................................................................................................................17
6.2.3 What can be set via GCC .........................................................................................................................17
6.3 HOW TO CONNECT BETWEEN THE MITRAS LX7 AND PC ..............................................................................................17
6.4 ADJUSTING THE LIGHTING ......................................................................................................................................22
6.4.1 Customizing a Lighting Schedule via Light Composer..............................................................................22
6.4.2 Securing and Loading Lighting Projects...................................................................................................29
6.4.3 Customizing the Color Channels ..............................................................................................................30
6.4.4 Seasonal Lighting.....................................................................................................................................30
6.4.5 Power Balancing Technology...................................................................................................................31
6.4.6 Further settings .......................................................................................................................................32
6.5 SAVE AND LOAD SETTINGS .....................................................................................................................................32
6.5.1 Saving Settings ........................................................................................................................................33
6.5.2 Loading Settings ......................................................................................................................................33
7WARRANTY/LIABILITY ..................................................................................................................................... 33
8ADDITIONAL INFORMATION............................................................................................................................ 34
8.1 HELP AND INFORMATION .......................................................................................................................................34
8.2 FIRMWARE-UPDATE .............................................................................................................................................34
9TECHNICAL DATA ............................................................................................................................................. 34

Instruction Manual Mitras LX7
EN 2016-12-27 3
Unleash the True Potential of your Plants and Corals!
Congratulations on your new Mitras® LX7 purchase!
You now own the most powerful LED light on the market from GHL. From design to function,
the Mitras® LX7 provides outstanding quality and light performance. These characteristics
make a difference in your aquarium by boosting coral and plant coloration and also helping
to achieve accelerated growth.
Intuitive user-friendly operation with built-in WiFi and Cloud accessibility as well as multi-
channel Illumination Control makes this luminaire, one of a kind.
Enjoy Your Passion!
GHL Takes Care of the Rest.

Instruction Manual Mitras LX7
EN 2016-12-27 4
Get the Most out of your GHL Product
GHL products are well-equipped with simple and intuitive features. In order to get the most
out of our products, we recommend you read our Programming Guide and Instruction
Manual together. Doing so will provide you with the most profound details for using our
product. These and other helpful documents can be downloaded from our website’s
download area (Support->Downloads). Visit our homepage at www.aquariumcomputer.com,
our Support Forum or meet us on Facebook to become a GHL-Product expert and fully utilize
the full range of functions offered from your device!
1Safety Instructions
Please read these instructions carefully before operating the Mitras LX7.
GHL products are built with maximum security and safety in mind. However, product safety
for this device can only be guaranteed if you follow these guidelines.
Anyone who uses this device must become familiar with the following safety instructions and
the operation of the device.
Failure to follow these instructions will void any warranty claims.
In this manual, the following symbols are used:
TIP
General note, tip or advice.
WARNING
Important note for operation, to avoid damage to the equipment, and for
your safety.
DANGER
Warning that non-compliance can result in injury or damage to the device.

Instruction Manual Mitras LX7
EN 2016-12-27 5
1.1 Safety of Children and Vulnerable Persons
WARNING
This equipment must not be used:
By small children and vulnerable persons with limited physical,
sensory or mental capabilities.
By people who are unfamiliar with the functions of this product.
1.2 Intended Use
The Mitras LX7 is intended exclusively for use in the domestic area. Mitras LX7 may only be
operated with GHL accessories.
Make sure to place the device away from splashing water, moisture or other liquids.
The luminaire is to be used exclusively for illuminating open aquariums in dry indoor areas.
For your own safety, please look at the hazard prevention and safety instructions in the
chapters that follow.
2General
2.1 About this Manual
These instructions apply to the pendant luminaire Mitras LX7.
2.2 Features
Illuminated blue graphical display
Control panel with capacitive buttons
USB connection
2.4-GHz radio module
Luminaire power cable for connection to the power supply unit for power supply
Reset button
2.3 Scope of Delivery
Please check the contents of this box. The following items should be included:
Pendant luminaire Mitras LX7
USB-Cable
Power Supply

Instruction Manual Mitras LX7
EN 2016-12-27 6
Power Cord
Supplementary sheet
Please check to make sure all items are in perfect condition. In case of damage, immediately
contact the dealer from whom you purchased the Mitras LX7.
WARNING
Damaged Mitras LX7 Luminaires or components may not be put into
operation under any circumstances.
2.4 Important Operating Instructions
Mitras® LX7 has been designed exclusively for use over open aquariums in indoor areas.
To ensure safe operation, the following guidelines must be followed.
Disregarding these safety guidelines, will result in voiding your warranty. In which case, the
manufacturer rejects any responsibility or liability for damage!
WARNING
Moisture indicators are placed inside the unit and will change color when
exposed to excessive moisture.
Removing these indicators will void all warranty claims.
DANGER
The Mitras LX7 must not be operated under covers. Excessive
humidity and high temperatures will damage the luminaire (See
technical data)
No operation may be performed inside panels or within other covers
or structures which do not provide sufficient air circulation. Constant
air circulation for heat dissipation during operation of the luminaire
as well as of the power supply unit must be ensured. The ventilation
slots of the luminaire must never be blocked or obscured.
Make sure that the power cord is plugged into a grounded outlet;
otherwise you could get an electric shock or cause a fire.
Protect the power cable from damage (For example, twisting,
kinking, clamping). Please also pay attention to the joints and
connections to the device.

Instruction Manual Mitras LX7
EN 2016-12-27 7
WARNING
Maintenance and cleaning for the luminaire should only be
performed when the unit is powered down. The luminaire must be
suspended from the ceiling fixture or disconnected from other
mounting kits. Make sure to unplug the power cord first.
Be careful when touching the lamp during operation. Some parts of
the lamp can get very warm.
The LEDs of the luminaire are extremely bright. Do not look directly
into the light source.
The luminaire must be regularly cleaned. To do this, it must be
switched of.
Disconnect the power plug by pulling the plug, not the cable.
Never attempt to disassemble, repair or alter the equipment by
yourself.
Do not insert sharp objects into the electrical contacts and ports.
DANGER
If the unit falls into the aquarium or has been exposed to moisture
or humidity, first turn off the power to the device via the fuse or
circuit breaker, then pull the power cord.
Never touch the power plug with wet hands.
If the contact of the plug is wet or soiled, please dry it completely or
clean it with a cloth. The mains plug must not be immersed in the
water.
DANGER
The device may not be operated if it has been damaged in any way
(e.g. damaged power cord or plug, liquids or objects have gotten into
the interior, device has been exposed to excessive moisture, the
normal operation is disturbed, or the device has been dropped).
If the plug or socket gets wet, first turn off the power to the device
via the fuse or the circuit breaker. Then pull the power cord.
If the lamp has fallen into your aquarium, first pull the mains plug
before you pull it out of the water. Under no circumstances should
the lamp be used again!
Never operate the lamps then leave it unsupervised when children,
pets or persons are nearby.
When cleaning the aquarium, pull the mains plug of the luminaire.

Instruction Manual Mitras LX7
EN 2016-12-27 8
No water must enter the luminaire through the ventilation slots.
The luminaire must not be exposed to fine dust which can occur
during renovation work or drilling holes. Always protect the
luminaire from these particles.
Salt deposits must be removed immediately.
Please note that improper or neglected care may result in damage
not covered by the warranty.
3Connections of the Mitras LX7
3.1 General
Applies to all connections:
3.2 Connection Overview
The Mitras LX7 has the following connections:
WARNING
Connect only original accessories from GHL.
Do not use force when plugging connectors. If a plug contact does
not fit, it is imperative to check that you have chosen the correct
socket..

Instruction Manual Mitras LX7
EN 2016-12-27 9
3.2.1 USB Connection
The USB port is located on the back of the luminaire.
The Mitras LX7 can be connected to a PC by using the included USB cable. With this
connection, you can comfortably program your fixture by using GHL Control Center.GCC
software can be downloaded free of charge from our website’s download area.
3.2.2 Power Supply Connection
Luminaire power cable for connection of the Mitras LX7 to the power supply unit.
4Functions of the Mitras LX7
4.1 Functions
Simple and intuitive menu-driven operation
Extensive lighting control:
–9 dimmable channels
–Simulation of Moon phases, Thunderstorms, Clouds and Cloud cover
–Seasonal lighting

Instruction Manual Mitras LX7
EN 2016-12-27 10
–Acclimation program
Child protection via PIN code
Settings are stored during power loss in nonvolatile memory (EEPROM)
Operable via PC software, GCC (Free of charge)
5Activation
5.1 Installing the Mitras LX7
This device must be protected from water at all times!
The Mitras LX7 can be positioned above the aquarium by using the Mitras Flex Mount System
or Mitras Hanging Kit. Please make sure to allow sufficient space between the fixture and top
of the aquarium. When selecting the mounting material, make sure you have adequate sizing
and stability, and make sure that the unit cannot fall into the water during assembly.
Mitras LX7 can be destroyed by excess moisture or atmospheric humidity - please
observe the technical data and notes below!
To ensure safe operation, the following guidelines must be followed! In the case of non-
compliance, warranty claims expire, the manufacturer also rejects any responsibility or
liability for damage!
Powered equipment and water can become a dangerous combo if precautions are not taken.
It is therefore essential to supply power to all mains-operated devices which are operated in
the aquarium or in the vicinity of the device via a residual current circuit breaker!
In order to avoid any danger, all mains-operated devices must be disconnected from the
mains; all plugs must be disconnected!
DANGER
The luminaire is to be used exclusively for illuminating open aquariums in
dry indoor areas.
The luminaire must not be operated under a closed aquarium cover
or canopy. Excessive humidity and high temperatures will damage
the luminaire (See technical data)
The luminaire must be mounted at least 20 cm (7.87”) away from the
top of the aquarium.
The lamp must not be operated lying on the edges of the aquarium.
To avoid heat build-up, the luminaire must not be operated in a
horizontal position. A minimum distance of 10 cm (eg to a splash
screen) must be maintained under the protective screen of the

Instruction Manual Mitras LX7
EN 2016-12-27 11
Minimum distance to the upper edge of the aquarium:
luminaire.
Under no circumstances should the luminaire be operated without
the protective shield or with a damaged shield.
The luminaire must be protected against splashing water, excess and
condensing humidity. Please observe the following technical data.

Instruction Manual Mitras LX7
EN 2016-12-27 12
TIP
The Mitras LX7 is equipped with an acclimation program that allows you to
easily adjust the performance and output of the light.
WARNING
To ensure proper operation, the connection cables should never be
kinked, crimped, or positioned in an unsuitable way.
5.2 Connection to the Power Supply / Switching on the Mitras LX7
Connect the luminaire power cable to the power supply. Connect the power supply unit to
the power cord and connect the power connection cable with the plug to the power outlet.
DANGER
Aquarium specimens are very sensitive to sudden changes in lighting
conditions. If an adjustment (duration, intensity, color and alignment of the
lighting) is needed, please perform these changes gradually and observe
the reaction of the ecosystem in the aquarium.
DANGER
Products that are already powered should never be pulled by the cable.
This may cause malfunction or damage the connected power supply and
the Mitras LX7.
They should only be pulled by the plug connected to the power socket.
Mitras LX7 and its accessories are destroyed by moisture or excessive
humidity.
DANGER
Ensure that the mains voltage matches the voltage specified on the
identification plate located on the bottom of the device.
Connect the device only to a properly installed and grounded outlet
with a minimum rating of 10A.
Never use a different voltage supply. Incorrect polarity or voltage can
destroy the device.

Instruction Manual Mitras LX7
EN 2016-12-27 13
6Operation
6.1 Operation on the Device
Use the navigation buttons (arrow keys) on the device to make settings or desired changes to
your settings.
The Mitras LX7 can be operated as a stand-alone light or together with several lamps in the
master and slave mode.
Use only the supplied AC adapter
DANGER
Never leave your aquarium unsupervised for an extended amount of
time.
Always remember that technologies can fail and therefore,
malfunctions can never be ruled out!
Power failures, incorrect settings, damage (For example, by water or
overvoltage) or simply an unexpected operating situation can lead to
fatal damage.
The manufacturer disclaims any liability for (consequential) damages
or losses which might arise in connection with the use of the ProfiLux
System extent legally permissible.

Instruction Manual Mitras LX7
EN 2016-12-27 14
TIP
Master and Slave modes are ideal for running simulations across all
luminaires. These simulations can be performed across one or more
luminaire:
Gliding cloud simulation
Sunrise and sunset with east-west simulation
Thunderstorm
It is particularly convenient to use these settings via the GHL Control Center
(See below 6.2)
Set the time and date first.
TIP
If several Mitras® LX7 are operated, it is sufficient to make the settings for
the lighting and the clock with only one luminaire.
Set this luminaire as a master (Menu: System-> Wireless), the others as
slaves, and give the luminaires different addresses (Nos.1-31).
The settings of the master light are then transmitted via radio to the other
luminaires.
Press any arrow key to enter. You can move up and down from the right to the left with the
arrow keys in the menu. The right and left arrow keys are programmed as shortcut keys. You
can press the buttons to go directly to thunderstorm or maintenance.
The operation of the device is very simple. Use the up and down arrow keys to navigate
through the menus and make a selection.
To confirm the selection of a menu item, press the confirmation key (Check mark button:
Confirm input = Return). This will take you to the sub-menus.
Make the desired changes and save them with the confirmation key. Press the Cancel key
(Cross mark button: Cancel input = Escape) to abort entries.
After each setting process, you are asked if you want to save the changed settings. Only after
confirmation with Yes, the new settings are accepted and saved. These settings are also
stored in the nonvolatile memory (EEPROM, independent of the mains voltage) and are
restored after voltage interruption.

Instruction Manual Mitras LX7
EN 2016-12-27 15
The following types of dialogs are used when operating the device:
Dialog type
Display*
Operation
Select Yes / No
Use the left-arrow key to select Yes, use
the right-arrow key to select No. The
current selection is marked with a
frame. Confirm with RETURN.
Enter a number
(0-9)
Use the up-arrow to increase the
number, decrease with down-arrow.
Confirm with RETURN.
* The illustrations are exemplary.
6.1.1 Menu Structure
The operating menu is structured as follows:
Menu Structure*
Clock:
Time & Date
Location
Illumination:
Illumination run
Manual illumination
Clouds
Moon
Rainy days
Storms
Light-demo
Acclimation
Extras:
Info and Support
Language
Display
Maintenance
System:
Factory settings
PIN
Energy options
Wireless
* The menu structure can slightly differ from the one shown above. Menu layout will depend
on the firmware of the respective luminaire model.

Instruction Manual Mitras LX7
EN 2016-12-27 16
6.1.2 Display Indications
The display shows the day, date and time in the upper line. On the right side of the display,
different symbols are displayed depending on the operating state:
Display
Meaning
Current lunar phase
Maintenance mode active
Manual operation for lighting active
The lower lines display current values, e.g. Illumination intensity of the lighting channels
successively alternating, fan activity, heat sink temperature of the luminaire and the current
lunar phase.
If you are in a submenu without setting anything the device automatically returns to the main
menu after a certain period of time.
Display*
Meaning
Display of the current brightness of lighting channels in
percent and the lunar phase
Display of the brightness of a lighting channel in percent, fan
activity, heat sink temperature and lunar phase
* The illustrations are exemplary.
6.2 Operating the Device via the Software GCC
All settings of the device can also be programmed via the software GHL Control Center (GCC),
which is available for download free of charge in the download area (support-> downloads)
of our homepage www.aquariumcomputer.com.

Instruction Manual Mitras LX7
EN 2016-12-27 17
6.2.1 Requirements
You will need to download the appropriate GHL Control Center version for the firmware of the
respective Mitras LX7.
Operating System compatibility: Microsoft Windows Vista® and Windows 7®, Windows 8®,
Windows 10®.
The connection to the Mitras LX7 can be established via USB:
After successful installation, connect Mitras LX7 to your PC using the USB cable. The driver is
installed automatically.
6.2.2 GCC General Information
With the Load button, the settings of the Mitras LX7 are read out and the program displays
are updated. Clicking the Save button will store the settings you have made in the program
and transfer it to the device.
6.2.3 What can be set via GCC
With GCC, you have access to almost all settings. Some features can only be carried out
directly on the device.
6.3 How to Connect between the Mitras LX7 and PC
Two steps must be taken before your Mitras LX7 can be operated with a PC:
PC and ProfiLux must be connected with a cable via USB
The PC program GCC must be set up
Then proceed as follows:
Open the GCC application and connect the USB cable to your device and PC.
Navigate to "Administration" -> "Connections" -> "Device Manager". In Device Manager, you
will see "GHL Virtual Communications Port" for your device. (Illustration shown below)

Instruction Manual Mitras LX7
EN 2016-12-27 18
In the illustrated example, this is "COM4". (For illustration purposes only!)
Close the "Device Manager window" and click "New".
Select your device.
The "Connection settings" window pops up automatically.

Instruction Manual Mitras LX7
EN 2016-12-27 19
Enter any connection name (for example "Mitras LX7") and set the previously determined
port (COM4) via the selection window (<Auto>). Press "Save".
Mitras LX7 is now visible in the sidebar. By double-clicking the device or by pressing the
"Connect" button in the upper ribbon bar, the connection between the device and your PC is
established.
Once connected, you can view the menu of the Mitras LX7, in which you can make all desired
settings.
For further settings and programming please refer to the "Programming manual for Mitras
LX7" which you can download in the download area (Support-> Downloads) of our homepage
www.aquariumcomputer.com.

Instruction Manual Mitras LX7
EN 2016-12-27 20
Once a connection has been successfully established, GHL Control Center examines the
connected luminaire and displays the start screen. (Shown above)
The available setting options are displayed in a tree structure in the sidebar.
The connection can be disconnected by pressing the "Disconnect” button in the upper ribbon
bar.
Other manuals for Mitras LX7
1
This manual suits for next models
1
Table of contents
Other GHL Aquarium manuals
Popular Aquarium manuals by other brands

Sera
Sera PRECISION LED light manual

Interpet
Interpet CF1 Instruction manual and set up guide

iquatics
iquatics Aqualumi Universal quick start guide

Askoll
Askoll PURE XL HC LED instruction manual

Oase
Oase HighLine Aquarium 125 operating instructions

Tetra
Tetra Whisper 10-30 INSTRUCTIONS, SAFEGUARDS & WARRANTY