Gin Bolero Plus User manual

Bolero PlusOwners Manual
Please read this manual prior to your first flight with the Bolero Plus -Page 3

2
ThankYou…
Thank you for choosing the Bolero Plus. We are confident that this paraglider will provide you
with countless happy experiences as you progress in your flying career. This manual contains
all the information you need to fly and maintain your paraglider. A thorough knowledge of your
equipment will keep you safe and enable you to maximize your full potential.
Please pass on this manual to the new owner if you do resell your glider.
Happy Flights and Safe Landings,
The GIN Team
SafetyNotice
By the purchase of our equipment, you are responsible for being a certified
paraglider pilot and you accept all risks inherent with paragliding activities
including injury and death. Improper use or misuse of GIN equipment greatly
increases these risks. Neither Gin Gliders Inc nor the seller of GIN equipment
shall be held liable for personal or third party injuries or damages under any
circumstances. If any aspect of the use of our equipment remains unclear,
please contact your local paragliding instructor, GIN reseller or the importer in
your country.

3
Contents
ThankYou….................................................................................................................................2
Safety Notice...............................................................................................................................2
1. Gin Gliders.................................................................................................................................4
2. Introducing the Bolero Plus......................................................................................................5
ForPilotsWho… ..........................................................................................................................5
Cutting-edgeDesign.....................................................................................................................5
Manufacturing.............................................................................................................................6
3. Before you Fly...........................................................................................................................7
Pre-delivery Inspection................................................................................................................7
SpeedSystem..............................................................................................................................7
Brakelineadjustment...................................................................................................................7
Rucksack.....................................................................................................................................8
Yourharness...............................................................................................................................9
CertifiedWeightRange.................................................................................................................9
Pre-flightsafety..........................................................................................................................9
4. Flying the Bolero Plus.............................................................................................................10
Preparationforlaunch................................................................................................................10
Takeoff.....................................................................................................................................10
Lineknotsortangles..................................................................................................................11
MinSink/bestglide...................................................................................................................11
Acceleratedflight ......................................................................................................................11
ActiveFlying .............................................................................................................................11
Inturbulence.............................................................................................................................11
Losingaltitude ..........................................................................................................................13
Steeringwithoutbrakes .............................................................................................................14
Aerobatics.................................................................................................................................14
LandingwiththeBoleroPlus.......................................................................................................15
Towlaunch................................................................................................................................15
Motorizedflight.........................................................................................................................15
5. Care, Maintenance and Repairs..............................................................................................16
Ground handling ........................................................................................................................16
UVdamage ................................................................................................................................16
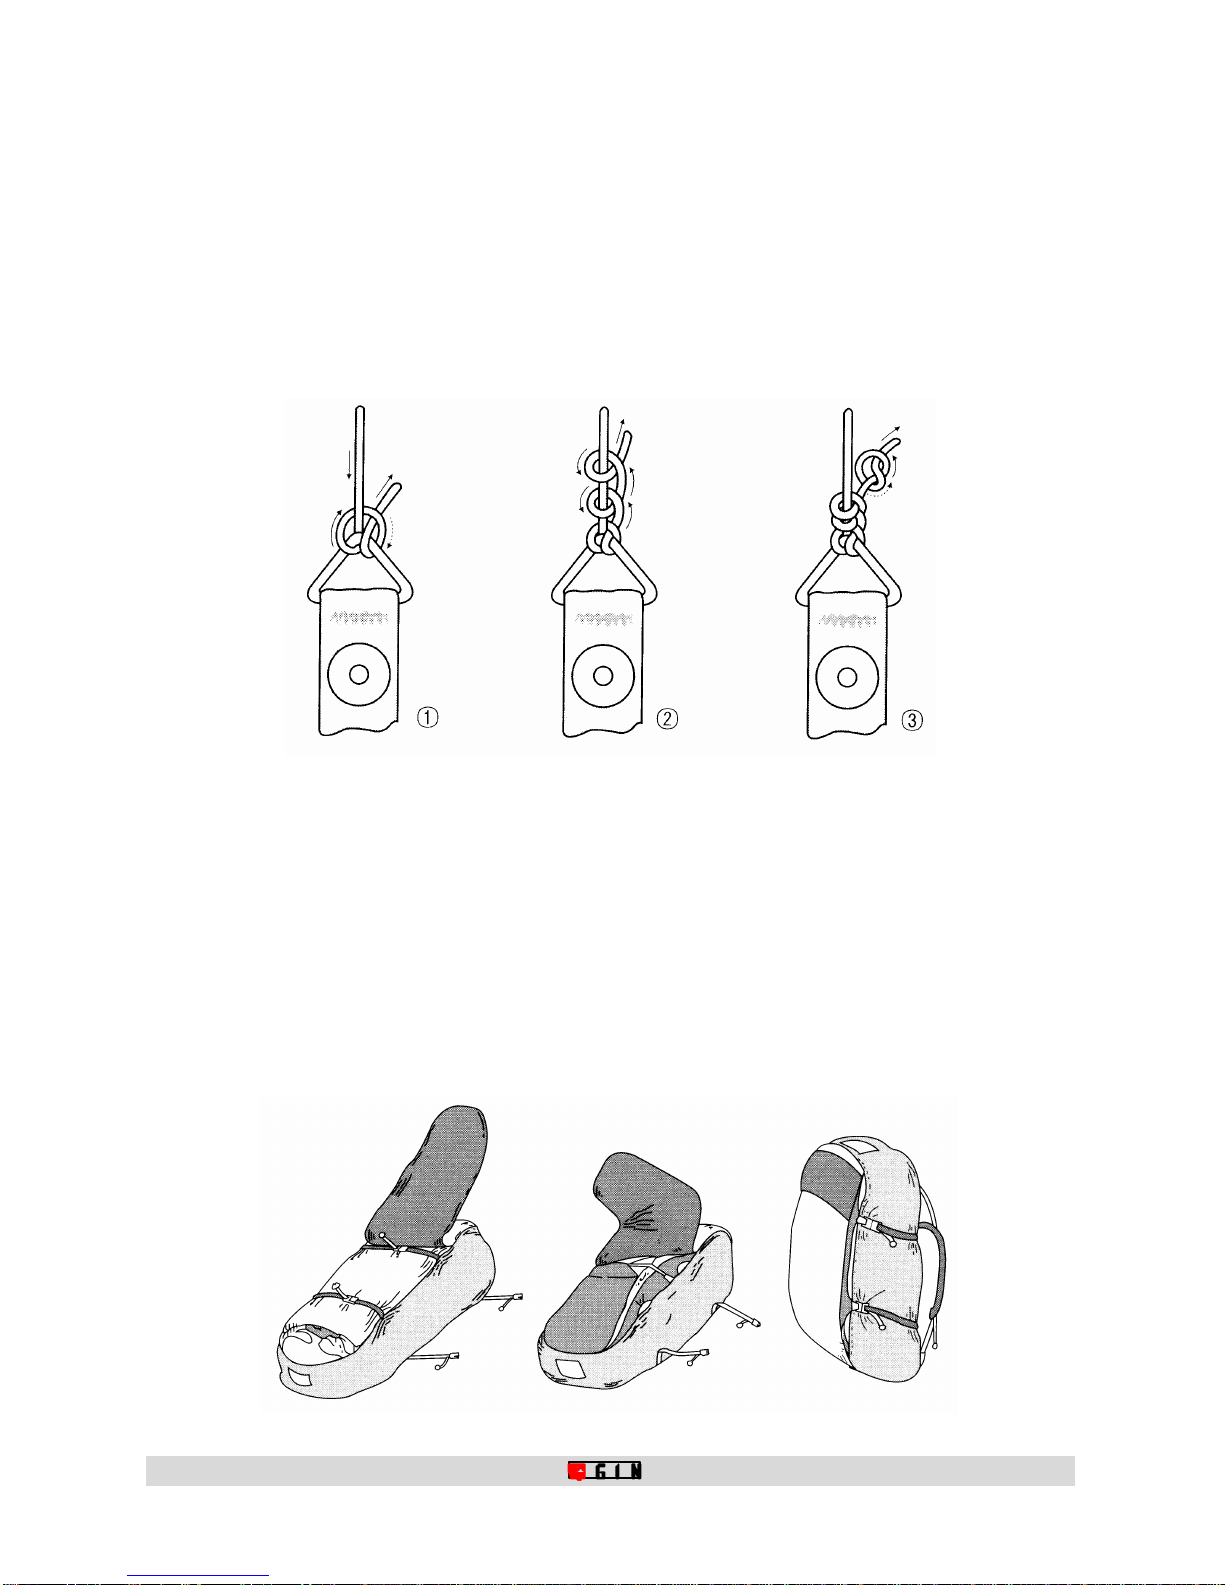
Packinginstructions...................................................................................................................16
TransportandStorage................................................................................................................16
Cleaning....................................................................................................................................17
Inspections ...............................................................................................................................17
Repairs.....................................................................................................................................17
6. Reference ................................................................................................................................18
TestingandCertification.............................................................................................................18
Technical Specifications..............................................................................................................19
LinePlan...................................................................................................................................20

4
1.GinGliders
Gin Gliders was formed in 1998 by paraglider designer and competition pilot Gin Seok Song and
his team of engineers and test pilots.
Gin’s philosophy is simple: to design gliders that he, and any other pilot, loves to fly. This
philosophy applies equally for an entry-level wing such as the Bolero Plus, as for the world-
beating competition glider, the Boomerang. No glider is released to the market without Gin’s
complete satisfaction.
Gin has over 15 years’ experience of designing and manufacturing paragliders, and is backed by
an equally experienced team, both within the company in Korea and throughout a worldwide
network of distributors and dealers. The “GIN Team” has won the Paragliding World Cup every
year from 1998 to 2002 and has had countless other competition successes in World Cups,
World and National Championships. This high level of expertise provided by dedicated
professionals ensures that you get the best possible product support and after sales service.

5
2.Introducing theBolero Plus
The Bolero Plus is a new concept in an entry-level wing. Designer Gin Seok Song has drawn on
all his years of experienceto produce a wing that is uniquely in tune with the needs of today’s
pilots. The Bolero Plus offers outstanding security, with precise but forgiving handling. This
allows the pilot to accurately feel the sensations of flight, and thus develop an active flying
style.Rapid progression up the learning curve is enabled, as the pilot becomes well acquainted
with the myriad of different movements and moods of the air. The Bolero Plus will allow you to
experience the full pleasure of free flight, without ever compromising your safety.
ForPilotsWho…
The Bolero Plus is an ideal first glider, and is also suitable for the more experienced club pilot
who flies infrequently and wants a good performing glider with the highest safety margin. The
Bolero Plus is designed for all kinds of flying, from the first steps at the paragliding school
training slope via ridge soaring to thermaling and cross country.
Cutting-edgeDesign
Gin has made extensive improvements in the Bolero Plus compared to its predecessor, the
Bolero. Performance, take-off and handling characteristics have been improved without
sacrificing security.
Wind tunnel research and new software to optimize the shape of the leading edge has produced
an even cleaner airfoil.
A double reinforcement at the leading edge has been introduced. This improves take-off
characteristics, performance and increases the lifetime of the canopy.
The brake line layout features an extra upper line that gives the wing an even more precise feel.

6
Weight and drag have also been reduced by reduction of the total length of line material used,
and the introduction of a new, hi-tech, light fabric.
These and other innovations ensure that by purchasing the Bolero Plus, you are getting the best
possible glider in its class.
Manufacturing
All GIN gliders are produced in thecompany’s own facilities using the most modern techniques.
Highly skilled staff take extreme care during the entire manufacturing process. Stringent
quality control is made after each step, and all materials that go into each wing can be traced.
These measures guarantee that pilots fly with the assurance that their wing meets the most
exacting safety standards.

7
3. Before you Fly
Pre-deliveryInspection
The Bolero Plus is delivered with speed system, rucksack, inner bag, compression strap, repair
tape and this manual. Your instructor or dealer should have made a test inflation followed by a
test flight before delivery.
SpeedSystem
The speed system increases the maximum speed by lowering the angle of attack with a pulley-
guided, foot-operated system. Approx. 10 km/h gain in speed can be realized with the
accelerator at full travel.
It is important to have your accelerator system correctly routed through your harness and
attached to the risers with the supplied Brummel hooks. The length of the speed bar shouldbe
initially adjusted while on the ground, sitting in the harness so that the legs are fully extended
at the point of full accelerator travel. It is helpful to have an assistant hold the risers taut
while making this adjustment. Subsequent fine tuning can be done on the ground following the
first flight with the speed system. If in doubt about this procedure, consult your instructor or
dealer.
Riser ABCD
length at trim speed 48cm 48cm 48cm 48cm
length at full speed 37cm 39cm 43.5cm 48cm
Brakelineadjustment
The main brake line lengths of the Bolero Plus correspond to the tested results of DHV. These
line lengths have been fine tuned by GIN test pilots, and it should not be necessary to adjust
them.

8
In soaring flight, it is common to fly with half a wrap on the brakes. However, care should be
taken to release the wraps in any extreme situation.
If you do need to make adjustments to suit your harness, body and flying style, we strongly
recommend that you test fly the glider with every 2cm of adjustment. There should be a
minimum of 10cm of free brake travel when the glider is flown hands-off.This preventsthe
brakes being applied unintentionally when the speed system is fully engaged. We recommend a
double sheepshank or a bowline knot for the brake handle attachment as shown in the diagram.
Rucksack
All Gin gliders are delivered with a durable ripstop Cordura rucksack, designed for ergonomic
carrying comfort and ease of use.
The rucksack should be packed carefully to achieve maximum comfort. First,place theglider
inside the harness and then put the top of harness in the bottom of the rucksack with the glider
side next to the back of the rucksack. Finally, tighten the internal and external compression
straps and adjust the shoulder and waist straps to ensure the equipmentstays firmly inplace
when walking. There are also two storage pockets for accessories.
An XXL rucksack (200L capacity) is available as an optional extra for pilots that require it.

9
Yourharness
The Bolero Plus is certified foruse with all harnesses with variable cross-bracing (GH type).
99% of harnesses produced after 1993 are of the GH type. Older harnesses with fixed cross-
bracing (GX type) are not certified and should not be used. Check with the manufacturer of the
harness or your paragliding instructor if in doubt.
The adjustment of the harness chest strap controls the distance between carabiners and affects
the handling and stability of the glider. Tightening the chest strap increases stability,
lengthening it gives more feedback from the glider decreases stability.
Gin calculates and draws the planofthe glider with a distance between the carabinersof 44cm.
We recommend a setting a distance of 42cm to 50cm between the carabiners, depending on the
size and design of the harness. There is no need to fly with a tight chest strap setting with the
Bolero Plus, as there is no tendency for it to feel unstable, unlike older gliders.
CertifiedWeightRange
The Bolero Plus must be flown within the certified weight range given in the reference section
at the back of this manual. The weight range is quoted as the total weight in flight, i.e. the
weight of the pilot, glider, harness and accessories. The easiest way to check your total weight
is to stand on weighing scales with all yourequipment packed into your rucksack.
Pre-flightsafety
To fly this equipment you should:
Have appropriate practical and theoretical training and experience for this class of glider.
Have the necessary insurance and licences.
Be in your right mind, unaffected by extreme stress, recreational or prescribed drugs.
Only fly in conditions suitable for your level of paragliding.
Wear suitable head protection, use a certified harness and emergency parachute.
Make a thorough pre-flight check.

10
4. Flying the BoleroPlus
We recommend that you first practice inflating your glider on a small training hill, or flat
ground. Make your first flights with your new paraglider in gentle conditions on a familiar
flying site.
Preparationforlaunch
Following a consistent method of preparation and pre-flight checks is vital for safe flying. We
recommend the following:
On arrival at the flying site, assess the suitability of the conditions: wind speed and
direction, airspace, turbulence and thermal cycles.
Inspect your glider, harness, reserve handle and pin, helmet and any other equipment.
Choose a sufficiently large take-off area with even ground and no obstacles.
Lay the glider out according to the planform, and get the lines and risers sorted out.
Secure yourself in your harness and don’t forget the leg loops! Put your helmet on.
Connect the risers to your harness carabiners, ensuring there are no twists or loops
around the lines.
Connect the speed system to the risers with the Brummel hooks.
Do a final line check by pulling gently on the risers or lines to ensure there are no new
knots, tangles or interfering branches or rocks. Take extra care in nil or light winds.
Pre-flightchecklist
Reserve parachute: pin in and handle secure.
Helmet and harness buckles closed.
Lines free.
Canopy open and into wind.
Airspace clear.
Takeoff
The key to a successful launch technique is to practice ground handling on flat ground whenever
you can.
Light or Nil Wind Launch
The Bolero Plus inflates steadily in nil-wind conditions. Simply guide the glider with the A-
risers, keeping your arms bent and hands at the level of the shoulders. Allow your arms to rise
in an arc and wait for the glider to inflate and come above your head –do not push the risers.
There is no need to pull the risers hard. Run positively as the glider comes above your head.
Be sure to look up and check that the canopy is fully inflated before you take-off, and that
there are no tangles in the lines. If any irregularity should occur and you’re not yet airborne,
abort the launch immediately by stalling the glider. On steep launches, stall one side of the
glider and run parallel to the hill.
If the glider should come up sideways, and the situation is recoverable, run towards the lower
side rather than trying to struggle against theforce.
An impulse launch where you start running with slack lines close to the glider is not needed.

11
StrongWindLaunch
The reverse launch technique is recommended. Holding the brakes, turn around to face the wing
passing one set of risers over your head as you turn. We suggest building a "wall" by partially
inflating your glider on the ground, thus sorting lines out thoroughly. Check the airspace is
clear and gently pull the glider up with the A risers. When the glider is overhead, check it gently
with the brakes, turn and launch. In stronger winds, be prepared to take a couple of steps
towards the glider as it inflates and rises.
Lineknotsortangles
If you do take off with a line knot or tangle, try to get clear of the ground and any traffic before
taking corrective action. Weightshift and/or counterbrake to the opposite side and pump the
knotted side with your brake. Be careful not to fly too slowly to avoid a stall or spin. If the knot
or tangle is too tight to pump out, immediately fly to the landing zone and land safely.
Min Sink / best glide
The minimum sink speed is achieved by pulling approximately 30 cm of brake. The theoretical
best glide speed in calm air is realized at the hands-off position.
Acceleratedflight
Once you have become accustomed to flying the Bolero Plus, you can practice using the speed
system, which allows improved glide in headwinds and greater penetration in strong winds.
Apply the speed system by pushing the speed bar progressively with your feet. Be prepared to
controlroll by using weightshift and pitch by varying the amount of bar. Keep a very light
pressure on the brakes in order to feel the canopy.
Avoid flying accelerated near the ground, and don’t use more than half the maximum travel in
turbulence.
Ifyou doencounter a collapse while using the accelerator, step off the bar first before taking
any other corrective actions.
ActiveFlying
The Bolero Plus has a high internal pressure, resistance to tucking and a very high degree of
passive safety. However, it is recommended that at this stage you already start practising an
active flying style. This will help you avoid deflations in all but the most turbulent conditions.
The key to active piloting is keeping the glider above your head at all times. If it falls back
behind you, let up the brakes. If it surges in front of you, counterbrake until the surge is
controlled. If you sense a loss of pressure on one side of the canopy, smoothly apply brake
and/or weightshift on the appropriate side until you feel pressure return. In all cases, maintain
adequate airspeed and avoid overreaction.
Inturbulence
Deflations of the canopy can occur in strong turbulence. The Bolero Plus will recover without
pilot input in almost all situations, so whenever in doubt, let up the brakes and let the glider fly.

12
However, it is recommended that you follow the advice below in order to help the wing recover
more rapidly.
Asymmetricdeflation
In the event of encountering strong turbulence and suffering an asymmetric deflation (collapse
on one side), the Bolero Plus will promptly and easily re-inflate without interference from the
pilot, but the course might alter slightly. This might be unwanted close to the ground or other
gliders. Maintain your course by weightshifting away from the collapsed side. Thisaction canbe
aided by applying a little force on the brake opposite to the deflation. This will normally be
sufficient. However, if the deflation fails to come out, pump the deflated side with a firm and
smooth pumping motion. Let the glider regain itsflying speed after it has re-inflated.
Symmetricdeflation
A symmetric (frontal) deflation will come out promptly without pilot input. The glider will
regain airspeed with a small surge. If counter braking, be careful not to over-correct.
Cravat/gliderwrappedaroundlines
A cravat occurs after a severe deflation when the wingtip becomes trapped in the glider lines. It
is extremely unlikely to occur on the Bolero Plus. Nevertheless, the pilot should be familiar with
the procedure for correcting it. Counterbrake and/or weightshift and pump the brake on the
tangled side. On all Gin gliders, there is a separate stabilizer/winglet main line that goes down
to the B riser. This line usually comes slack in the event of a cravat. Pull it down completely
until it comes tight and the cravat normally comes out.
Flatspin
In normal thermaling flight, you are very far from the limits of a flat spin. Nevertheless, should
this occur, just let up the brakes and wait for the glider to surge forward.
Cascadeofevents
Many reserve deployments are a result of a cascade of over-corrections by the pilot. Please
note that over-corrections are often worse than no input at all.

13
Losingaltitude
Extremely strong and widespread lift is found, for example, in storm conditions. The bestplace
to be in this situation is on the ground. Nevertheless, if you’ve been caught out by the weather
and find yourself needing to descend rapidly, there are several ways to do so. The best way is,
of course, to find sink. Failing that, try one of thetechniques below. They are presented in order,
from the least to the most extreme. Most of these techniques place undue stress on your glider,
and should be avoided if your wish to extend its lifetime. We recommend you initially practice
these manoeuvres under qualified supervision during a safety training course.
Bigears
Big ears is a safe method of moderately losing altitude while maintaining some forward speed.
Pull in big ears with the outer “A” line on each side. The Bolero Plus is fitted with a “bigears
kit” to facilitate this process. Simply pull the red handles velcroed to the risers outwards and
downwards as shown.
Although the noise of the wind around your ears may indicate the airspeed improves, the
airspeed does not improve with big ears. You may use the speedbar in combination with big
ears to maintain your forward speed but increase the sink.
The glider can be steered while in big ears using weightshift alone.
When releasing the lines, the Bolero Plus’s ears will come out on their own. Releasethe bigears
at least 100m above the ground. If this is not possible, keep the big ears in until you flare for
landing rather than letting them out on the approach. This is a safer method because of a
possible wind gradient close to the ground and your low airspeed/high wing loading with big
ears in.
Spiraldive
The spiral dive should be considered an extreme manoeuvre. Practice spiralling with caution and
lesser sink rates to get a feel for the Bolero Plus’s behaviour. Weightshift and pull the brake on
one side gradually. Let it accelerate for two turns and you will enter the spiral dive. Once in the
spiral, you can control your descent rate and bank angle with weight shift and the outer brake.
WARNING! A pilot who is dehydrated and/or not accustomed to spiralling can lose consciousness
in a steep spiral dive!As with all types of aircraft, we advise you to assist the glider to exit

14
from the spiral dive in a controlled manner. Let the glider decelerate for one or two turns by
applying outer brake and/or weight shift.
B-stall
To quickly lose altitude without straining your body with G-force you can use the B-stall. Reach
up to the B-risers just below the maillons and twist your hands while gently pulling. It will be
difficult at first, but become lighterthe more you break the aerofoil. Once pulled, do not release
immediately. The glider needs to settle into a stable B-stall before releasing. On exiting the B-
stall the Bolero Plus has a very gentle dive without deep stall tendencies. We advise you to
release the B-stall symmetrically with both hands in a decided manner.
Fullstall,dynamicstall
This is an extreme manoeuvre and there should never be any need to perform one.
Do not take wraps with your brakes before entering a full stall. Keep your hands closeto your
body during the stall, and lock them under your harness seat plate if necessary. In a stable full
stall, the canopy will oscillate back and forth. Before releasing the stall, raise your hands
slightly and evenly to fill the glider with air. If possible, let the brakes up when the glider is in
front of you to avoid excessive surge. The Bolero Plus will slow down the surge on its own, but
you may counter brake the dive briefly for comfort if needed and then let up the brakes to
regain airspeed. Be careful to not stall the glider again when damping the surge.
Never attempt a stall and then change your mind and release the brakes, as the glider will surge
radically.
Deepstall(parachuting,stablestall)
The Bolero Plus does not have a tendency to get into nor stay in a deep stall. Should this
nevertheless occur, put your hands on the A risers and push forward to gain speed. On some
modern harness/accelerator setups, you can reach the speedbar without using your hands. If so,
push the speedbar. Never try to steer out of a deep stall.
You can recognise a deep stall by the glider getting "mushy" and the airflow around your ears
decreasing. This situation is usually achieved by flying in turbulence or exiting a deflation with
too much brakes applied.
Steering without brakes
If a brake is not operationalfor some reason, you can steer the Bolero Plus with the D-risers.
Add steering input by weight-shifting in your harness. Be careful not to steer too much with the
riser to avoid any possibility of a spin.
Aerobatics
The Bolero Plus is not designed for aerobatics. Besides the inherent risks, extreme manoeuvres
of any kind place unnecessary stress on the glider and effectively shorten its lifespan.

15
LandingwiththeBoleroPlus
Select a familiar landing area free of obstacles and carefully note the wind speed and direction
in the landing area. The low minimum flying speed ofthe BoleroPlus will help you to make a
soft landing in all conditions. Approach the landing with sufficient airspeed and don’t leave
your last turn too late or too steep.
Before landing, slide your legs forward in the harness so that you adopt the standing position.
NEVER land in the seated position; it is very dangerous for your back even if you have back
protection, which is only a passive safety system. Standing up before landing is an active
safety system, and is much more effective.
Towlaunch
The Bolero Plus is suitable for towing by pilots who have the relevant towing certification. The
Bolero Plus has no tendencies towards deep stall/parachuting. There is sufficient margin to
counter steer the glider in a normal towing situation. Make sure you use proper equipment,
experienced personnel, the recommended techniques and all relevant safety precautions for
towing.
Motorizedflight
Paragliding certification does not include motorized flight. However, motorized flying has been
made with great success due to its very easy take-off characteristics, good performance,
stability and extraordinarily good handling. Always use certified combinations of
engine/harness/glider. Always check with your federation if in doubt.

16
5. Care, Maintenance and Repairs
The materials used in the Bolero Plus have been carefully selected for maximum durability.
Nevertheless, following the guidelines below will keep your paraglider airworthy and will
ensure a long period of continuous safe operation. Excessive wear is caused by careless ground
handling and packing, unnecessary exposure to UV light, chemicals, heat and moisture.
Groundhandling
Thefollowing shouldbe avoided:
Violent shocks to the upper surface (e.g. when the canopy crashes to the ground leading
edge first whilst ground handling).
Dragging the glider along the ground.
Stepping on the lines or canopy. The Kevlar inside the sheath can take lots of pullingforce
without stretching, but is sensitive to bending with small radius.
Opening your wing in strong winds without first untangling the lines.
UVdamage
Avoid leaving the glider out in the sun unnecessarily. UV rays from the sun degrade paraglider
cloth.
Packinginstructions
We advise you to pack the glider ‘accordion wise’ as shown in the diagram. This packing
procedure takes slightly longer and requires an assistant, but it conserves the rigidity in the
profile reinforcements.
Since folding the gliderweakens the materials, pack the glider as loosely as possible.
TransportandStorage
Moisture is the worst enemy for your glider, adversely affecting the ageing of fabric, lines and
reinforcements. The Bolero Plus should therefore be kept dry and cool. Do not pack the glider

17
away for a prolonged period if it is damp, sandy, salty, or if other objects have entered the cells.
Always allow it to dry naturally before storage in a dry room. Leave the rucksack zip open
whenever possible to allow residual moisture to evaporate, and do not transport or store the
glider in the proximity of chemicals such as gasoline, paints or other solvents.
Cleaning
Use only lukewarm water and a soft cloth to clean your wing. Never use any abrasive materials
or detergents. Only clean the wing if it is absolutely necessary e.g. after a landing in salt water.
Inspections
The Bolero Plus should be fully inspected by an authorized Gin agent after every 100 hours
flying time or every year, whichever is sooner. A full inspection will give you peace of mind and
extend your glider's lifetime. Additional inspections should be performed by a qualified person
following a crash or violent landing on the leading edge, or if you note a deterioration of
performance or behaviour.
You should also check for any damage to your lines, sail, and carabiners before each flight.
Repairs
Very small holes in the sail can be repaired with the sticky back tape provided with your glider.
Damaged lines should ideally be replaced by your GIN dealer. Before fitting a replacement line,
check it for length against its counterpart on the other side of the wing. When a line has been
replaced, always inflate the glider on flat ground to check that everything is in order before
flying.
Major repairs, such as replacement panels, should only be carried out by the distributor or
manufacturer.

18
6. Reference
Testing and Certification
The Gin Glider Bolero Plus has passed DHV 1(GH) and AFNOR standard. This is the safest class of
paraglider. The Bolero Plus has also passed load tests and shock tests with a load exceeding 8G
of the maximum weight in flight.

19
TechnicalSpecifications
SIZE XSSMLXL
AREA 24.39m² 25.98m² 28.2m² 30.5m² 32.89m²
SPAN 10.97m 12.32m 11.8m 12.27m 12.74m
FLAT
A.R 4.93 4.93 4.93 4.93 4.93
AREA 22.14m² 23.59m² 25.6m² 27.68m² 29.85m²
SPAN 9.23 9.53 9.93m 10.32m 10.72m
PROJECTED
A.R 3.85 3.85 3.85 3.85 3.85
ROOT 2.80m 2.89m 3.02m 3.14m3.26m
CHORD TIP 0.59m 0.61m 0.64m 0.66m 0.69m
TOTAL HEIGHT 6.60m 6.81m 7.1m 7.38m 7.66m
CELL NUMBER 37 37 37 37 37
GLIDER WEIGHT 5.1kg 5.5kg 5.9kg 6.3kg 6.7kg
WEIGHT IN FLIGHT 60~75kg 70~85kg 80~105k
g95~120k
g105~145kg
D.H.V 11111

20
Line Plan
Table of contents
Other Gin Aircraft manuals
Popular Aircraft manuals by other brands

Flylight Airsports
Flylight Airsports Skyranger Swift Operator's manual

North Kite
North Kite Trust BAR 11 user manual

Wills Wing
Wills Wing Skyhawk Owner's manual & service manual

Schempp-Hirth Flugzeugbau
Schempp-Hirth Flugzeugbau Ventus-3T Sport Flight manual

Flusurfer
Flusurfer Speed 3 user manual

Navair
Navair Navy F-8E Flight manual

Gradient
Gradient Aspen 6 user manual

Scott Sport
Scott Sport N143W Pilot operating handbook

Ozone
Ozone Element Pilot's manual

AirBorne WindSports
AirBorne WindSports XT 582 Maintenance manual

Schempp-Hirth Flugzeugbau
Schempp-Hirth Flugzeugbau Duo Discus Flight manual

S.E.A. Paragliders
S.E.A. Paragliders FireStarter Pilot's manual