GL-CFD06DA-35 Series
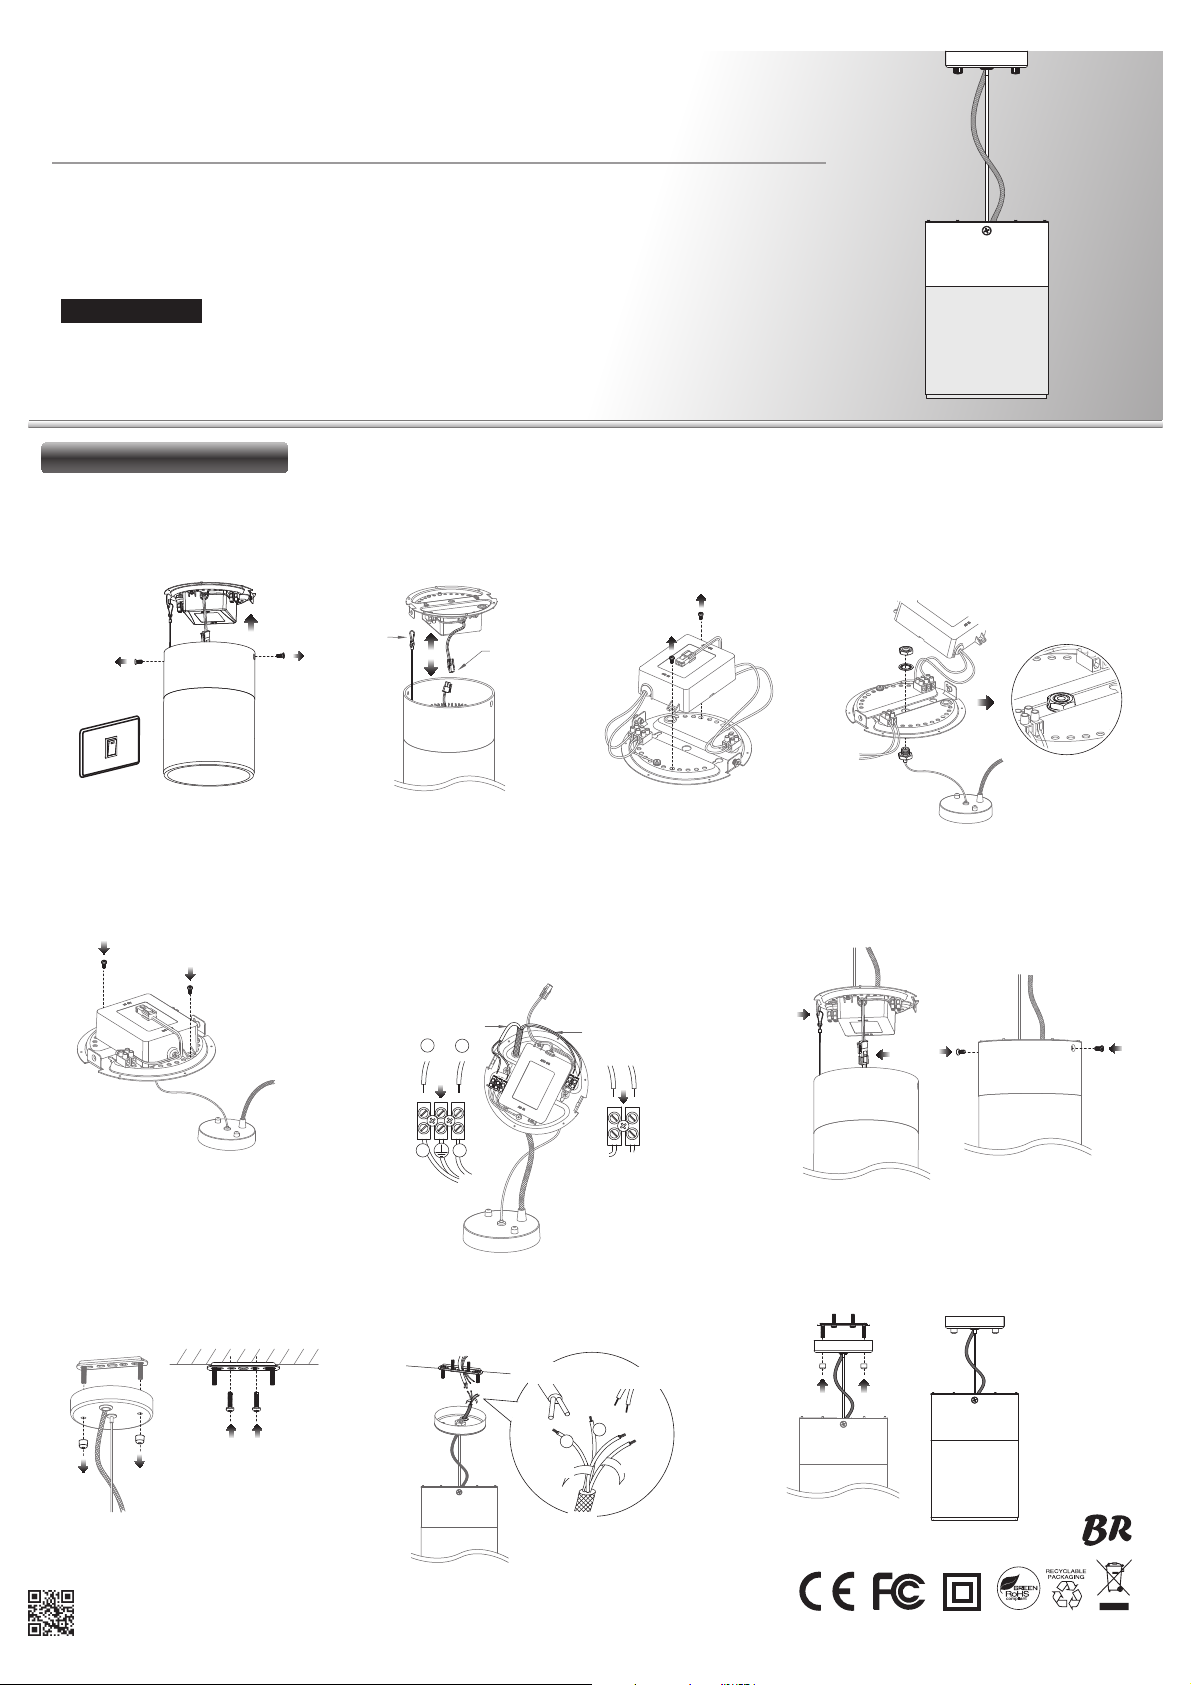
Installation Steps
Step 1.
Step 5.
Step 8. Step 9.
Step 10.
Step 6. Step 7.
Remove M5 screws from two sides of the
lighting fixture, and separate the lighting
fixture from power base.
Fix the driver with by replacing the
screws in the step 3 on the power plate.
Remove the cap nuts and attach the mounting
plate to the ceiling with screws.
Connect the internal power cord to the AC power
cord of the ceiling mount.
Insert the ceiling mount through the screws of the
mounting plate, and fasten the cap nuts.
Fix the steel wire and cable. Installation completed.
Disconnected the power connector
and unhook the safety steel wire.
Unscrew the two screws of the power
base, and move the driver outside the
power plate. (Do not remove the cable
from the driver)
Assemble the (a.)cable clamps, (b.)washer
and (c.)screw nut in the order onto the power
plate, and make sure they are locking.
Step 2. Step 3. Step 4.
OFF
Make sure to
turn off the power before installing.
Thank you for choosing the GL-CFD06DA-35 Series LED products. Please install and use the products
according to the following directions to ensure normal function and operation. Please use stainless screw
to fix holder and make sure screwed tightly. If you do not follow these instructions to properly install and
use the GL-CFD06DA-35, you will not be eligible for warranty compensation or protection. We do not take
any responsibility for product damage resulting from improper installation or abnormal usage.
© 2016 GlacialTech Inc.
All rights reserved. All brand names and trademarks are the properties of their respective owners.
The specifications are subject to change without notice.
For further information please visit official website : www.GlacialLight.com
AC power cord Dimming cable
The setup process should be executed by qualified(certified) engineers.
We suggest to wear the clean gloves during the process of installation.
If the external flexible cable or cord of this luminaire is damaged, it shall be exclusively replaced by the
manufacturer or his service agent or a similar qualified person in order to avoid a hazard.
Prior to installation, remove the AC power.
Do not touch the reflector and LED CoB when during the process of installation.
1.
2.
3.
Blue Brown
N L
Blue Brown
NLDIM-
%ODFN 5HG
DIM+
DIM-
:KLWH %OXH
DIM+
(1.)
(2.)
(1.)
(2.)
(1.)
(2.)
(3.)
(4.)
Make the AC power cord and dimming cable of the ceiling
mount through the grommet on the power base.
Connect the AC power cord to the connector on the power
base.
Connect the dimming cable to the connector on the power
base. (If not require dimming function, please ignore this step.)
Fasten the screws on the connector.
Attached the power connector and hook the safety
steel wire of the lighting fixture to the power base.
Use M5 screws to fix the lighting fixture and the
power base.
D
F
E
Blue
Brown
N
L
DIM-
%ODFN 5HG
DIM+
CAUTIONS
Power
connector
Safety
steel wire
internal AC
power cord Dimming
cable
ceiling mount
Installation of suspension accessory


