manuals.online logo
Brands
  1. Home
  2. •
  3. Brands
  4. •
  5. Glasdon
  6. •
  7. Cleaning Equipment
  8. •
  9. Glasdon NEXUS 100 Quick start guide

Glasdon NEXUS 100 Quick start guide

NEXUS 100 CUP RECYCLING STATION
OPERATIONAL INSTRUCTIONS
NEXUS 100 CUP RECYCLING STATION
1.
Using the nger lip at the front
of the lid, lift the lid upwards.
OPENING DOOR / CHECKING FILL LEVEL OF CUP STACKERS
Lift the lid to the upright position
until the lid is held by the stay
feature.
Tilt the door forward until
the door is held in the open
position.
2. 3.
®
Ensure that all personnel read the points listed within this leaet and that a copy is given to staff involved with
the installation and maintenance of this product. Glasdon recommends that a full Health and Safety analysis
is carried out prior to installation.
1 of 4
Use the spout to ensure the
reservoir is emptied easily and
neatly.
To remove the cups, move the
quick release 45 degrees to the
right.
Remove the reservoir using the
handle on the top, remove
from the side pod to empty.
Remove each cup stacker from
the bar at the rear of the bin
body.
2 of 4
REMOVING / EMPTYING THE CUP STACKERS WITH NO BAG
REMOVING / EMPTYING THE LIQUID RESERVOIR, WASTE LINER & DRIP TRAY
4. 5.
7. 8.
The reservoir has a large opening
and is easily cleaned with warm
soapy water.
9.
Remove the left side pod lid.
6.
Return the reservoir and lid
to complete the emptying
procedure.
10.
Remove the right side pod lid.
11.
3 of 4
Remove the 8ltr liner for emptying
and cleaning.
The door comes complete with a
drip tray to collect any spills and
is removable for ease of
cleaning.
12. 14.
Return the liner and lid to
complete the emptying
procedure.
13.
INSERTING A SACK WITHIN THE BIN BODY
Rest each cup stacker against
the rear side of the door within
the drip tray.
Tilt the door open. Remove
each cup stacker from the steel
bar at the rear of the bin.
16. 17.
Lift the lid to the upright position
until the lid is held by the stay
feature.
15.
Place each cup stacker within
the sack resting them on the
steel bar.
19.
Place the sack inside of the bin
resting one half of the sack on
the steel bar.
18.
Ensure the sack is held within the
bin body, close the door and lid
to secure the sack in place.
20.
.
Issue 1 - November 2017 - Stock No. C000/0509 - DWG No. 07B-371-21
NEXUS ARE TRADEMARKS OR REGISTERED TRADEMARKS OF GLASDON GROUP OR ITS SUBSIDIARIES
IN THE U.K. AND OTHER COUNTRIES
A planned maintenance schedule or regular inspection is
recommended, replacing components as necessary.
Replacement components are available direct from GLASDON.
GLASDON cannot be held responsible for claims arising from incorrect
installation, unauthorised modications or misuse of the product.
© Copyright November 2017
Glasdon UK Ltd reserve the right to alter specications without prior notice.
4 of 4
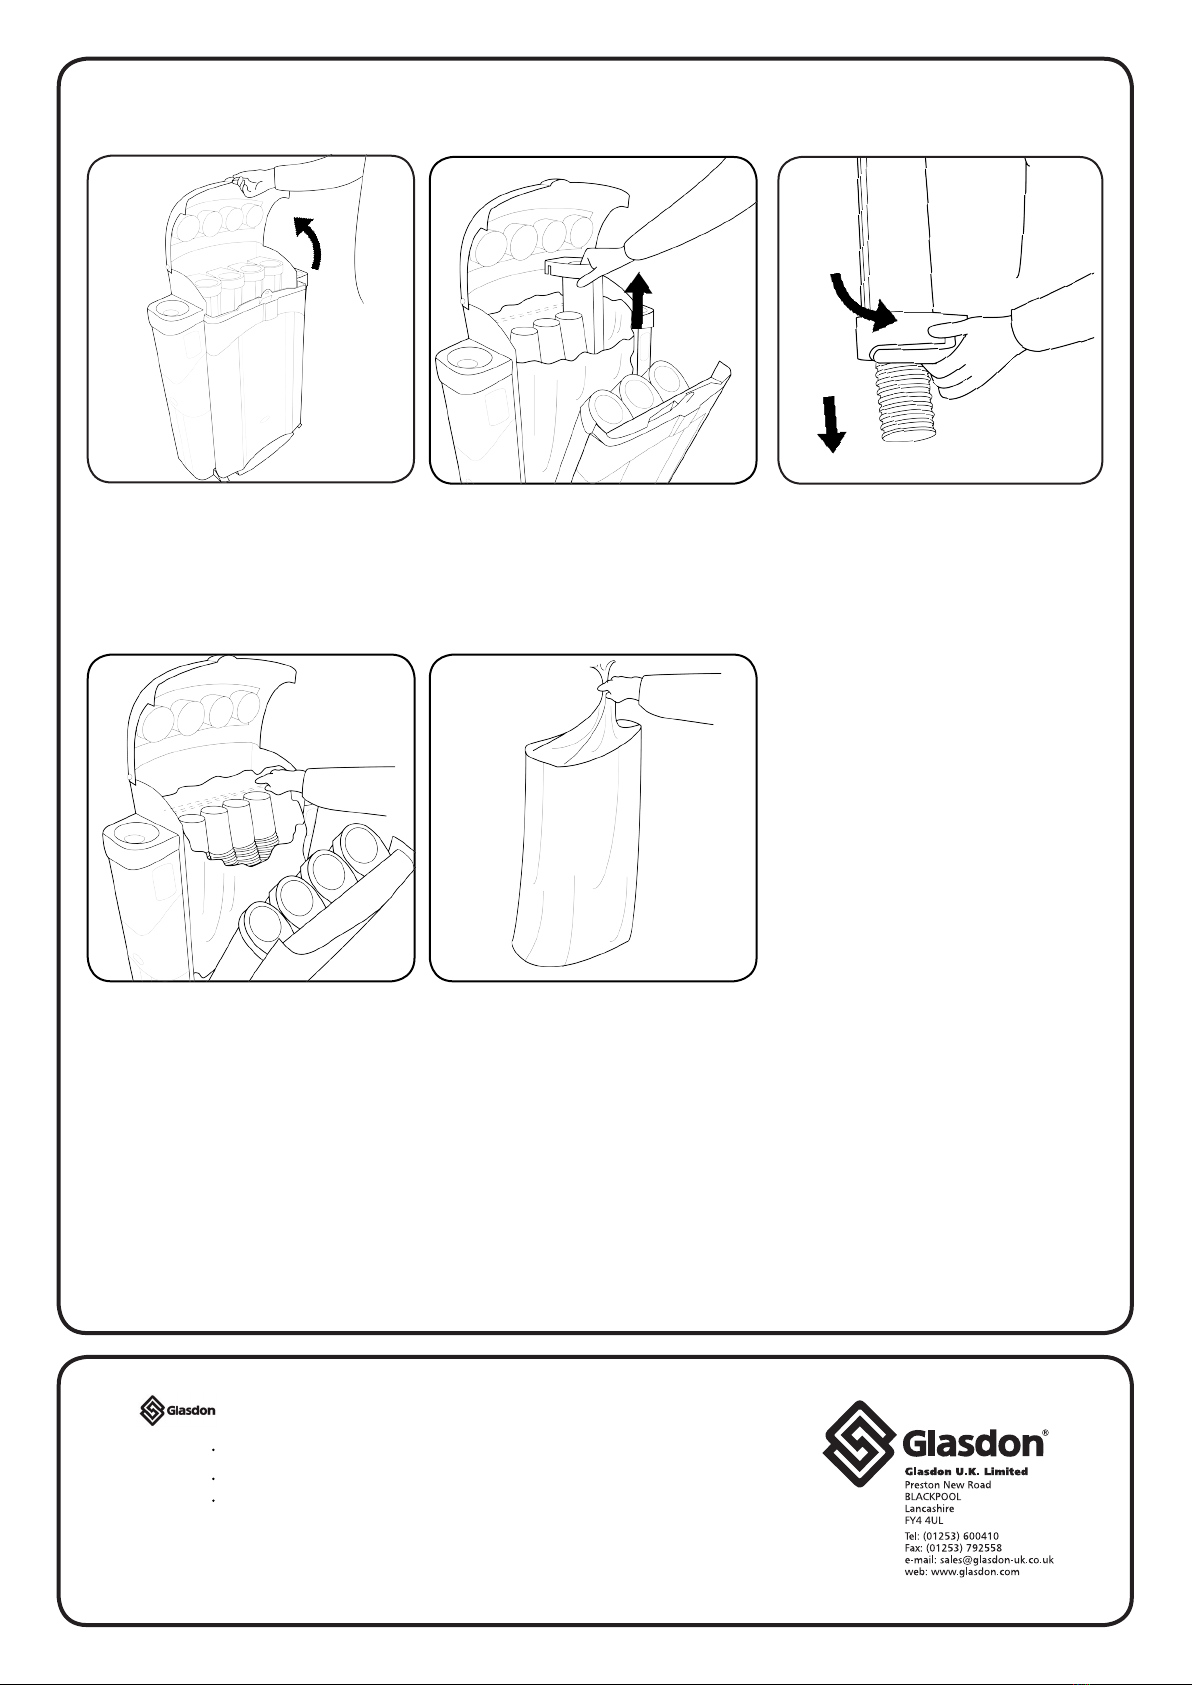
EMPTYING CUPS WITH A SACK IN THE BIN BODY
23.
Lift the lid to the upright position
until the lid is held by the stay
feature.
21.
Repeat steps 22-23 for all 4 cup
stackers.
24.
Lift the cup stacker from the
steel bar.
22.
To remove the cups, move the
quick release 45 degrees to
the right. Rest the empty cup
stacker inside the drip tray.
Remove the bagged stacks of
cups for recycling. Refer to steps
15-20 to place a new sack in the
bin
25.

Popular Cleaning Equipment manuals by other brands

ECOVACS AIRBOT Z1 instruction manual

ECOVACS

ECOVACS AIRBOT Z1 instruction manual

Ghibli SAKURA 231 STEAM KIT instruction manual

Ghibli

Ghibli SAKURA 231 STEAM KIT instruction manual

IBS Scherer M-500 Translation of the original instructions

IBS Scherer

IBS Scherer M-500 Translation of the original instructions

Hizero F1 user manual

Hizero

Hizero F1 user manual

US Steam Eagle Operational guide

US Steam

US Steam Eagle Operational guide

Pahlen 31225 Installation instruction

Pahlen

Pahlen 31225 Installation instruction

Samsung VCA-SAE90A user manual

Samsung

Samsung VCA-SAE90A user manual

Getinge 46-2 installation instructions

Getinge

Getinge 46-2 installation instructions

Kärcher PSU 4-18 quick start guide

Kärcher

Kärcher PSU 4-18 quick start guide

Rawlins KaiVac 1200 Series Operator and parts manual

Rawlins

Rawlins KaiVac 1200 Series Operator and parts manual

Parkside PDRP 6.2 B2 Translation of the original instructions

Parkside

Parkside PDRP 6.2 B2 Translation of the original instructions

AquaPur AFR 3 A1 operating instructions

AquaPur

AquaPur AFR 3 A1 operating instructions

Microdyn Nadir BIO-CEL EASY user manual

Microdyn Nadir

Microdyn Nadir BIO-CEL EASY user manual

Brunswick Authority22 Service bulletin

Brunswick

Brunswick Authority22 Service bulletin

Kwunphi Kwun-B10L2 manual

Kwunphi

Kwunphi Kwun-B10L2 manual

Nilfisk-Advance Griff user guide

Nilfisk-Advance

Nilfisk-Advance Griff user guide

Ferm TBA1002 Original instructions

Ferm

Ferm TBA1002 Original instructions

RIDGID K-380 operating instructions

RIDGID

RIDGID K-380 operating instructions

manuals.online logo
manuals.online logoBrands
  • About & Mission
  • Contact us
  • Privacy Policy
  • Terms and Conditions

Copyright 2025 Manuals.Online. All Rights Reserved.