manuals.online logo
Brands
  1. Home
  2. •
  3. Brands
  4. •
  5. Glatz
  6. •
  7. Patio Furniture
  8. •
  9. Glatz SUN COMFORT PENDOLINO User manual

Glatz SUN COMFORT PENDOLINO User manual

Gebrauchsanweisung
Suncomfort Pendolino Sonnenschirm
Mode d’emploi
Parasol Suncomfort Pendolino
Istruzioni per l’uso
Ombrellone Suncomfort Pendolino
Instructions for use
Suncomfort Pendolino Sunshade
IT
Gentile cliente,
Ci congratuliamo e La ringraziamo per aver acquistato l’ombrellone a braccio laterale SUNCOMFORT-
PENDOLINO. Per poter trascorrere molte giornate di sole all’ombra del nostro ottimo prodotto, la preghiamo
di leggere attentamente le presenti istruzioni per l’uso.
Grazie.
In ogni momento della giornata – un occasione di relax – al fresco dell’ombra
Montaggio dell’ombrellone
a Per montare in modo sicuro l’albero 1sono adatte basi Bcon almeno 75 kg di peso, ø albero
dell’ombrellone 47 mm e un dispositivo di fissaggio anti-graffio.
b Controllare che non ci siano oggetti o persone nella zona in cui si aprirà l’ombrellone.
Spingere in avanti il braccio portante 5 fino a quando si incastra.
c Disporre allontanandoli l’uno dagli altri la stoffa e i saettoni. In questo modo risulta più facile aprire
l’ombrellone la prima volta.
d Girando la manovella F– in senso orario – l’ombrellone si apre in modo facile e comodo.ATTENZIONE:
l’ombrellone è aperto del tutto quando il perno di scorrimento 7si è inserito completamente nel tubo a
corona 8. Non serrare eccessivamente la manovella! Eventuali danni non sono coperti dalla garanzia.
Orientare e girare l’ombrellone
a L’ombrellone può essere orientato a destra e a sinistra e quindi seguire i raggi del sole.
b Rotazione a 360º – Allentare la vite di serraggio Isul tubo della base. Ruotare l’ombrellone nella
direzione desiderata. Riavvitare la vite di serraggio I.
c Inclinare l’ombrellone – allentare la leva di bloccaggio e con l’aiuto della maniglia dell’asta 
orientare l’ombrellone nella posizione desiderata. Riavvitare la leva di bloccaggio .
Chiudere l’ombrellone
a Controllare che non ci siano oggetti o persone nella zona in cui si chiuderà l’ombrellone.
b Per prima cosa portare in posizione orizzontale l’ombrellone (allentare la leva di bloccaggio ).
c Girare la manovella Fin senso antiorario fino a che l’ombrellone è completamente chiuso.
d Allentare la leva di bloccaggio e portare indietro il braccio portante 5e l’ombrellone .
Per poter sfruttare il più a lungo possibile l’ombrellone SUNCOMFORT-PENDOLINO, si consiglia di proteggere
l’ombrellone da pioggia e vento con un rivestimento. Si prega di ricordare che tale rivestimento non deve
essere collocato quando l’ombrellone è ancora bagnato.
GB
Dear Customer,
We congratulate you on the purchase of our SUNCOMFORT-PENDOLINO side post parasol and offer you our
sincere thanks. In order that you may enjoy many beautiful, sunny days in the shade of our high-quality pro-
duct please read the following ‘Instructions for Use’ carefully.
Thank you.
At any time of the day – comfortable relaxation – in the cool shade
Erect the parasol
a Suitable equipment for erecting the mast 1safely is as follows: a pedestal 2, with a minimum weight of
75 kg, a 47 mm ø parasol mast and a scratch-free fixing clamp.
b When opening the parasol please make sure that there are no objects or people in the vicinity. Lift the
support arm 5and push forward until it engages.
c Gently open out the material and the struts. This makes it easier to open the parasol for the first time.
d By turning the crank handle Fclockwise the parasol opens easily and smoothly. NOTE: The parasol is
fully open when the sliding pin 7has entered fully into the pole 8. Do not over crank the handle! Where
applicable such damage is not covered by the guarantee.
Tilting and rotating the parasol
a The parasol section can be tilted in any direction from left to right and can therefore be adapted to
the position of the sun.
b 360º rotation – loosen the fixing bolt Ion the mast. Rotate the parasol to the desired position. Re-tighten
the fixing bolt I.
c To tilt the parasol section – loosen the release handle and tilt the parasol section to the desired
position with the aid of the bar handle . Re-tighten the release handle .
Closing the parasol
a When closing the parasol please make sure that there are no objects or people in the vicinity.
b First return the parasol section to the horizontal position (loosen release handle ).
c Turn the crank handle F anti-clockwise until the parasol section  is fully closed.
d Loosen the release handle and swing the support arm 5and the parasol section back into position.
In order that your SUNCOMFORT-PENDOLINO side post parasol can provide you with pleasure for a long time
we recommend that you protect the parasol against wind and weather with a protective cover. Please note
that the protective cover should not be placed over a wet parasol.
Safety!
Close the parasol when the weather is windy. Do not leave parasols open when unattended.
No guarantee or liability is accepted for wind damage.
Sicurezza!
Quando si alza il vento chiudere l’ombrellone. Non lasciare aperti gli ombrelloni senza
controllo. Si declinano ogni responsabilità e diritto a garanzia in caso di danni provocati
dal vento.
PENDOLINO
DE
Sehr geehrter Kunde
Wir gratulieren Ihnen zum Kauf unseres Freiarmschirmes SUNCOMFORT-PENDOLINO und danken Ihnen recht
herzlich dafür. Damit Sie viele schöne, sonnige Tage im Schatten unseres qualitativ hervorragenden Produktes
verbringen können, bitten wir Sie diese Gebrauchsanweisung sorgfältig zu lesen.
Besten Dank.
Zu jeder Tageszeit – komfortable Entspannung – im kühlen Schatten
Schirm aufstellen
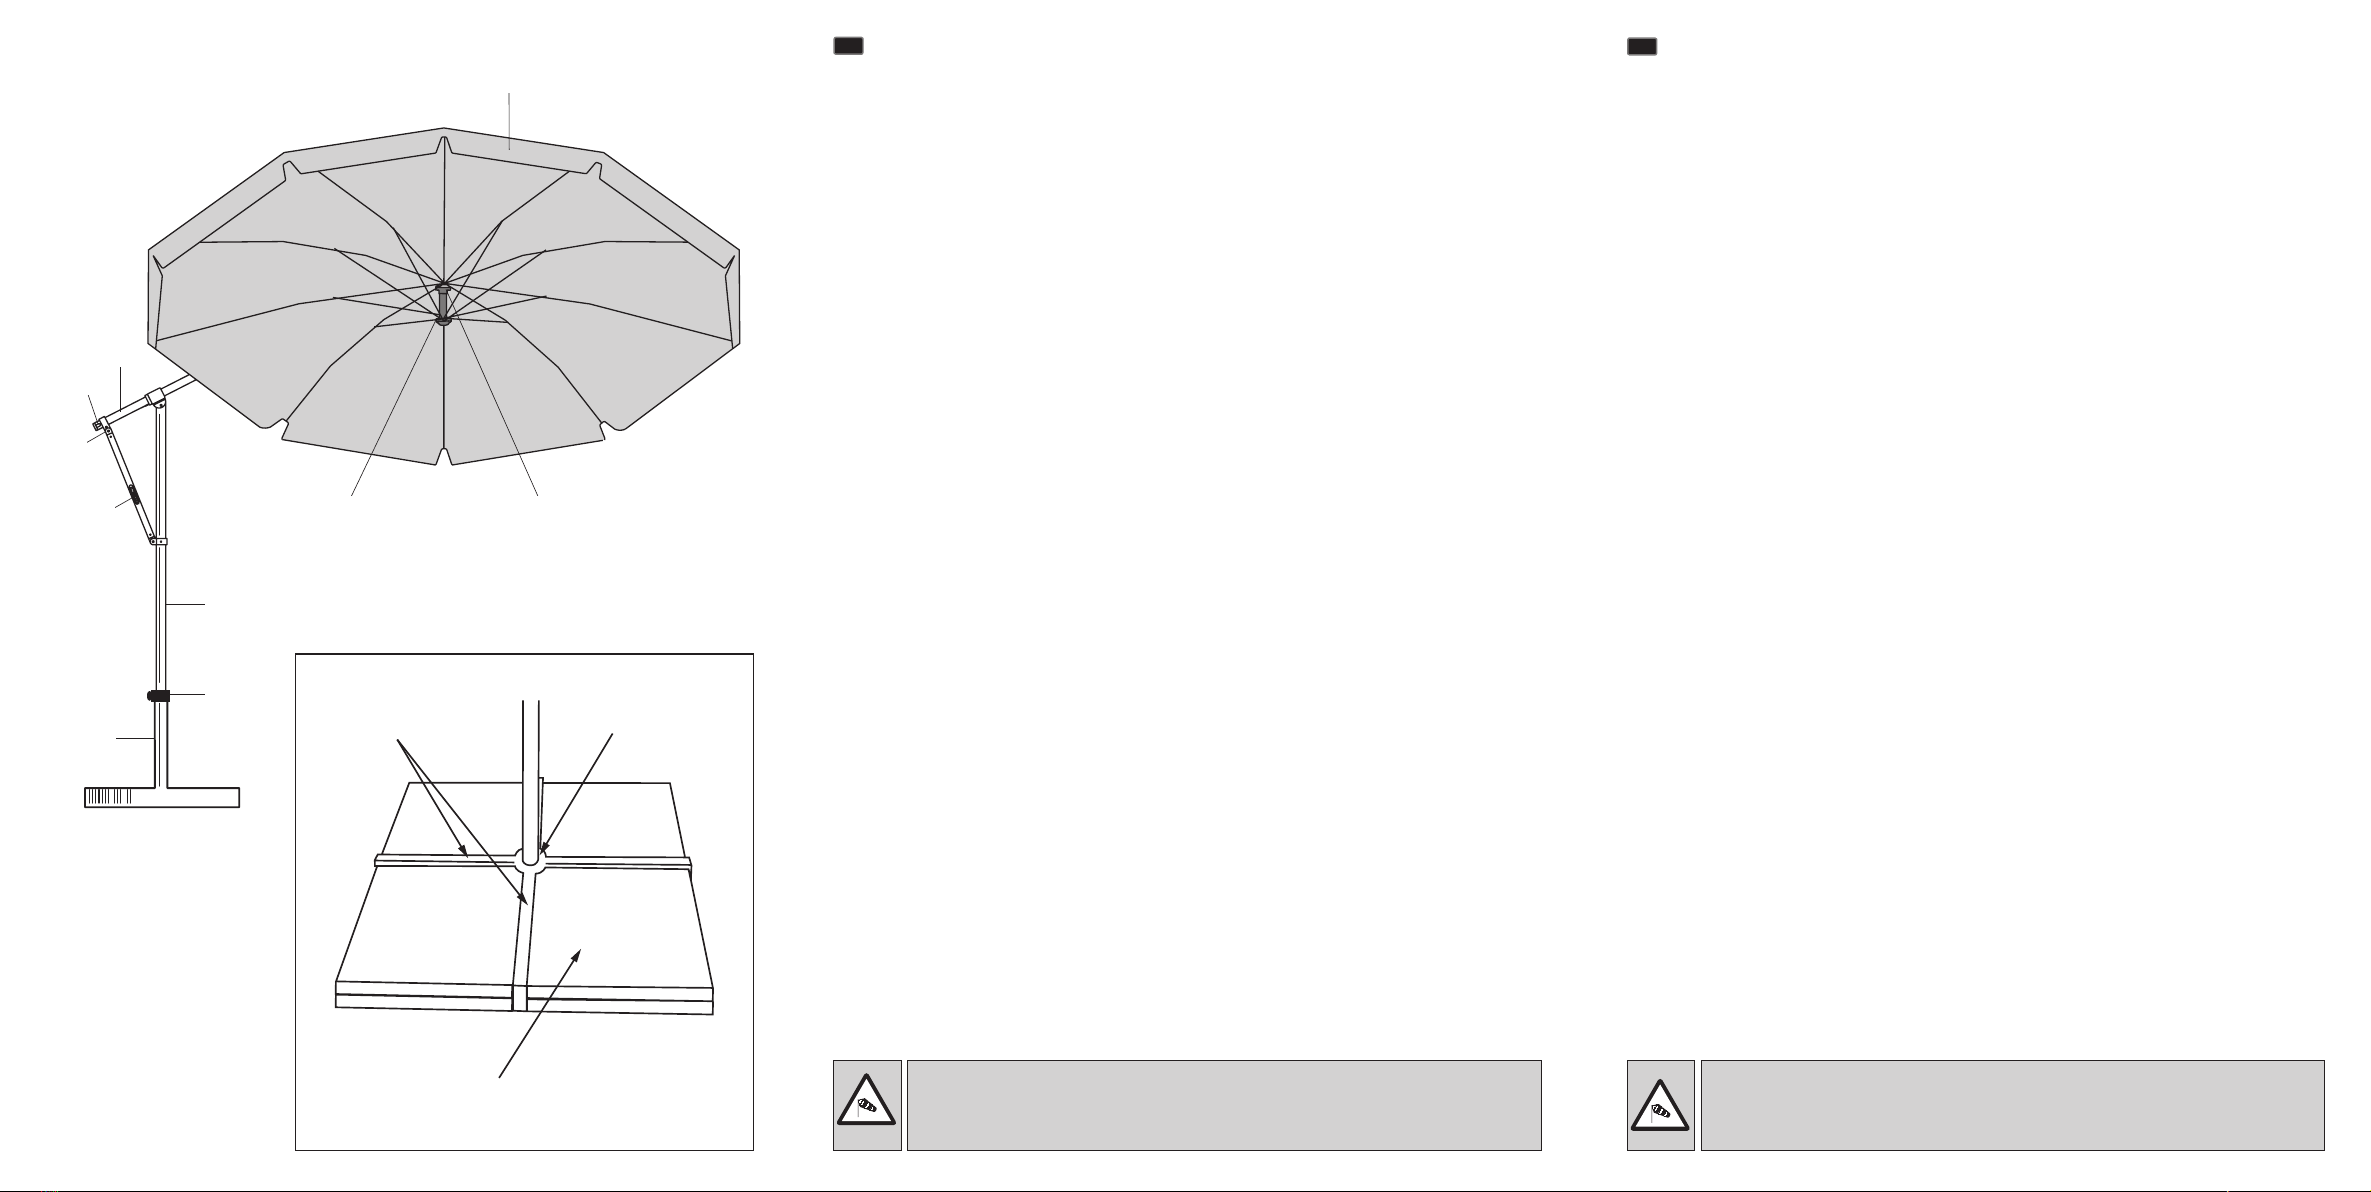
a Zum sicheren aufstellen des Mastes 1eignen sich Sockel 2 mit mindestens 75 kg Gewicht, ø Schirmmast
47 mm und einer kratzfreien Feststellklemme.
b Achten Sie darauf, dass sich keine Gegenstände und Personen im Öffnungsbereich befinden. Den Tragarm 5
durch Anheben soweit nach vorne schieben, bis dieser einrastet.
c Den Stoff und die Streben leicht auseinander spreizen. Dadurch lässt sich der Schirm beim ersten Mal
leichter öffnen.
d Durch Drehen der Kurbel F– im Uhrzeigersinn – öffnet sich der Schirm leicht und bequem.ACHTUNG: Der
Schirm ist ganz geöffnet, wenn der Schieberzapfen Gganz in das Kronenrohr Heingefahren ist. Kurbel
nicht überdrehen! Allfällige Schäden fallen nicht unter die Gewährleistung.
Neigen und Drehen des Schirmes
a Das Schirmteil ist universell nach links und rechts neigbar und lässt sich dadurch dem Sonnenstand anpassen.
b Drehung 360º – Feststellschraube 9am Sockelrohr lösen. Schirm in die gewünschte Richtung drehen.
Feststellschraube 9wieder anziehen.
c Schirmteil
neigen – Klemmhebel Clösen und mit Hilfe des Stabgriffes das Schirmteil in die
gewünschte Position neigen. Klemmhebel Cwieder anziehen.
Schliessen des Schirmes
a Achten Sie darauf, dass sich keine Gegenstände und Personen im Schliessbereich befinden.
b Zuerst Schirmteil wieder waagrecht stellen.
c Kurbel
Fgegen den Uhrzeigersinn drehen bis Schirmteil  vollständig geschlossen ist.
d Klemmhebel
Clösen und Tragarm 5mit Schirmteil zurückschwingen.
Damit Sie lange Zeit an Ihrem SUNCOMFORT-PENDOLINO Freiarmschirm Freude haben, empfehlen wir den
Schirm mit einer Schutzhülle vor Wind und Wetter zu schützen. Bitte beachten Sie, dass die Schutzhülle nicht
auf einen nassen Schirm aufgezogen werden darf.
Sicherheit!
Bei aufkommendem Wind Schirm schliessen. Unbeaufsichtigte Schirme dürfen nicht geöffnet
bleiben. Keine Gewährleistung oder Haftung bei Windschäden.
FR
Cher client,
Nous vous félicitons et nous vous remercions sincèrement pour l’achat de notre parasol excentré
SUNCOMFORT-PENDOLINO.Afin que vous puissiez profiter de nombreuses belles journées ensoleillées à
l’ombre de notre produit d’excellente qualité, nous vous prions de lire ce mode d’emploi avec attention.
Merci beaucoup.
A toute heure de la journée – détente confortable – à la fraîcheur de l’ombre
Installer le parasol
a Pour installer le mât 1en toute sécurité, le socle 2devra être chargé d’un poids minimum de 75 kg,
mât ø 47 mm et une pince de blocage qui ne raye pas.
b Veillez à ce qu’il n’y ait ni personnes, ni objets dans la zone d’ouverture. En le soulevant, avancer le bras
portant
5le plus possible en avant jusqu’à enclenchement.
c Ecarter légèrement la toile et les baleines. Le parasol sera ainsi plus facile à ouvrir la première fois.
d En tournant la manivelle Fdans le sens des aiguilles d’une montre, le parasol est facile et confortable à
ouvrir. ATTENTION: Le parasol est entièrement ouvert dès que le curseur Gse trouve complètement dans
le tube du chapiteau H. Ne pas forcer sur la manivelle! Les dommages éventuels en résultant ne seront
pas couverts par la garantie.
Incliner et faire pivoter le parasol
a La partie parasol est inclinable de manière universelle sur la droite et sur la gauche, s’adaptant ainsi à la
position du soleil.
b Rotation 360º – Desserrer la vis de blocage 9sur le tube au niveau du socle.Tourner le parasol dans la
direction souhaitée. Resserrer la vis de blocage 9.
c Incliner la partie parasol – Desserrer le levier de blocage Cpuis incliner la partie parasol dans la position
souhaitée à l’aide de la poignée . Resserrer le levier de blocage C.
Fermer le parasol
a Veillez à ce qu’il n’y ait ni personnes, ni objets dans la zone de fermeture.
b Commencer par remettre la partie parasol  à l’horizontale (Desserrer le levier de blocage C).
c Tourner la manivelle F dans le sens inverse à celui des aiguilles d’une montre jusqu’à ce que la partie
parasol soit complètement fermée.
d Desserrer le levier de blocage C puis ramener le bras portant 5et le parasol en arrière.
Afin que votre parasol excentré SUNCOMFORT-PENDOLINO vous réjouisse pendant longtemps, nous vous
recommandons de le protéger contre les intempéries à l’aide d’une housse. Veillez à ne pas mettre la housse
sur un parasol humide.
Sécurité!
Fermer le parasol en cas de vent. Ne pas laisser les parasols ouverts sans surveillance.
En cas de dommages dus au vent, nous ne pourrons être tenus responsables et il n’y aura
pas de prise en charge par la garantie.
1.
Kreuzfüsse
ineinander legen
3.
Unbedingt 8 St. Gehwegplatten 40 x 40 cm einlegen,
bevor der Schirm aufgestellt wird. KIPPGEFAHR!
2.
Sockelrohr mit
den 4 Schrauben
festschrauben
8

8
7
5
4

6
1
9
2

Other Glatz Patio Furniture manuals

Glatz Suncomfort Pendolino User manual

Glatz

Glatz Suncomfort Pendolino User manual

Glatz Palazzo M8 User manual

Glatz

Glatz Palazzo M8 User manual

Glatz Suncomfort Push Up User manual

Glatz

Glatz Suncomfort Push Up User manual

Glatz SUN COMFORT RUSTICO Manual

Glatz

Glatz SUN COMFORT RUSTICO Manual

Glatz SUN COMFORT PSV16 Install guide

Glatz

Glatz SUN COMFORT PSV16 Install guide

Glatz Suncomfort Shell Turn User manual

Glatz

Glatz Suncomfort Shell Turn User manual

Glatz AMBIENTE NOVA User manual

Glatz

Glatz AMBIENTE NOVA User manual

Glatz SUNCOMFORT SUNFLEX User manual

Glatz

Glatz SUNCOMFORT SUNFLEX User manual

Glatz Bogaart Sunwing C+ User manual

Glatz

Glatz Bogaart Sunwing C+ User manual

Glatz AURA User manual

Glatz

Glatz AURA User manual

Glatz PALAZZO STYLE/E User manual

Glatz

Glatz PALAZZO STYLE/E User manual

Glatz Fortino User manual

Glatz

Glatz Fortino User manual

Glatz Pendalex P+ User manual

Glatz

Glatz Pendalex P+ User manual

Glatz SUN COMFORT SUNFLEX User manual

Glatz

Glatz SUN COMFORT SUNFLEX User manual

Glatz PALAZZO STYLE/E User manual

Glatz

Glatz PALAZZO STYLE/E User manual

Glatz SUN COMFORT VARIOFLEX User manual

Glatz

Glatz SUN COMFORT VARIOFLEX User manual

Glatz SUN COMFORT FLEX ROOF Manual

Glatz

Glatz SUN COMFORT FLEX ROOF Manual

Glatz Suncomfort Flex Roof User manual

Glatz

Glatz Suncomfort Flex Roof User manual

Glatz SUN COMFORT VARIOFLEX User manual

Glatz

Glatz SUN COMFORT VARIOFLEX User manual

Glatz Suncomfort Rustico User manual

Glatz

Glatz Suncomfort Rustico User manual

Glatz SOMBRANO S User manual

Glatz

Glatz SOMBRANO S User manual

Glatz SUN COMFORT SUNFLEX User manual

Glatz

Glatz SUN COMFORT SUNFLEX User manual

Glatz Alu-Top User manual

Glatz

Glatz Alu-Top User manual

Glatz Fortello LED User manual

Glatz

Glatz Fortello LED User manual

Popular Patio Furniture manuals by other brands

LAZBOY D71 M80908 owner's manual

LAZBOY

LAZBOY D71 M80908 owner's manual

Country Living S74307 owner's manual

Country Living

Country Living S74307 owner's manual

LAZBOY Sears Madeline D71 M20918 Use and care guide

LAZBOY

LAZBOY Sears Madeline D71 M20918 Use and care guide

Simply Shade Ibiza SSUWA811SS instruction manual

Simply Shade

Simply Shade Ibiza SSUWA811SS instruction manual

Shadowspec SU3 owner's manual

Shadowspec

Shadowspec SU3 owner's manual

Loll Designs Adirondack Bench Assembly instructions

Loll Designs

Loll Designs Adirondack Bench Assembly instructions

Gloster HALO quick start guide

Gloster

Gloster HALO quick start guide

siena GARDEN LEO N+ Assembly instruction

siena GARDEN

siena GARDEN LEO N+ Assembly instruction

Blooma Kiwi 3663602936701 Assembly instructions

Blooma

Blooma Kiwi 3663602936701 Assembly instructions

Merax BREED SOFA SET WF191435 Assembly instruction

Merax

Merax BREED SOFA SET WF191435 Assembly instruction

BCP SKY5897 instruction manual

BCP

BCP SKY5897 instruction manual

Alice's Garden HARDELOT BU300 quick start guide

Alice's Garden

Alice's Garden HARDELOT BU300 quick start guide

Mocka Tropical Beach Umbrella Assembly instructions

Mocka

Mocka Tropical Beach Umbrella Assembly instructions

FLORABEST 289427 Assembly and Safety Advice

FLORABEST

FLORABEST 289427 Assembly and Safety Advice

Treasure Garden UM801 Assembly and operation guide

Treasure Garden

Treasure Garden UM801 Assembly and operation guide

Marquee 3M CANTILEVER UMBRELLA Assembly instructions

Marquee

Marquee 3M CANTILEVER UMBRELLA Assembly instructions

ALDI 4832109840HD Assembly instructions and user's manual

ALDI

ALDI 4832109840HD Assembly instructions and user's manual

YOTRIO 10' Patio Offset Umbrella Assembly manual

YOTRIO

YOTRIO 10' Patio Offset Umbrella Assembly manual

manuals.online logo
manuals.online logoBrands
  • About & Mission
  • Contact us
  • Privacy Policy
  • Terms and Conditions

Copyright 2025 Manuals.Online. All Rights Reserved.