Vibra
LITE12
CALENDAR MODE
Program and keep track of hour, minutes, seconds and
calendar (day of the week, day/date of the month,
month, and year in up to three different time zones.
Time Zone 1, 2 or 3 can be selected to be displayed
on the screen.
Note: Preset alarms will go off based on the time zone
displayed on the screen.
Select the TIME format
12hour = AM/PM time or
24 hour = Military Time
Note: TIME format selected will automatically be
applied to all three time zones.
Select the DATE format (Month followed by the
Day/Date of the Month OR Day/Date of the Month
followed by the Month)
Note: DATE format selected will automatically be
applied to all three time zones.
Calendar Mode Screen Abbreviations:
T-ZONE = Time Zone, hr = Hour, MM = Month, DD =
Day/Date, SU = Sunday, MO = Monday, TU = Tuesday,
WE = Wednesday, TH = Thursday, FR = Friday, SA =
Saturday.
Calendar Mode Programming Instructions:
1) Press the “MODE” button to rotate
to the Calendar Mode screen.
2) Hold down the “SET/RST” button
until “T-ZONE” is displayed at the
top of the screen. The number “1”, “2” or “3” at the
bottom of the screen will be flashing.
3) Use the “ST/STP” button to select the time zone you
want to set.
4) Press the “MODE” button. The hour digit(s) will be
flashing.
5) Use the “ST/STP” button to set the hour. Note: When
using the 12 hour clock, “PM” will be displayed in the
box at the left of the screen when the hour is set for
PM. If the hour is set for AM, the box will be empty.
6) Press the “MODE” button. The minute digit(s) will be
flashing.
7) Use the “ST/STP” button to set the minutes.
8) Press the “MODE” button. The second digit(s) will be
flashing.
9) Use the “ST/STP” button to reset the seconds to zero
(00) if necessary.
10) Press the “MODE” button. The day/date of the month
will be flashing.
11) Use the “ST/STP” button to set the day/date. (1-31)
12) Press the “MODE” button. The month will be flashing.
13) Use the “ST/STP” button to set the month. (1-12)
14) Press the “MODE” button. The last two numbers of
the YEAR will be flashing.
15) Use the “ST/STP” button to set the year.
16) Press the “MODE” button. The number “12” or “24”
will be flashing. (12 = AM/PM 12 hour time OR 24 =
military 24 hour time).
17) Use the “ST/STP” button to set the time format.
18) Press the “MODE” button. The letters “MM:DD” OR
“DD:MM” will be flashing. (Month followed by
Day/Date of the Month =”MM:DD” OR Day/Date of
the Month followed by Month = “DD:MM”).
19) Use the “ST/STP” button to set the DATE format.
20) Press the “SET/RST” button to save programmed
information.
Note: When setting the Calendar Mode, if programming
is interrupted and no button is pushed within 2 minutes,
the flashing will stop and the settings that are shown on
the screen will be held. Finish programming by repeating
steps 1 and 2 and rotating through the other steps to
complete as needed.
To Select the Time Zone to be Displayed in the
Calendar Mode:
1) While in the calendar mode, hold down the “SET/RST”
button until “T-Zone” is displayed at the top of the
screen. The number “1”, “2” or “3” at the bottom of the
screen will be flashing.
2) Use the “ST/STP” button to select the time zone
wanted displayed.
3) Press the “SET/RST” button to lock in the selected
time zone.
Quick Viewing of Additional Time Zones:
While in the calendar mode press the “ST/STP” button to
rotate to the two time zones not currently displayed. If no
button is pushed for approximately five seconds, the
screen will automatically return to the Time Zone that was
set to remain displayed.
ALARM MODE:
Program up to twelve daily alarms.
Alarms are approximately twenty seconds in duration
before stopping automatically. Activated alarms can
be stopped manually by pushing the “ST/STP” button
once.
Alarms will respond with the alert (sound, vibrate or
both) that has been set in the OPTION Mode.
Programmed alarm times will go off daily based on the
Time Zone set to remain displayed in the calendar
mode.
Alarm Mode Screen Abbreviations: ALM = Alarm
Alarm Mode Programming Instructions:
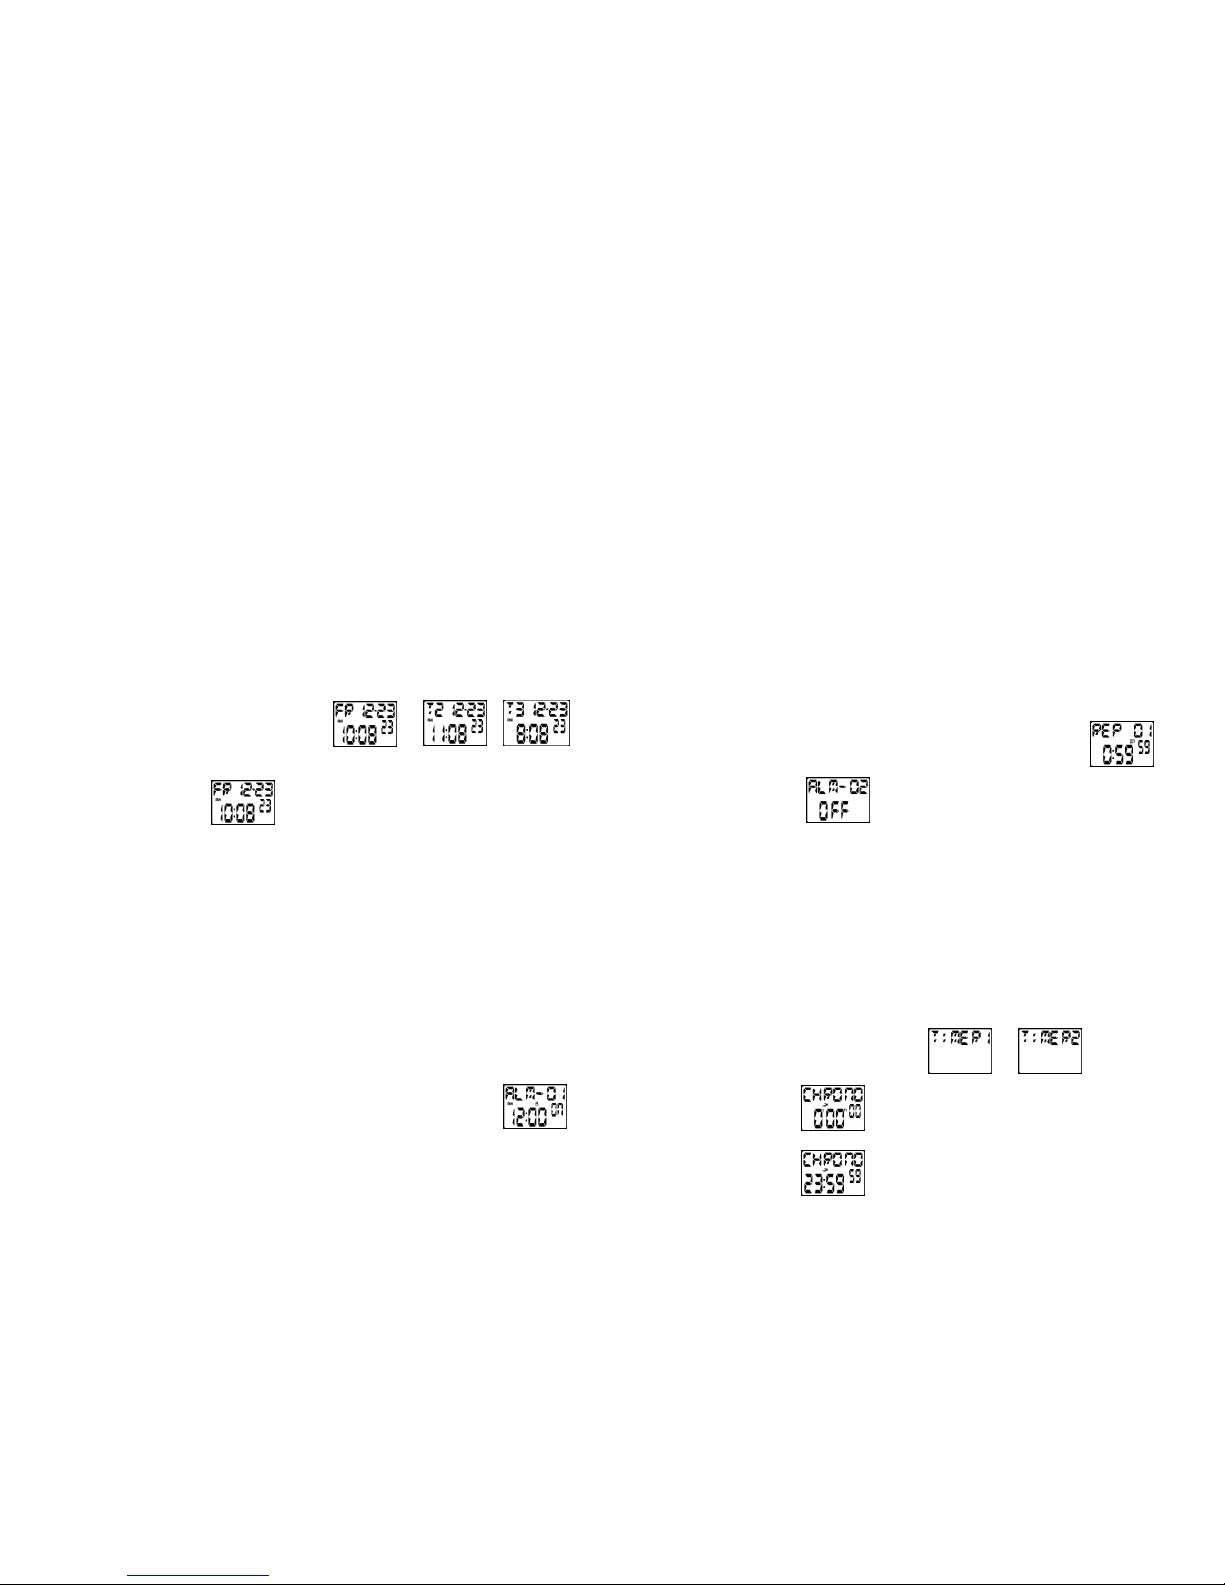
1) Press the “MODE” button until
“ALARM” is displayed at the top
of the screen. After approximately
two seconds “ALM-01” will be
displayed. Alarm One On
2) Hold down the “SET/RST” button until the number “01”
flashes.
3) Use the “ST/STP” button to select the alarm you would
like to set (“01” –“12”).
4) Press the “MODE” button. The hour digit(s) will be
flashing.
5) Use the “ST/STP” button to set the hour.
Note: When using the 12 hour clock, the “PM”
indicator will be displayed in the box at the left side of
the screen. If the hour is set for AM, the box will be
empty.
6) Press the “MODE” button. The minute digit(s) will be
flashing.
7) Use the “ST/STP” button to set the minutes.
8) Press the “SET/RST” button to save programmed
information, OR to advance to the next alarm, press
the “MODE” button while the minutes are flashing and
then press the “ST/STP” button. Repeat steps 4
through 8.
Note: When setting the times in Alarm Mode, if
programming is interrupted and no button is pushed within
2 minutes, the flashing will stop and the settings that are
shown on the screen will be held. If no button pushed
within 2 additional minutes, screen will return to Calendar
Mode automatically.
Turning Alarms On/Off:
1) Press the “MODE” button until “ALARM” is displayed at
the top of the screen. After approximately two
seconds “ALM-01” will be displayed.
2) Use the “SET/RST” button to select the alarm you
would like to turn on/off.
3) Use the “ST/STP” button to change the selected alarm.
Note: When the alarm is on, the alarm time will be
displayed with “On” in the second box on the right side of
the screen. When the alarm is off, “OFF”
is displayed at the bottom of the screen.
Note: To deactivate or re-activate ALL
Alarms, see OPTION Mode
Programming Instructions and select OFF or ON for
Vibration and Sound.
CHRONOGRAPH (STOPWATCH) MODE:
Counts up to 23 hours, 59 minutes and 59 seconds.
Provides single event, time out (pause) and split
timing.
Chronograph Mode Screen Abbreviation:
CHRONO = Chronograph
Chronograph Instructions:
1) Press the “MODE” button until “CHRONO” is displayed
at the top of the screen. After approximately two
seconds, “0‟00”00 will be displayed at the bottom of
the screen.
If a time other than “0‟00”00 is displayed, press the
“ST/STP” button to stop the timer if it is counting up.
When timer is stopped, press the
“SET/RST” button.
2) Press the “ST/STP” to start counting
up. The icon located in the center
box on the screen will be flashing.
3) Press the “ST/STP” button to stop
the timer and record the elapsed
time.
4) Press the “ST/STP” button to resume timing.
Chronograph Split Timing:
1) Reset the Time Display to zero (“0‟00”00) as noted
above.
2) Press the “ST/STP” to start counting up.
3) Pressing the “SET/RST” button will freeze the screen.
The elapsed time can be recorded while the internal
timer continues to count up, but is not displayed.
4) Pressing the “SET/RST” button a second time will
display the total elapsed time. (counting up
continues.)
Note: Chronograph Mode remains on the display. Press
the “MODE” button to rotate to Calendar Mode.
TIMER MODE:
Program a countdown time up to 23 hours, 59 minutes
and 59 seconds on two timers. When the countdown
reaches zero (0:00 00) the alert(s) that are set will
activate and stop automatically. Duration of Timer
One alert is five seconds. Timer Two Alert is 10
seconds. Activated alert can be stopped manually by
pushing the “ST/STP” button once.
Alert can be set for sound, vibrate or both. (Sound and
vibration can be turned on/off in the OPTION mode.)
REPEAT option can be turned “ON or “OFF”. When
REPEAT is turned “ON”, the programmed countdown
time will automatically repeat each time it reaches zero
(0:00 00). The number of times this
has been repeated will be displayed
at the top of the screen.
(up to 99 and rolling over to 0)
Note: If a countdown time of less than thirty seconds
is set to repeat, the alert duration will change to
approximately one second before stopping
automatically.
REMIND option can be turned “ON‟ or “OFF”. When
REMIND option is turned “ON”, an alert approximately
one second in length will be activated at ten minutes
before zero, at 5 minutes before zero and again at 30
seconds before zero.
Timer Mode Screen Abbreviations: TMR = Timer ,
REP = Repetition
Timer Programming Instructions:
1) Press the “MODE” button to select either “TIMER1”
OR “TIMER 2” to be displayed at the top of the screen.
After approximately two seconds “TMR-1” for TIMER
1 OR “TMR-2” for TIMER 2 will be displayed.
2) Hold down the “SET/RST” button until the hour digit(s)
flash.
3) Use the “ST/STP” button to set the hour.
4) Press the “MODE” button. The minute digit(s) will be
flashing.
5) Use the “ST/STP” button to set the minutes.
6) Press the “MODE” button. The second digit(s) will be
flashing.