GME TX670 User manual

Gloss white art stock - 130gsm
Trimmed doc size: 65mm (w) x 126 mm (h) 32 pages
Book to be saddlestiched in 2 places
Printed in CMYK throughout with gloss Aq Varnish
2 watt handheld UHF CB radio
INSTRUCTION MANUAL

PAGE 2 INSTRUCTION MANUAL TX670
CONTENTS
ACCESSORIES ......................................................................3
IMPORTANT INFORMATION...............................................3-5
Possible Issues ................................................................. 6
TELEMETRY CHANNELS........................................................ 7
FEATURES............................................................................ 7
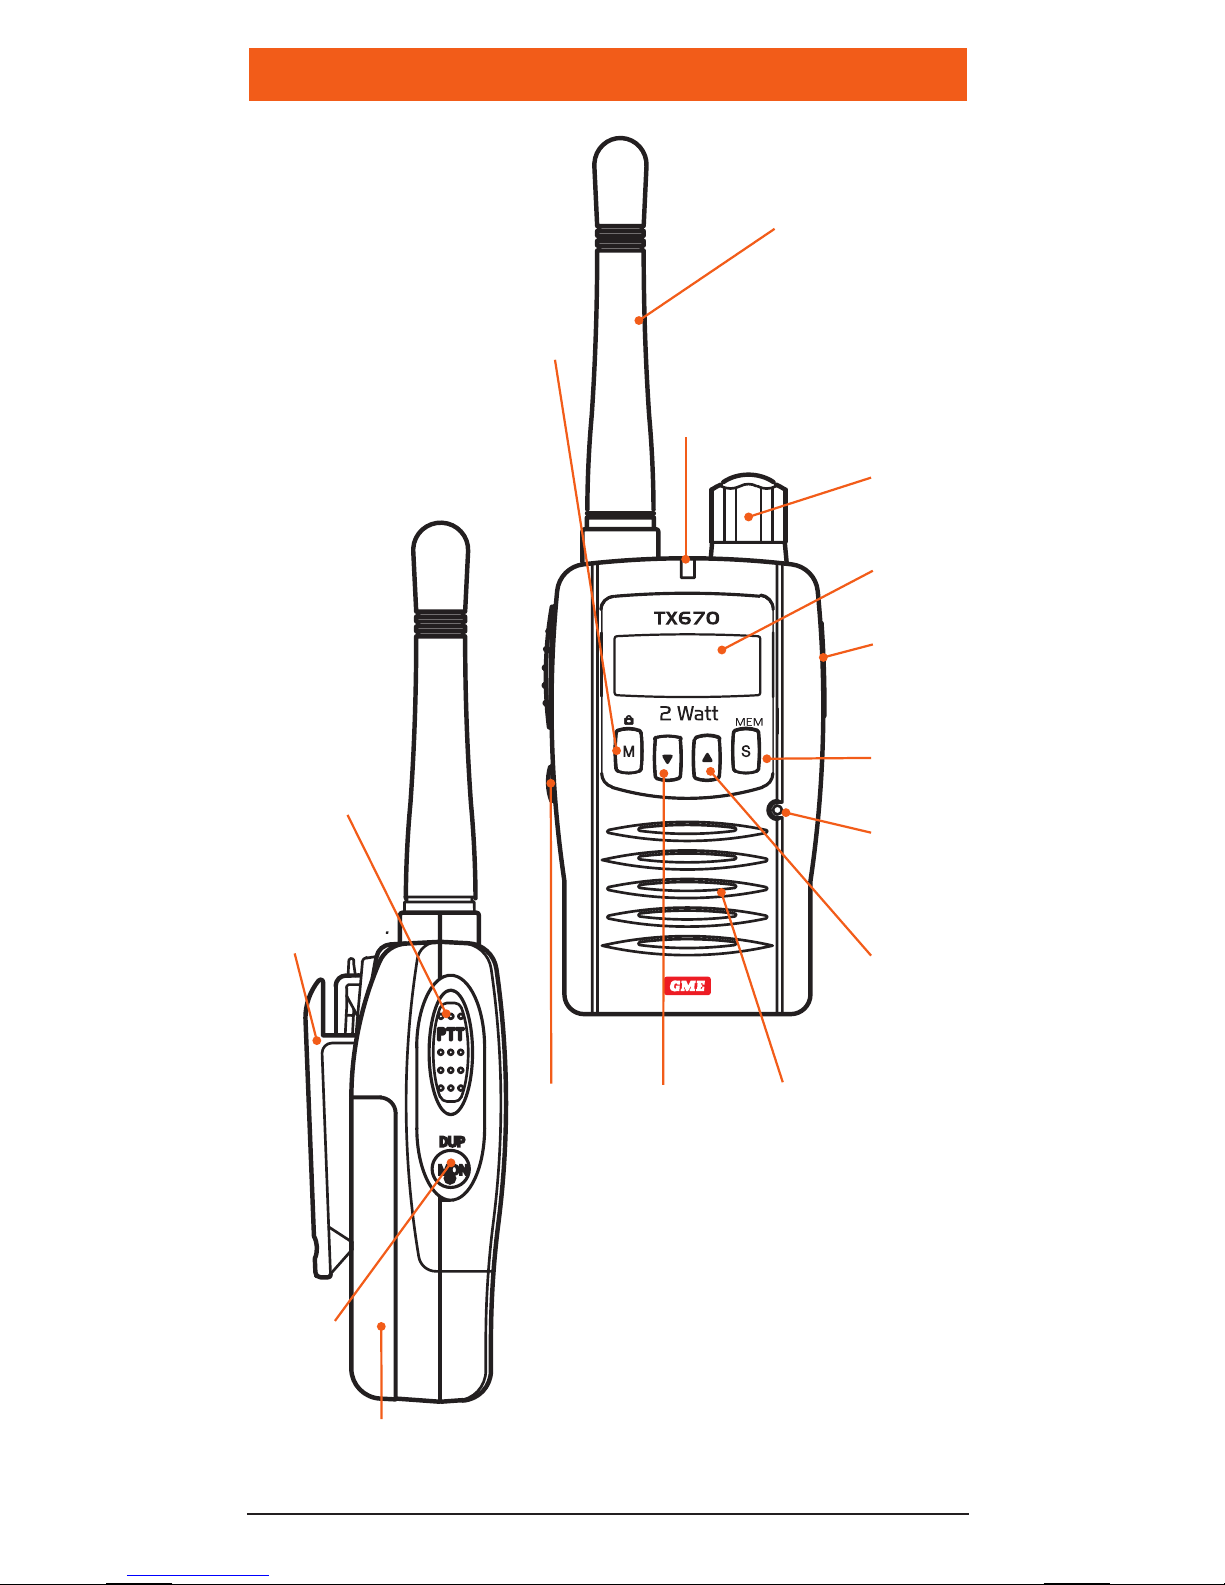
RADIO CONTROLS................................................................ 8
LCD Display .....................................................................9
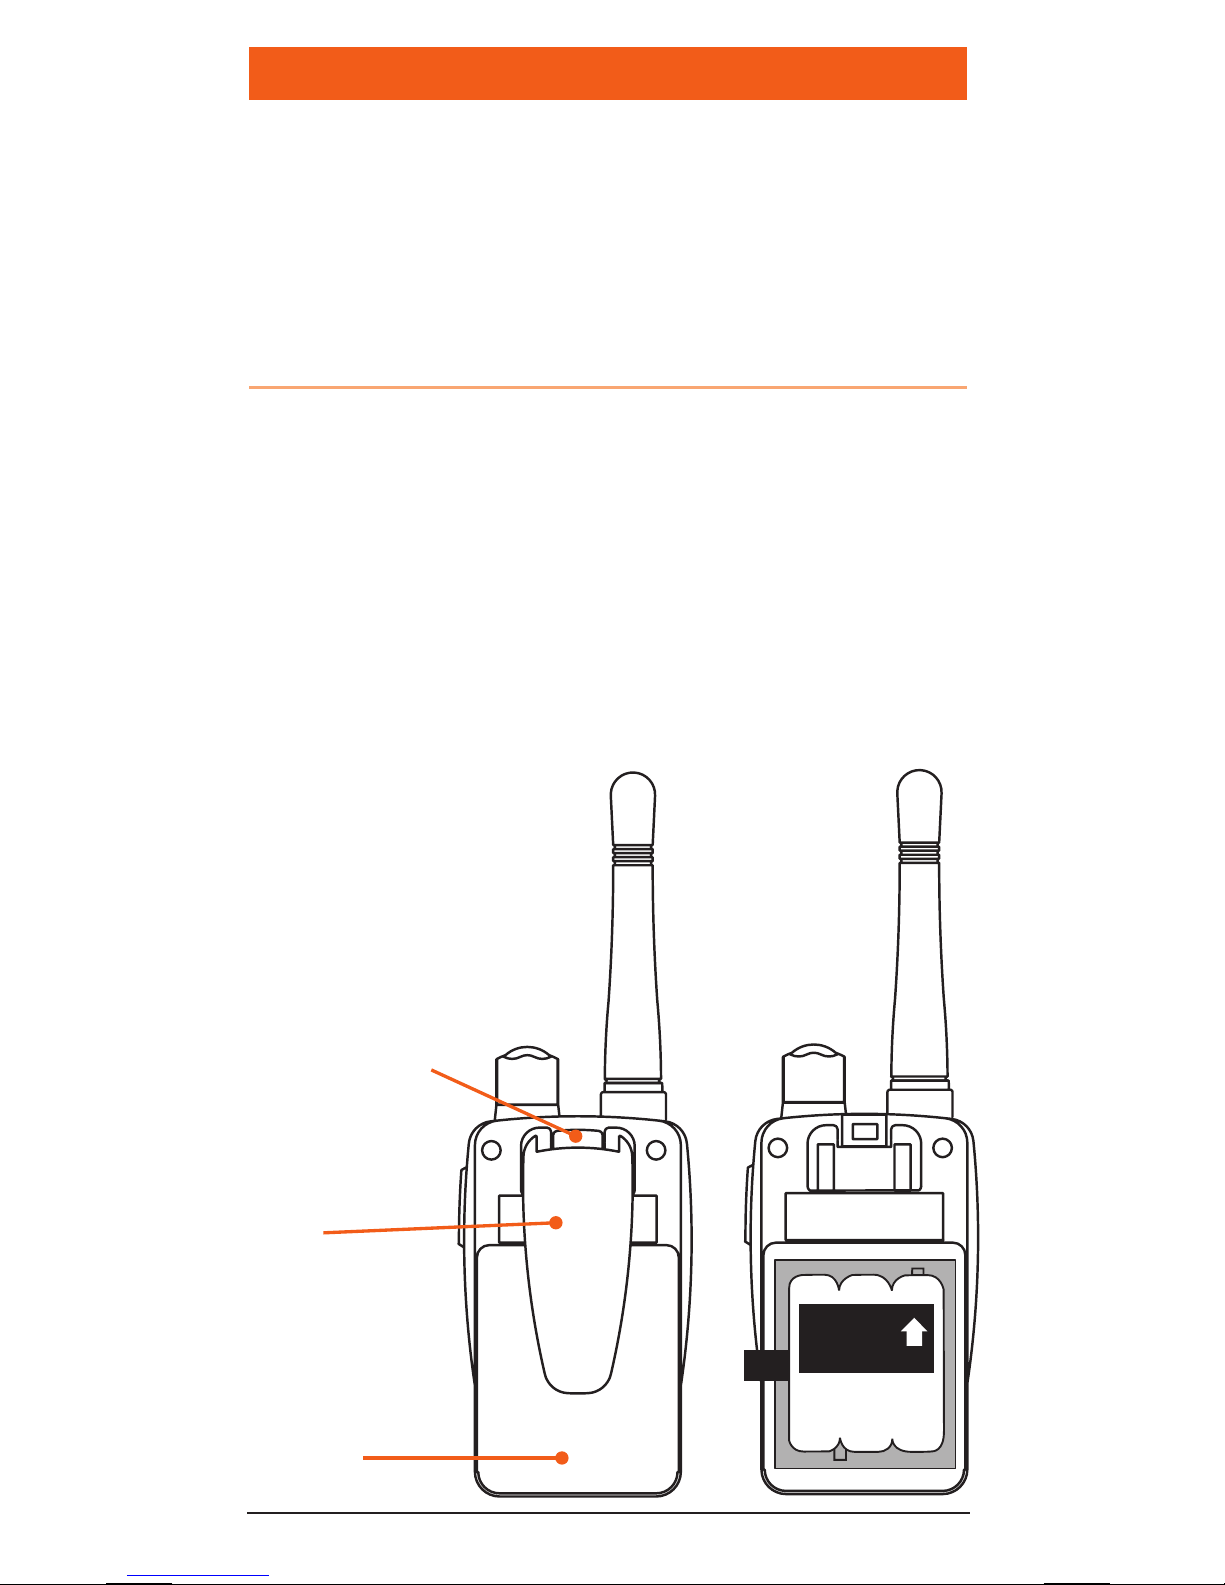
POWERING THE RADIO ...................................................... 10
GENERAL OPERATION........................................................ 13
Power On/Off................................................................. 13
Adjusting the Volume..................................................... 13
Display Lighting ............................................................. 13
Receiving Signals ........................................................... 13
Transmitting................................................................... 14
Duplex/Monitor Key........................................................ 14
Scan/Memory Key .......................................................... 16
Mode/Key-Lock Function ................................................ 18
1. CTCSS Code Selection ................................................ 19
2. Transmitter Power....................................................... 20
3. VOX Settings .............................................................. 21
4. Dual Watch Settings ................................................... 21
5. Squelch Settings......................................................... 22
6. Roger Beep Tone Selection ......................................... 23
7. Button Beep Tone Selection ........................................ 23
8. Call Alarm Selection .................................................. 24
CTCSS TONE FREQUENCIES................................................25
UHF CB OPERATING FREQUENCIES ....................................26
SPECIFICATIONS ................................................................28
GME CONTRACT WARRANTY AGAINST DEFECTS................29

TX670 INSTRUCTION MANUAL PAGE 3
WARNING - SAFETY INFORMATION
ACCESSORIES
SUPPLIED
• TX6702/1wattUHFhandheldradio
with flexible antenna
• 3.6VNi-MHrechargeablebatterypack
• 240VACadapter
• Instructionmanual
OPTIONAL
• Speakermicrophone
• Hands-freeearmicrophone
• Necklanyard
• Vehiclecigarettelightertricklecharger
• Leathercase
The TX670 is a radio transmitting device.
• Whentransmitting,keeptheantennamore
than 25 mm from any part of the head or body.
• Donottransmitnearelectricalblasting
equipment or in explosive atmospheres.
• Do not allow children to operate a radio
transmitter unsupervised.

PAGE 4 INSTRUCTION MANUAL TX670
IMPORTANT
READ ALL INSTRUCTIONS carefully and
completely before operating your radio and retain
this manual for future reference.
NEVER connect the radio to a power source other
than the supplied battery. This may damage your
product.
DO NOT place your radio in front of a vehicle
airbag.
DO NOT use your radio with a damaged antenna.
DO NOT attempt to modify your radio in any way.
ALWAYS charge your radio at normal room
temperature.
ALWAYS switch off your radio where notices
restrict the use of two-way radio or mobile
telephones.
ONLY use GME approved rechargeable batteries
with the supplied charger.
AVOID exposing your radio to water. It is not
waterproof.
AVOID storing or charging your radio in direct
sunlight.
AVOID storing or using your radio where
temperatures are below -20°C or above +60°C.

TX670 INSTRUCTION MANUAL PAGE 5
IMPORTANT INFORMATION
CONCERNING UHF CB RADIO
The use of the Citizen Band radio service is licensed
in Australia by the ACMA Radio communications
(Citizens Band Radio Stations) Class Licence and
in New Zealand by the Ministry of Economic
Development New Zealand (MED). A General User
Radio Licence for Citizens Band radio and operation is
subject to conditions contained in those licences.
The class licence for users and equipment operating in
the CB/PRS 477 MHz band has been amended. This
radio meets the new 80 channel standard.
In simple terms the same amount of spectrum is
available;however,
radio transceivers can now
operate in a narrower bandwidth and hence use less
spectrum. These radios are generally referred to as
narrowband or 12.5 kHz radios. By using 12.5 kHz
channelspacinginsteadof25kHz,the40channels
originally allocated can now be expanded to 80
channels thereby doubling the channel capacity and
relieving congestion in the UHF CB/PRS band.
Original 40 channel wideband Radios will continue
tooperateontheoriginal40channels,howeverthey
will not be able to converse on the newer channels
41 – 80. The newer narrowband radios will be able to
converse with all older 40 channel wideband radios
on all channels 1 to 40 as well as the newer channels
allocated from 41 to 80.
The mixing of narrowband and wideband radios
in the same spectrum can cause some possible
operating issues of interference and varying levels
of received volume.

PAGE 6 INSTRUCTION MANUAL TX670
POSSIBLE ISSUES
When a new narrowband radio receives a transmission
from an older wideband radio the speech may sound loud
and distorted – simply adjust your radio volume for best
performance.
When an older wideband radio receives a signal from a
newnarrowbandradio,thespeechmaysoundquiet-
simply adjust your radio volume for best performance.
Depending on how close your receiving radio is to another
transmittingradio,therecanbeinterferencefromthe
transmitting radio if it is using a channel adjacent to the
channel you are listening to. Simply try going up or down a
few channels from the currently selected channel.
The above situations are not a fault of the radio but a
symptom of operating wideband and narrowband radios
in the same bandwidth. This possible interference will
decrease over time as the population of wideband radios
ages and decreases.
Further information and updates are available from the
Australian Communications and Media Authority (ACMA)
at www.acma.gov.au and the Ministry of Economic
Development(MED),RadioSpectrumManagementat
www.rsm.govt.nz
The ACMA has allocated channels 5/35 for emergency use
only. Channel 5 is the primary Simplex Emergency Channel.
WhereaChannel5repeaterisavailable,youshouldselect
Duplex on CH 5.
NOTE: Channel 35 is the input channel for the Channel 5
repeater therefore Channel 35 should also not be used for
anything other than emergency transmissions.

TX670 INSTRUCTION MANUAL PAGE 7
TElEMETRY CHANNElS
ACMA regulations have allocated channels 22 and 23
for telemetry only applications and have prohibited the
transmission of speech on these channels. Consequently the
TX670 has a transmit-inhibit applied to channels 22 and 23.
In the event that additional telemetry/telecommand
channelsareapprovedbytheACMA,thesechannelsshall
be added to those currently listed where voice transmission
isinhibited.Currentlytransmissionsonchannels61,62and
63 are also inhibited and these channels are reserved for
future allocation.
FEATURES
•Microprocessor Controlled Frequency Synthesiser:
Allowsuserprogrammablecontrolofscanning,channel
memories and selected feature options.
•
Programmable Scan Function: Scans up to 80 UHF
CB channels.
•In-built CTCSS: User selectable Continuous Tone Coded
Squelch system for quiet channel operation.
•2 watts/1 watt RF Power: When transmitting in close
range you can conserve battery power by using the Low
Power setting.
•Individually Programmable Duplex Function:
User selectable for those individual repeater channels
in your area.
•Power-Save Feature: Sleeps during periods
of inactivity.
•Keypad Lock: Prevents accidental button presses.
•Backlit LCD: For night viewing.
•Calling Tone/Roger Beep: Alerts you to incoming calls.
•Dual Watch: Monitors two channels simultaneously.
•VOX: Voice activated transmit for hands free operation.

PAGE 8 INSTRUCTION MANUAL TX670
RADIO CONTROlS
Push-to-
talk (PTT)
Duplex/
Monitor
Battery/
Compartment
Belt
Clip
LCD
External
Speaker
Mic
Mic
LED
Antenna
Speaker
Mode/
Lock Key
Scan/
Memory
Volume
On/Off
Channel
Up
Channel
Down
Duplex/
Monitor

TX670 INSTRUCTION MANUAL PAGE 9
LCD DISPLAY
1 Receiver Busy Icon:
Appears when receiving.
2 Transmit Icon: Appears
when transmitting.
3 Memory Icon: Appears
when the selected channel
is stored in the Scan
memory.
4 Scan Indicator Icon:
Appears when SCAN is
enabled and the radio is
scanning.
5 Button Beep Tone Icon:
Appears when the button
beep confirmation tone is
selected.
6 Roger-Beep Tone Icon:
Appears when the Roger-
Beep tone is enabled.
7 Battery Level Icon:
Indicates battery charge
level. Flashes when battery
is almost empty.
8
Dual Watch Icon: Appears
when Dual Watch mode is
active.
9 High Power Icon: Appears
when High transmitter
power is selected.
10 Duplex Icon: Indicates
that Duplex communication
has been enabled.
11 Key-Lock Icon: Appears
when the keypad is locked.
12 Monitor Icon: Appears
when Monitor function is
activated.
13 Power Save Icon:
Appears when the radio is
in the power save mode.
14 Voice Activated
Transmission (VOX)
Icon: Appears when the
VOX mode is activated.
15 CTCSS Tone: Displays the
selected CTCSS tone
(from 00 – 38) on the
selected channel.
16 Channel Display:
Indicates the channel
number in use.
1 2 3 4 5 6 7
8
10
11
1213141516
9
External
Speaker
Mic
Scan/
Memory
Volume
On/Off
Channel
Up

POWERING THE RADIO
Your TX670 is powered by a Ni-MH rechargeable
batterypack.Ifleftunused,thebatterieswilldischarge
within a few months. If you have not used your TX670
forsometime,youwillneedtorechargeyourbattery
pack before use.
Installing the Batteries
Battery installation is easier when the belt clip is
removed.Todothis,releasethespringclipandslide
the belt clip downward and away from the radio body.
1. Press the centre-top area of the battery cover and
slide downwards.
2. Install the rechargeable battery pack in the direction
indicated on the pack until it ‘clicks’ into place.
3. Replace the battery cover and belt clip.
Belt
Clip
Spring Clip
Battery
Cover
This side
faces up
PAGE 10 INSTRUCTION MANUAL TX670

TX670 INSTRUCTION MANUAL PAGE 11
Charging the Batteries
Your TX670 is supplied with an AC adapter which will
recharge a fully discharged battery pack to full capacity
in around 15-16 hours.
1. Plug the charger into a standard 240 volt AC outlet.
2. Connect the charger to mic/charge socket on
the radio.
Battery Low Alert
Whenthebatteryiconblinksonthedisplay,thebattery
level is low and the batteries should be recharged or
replaced.Ifthebatteriesarenotcharged,anaudio
tone will then sound to warn the user that the batteries
are almost discharged.
Battery Usage
The time taken to discharge the batteries will depend
on how you use the TX670. The 1500 mAh battery
pack supplied is powerful enough for a full days use
under average conditions.
Conserving Battery Power
The TX670 has built-in power saving features to
help you get the maximum amount of time between
charges. If you need to operate your TX670 in a
situation where you require maximum battery life (e.g.
a remote site where there is no convenient recharging
facility nearby) the following hints can greatly reduce
the amount of power drawn from the batteries.
Standby Mode
The TX670 will automatically enter the ‘Standby’ mode
when it is inactive (i.e. not transmitting or receiving
signals). While in Standby mode it will still check for
incoming signals but it will draw considerably less

PAGE 12 INSTRUCTION MANUAL
TX670
power from the batteries. As soon as a signal is heard
or the keys are pressed the TX670 will ‘wake up’
again. This Standby mode is automatic and by itself
can extend the battery life by many hours.
Using CTCSS
If you are expecting to receive signals on a busy
channel,youcanprogramthatchannelforCTCSS
operation and get the other person to call you using
the same CTCSS tone. Your radio will then remain in
Standby and ignore all other signals until your selected
CTCSS tone is received.
Scanning
The TX670 draws more power from the batteries when
scanning than when monitoring a single channel. This
is because it must ‘wake up’ more often to monitor
each channel for activity. You can lengthen the battery
lifebyavoidinganyunnecessaryscanning.Inaddition,
scanning increases the chance of finding a signal
thereby keeping the receiver ‘awake’ and the Squelch
open more often.
Low Transmit Power Settings
The transmitter has both high and low power settings.
Ifyouareonlyoperatingovershortdistances,are
in a reasonably high location or are close to a local
repeater,tryusingthelowtransmitterpowersetting.
This reduces the transmitter power from 2 watts to 1
watt effectively doubling the talk time available.

TX670 INSTRUCTION MANUAL PAGE 13
GENERAl OPERATION
POWER ON/OFF
Rotate the Volume control clockwise past the ‘click’ to
turn the radio ON. Rotate the control counter-clockwise
past the click to turn the radio OFF again.
ADJUSTING THE VOLUME
Withtheunitpoweredon,rotatetheVolume
control clockwise to increase the volume and counter-
clockwise to decrease the volume.
DISPLAY LIGHTING
The LCD backlighting activates automatically whenever
a key is pressed and turns off automatically after about
5 seconds.
RECEIVING SIGNALS
WhiletheTX670isnotreceivingsignals,itwillremain
in the Standby mode to conserve battery power.
Whenasignalisreceived,theLEDindicatoronthe
upper edge of the radio will light green and the icon
will appear on the display. Adjust the Volume control
for a comfortable listening level.
If the incoming signal is encoded with a CTCSS
tonethatmatchestheonesetinyourradio,theLED
indicator will light orange and you will be able to hear
the signal in the speaker.
If the LED indicator lights green and the icon
appearsbutyoucannothearthesignal,itislikelythat
your radio has CTCSS enabled and the incoming signal
is not using your selected CTCSS tone (see ‘Mode
Settings’ for more details on CTCSS settings).

PAGE 14 INSTRUCTION MANUAL TX670
Ifnofurthersignalsarereceived,theunitwillreturnto
Standby mode.
TRANSMITTING
Totransmit,pressandholdthePush-To-Talk(PTT)
switch. The other radio you are talking to must be set to
the same channel (and CTCSS code if applicable). Hold
the TX670 approximately 5 to 8 cms from your face
with the antenna vertical and speak into the built-in
microphone.
While the PTTswitchispressed,theLEDindicatoron
the upper edge of the radio will light red and the
icon will appear on the LCD.
Whenyouhavenishedspeaking,releasethePTT
switch to receive incoming signals (it is not possible
to transmit and receive at the same time). If no further
signalsarereceived,theunitwillreverttoStandbymode.
TIP: The PTT switch can also be used to transmit a Call
Alarm melody. When the Call Alarm melody is enabled (see
ModesettingsformoredetailsontheCallAlarmsettings),
pressing the PTT switch twice quickly will call another
party on the same channel and play the Call Alarm melody
intheirradio’sspeaker.Whenthishappens,the
icon
will appear and the LED indicator will light red for about 3
seconds. The call alarm can only be sent once per minute.
DUPLEX/MONITOR KEY
The DUP/MON key is a dual function key that controls
both the Duplex and Monitor functions.
DUP Key
Press this button to select Duplex mode on channels
1 – 8 and 41 – 48. Duplex can be enabled or disabled
separately on individual channels.

TX670 INSTRUCTION MANUAL PAGE 15
Ifnofurthersignalsarereceived,theunitwillreturnto
Standby mode.
TRANSMITTING
Totransmit,pressandholdthePush-To-Talk(PTT)
switch. The other radio you are talking to must be set to
the same channel (and CTCSS code if applicable). Hold
the TX670 approximately 5 to 8 cms from your face
with the antenna vertical and speak into the built-in
microphone.
While the PTTswitchispressed,theLEDindicatoron
the upper edge of the radio will light red and the
icon will appear on the LCD.
Whenyouhavenishedspeaking,releasethePTT
switch to receive incoming signals (it is not possible
to transmit and receive at the same time). If no further
signalsarereceived,theunitwillreverttoStandbymode.
TIP: The PTT switch can also be used to transmit a Call
Alarm melody. When the Call Alarm melody is enabled (see
ModesettingsformoredetailsontheCallAlarmsettings),
pressing the PTT switch twice quickly will call another
party on the same channel and play the Call Alarm melody
intheirradio’sspeaker.Whenthishappens,the
icon
will appear and the LED indicator will light red for about 3
seconds. The call alarm can only be sent once per minute.
DUPLEX/MONITOR KEY
The DUP/MON key is a dual function key that controls
both the Duplex and Monitor functions.
DUP Key
Press this button to select Duplex mode on channels
1 – 8 and 41 – 48. Duplex can be enabled or disabled
separately on individual channels.
Duplex operation allows the TX670 to transmit on
a different frequency to that which it receives. This
allows operation through repeater stations in your area.
Repeaters automatically re-transmit your signal over
amuchwiderarea,providinggreatlyincreasedrange.
The Duplex mode only works on channels 1 – 8 and
41–48.WithDuplexselected,yourTX670actually
transmits 30 channels higher than it receives.
* Emergency channel only
Channel
Selected
Receive
Channel
Transmit
Channel
1 1 31
2 2 32
3 3 33
4 4 34
5* 5* 35*
6 6 36
7 7 37
8 8 38
41 41 71
42 42 72
43 43 73
44 44 74
45 45 75
46 46 76
47 47 77
48 48 78

PAGE 16 INSTRUCTION MANUAL TX670
ToswitchbetweenSimplexandDuplexmodes,select
aduplexchannel(1–8,41–48)thenbrieypress
the DUPbutton.WhenDuplexmodeisselected,‘DUP’
appears on the display on that channel.
Mon Key
ToopentheSquelch,pressandholdtheMON key.
This allows you to check the current channel for
activitybeforetransmitting,particularlyifyouhave
CTCSSenabled.WhentheSquelchisopen,theLED
indicator on the upper edge of the radio will light
green,the icon appears on the display and you
will hear static or hiss if the channel is clear. Do not
transmit if you hear any conversations. Press and hold
the MON key again to close the Squelch.
CTCSS
ToactivateordeactivateCTCSS,thecurrentchannel
must have a CTCSS code selected via the MODEkey,
(see MODE key settings for more details).
SCAN/MEMORY KEY
The SCAN key is a dual function key that controls
both Scan and Memory Functions.
Scanning Function
Channel Scanning allows you to monitor channels that
have been included in the active scan list. The active
scan list includes all channels which display the icon
‘M’ on the LCD.
Toenablechannelscanning,brieypresstheSCAN
key. ‘SCAN’ will be displayed and the radio will show
rapidly changing channel numbers as it scans through

TX670 INSTRUCTION MANUAL PAGE 17
thechannels.Whilescanning,brieypressthe or
keys to select the scan direction.
ToexittheScanmode,brieypresstheSCAN key
again. The TX670 will return to normal operation and
‘SCAN’ will disappear from the display.
Scanning Features
• Ifasignalisreceived,thescanispaused,allowing
you to transmit and receive on that channel. The
radio will automatically resume scanning a few
seconds after the last reception or transmission.
• PressthePTT switch while the unit is scanning to
jump to the home channel (the home channel is the
channel the radio was on at the time scanning was
activated). You can then transmit and receive on
that channel. The radio will automatically resume
scanning a few seconds after the last reception or
transmission.
•
Whentheunithasstoppedonabusychannel,press
the or keys to ‘skip’ over the busy channel and
continue scanning.
TIP: The Scan mode will reduce the overall battery life
because the Standby (battery saver) feature is overridden.
You should avoid scanning if the batteries are running low
and you need to conserve power.
Memory Function
The Memory function enables and disables the current
channel to be memorised into the scanning list. When
the channel is memorised with the ‘MEM’ icon on
theLCD,scanningwillincludethechannel.Whenthe
channelisdeletedfromthescanninglist,thechannel

will be skipped upon scanning. All channels are saved
toMemoryduringmanufacture.TodisabletheMemory,
press and hold the SCAN/MEM key.
MODE/KEY-LOCK KEY
Mode Function
The MODE key is used to set the various feature settings
of the TX670. The following chart shows the order of
these selections:
Standby Mode:
1. CTCSS Code Selection
2. Transmitter Power
3. VOX Settings
4. Dual Watch Channel
5. Squelch Settings
6. Roger Beep Tone Selection
7. Button Beep Tone Selection
8. Call Alarm Selection
Key-Lock Function
The Key-Lock function disables the keys to prevent
accidental key
presses from changing the preferred
settings of the radio. When
thekeysarelocked,the
Icon is displayed and all key presses are ignored except
for the PTT and Key-Lock functions.
ToactivatetheKey-Lock,pressandholdtheMODE
button for about 2 seconds. The icon will appear on
thedisplay.TocanceltheKey-Lock,pressandholdthe
MODE button again. The icon will disappear from
the display.
PAGE 18 INSTRUCTION MANUAL TX670

TX670 INSTRUCTION MANUAL PAGE 19
Selecting Channels
In the ‘Standby’mode,pressthe or key to step
up/down one channel. Press and hold the or keys
to quickly scroll up/down through the channels.
In ‘Mode edit’mode,pressthe or key to step
upwards or downwards through the selected mode
settings.
1. CTCSS CODE SELECTION
The Continuous Tone Coded Squelch System (CTCSS) is
a Squelch quieting system that allows groups of users to
share the same channel without disturbing each other. It
uses 1 of 38 low frequency tones to open and close the
Squelch on the radio. The CTCSS codes do not prevent
others from hearing your transmission. They simply
provide you with a quieter channel by preventing you
from hearing transmissions that are not using the same
code as you and are therefore not directed at you.
NOTE: To communicate with other UHF radios using
CTCSS,allradiosyouwishtocommunicatewithmustbe
switched to the same channel and have the same CTCSS
code selected. If you wish to receive signals from UHF
radios that are not using CTCSS you will need to either
disable CTCSS on that channel or set the CTCSS code to
‘oF‘ as described in the following ‘note’.
To select a CTCSS Code
From the ‘Standby’ mode:
1. Select the required channel using the or keys.
2. Press the MODE key ONCE (1) to select the CTCSS
setting mode. ‘CTC’ will flash on the display.

PAGE 20 INSTRUCTION MANUAL TX670
3. Press the or keys to select the required CTCSS
code. (A list of available codes is shown in the chart
on page 22).
NOTE: To turnCTCSSoffonthischannel,settheCTCSS
code to ‘oF‘.
4. Press the MODE or PTT key momentarily to confirm
and store your selection.
NOTE: CTCSS is only enabled on those channels with
CTCSS codes selected. All other channels will continue to
operate normally.
2. TRANSMITTER POWER
The transmitter power can be set to High (2 watts) or
Low (1 watt). The power setting applies to all channels.
To set the Transmit Power
From the ‘Standby’ mode:
1. Press the MODE key TWICE (2) to select the power
setting mode. ‘Po’ will be displayed and ‘HI’ or ‘LO’
will be flashing on the display.
2. Press the or keys to select the required power
setting. Select ‘HI’ for high power or ‘LO’ for
low power.
3. Press the MODE or PTT key momentarily to confirm
and store your selection.
The TX670 should now display the selected channel
number along with ‘HI’ if you have selected high power.
Ifyouhaveselectedlowpower,thissettingwillnot
be indicated.
Other manuals for TX670
3
Table of contents
Other GME Radio manuals