gofanco Prophecy PRO-Matrix44-SC User manual

PRO-Matrix44-SC
4K HDR 4x4 Matrix with Downscale Support
®
Made in Taiwan
User‘s Guide

®
PRO-Matrix44-SC
Congratulaons for owning a gofanco product. Our products aim to meet all your
connecvity needs wherever you go.
Have fun with our products!
Please read this manual carefully before rst use.
If you need more informaon about our products, please visit www.gofanco.com.
For technical support, please email us at support@gofanco.com.
For drivers/manuals download, please go to hp://www.gofanco.com/download.

®
PRO-Matrix44-SC
Please read all of these instructions carefully before you use the device. Save
this manual for future reference.
The PRO-Matrix44-SC 4K HDR 4x4 Matrix with Downscale Support has been
tested for conformance to safety regulations and requirements, and has been
certied for international use. However, like all electronic equipments, the
PRO-Matrix44-SC should be used with care. Please read and follow the safety
instructions to protect yourself from possible injury and to minimize the risk of
damage to the unit.
• Follow all instructions and warnings marked on this unit.
• Do not attempt to service this unit yourself, except where explained in this
manual.
• Provide proper ventilation and air circulation and do not use near water.
• Keep objects that might damage the device and assure that the placement of
this unit is on a stable surface.
• Use only the power adapter and power cords and connection cables designed
for this unit.
• Do not use liquid or aerosol cleaners to clean this unit. Always unplug the po-
wer to the device before cleaning.
1. Safety and Notice
Table of Contents
1. Safety and Notice ..................................................................3
2. Introduction .......................................................................4
3. Features...........................................................................4
4. Package Contents ..................................................................5
5. Specication ......................................................................6
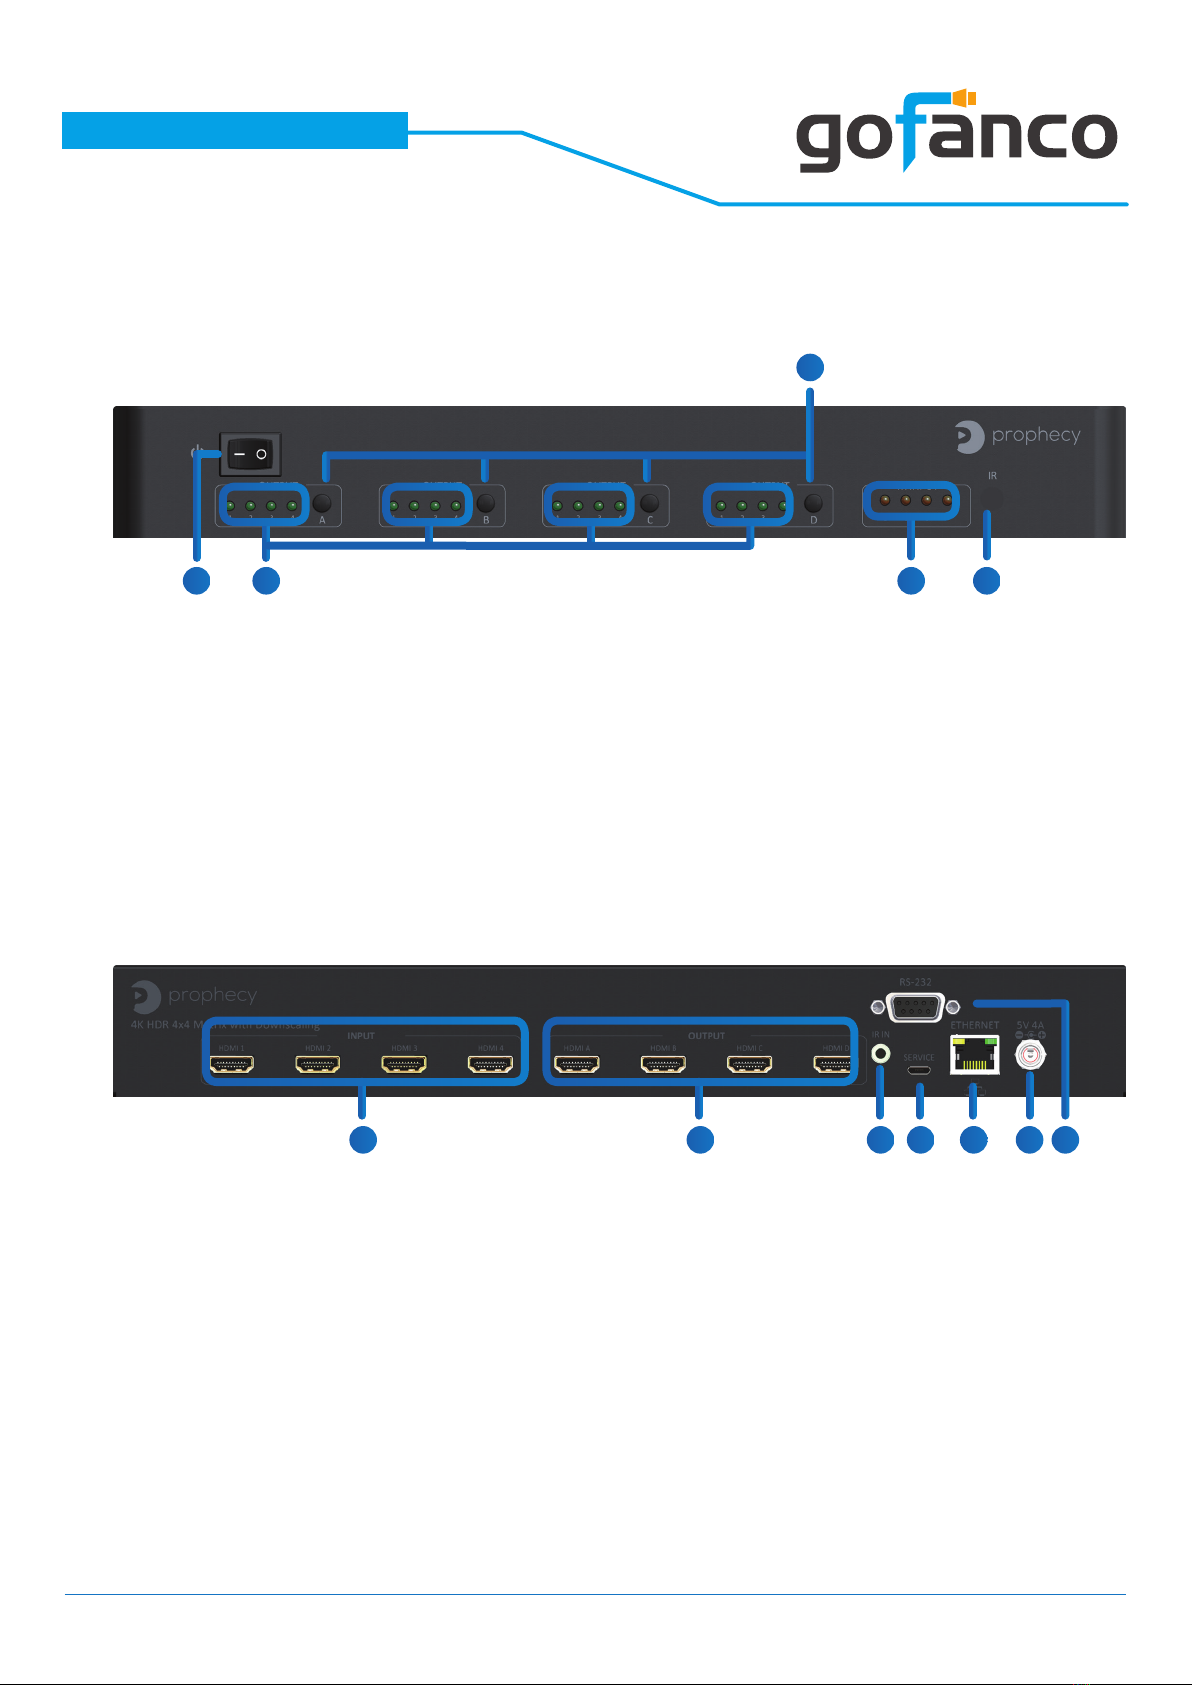
6. Panel Description ..................................................................7
7. Connection Diagram ...............................................................8
8. Hardware Installation ..............................................................8
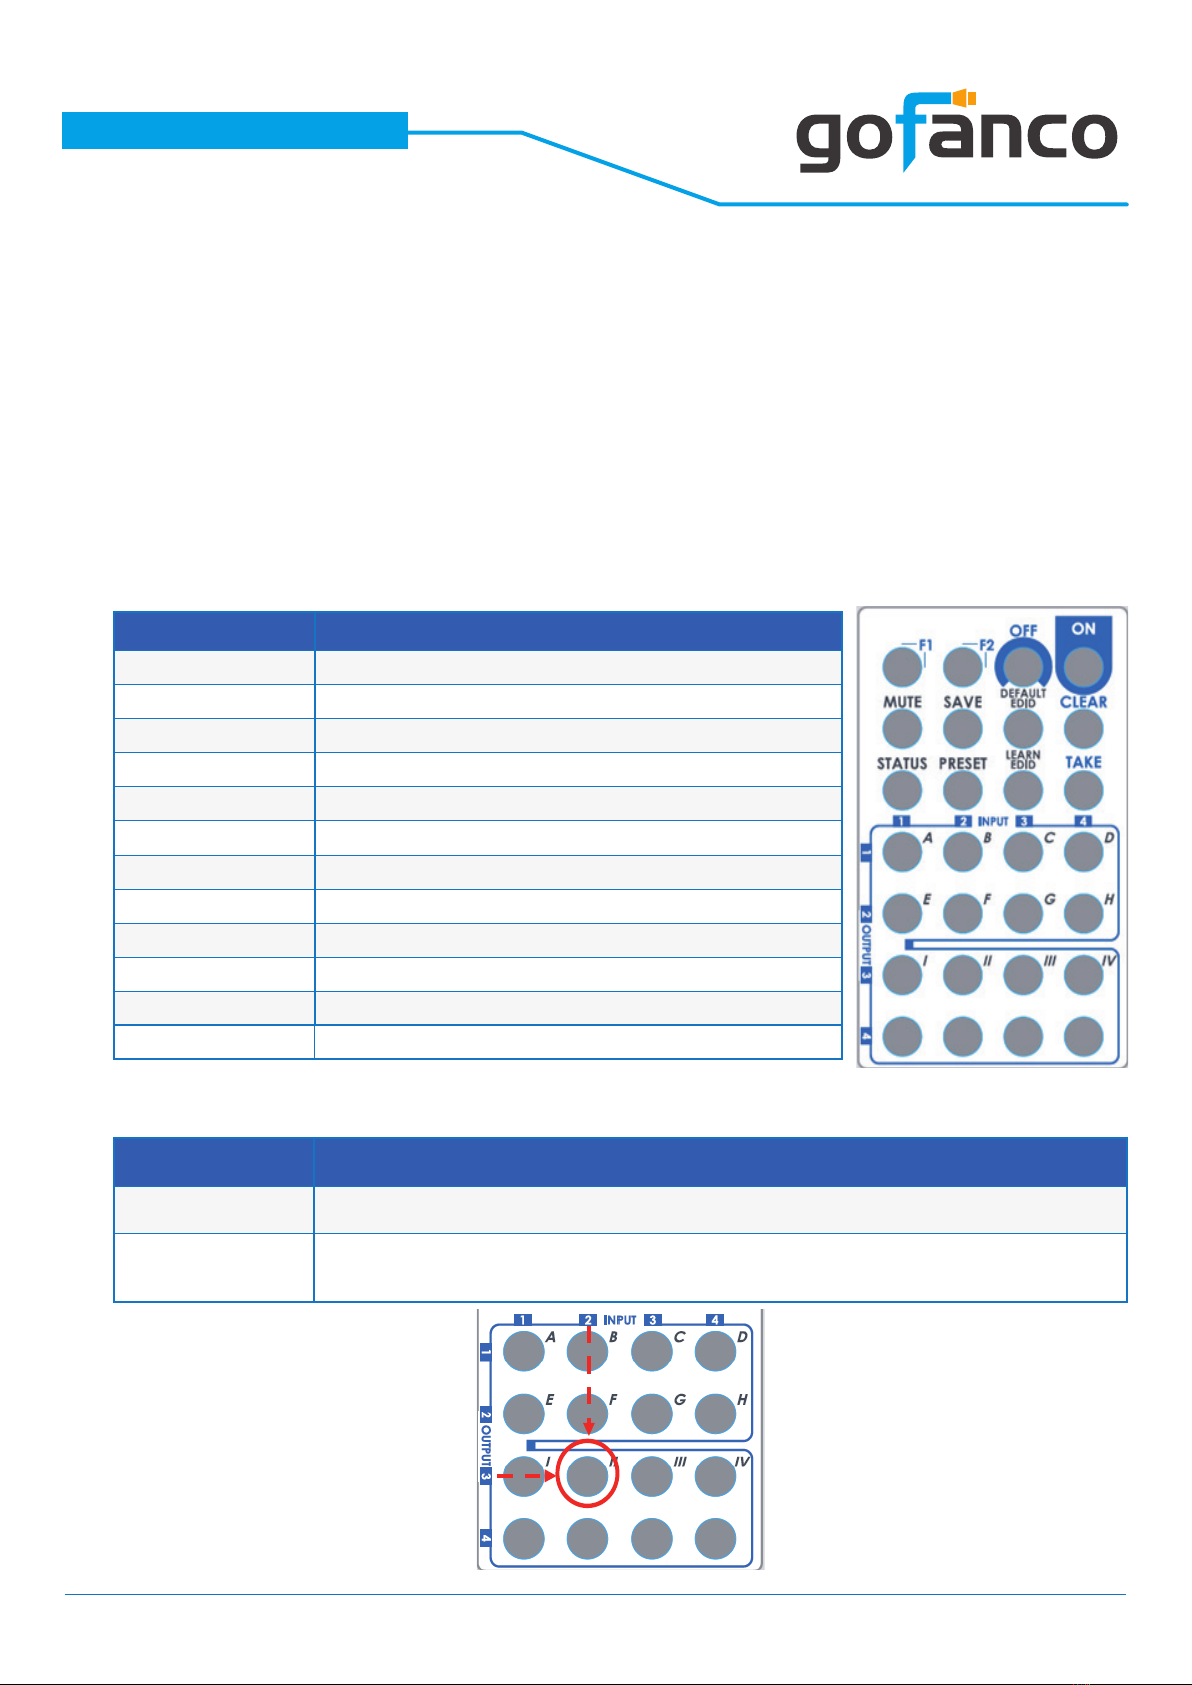
9. Operation Approach................................................................9
10. EDID Learning ....................................................................27
11. FAQ ..............................................................................28
12. Edid LearningWarranty ............................................................29
3

®
PRO-Matrix44-SC
• HDMI 2.0a compliant
• Supports 4K2K@60 4:4:4 8bits
• Supports HDR*(4K2K@60 4:2:0 10bits**)
• HDCP 2.2 compliant and 1.4 compliant
• Wide frequency range: 25MHz~600MHz
• Video bandwidth: 18Gbps
• Supports resolution downscaling from 4K2K to 1080P***
• Supports default EDID and EDID learning from display
• Supports xvYCC, x.v.Color& Deep Color
• Connect up to four HDMI source devices and independently distribute
any source to any of the four HDMI displays
• Micro-USB rmware update for expanded compatibility
• Supports Dolby Digital, DTS-HD and Dolby TrueHD audio
• Switching methods: Push buttons, IR remote, RS-232, IP control,
cloud & echo control
• Surface & rack mountable
• 6-8 seconds channel switch response time
3. Features
The PRO-Matrix44-SC 4K HDR 4x4 Matrix with Downscale Support pro-
vides the most exible and cost eective solution in the market to route
high denition video sources plus multi-channel (up to 7.1-channel) digi-
tal audio from any of the four HDMI sources to the remote displays at the
same time. The PRO-Matrix44-SC supports HDR and true 4K2K video! Besi-
des, PRO-Matrix44-SC supports auto downscale from 4K2K to 1080P.
With the latest HDMI 2.0 video & audio support, the PRO-Matrix44-SC is
well suited for home theaters, conference rooms, or other similar settings
or applications.
2. Introduction
4

®
PRO-Matrix44-SC
• 1x PRO-Matrix44-SC
• 1x DC 5V 4A
• 1x IR Remote control*
• 1x Rack-mounting ear set
• 1x IR Receiver
• 1x Installation software CD
• 1x User Manual
4. Package Contents
Addional IR remote controllers and IR blasters can be purchased as oponal
accessories to control the HDMI sources located separately.
*
HDR = High Dynamic Range.
The video bandwidth of 4K2K@60 4:2:0 10bits (HDR) is 384 MHz, and the
4K2K@60 4:4:4 8bits is 594MHz.
NOT supports
(1) Resoluon downscaling from 4K2K@60 4:2:2 to 1080P
(2) Frame rate conversion
(3) 4K2K@60 4:2:2 to 4K2K@60 4:2:0
*
**
***
5
PRO-Matrix44-SC can bypass 4K HDR data content, but can NOT process it and
make HDR content 100% t into 1080p

®
PRO-Matrix44-SC
5.Specications
Item Description
Technical
Role of usage True 4x4 matrix
HDMI compliance HDMI 2.0a
HDCP compliance HDCP 1.4/ HDCP 2.2
Video bandwidth Single-link 594MHz [18Gbps]
Video support HDR 4K2K@60(4:2:0 10bits)/ 4K2K@60 (4:4:4 8bits)
Audio support DTS-HD Master Audio, Dolby TrueHD Dolby Digital,
DTS, DVD-Audio, LPCM, SACD, MPCM
ESD protection Human body model — ±15kV [air-gap discharge] & ±8kV [contact discharge]
PCB stack-up 6-layer board [impedance control — dierential 100Ω; single 50Ω]
Input 4x HDMI/ 1x RS-232/ 1x Ethernet/ 1x IR socket for IR receiver
Output 4x HDMI
HDMI Input selection Push-in button/ IR remote control/ RS-232 control/ IP control/ Cloud control
IR remote control Electro-optical characteristics: = 25° / Carrier frequency: 38kHz
HDMI connector Type A [19-pin female]
RJ-45 connector WE/SS 8P8C with 2 LED indicators
RS-232 connector DE-9 [9-pin D-sub female]
USB connector Micro USB
3.5mm connector [System IR] Receives IR commands from remote control
Mechanical
Housing Metal enclosure
Dimensions
[L x D x H]
Model 340 x 123 x 44mm [1'1" x 4.8" x 1.7"]
Package 494 x 225 x 70mm [1'6" x 8.9" x 2.8"]
Carton 510 x 380 x 252mm [1'7" x 1'2" x 10"]
Weight Model 1181g [2.6 lbs]]
Package 1837g[4 lbs]
Fixedness Wall-mounting case
Power supply 5V 4A DC
Power consumption 12 Watts [max]
Operation temperature 0~40°C [32~104°F]
Storage temperature -20~60°C [-4~140°F]
Relative humidity 20~90% RH [no condensation]
6

®
PRO-Matrix44-SC
6. Panel Description
Front Panel
Rear Panel
1.Power Switch
2.Selected Source Status LED: When users use port channel push button, the
indicator LED will show the selected source.
3.Port 1-4 Channel Push Button: Select input channel
4.Source Status: 4K Input source detection LED
5.IR SENSOR: IR sensor for receiving the IR commands from IR remote
6.INPUT 1-4: HDMI inputs
7.OUTPUT 1-4: HDMI outputs
8.System IR Receiver: Ext. IR receiver
9.Micro USB: Micro-USB port for F/W update
7
1 4 5
6 7 8 9
10 11 12
2
3
10. Ethernet: Ethernet control port
11. +5V DC: 5V DC power jack
12. RS-232: RS-232 control port (for software control and rmware update)

®
PRO-Matrix44-SC
7. Connection Diagram
8. Hardware Installation
8
PRO-Matrix44-SC as master
1. Connect all sources to HDMI Inputs on the 4x4 HDMI Matrix PRO-Matrix44-SC.
2. Connect all displays to HDMI Outputs on the 4x4 HDMI Matrix PRO-Matrix44-SC.
3. Connect the +5V 4A DC power supply to the 4x4 HDMI MatrixPRO-Matrix44-SC.

®
PRO-Matrix44-SC
9
Method A: Push-in Button
IN/OUT MAP
(1) Use Port 1-4 Channel Push Button to select the source
(2) Input1~4 can be selected in order
Method B: IR Remote Control
9. Operation Approach
Button Function
OFF Standby mode
ON Power on the matrix switcher
MUTE Turn o output’s video and audio
STATUS Preset output status
SAVE Save current mapping mode
PRESET Preset mapping mode
DEFAULT EDID Begin default EDID selection
LEARN EDID Begin EDID learning from one output
CLEAR Clear the previous IR operation procedure
TAKE Trigger the previous setting
F1 Reserved
F2 Reserved
Operation Procedure
IN/OUT Switch Push the button on the checkerboard to select input & output port
Ex: Input 2
To Output 3 Push the red circle button as below to select input 2 to output 3
1. IN/OUT Switch

®
PRO-Matrix44-SC
2. Example of function key
10
Operation Procedure
Mute Output Mute + A~D(Output 1~4) + Take
Ex: Mute Output 3
1. Press “MUTE” button
2. Press number key “C” to select Output 3
3.Press “TAKE” button
Output Status Status + A~D(Output 1~4) + Clear
Ex: Output 4
(Input 2)
1.Press “STATUS” button
2.Press number key “D” to select Output 4
3.Press “CLEAR” button
Save Current Mapping Save + A~H(1-8 storage site) + Take
Ex: Save current
mapping to 5
1.Press “SAVE” button
2.Press number key “E” to select the storage site 5
3.Press “TAKE” button
Preset Mapping Preset + A~H(1-8 storage site) + Take
Ex: Preset saved mapping
from 5
1.Press “PRESET” button
2.Press number key “E” to select the storage site 5
3.Press “TAKE” button
Learn default EDID Default EDID + A~H(1-8 default EDID) + I~IV(input 1~4) + Take
Ex: Default EDID 2
Input 3
1.Press “DEFAULT EDID” button
2.Press number key “B” to select default EDID 2
3.Press number key “III” to select Input 3
4.Press “TAKE” button
Learn Output EDID Learn + A~B(Output 1~2) + I~IV(input 1~4) + Take
Ex: Learn Output 4
Input 3
1.Press “LEARN” button
2.Press number key “D” to select Output 4
3. Press number key “III” to select Input 3
4.Press “TAKE” button

®
PRO-Matrix44-SC
11
Method C: Software Control through RS-232 port
12 3
65 7 8 9
System Requirement
(1) OS Information: MS WinXP/7/8.1/10
(2) Baud rates: 115200
(3) Software size: 1 MB
(4) Minimum RAM requirement: 256 MB
1. I/O Routing Button
1Power ON/ Standby mode
2Control SW via RS-232
3Control SW via Network
4COM Port Selection
5I/O Routing Button
6EDID Button
7Rename I/O Button
8Network Setting & Default Reset
Button
9Firmware Update Button
4
I/O Mapping:
Switch the input for each output
Recall Mapping:
(1) Select the stored Mapping(1-8)
(2) Click “Recall” button to recall previous mapping which are saved
Save Mapping:
(1) Select Mapping(1-8)
(2) Click “Save” button to save current mapping

®
PRO-Matrix44-SC
12
Learn EDID from Default to Input
(1) Select Default EDID(1-17 Default EDID)
(2) Select designated Input
(3) Click “Apply” button to learn from default EDID
Learn EDID from Display to Input
(1) Select output
(2) Select designated Input
(3) Click “Apply” button to learn from display EDID
Load EDID File to Input
(1) Click “Load File” button to select the EDID le
(2) Select designated Input
(3) Click “Apply” button to load EDID File
View EDID
(1) Select Input, HDMI output or EDID le
(2) Click “View” button to read and analyze the EDID
2. EDID Button

®
PRO-Matrix44-SC
Rename I/O:
(1) Rename the Inputs
(2) Rename the Outputs
Rename Mapping:
(1) Rename the Mappings
3. Rename I/O Button
13

®
PRO-Matrix44-SC
Network-DHCP mode
Select DHCP and click “Read” button to automatically get the IP address
Information
Network-Static mode
Click Static and then key in the “IP”, “MASK”, “GATEWAY” information. After
setting IP address, please click “Save” button to save IP address Information
“Read” Button *The default IP address is 192.168.1.70
Read the IP address from the device
“Save” Button
Save the IP address which is manually entered
Cloud setting-Association Code
To get an “association code”. The device can use this code to pair with cloud
server.
Cloud-Reset Cloud
To reset cloud after a successful pairing
4. System Button
14

®
PRO-Matrix44-SC
MAC
Read the device’s MAC address information
System-Factory Reset
To do factory default reset
Firmware Version
To get the F/W version information
Before you start to update, please make sure you have secured the
connection between your computer COM port and the device.
15
5. Firmware Update Button

®
PRO-Matrix44-SC
Main Board
*Using RS-232 to USB cable connect the device and your PC/laptop.
(1) Click the “Open Dialog” button to do rmware update, the rmware update
window of main board shows up as below
(2) Click the “File” button to select the le which you want to write into device
(3) Click the “Start” button and the main board rmware will start to update
(4) After updating, please power cycle the device
Input
*Using Micro-USB to USB cable connect the device and your PC/laptop.
(1) Click the “Open Dialog” button to enter the software page
(2) Open rmware update software and then device will start to update rmware
automatically.
(3) After update process is done, software will show “Success” message and then
be closed automatically.
(4) Click the “Open Dialog” button to update next input port.
(5) Plug and unplug the Micro-USB cable. Repeat the step 2 ~ step 5, until nishing
all the input port rmware update.
16

®
PRO-Matrix44-SC
17
Output
*Using RS-232 to USB cable connect the device and your PC/laptop.
(1) Click the “Open Dialog” button to open the FW Updated window.
(2) Click the “File” button to select the le which you want to write into device
(3) Click the “Upgrade” button and the rmware will start to update
(4) After updating, please power cycle the device

®
PRO-Matrix44-SC
18

®
PRO-Matrix44-SC
19
Add Device to intriCloud
1. First, please make sure the Matrix is connected to your Ethernet with internet
access.
2. Connect the Matrix to your Windows computer (Windows 10) via a USB Type
A (male) to USB Mini-B 5-pin (male) cable (cable not included). The Matrix will
add a Prolic USB to Serial COM port. Use this COM port in Step 4.
3. Run the application “Matrix_Serial from the included CD-ROM and the appli-
cation pictured below will open. *Note: if your system doesn’t have a CD-
ROM, go to www.gofanco.com/download, search for this product by its part#
PRO-Matrix44-SC, and click on “Control Programs” to download the software.
4. Select the proper COM port from the drop down box, then click the serial port
icon on the upper left corner of the application box to connect to the Matrix,
when the icon turns green select the System tab.
5. Select DHCP, if your network has a DHCP server, otherwise select Static.
Please wait 10-15 seconds after making the selection before going to the
next step.
5a) For DHCP, the IP address is automatically assigned, click Read to display
the settings.
5b) For Static, enter the IP address, Mask, and Gateway, then click Save. (Plea-
se see your Network admin for the proper settings)

®
PRO-Matrix44-SC
1. In Cloud setting, click on Read to obtain an Association Code. Write down this
code, you’ll need it to congure your intriCloud account later.
2. Access your intriCloud account and log in to your account. On the upper
right corner, click “Add Device”.
3. Enter the Association code and click Apply for pairing with your Matrix.
20
Table of contents
Other gofanco Matrix Switcher manuals

gofanco
gofanco Matrix44HD2-LCD User manual

gofanco
gofanco Matrix44-HDBT User manual

gofanco
gofanco PRO-Matrix88 User manual

gofanco
gofanco PRO-Matrix88-aud User manual

gofanco
gofanco Matrix44-HDBT User manual

gofanco
gofanco PRO-MatrixWall44 User manual

gofanco
gofanco 4x4 HDMI Matrix 4K User manual

gofanco
gofanco Matrix44HD2-BSC User manual

gofanco
gofanco Matrix88-HDBT User manual

gofanco
gofanco Matrix88HD2 User manual