Gold Century GC-1010 User manual

1
Gold Century
GC-1010 Metal Detector
Digital LCD Display Advanced Metal Detector
OWNER’S MANUAL
And
Warranty

2
CONTENTS
Features……………………………………………………………………... 3
Preparation………………………………………………………………….. 4
Assembling the detector………………………………………………… 4
Installing the batteries…………………………………………………… 5
Using headphones……………………………………………………….. 5
Listening safely…………………………………………………………… 6
Functions and indications………………………………………………….. 6
A quick look at the detector……………………………………………… 6
Displays…………………………………………………………………… 6
Tones……………………………………………………………………… 7
Operation……………………………………………………………………. 8
Turning on the detector………………………………………………… 8
Setting the operation mode……………………………………………… 9
Testing and using the detector………………………………………….. 9
Indoor testing and use………………………………………………… 10
Outdoor testing and use………………………………………………. 11
Searchcoil sweeping hints………………………………………………. 11
Adjusting sensitivity……………………………………………………… 12
Application Hints……………………………………………………………. 13
Pinpointing the target……………………………………………………. 13
Factors that affect the detecting………………………………………… 14
Care and maintenance……………………………………………………... 14

3
With your metal detector, you can hunt for coins, relics, jewelry, gold, and silver
just about anywhere. The detector is versatile and easy to use.
The detector’s features include:
LCD Display—shows the probable type of metal with an arrow, the depth of
the target, DISC/NOTCH range, the level of SENS with segment, the operating
mode, and low battery indication.
Three Tone Audio Discrimination—sounds distinctive tones for different
types of metal.
Notch—ignores junk metal and finds valuable items by setting the disc and
notch range.
Super Slow Sweep Identification—with a very slow sweep of the search coil
to discriminate different types of metal.
Headphone Jack—lets you connect headphones (not supplied) and operate
without trouble.
Waterproof Searchcoil—lets you use the detector even if you must put it
under water.
Note: Your metal detector requires two 9-volt alkaline batteries (not supplied).

4
PREPARATION
ASSEMBLING THE DETECTOR
Assembling your detector is easy and requires no special tools. Just follow
these steps.
1. Turn the stem’s lock nut clockwise until it loosens.
2. Lengthen or shorten so when you stand upright with the detector in your
hand, the search coil is level with and about 1/2 to 2 inches above the ground
with your arm relaxed at your side.
3. Turn the stem’s lock nut counter-clockwise to lock it in place.
4. Unscrew the knob on the search coil and remove the knob connector. Insert
the stem and align the holes on the search coil bracket and the stem. Push
the connector through the holes and tighten the knob.
5. Wind the search coil cable around the stem. Leave enough slack in the
cable.
6. Insert the search coil’s plug into the search coil jack on the detector’s control
housing.
Caution:
The search coil’s plug fits into the connector only one way. Do not force
the plug or you could damage it.
SEARCHCOIL
KNOB CONNECTOR
STEM
LOCK NUT
CABLE
ARM SUPPORT

5
7. Loosen the knob at the search coil’s end, then adjust the search coil to the
desired angle so that it is parallel with the ground. Then tighten the knob.
Caution:
Do not overtighten the search coil or use tools such as pliers to tighten it.
8. Insert the arm support into the end of the stem and tighten the lock screw.
INSTALLING THE BATTERIES
Cautions:
Use only fresh alkaline batteries of required size.
Do not mix the old and new batteries or different types of batteries.
1.Slide the POWER button to turn on the power.
2.Slide the left and right battery covers off in the direction of the arrow.
3.Place a 9V battery into the battery compartment matching the polarity
symbols (+ and -) marked inside.
Warning:
Dispose of old batteries promptly and properly. Never bury or burn them.
Caution:
If you don’t plan to use the unit for a week or more time, remove the
batteries. Batteries can leak chemicals that can destroy electronic parts.
To extend the battery life, exchange the left and right battery after
3~4hours of operation.

6
USING HEADPHONES
1.Insert the headphones’ 3.5mm plug into the HEADPHONE jack. At this
time the internal speaker disconnects.
2.Set the VOLUME to the desired setting.
headphone
Listening Safely
To protect your hearing, set the volume to the lowest setting before you
begin listening, adjust the volume to a comfortable level.
Do not listen at extremely high volume levels. Extended high volume
listening can lead to permanent hearing loss.
Do not wear headphones while operating your detector near high-traffic
areas. Pay attention to traffic safety.
FUNCTIONS AND INDICATIONS
1. A QUICK LOOK AT THE DETECTOR

7
VOLUME CONTROL
OPERATION MODE
BUTTONS
POWER
TARGET INDICATOR
LCD SCREEN
INDICATION PANEL
FUNCTION PANEL
UP & DOWN
SENSITIVITY
DISC/NOTCH
2. DISPLAYS
The indicator of target includes target icons and LCD displays and is located
at the top of the detector. It can indicate coins of different type, gold, silver
etc. When the detector detects an object, an arrow appears below the target
icon of probable type of metal being detected. Also displays the depth of the
target. If the detector receives a strong signal, the arrow appears steadily. If
the signal is weak, the arrow blinks or does not appear.
Note:
If the detecting pauses for about 5 seconds, the arrow will disappear.
If an arrow points to a coin denomination, the detector might be
detecting either a coin or another type of metal (such as jewelry, tokens,
medals, or even junk metal) about same size and type as the coin.
Since the indications are approximations, the detector might not have
actually found the item it indicates. The indicator is only a visual
reference to help you decide if an item is worth investigating.

8
METAL ICONS
SENSITIVITYLEVEL
LOWBATT
OPERATION MODE
BUTTONS
TARGET INDICATION
DEPTH
SENSITIVITYDISC/NOTCH
CONTROL INDICATION
DISC/NOTCH RANGE
GOLD Range
IRON FOIL—indicates that the target is probably iron or foil. Some oxidized
iron might register somewhere within the SILVER range.
5¢(NICKEL)—indicates that the target is probably 5¢ or a nickel.
PULL TAB—indicates that the target is probably a pull tab from an aluminum
can. Some rough gold items might register within PULL TAB category.
S-CAPS—indicates that the target is probably a type of metal like bottle cap
with whorl. Some small gold items might register within this category.
1¢—indicates that the target might be a zinc penny or a copper coin. Some
large gold items might register within 1¢ category.
SILVER Range
1¢ 25¢--indicates that the target is probably 25¢ or 1¢. Some large aluminum
coin might register within 1¢ 25¢ category.
TONES
If the detector is set to the ALL METAL target mode, it sounds a single
tone when it detects any type of metal. If you set the detector to the
DISC or NORTCH modes, the built in audio identification system
sounds a unique audio tone for each of three categories of metal. This
makes it easier to identify the metal being detected.
The detector sounds a low tone when it detects small gold, nail, bottle
cap or nickels. A medium tone for aluminum pull tabs, zinc or copper

9
items.A high tone is for brass or silver items.
Notes:
When you set the detector to DISC or NOTCH mode, the detector
sounds a medium or high tone when it detects highly oxidized iron.
An arrow appears in medium or high tone area.
Depending on the alloys used to make them, about 15 percent of
gold rings cause the detector to sound a medium tone.
LOW TONE
MEDIUM TONE
OPERATION
TURNING ON THE DETECTOR
1.Slide the power switch to ON. The unit displays all symbols on the
LCD screen. The detector sounds low , medium, high tones
respectively. After about 2 seconds the detector enters stand-by state.
At this time the LCD displays ALLMETAL and SENS. The value of
SENS on the segment is 5. The range from MIN. to MAX. for
DISC/NOTCH is available.
2.SETTING THE OPERATING MODE
The detector comes with three operating modes of ALL METAL, DISC,
NOTCH. You can select the desired mode by relative touch key.
a.ALL METAL—used for detecting any type of metal. When the
detector detects any type of metal, it sounds a tone.
Note: When you operate in this mode, controls of DISC and NOTCH do

10
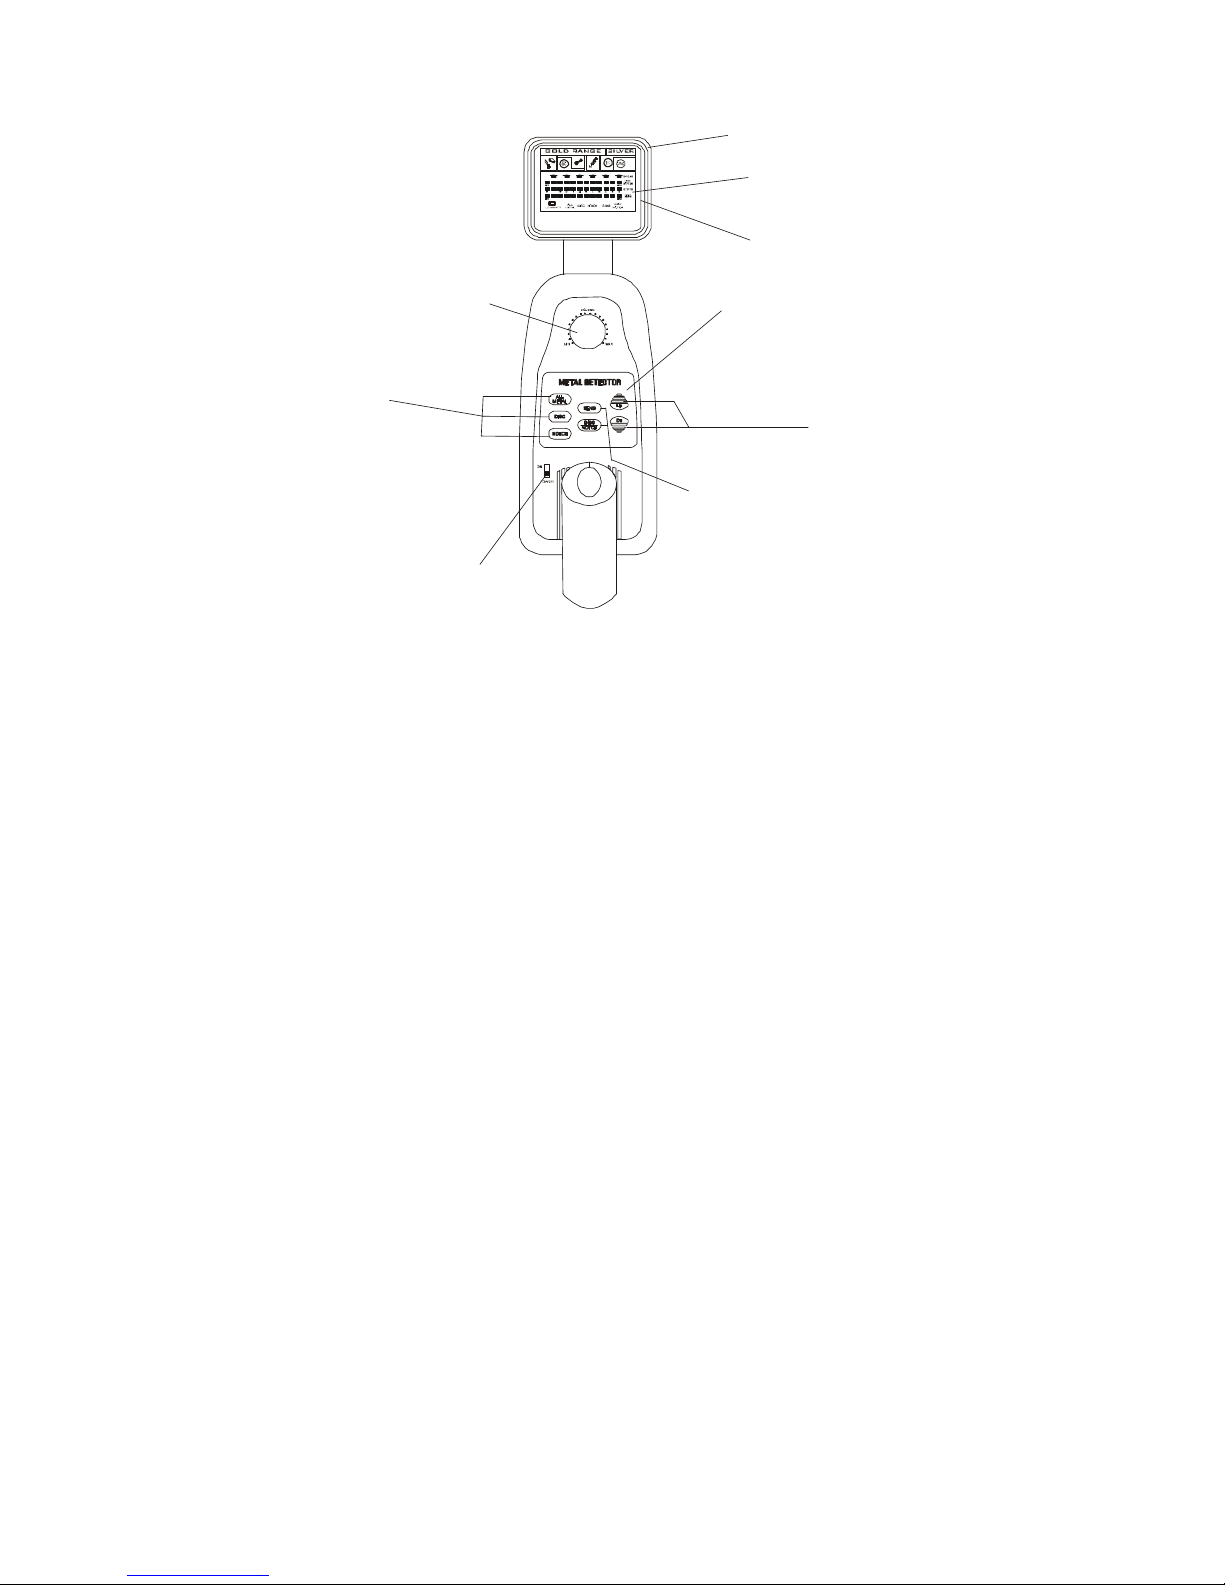
not function except SENS. To adjust the sensitivity, first press SENS
and UP to increase the sensitivity, then press Dn to decrease it.
b.DISC—used for target discrimination. You can set the target range
from MAX to MIN by pressing DISC/NOTCH and UP & Dn keys. The
detector can detect the metal type indicated on the display.
Meanwhile the detector rejects other metal types without displaying
on
the screen. For example, press Dn key, 4 levels on segment from
Max
to Min is increased.At this time, the detector can detect S- CAPS, 1¢
and also 25¢, other types of metal are rejected.
c.NOTCH—to ignore the metal type you do not want. You can select
the metal type desired by pressing the UP and Dn keys. The LCD
segment will indicate the selected types of metal. The detector can
detect the selected metal type.
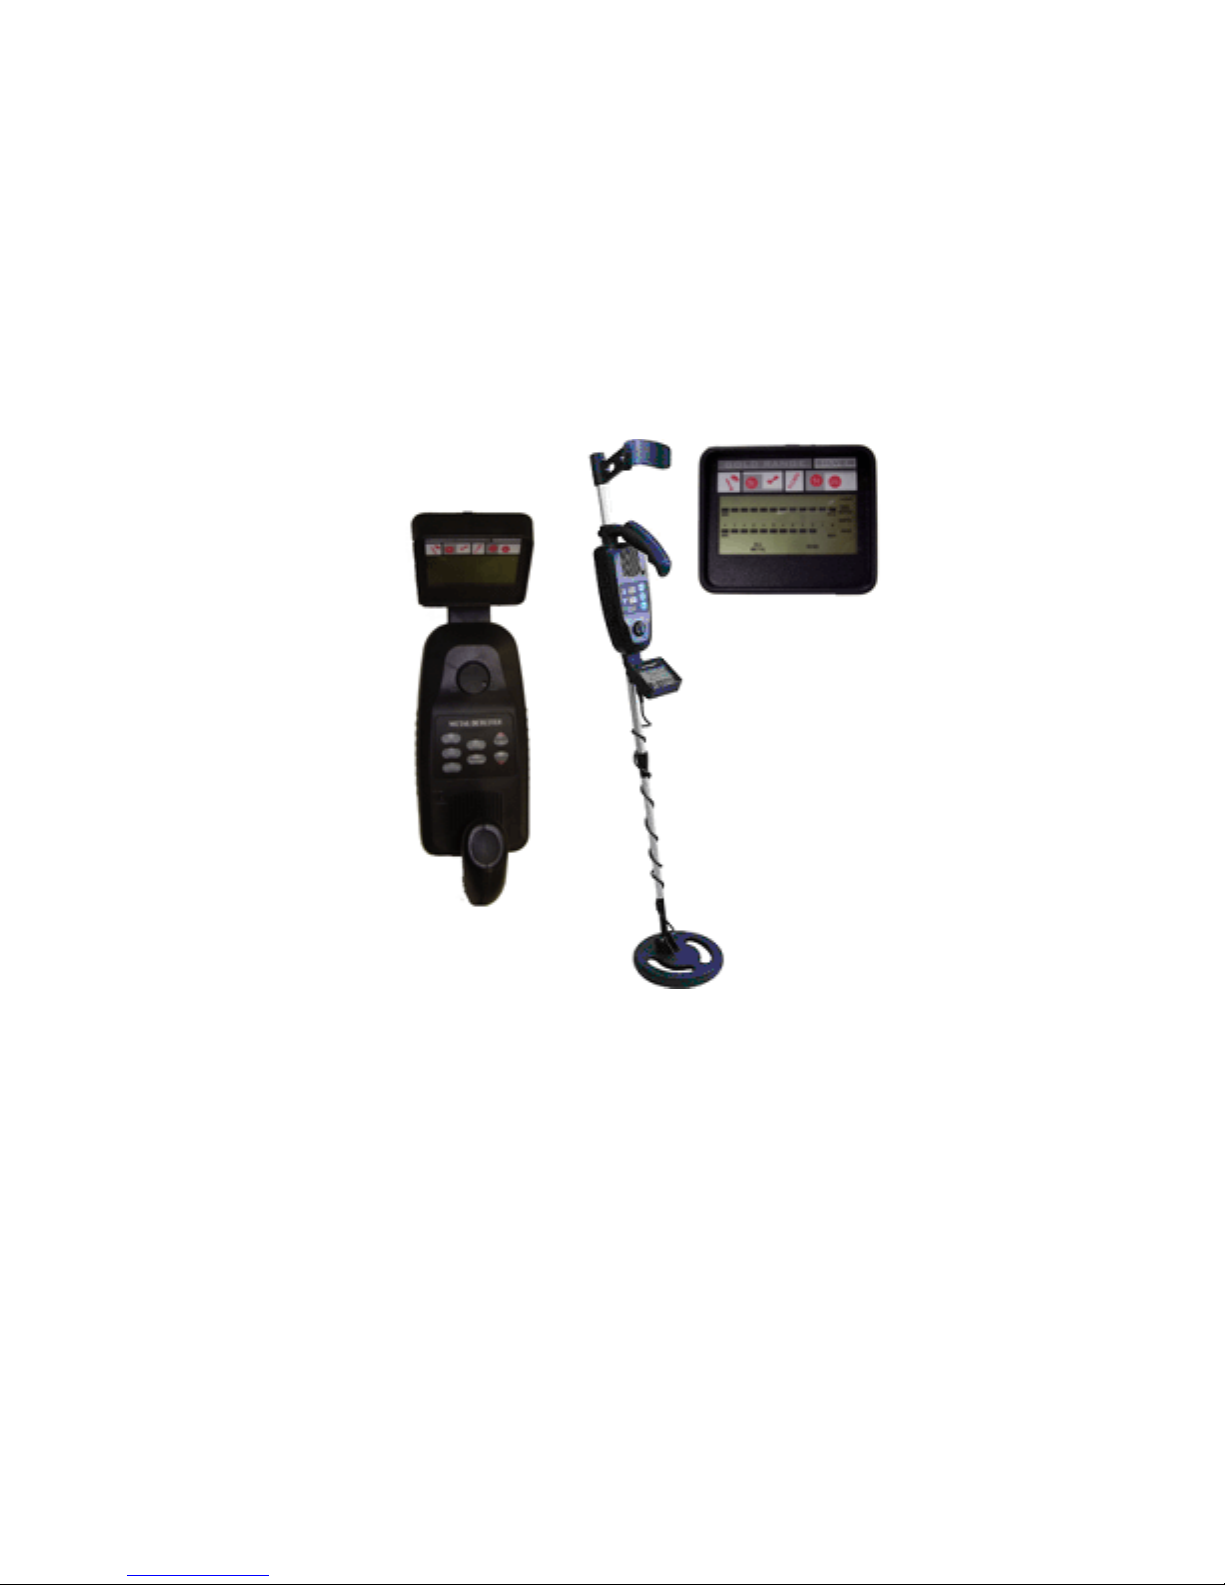
TESTING AND USING THE DETECTOR
To learn how the detector reacts to different metals, you should test it
before you use it the first time. You can test the detector indoors and
outdoors.
Indoor Testing and Use
1. Slide POWER to ON
2. Set the operating mode.
3. Place the detector on a wooden or plastic table, then remove any
watches, rings, or metal jewelry you are wearing.
4. Adjust the searchcoil so the flat part points towards the ceiling.
Note:
Never test the detector on a floor inside a building. Most buildings have

11
metal of some kind in the floor, which might interfere with the objects
you’re testing or mask the signal completely.
5. Slowly sweep a sample of the material you want the detector to find
(such as a gold ring or a coin) 2-3 inches or more above the face of
the searchcoil. When the detector detects any metal, it sounds a
tone and an arrow appears below the target icon. Also LCD displays
the depth of the target.
Note:
If you are using a coin, the detector will detect it more easily if you hold
it so a flat side is parallel with the flat side of the searchcoil. A sweep
with the side of coin over search coil might cause false indication and
unstable display of arrow.
Outdoor Testing and Use
1. Slide POWER to ON. Set the operating mode.
2. Find an area on the ground outside where there is no metal.
3. Place a sample of the material you want the detector to find (such
as a gold ring or a coin) on the ground.
Note:
If you are using valuable metal such as gold to test the detector, mark
the area where you place the item, to help you find it later. Do not place
it in tall grass or weeds).
4. Hold the seachcoil level to the ground about 1~2 inches above the
surface, slowly move the search coil over the area where you
placed the sample, sweeping the search coil in a side-to-side

12
motion.
Searchcoil Sweeping Hints:
Never sweep the searchcoil as if it were a pendulum. Raising the
searchcoil while sweeping or at the end of a sweep will cause false
readings.
correct
wrong
Sweep slowly hurrying will cause you to miss targets.
It’s better you sweep the search coil from side to side in an arc line
of 3 inches motion and keep the search coil parallel with the
ground.
If the detector detects the item, it sounds a tone, an arrow and the
depth appear on the display below the target icon.
If the detector does not detect the item, make sure that the target
mode is set correctly for the type of metal you’re searching for. Also
make sure that you’re moving the search coil correctly.
Notes:

13
The detector responds with a signal when it detects most
valuable metal objects. If a signal does not repeat after you
sweep the search coil over the target a few times, the target is
probably junk metal.
False signals can be caused by trashy ground, electrical
interference, or large irregular piece of junk metal.
False signals are usually broken or non-repeatable.
Adjusting SENSITIVITY
After you become familiar with how your detector works, it’s
important to fine tune the sensitivity to get a good effect.
Press the touch button SENS on the panel. Then press UP or Dn
to increase or decrease the sensitivity. The level on the segment will
be displayed from high to low position.
Note:
In order to detect the target deeply buried, you can adjust the SENS
to a high position. But not to set the level of SENS to Max position,
or the detector will receive interference and false signal from
broadcast antenna and other electronic lines. The detector will have
unstable arrow and irregular tone indications.
Application Hints
Pinpointing The Target
Accurately pinpointing a target makes digging it up easier. But it takes
practice. We suggest you practice finding sample on your own property
before you search other locations.
Follow these steps to pinpoint a target.
1. When the detector detects a buried target, continue sweeping the
search coil over the target in a narrowing side-to-side motion.

14
2. Make a visual note of exact spot
on the ground where the detector beeps.
3. Stop the search coil directly over this point on the ground. Then move
the search coil straight forward away from you and straight back
towards you a couple of times.
4. Repeat steps 1~3 at a right angle to the original search line, Make a
mark of “X” . The target will be directly below the “X” at the point of
the beep response.
Factors That Affect The Detecting
It’s difficult to have an accurate detecting result. Sometimes the
detecting may be restricted by some factors.
1.Conditions For The Target Being Detected
The angle of the target buried in the soil.
The depth of the target.
The level of oxidization of the target.
The Size of the target.
Electro-magnetic and electrical interference surrounding the
target.
If you detect patiently and correctly and practise more times, you’ll
get satisfactory result.
CARE AND MAINTENANCE

15
Your 3010/GC1010 metal detector is an example of superior design
and craftsmanship. The following suggestions will help you care for
your metal detector so you can enjoy it for years.
Handle the detector gently and carefully. Dropping it can
damage circuit boards and cases and can cause the
detector to work improperly.
Use the detector only in normal temperature
environments. Temperature extremes can shorten the life
of
electronic devices, damage the cases of the detector.
Keep the detector away from dust and dirt, which can
cause
premature wear of parts.
Wipe the detector with a damp cloth occasionally to keep
it looking new. Do not use harsh chemicals, cleaning
solvents, or strong detergents to clean the detector.

16
Gold Century Warranty
This product is warranted against defects in materials and workmanship for 1
year from date of purchase. The item must be shipped at buyer’s expense to our
offices where we will, at our discretion, repair or replace it free of charge.
Please include your original purchase receipt. This warranty is not valid for
defects caused by accidents, misuse, improper care, alteration or abuse, nor is it
valid if any service or repair is performed by non-authorized personnel.
Please contact us for a return authorization at 334-567-2300 or by email at
service@ace-distributors.net. Please include a letter describing the problem
and your return address.
Return to:
Ace Distributors, LLC
1100 Chandler Street
Montgomery, Alabama 36104
Table of contents
Other Gold Century Metal Detector manuals
Popular Metal Detector manuals by other brands

Minelab
Minelab Gold Monster 1000 quick start

Troy Custom Detectors
Troy Custom Detectors SHADOW X3 Owner's instruction manual

Kogan
Kogan KA3MTANDETA user guide

White’s Electronics
White’s Electronics M-59 Treasure Master Operator instructions

Garrett
Garrett Investigator G-500 owner's manual

Fisher
Fisher M-Scope CZ-20 QuickSilver operating manual

Fisher Research Labs
Fisher Research Labs F75 Special Edition Comprehensive operating manual & guide

Powerfix Profi
Powerfix Profi KH 2902 operating instructions

Minelab
Minelab GPX 6000 user manual

Fisher
Fisher Gold Bug DP owner's manual

Teknetics
Teknetics Gamma Sports 6000 owner's manual

Bounty Hunter
Bounty Hunter Quick Silve owner's manual