Goldstar GT18+ User manual

Goldstar GT18+
User guide

GoldStar 2
Ingredients
About Pulse intiction detectors……………………………………..….3
General and technical Features..…………………………...4
Package Content........................................................5
Preperation of Device...............................................6
Buttons ......................................................................7
Menu Settings.………………………………………………………..8
Programs….............……….............................................9
GR Program..…………………...........................................10
Delay Program....……………….…….……………………………..11
Auto dynamic Searching….………………………………………12
Pointing target…....………………………………………………....12
Explicationing the target……………………………… …………13,14
Gold program.…………………………………………………….……15
Grapich Screen……..……………………………………………….…15
Metal Discriminator…………………………....………………..…16
Parasite Causes and Solution…………………………………...17.18
Graphics of Depth........................................................19
Technique of Excavation..............................................20
Charging the Battery…...…………………………………………...20
Warranty and Maintenance

GoldStar 3
Pulse İndiction system Metal Dedectors
Thank you for choosing our deep search metal detector GT18, which has been designed as a
result of long studies. You can be sure that you have made the right decision.
Pulse system metal detectors have a good systems in detecting metals such as mass burials,
statues, gold, silver, copper, bronze, yellow metal, iron, aluminum.
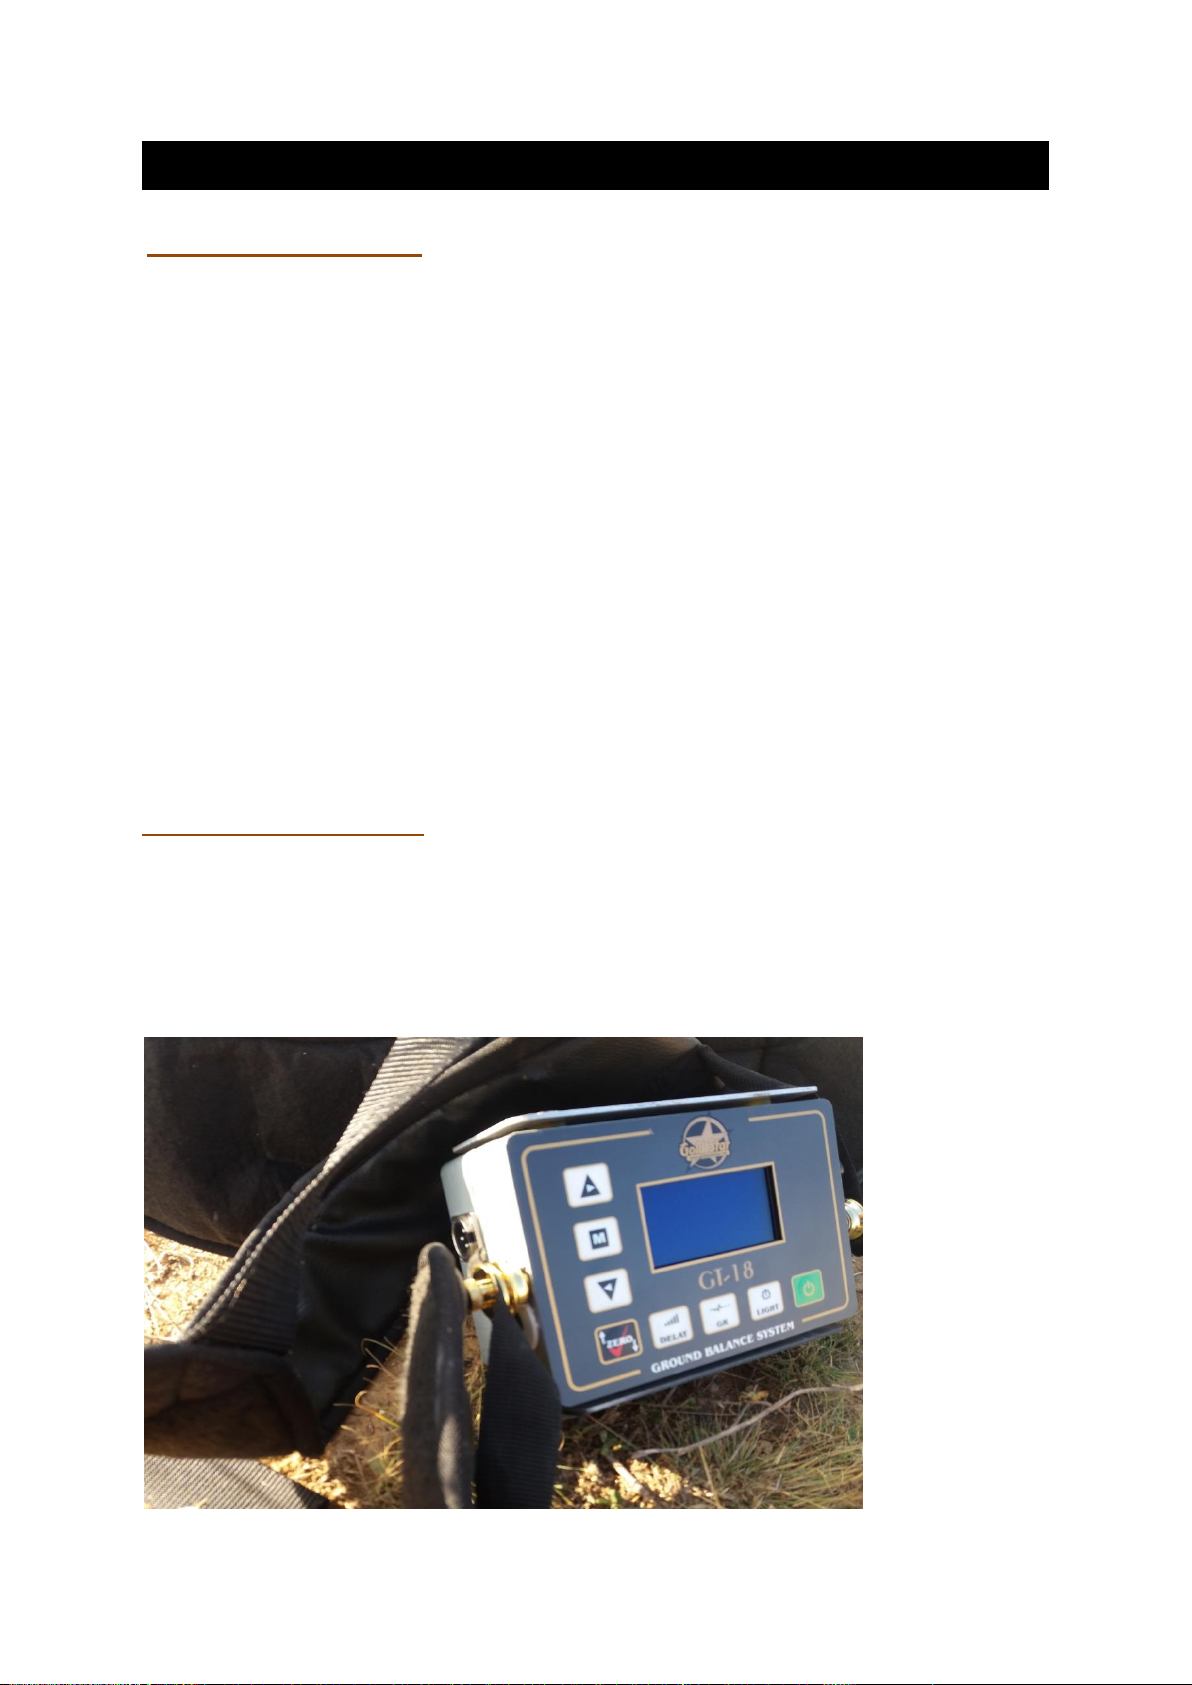
Goldstar Gt18 uses Ground balance system in 38 cm, 45 cm, and 90 cm coils. The device has
been adjusted to a level that does not require ground balance by testing with many mineral
accessories. It was brought to the level of "turn on and search".
Gt18 works with a pulse induction system designed for collective burial and metal object
searches. Especially with large headers, small metal wastes can be largely elected and large
areas can be scanned by sieving wastes. It works without losing performance and depth,
especially in mineralized fields.
The most common problems with pulse system metal detectors are their instability. Many
market devices works without a filter and do not hold ground balance. It is needed to be
resetted very often, which puts the user in difficult situations.
The products has been tested in many fields within the scope of Gold Technology Research and
Development. First of all, it is tested by master users in many soil conditions, and released after
many tests and stages. Despite that, the comments of our users are important for us. In this
sense, the entire Research and Development process is carried out in real natural soil. Our goal
is to improve its stability and depth feature. It provides great convenience to the user with its
filter circuit, frequency settings, high-quality sound system and automatic Ground Balance
system in difficult soil conditions.
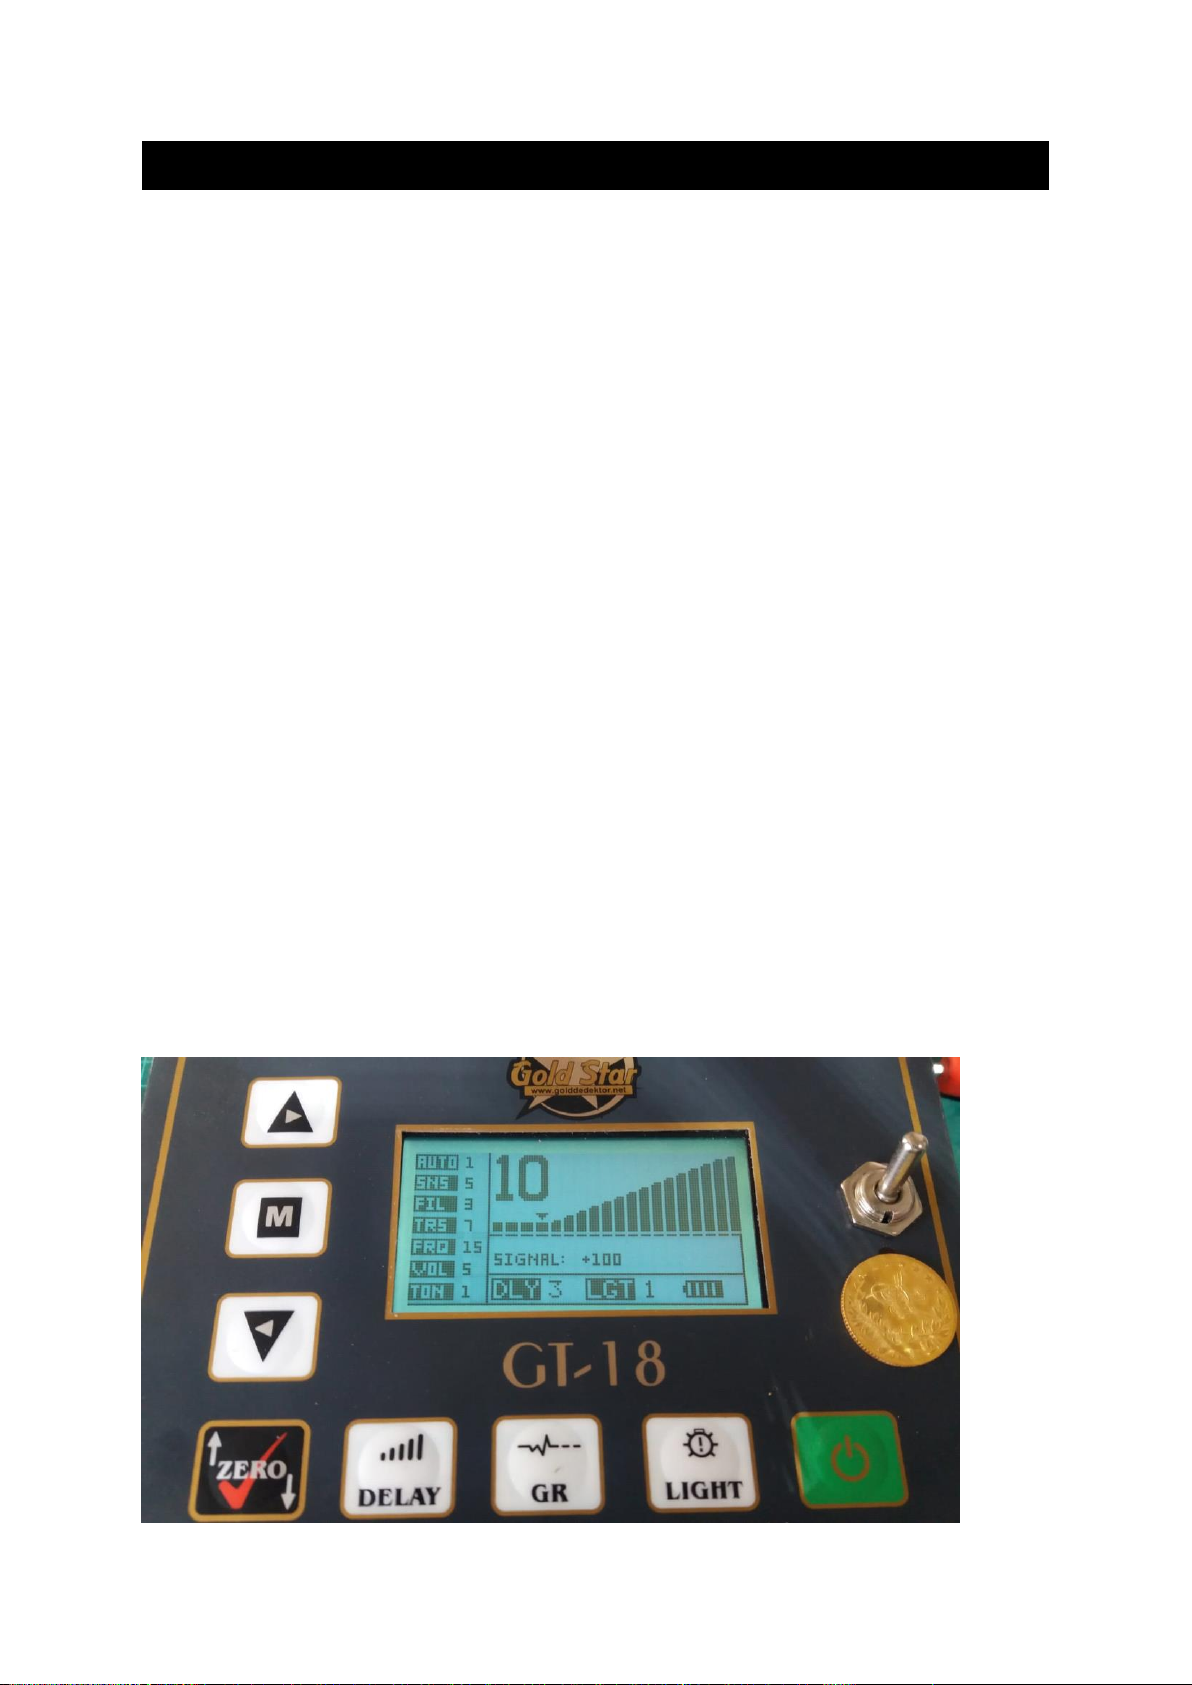
The main thing is knowledge and experience. This user manual has been written with
experience. Without understanding the language of the device, it will be difficult to reach the
result without knowing where and how to use it. However, it is designed to be used by both
amateurs and professionals. For ease of use, practical user manual and settings were added.
Read the user manual carefully a few times before you start to use it in order to get the best
efficiency from the device. Follow our videos and practice on natural land.
Gold Technology Good Luck…
Güzel cad.No:1 Kat:1 Bayburt/Turkey
Tel: +90458 211 6814 Gsm:+90 535 689 6379

GoldStar 4
General and Technical Features
*Professional Pulse Indiction system
-Static or dynamic working setting
-Concurrent 3 microprocessor
-Scanning big areas easily and efficiently;
-Manual setting for each kind of mineral soil
-Able to work more stable with filter feature;
-Auto balance on changing ground conditions with Auto3 setting
-GR: Ground Balance System for hard/harsh Soil conditions…
-DLY: Great stability for collective metal searching.
-Gold program: Program for only gold.
-Various sounds
-Graphic bar and oscilloscope screen.
-Different frequency setting around electricity and high voltage.
-Working Frequency:1000 Hz (1khz)
-Working Voltage: 12V 7Ah battery
-Bar indicator for Signal strength
-Metal conductivity value between 0,99
-2 level of screen brightness
-Protection for reverse connection of battery
-Weigh;1300 gram.
-Working Heat; -5°C +40°C
-Battery Working Voltage: 12Volt
-Battery Charging Time: Max. 3 hours.
-Working Time: Average 4 hours

GoldStar 5
.Package Content
Main Unit
Carrying Bag
38 cm. Coil
90 cm Header
Charger
Headphones
External Battery
User Manual
2 Years Warranty
Additional equipment
45 cm coil
120x120 cable
2x2 Pipe Header

GoldStar 6
Preperation the device to use:
1-Device Holder:They are located on both sides of the device. Make sure that
it is securely attached to the device by pulling in the geard side of the holder.
2-Battery Socket: Battery socket is on the left of the device.After connecting it right, hold it tight well.
ATTENTION:Do not try to connect it to the Coil Socket.
3-Coil Socket: Coil socket is on the right of the device. Wrap the connecting
cable of the coil around the handle and plug it into the socket on the right of
the device and tighten it well..
4-Coil selection switch:The direction of this switch should be changed when
using small header. When the direction of the switch is up, 38cm or 45cm
coil can be used. The direction of the switch should be down if you use big
coils such as 90cm or 120 cm. If you do this wrong, it can still work but there
will be soil influence, pay attention to this.
5-Switch on/off: You should press this button for 2-3 seconds to open after
connecting the battery. When you switch it off, you should press it for 4-5
seconds.
6-Screen Setting: After the device is switched on, if you cannot see anything
on the screen, you can use this button to set up the screen, and you will be
able to see characters on the screen.
7-Manual Soil Setting Button: This green button is for manually adjusting the
ground mineral on both delay and ground. Gr1 is recommended for small
headers and in this program, if the green button waits at 12 o'clock, it is in a
position to remove all minerals. In the 90cm headers, the depth of the group
money increases as you rotate button right in the gr1 mode. In 90cm headers,
as you turn this button right in gr1 mode, your group coin depth increases. In
the delay mode, as you turn it right, mineral removes, if there is no influence
on the soil, do not turn it right in delay mode..

GoldStar 7
Buttons;
Zero:It is a button to reset. It is explained in detail in the other pages.
Delay:Transition to the Delay Program.
"Delay" is searched by setting a distance between the header and the
ground. In this program, the distance from the ground must be kept.
Large coils are used.
GR:Transition to Ground Balance Program. GND1,GND2,GND3 are
prefered accroding to state of the soil. Small coils are used generally in
that program.
So 38cm and 45cm coils are used in gnd mode, and large coils are used
in delay mode, 90cm coil is available for both delay and gnd mode.
LIGHT: The button for setting the brightness of screen. It has 2 stages.
Zero ve Soil Setting:
Zero:It resets the device. Also helpful to get rid of parasites.
ZERO in Delay Program:
You only need to press zero button once in DLY(delay) mode. You will see a
Zero text near to the battery icon. That means it is ready.Especially in delay
auto1 mode, if the signal balance is broken down, you only need to press
the Zero. In auto3 mode, it resets on its own, so you do not need to press
zero.
Searching Clicky sounds: Set up Auto1 in menu and below if you choose
tone 3 you will have clicky static sound. It only works in delay mode.
ZERO in Ground(GR) Program:Auto3 is recommended in that program.
So you need to press zero if you want it to reset automatically.
ATTENTION! If the soil setting is not able to set up, the device is probably on a
metal..

GoldStar 8
Menu Settings:
When you press M button, you can move in the menu. You can change the values by
pressing up and down buttons.
Auto:It enables signal to reset. That means it resets automatically. It keeps
the balance in zero. If you want the balance to be kept, auto should be at
least 1. Resetting speed has 5 stages. Especially if Auto is 3, the coil should
be moved continuously. Screen bar disables and only sound enables.
Sns: Setting for Sensitivity. It has 5 stages. The more sensitivity it has, the
more powerful signals it has, but when sens is increased, the parasite will
be more, so it effects the stability. Level 4 for Sensitivity is recommended.
FIL: Setting for Filter. It has 5 stages. Removes the parasite effects. As filter
got high, a little bit delay will be in signals, but it enables clear signals . If the
FIL is 0, it means it is disabled. We recommend you to set it up in the level 4
in closed places and near to the electiricity cables. In delay and ground
mode, level 3 is recommended.
TRS: Threshold for the sound. In factory reset, it is on the level of 6 in Delay
mode. It has 8 stages. In Gr(Ground) Mode, level 7 is recommended. TRS is
also sensitivity setting in Ground mode.
FRQ: Setting for Frequency. It is for removing the parasites comes from
electiricity places and radio waves. You can fix it if you have sudden
parasites.
VOL: Setting for Volume.
TON: It has 3 different tones/sounds.

GoldStar 9
Working Programs:
The device has 2 program/working system.
1-GR: Ground Program
2-DLY: Delay Program
1-GR(Ground):When you press this button, DLY program closes, GR mode
opens. Hold for 2 seconds to see it on screen. If you only press, it help you to
change mode in gr1,gr2,gr3 and gold program. The working logic changes in
that program. For more mineralized soils, the mineral effect of the soil is
largely removed. Although depth losses occur in some metals compared to
the DLY Program, many metals do not change under the ground. It offers
very comfortable use. The coil is 50 cm. After resetting in the air, it is
brought to the ground. If there is no signal response when you raise the coil
and lower it to the ground, the device is set. The distance to the ground will
no longer be kept.
2-DLY(Delay): Delay has a ground effect, and is deeper than the ground
program. You should keep a distance between ground and coil in Delay
program.
Take the distance between coil and ground as a reference when you reset
the device in Delay Program. Dont move it up or down when you reset.
When you move the coil down to ground, device gives increasing signal
sound. During the search, keep the device in constant height. In the given
factory settings, there is no problem in many soil structures with large
coils.In Gr program, small coils are used.
Delay has 5 stages. The more the delay, the more the depth of the small
metals. Not much change in depth for large metals. The higher the delay, the
higher the mineral effect.. Delay in 1,2,3 have less mineral effect and more
stability. It is largely abstracted from mineral and small metals.
If there are adjustment distortions in each different soil structure, a new
adjustment should be made in that soil structure by pressing the Zero
button.Delay3 is recommended.

GoldStar 10
GR PROGRAM USAGE
First, 38cm and 45cm coils are recommended in GR1 program.
90cm coil can be used in both programs.
Large coil should be used in delay mode.
------------------------------------------------------------------------------------------
Usage of 38 , 45,90 cm. Coils in GR1 Mode:
Connect the battery and coil properly. The battery socket is on left, the coil socket is on the
right. After connecting the coil, make it tight by rotating it.
-Before turning on the device, the coil should be looking ahead.
-Hold the switch on button for 3 seconds.
-Wait. After the logo, the mainmenu will be on the screen..
-Now open GR1 mode by pressing GR Button.
-Set the device:AUTO3, SNS5, FİL3, TRS7.
-Soil setting button should be looking up.
-If there is parasite, find the optimal frequency.
-Now you can lower the coil to the ground. If there is metal on the ground it will
give sound, so check if it gives sound/reaction on a ground where there is no
metal.
-If there is reaction, set the device: sns4 trs6.
-If there is No reaction, set the device: sns5,trs7.Now it is ready to use.
Movement for Coil:
Move the coil left and right slowly. When moving, the height should be parallel.
(Look the picture below)
When it detect a metal, it will give signal and on the screen, the signal will get high
so the bars will get high.

GoldStar 11
Usage of Delay Program:
If you want to work with screen bars, you could set Auto1.
Screen bars disappears in Auto3,4,5. You will only get sounds
and values.
Usage of DLY with 90 cm and 1,5x1,5 Coils:
-Connect 1,5x1,5 coil to the device before opening it. Set the key down which is on
the screen's right.
-Lift the coil up to waist level. Turn on the device.
-Menu Setting:Delay3,Auto3,sens5,fil3,trs6 is recommended.
-Lower the coil to the ground approximately 20cm. And press Zero once.
-If we consider the average search distance as 20 cm, lower the coil to the ground
and lift it between 5 cm from the ground and observe if there is a ground effect.This
is very important. Do not make it touch the ground.
-if there is reaction, turn the soil setting button to the right a little bit. turn it right
until you get less reaction.
- When you set your coil, you can start using it by keeping the distance.
If you do not have ground effect while starting the first adjustment, you do not
need to turn the soil setting button.
Move slowly, take your time.
Change your frequency setting if there is unnecessary increase in magnetic
environments where parasite may be very high.. Or you can set your device:
AUTO3,DLY3,SNS5,FIL3,TRS5. It is normal to hear a slight sizzle/noise. Do
not take it serious. If you get a metal signal, get off the target and hold the
target from left to right again to make sure of the metal. The highest level of
the beep and signal bars is directly above the target. Real metal signals start
and end when the signal enters the target from all directions. During the
walking process, the target input signal must begin and end. If the signal
gets too long during the walking process, this may be caused by the mineral
structure that has a magnetic effect.

GoldStar 12
Auto in Delay Program
Usage of AUTO 0,1,2 Static:
When the delay is in Auto 0.1.2, the bar image is displayed on the screen. In this case, 3 different
tones can be selected below tone option in the menu. The most preferred tone is 3. When the tone is
at 3, small changes on the ground are in the sound. It is presented with small changes in tone 1 and
2, and it becomes more sensitive.
AUTO3,4,5 Dynamic Zero
In Auto3, the bar screen is canceled and the sound is used completely. With
a different tone except 3 tones in the menu, the system with continuous
reseting is enabled. In other words, automatic ground reset, instant reset is
activated.
In this tone of voice, a more effective sound is produced in close targets,
while it gives a breathing sound in deep targets, while in waste metals,
especially many types of iron, small waste will give a double tone mixed
sound.
When you swing from four directions on the target, even one aspect of it
giving a doubled sound indicates that it is worthless. Although there are
sometimes mistakes, you will get rid of many unnecessary targets with the
right results. This will save both time and effort.
It will give a fuller breathing sound in precious bulk metals.
Auto4.5 resets faster but will increase its speed and slightly reduce the deep
signals. If the small coil is in a very waste environment, it will be
appropriate to auto.
Due to the importance of this issue, follow our training videos by
subscribing to our youtube channel.
Pinpointing
The method of averaging the target when you find a target is the + method.
In other words, it is to find the point where the strongest signal is received
by moving the head over the target from right and left to make a + on the
received signal.
Follow the signal strength on the screen; where the bars and the sound are
loudest is where you are directly above the metal.

GoldStar 13
Commenting the found target: In the images below, it defines the SIZE OF THE TARGET
when passing over any metal. It is an estimate of its depth and diameter. (When walking with big
coils)
1-The signal is sudden and short, double voice 2-Short time weak signal
1-The signal is sudden and short, double voice
Those close to the surface will usually show themselves with strong signals that
increase suddenly and end early when they pass over them. When small metals
and shallow targets are detected, the bars will give high but short-term signals.
When the target encounters with the cable under the coil, the strength of the
signal increases. When the target reaches the center of the coil, the signal
strength decreases. When the cable encounters directly under the other pipe, the
signal increases again. These signals indicate that there is a small metal on the
surface. Metals in this signal are generally between 0.50 cm.
2-Short time weak signal
The sound given in this table is not a double sound, but again a signal that ends
very early. Since it is a little deeper than the previous one, it does not give a
double sound. That is, the large coil has difficulty grasping this metal because
the sensing effect is low. It gives a single sound, sometimes it may not even give
a signal when you enter the target from different directions.
These types of metals are generally between 30-70 cm. On average 3-5 cm in
diameter.

GoldStar 14
3-High voice, single signal 4-Normal voice, wide single signal
3-High voice, single signal
The signal in Figure 3 is clearer. Bars are between 4-6. For example; it will not
make a double-tone sound like Figure 1 when passing through and exiting a
target. To understand this thoroughly, enter and exit the target from 4 sides. If
the signal comes under the cable and ends evenly, in a solid tone without
increasing, the metal is medium.
4-Normal voice, wide single signal
In the example depicted in Figure 4, the signal is slightly longer but not valid for
a situation with a very long sound. The signal should increase and eventually cut
off. The main thing is the noticeable increase in the signal tone and the decrease
when you leave the target. To be able to understand this, you need over time
with experience.
5-Extending signal (mineral signal)
If the signal does not stop at all but continues for a long time, this is the sound from a mineral.
It may be longer in the Dly program. It is usually caused by the density of the brick. This is a
sign that the soil structure has changed or you need to refresh your setting. In the delay
program, the possibility of encountering this situation may generally be in old settlements. We
recommend that you work in the GR program in areas with high iron minerals with lots of
tiles. Wiping iron mineral and brick in the ground program will provide a comfortable use.

GoldStar 15
Gold Program
This program is specifically designed to find single gold coins and scattered gold coins in
coin searching.It is an great system for those who want to choose according to the target.
Gold text will appear on the screen. It is activated when you click the GR button one
more time after GR3.
Metals rejected; Large heavy metals ..
Accepted metals: Single gold coin, bronze coin, fine silver coin, bullet,
lead, small aluminum ...
It will be useful for individualists. Your chances of reaching the target that will save
some inert metals will increase in the fields where only one coin gold is there.
In this mode, soil effect, small brick chips are removed.
Graphic Screen:
When you hold down the Gr Button for 2 seconds, the bar screen closes and returns to
the graphic display.
Whichever program you are in, this does not change, only the screen data changes.
Delay program should have auto1, sens2, fil2 to get healthy data.
It indicates that metal is very close to the
surface.
It shows there is metal in deep
Medium depth, close to the surface

GoldStar 16
Metal separation: Discriminator
In pulse system devices, the discrimination is given as the conductivity value. The
Goldstar GT18 values the type and volume of the metal. It is enough to give an
idea. No clear distinction is expected. However, the values given are generally
stable. When the metal is detected, it will give value and if it is close. Otherwise,
the value number is not displayed. Still detects metal. When the device achieves
full signal intensity, it will give numerical value. Conductivity value is between
0.99. We can divide these numerical values into 3 groups.
Numerical value table:
Between 00,35
Usually the number of coins and small metals.
Lead, bullets, aluminum, gold coins, thin gold bracelets, low weight silver
coins, copper bronze.
Between 00,35-00,75
Small large irons, Dense mineral, Bulk coins.
Bulk coins will usually value between 50.70. However, it should be interpreted
taking into account the sound separation. If the sound is full signal is not doubled
, it should be considered. If it gives a doubled sound, it will be iron even if it gives
this number range.
Between 00,75-00,99;
Silver or copper coins over 7 grams are included in this group.
In addition, bulky objects, bulky coins, Ingots, Aluminum, Brass, copper, bronze,
silver, gold items.
If the device gives value; Hold the coil on target several times to get a complete
idea. Generally, evaluate according to which number range. For example; You
tried it 4 times, gave 25 once, gave 40-50 3 times, then you should think that
there may be metal objects in the 35-75 number range. In short, you should
consider the range in which the numbers are moving rather than changing. For
the best accurate reading, the target type reading process should be repeated.
Thus, the same value should be read several times for that target.

GoldStar 17
Parasite causes and solutions
There are 2 reasons affecting all devices:
1-Electromagnetic waves around.
2. Magnetic and mineral effects of soil.
1-Electromagnetic waves around and Solution
Surrounding frequency effect produces interference to each device. Urban
environment, electrical wires, high voltages, transmitter stations, mobile phones near
the device generate these parasites. This is not a soil related parasite.
In order to prevent these interferences, precautions have been taken with the frequency
system in the device. If the device is constantly interfering with no movement, change
the frequency numbers in the FRQ setting. Because it is about the environment an the
field, we cannot say to set the frequency to any number. Find the number where the
noise is diminishing and leave it there. The frequency range is 30 stages. When we
turned on the device in our own office, there were parasites originating from the
indoor environment. The signal bars were increasing and decreasing. When we set the
frequency to 21 or 22, the parasite waves decreased.
Adjust your filter settings to 4, especially in urban environments near high voltages.
The parasite will drop.
2. Magnetic and mineral effects of soil.
It is impossible to completely get rid of the mineral and magnetic effects in the soil.
The two biggest problems in the soil in pulse devices are that the device is affected by
soil changes and dense tiles. The tiles show an iron mineral effect. Brick effect
increases even more especially in snowy and wet old ruins. Soil mineral effect
increases by working in snowy and wet soil. It is recommended to use in dry soil first.
The brick effect is low in large coils, like 1.5x1.5 and 2x2. Of course, this depends on
your setting. For example, in Delay 4.5, the brick effect increases. We recommend you
to visit the ruins at delay3. As a different method, delay3 auto3, sens4, trs6 could be
used. In this case, you should use a kite coil.
In highly mineralized places, it will be enough to turn the delay to 2 and turn the
ground adjustment button to the right.
-When using the Delay in auto1, if the setting is distorted due to soil change, press
ZERO button.
-Using headphones allows you to capture deep sounds that are useful for noisy
environments.
When using a large pipe coil, travel constantly with an experienced person who has the
skills to hold the coil.

GoldStar 18
What can I do in places with a lot of waste?
Large coils can have waste effects at high DLY 3,4,5 positions in places with heavy
small metal waste. In this case, you should set up Delay to 1 or 2.
If you set the delay to 1 and TRS3, SNS4 AUTO3, the impact on waste will be greatly
reduced. Depth loss in large metals does not affect the Dly sensitivity, and using
larger coils(1.5x1.5 or 2x2 ) eliminates this problem.
Is the target metal or mineral?
1-When you look from all sides and the signal cuts off when you leave the target, it is
90% metal. Enter again from different angles where you got the first signal. In order
to be metal, the sound should decrease and stop at every exit from the target. If it
continues for a long time, it is a mineral. In this case, turn the ground adjustment
knob a little clockwise.
2- Dig the target from which you received the signal 20,30cm. Hold the coil again. If
the signal continues, it is a metal, if not, it is a mineral or dense mineral.
Does the device give a sound to the stones to the metalized slag?
Some metallic mineral stones are impossible to separate from minerals. If this is
destroyed, it will affect other processed metals and the depth will decrease. If you
work in the GR position in such places, the impact on mineral stones and tiles will be
greatly reduced. But metalized slags cannot be expected to cut because this is the
purpose of the metal detector.
Is it on the metal surface? Is it deep?
1-Examine the bar indicator on the screen. Where you get a signal, the bars are 1.2
levels and if the signal is a little wide, it is deep.
2-Hold the target with the big coil again with the small coil. If it gives a strong
signal, it is not deep.
3-Lift one side of the coil towards the ground and the other side upwards. Walk close
to the ground in the area where you are receiving a signal. If it gives a signal, it is
close and on the surface. Do not forget that these methods will occur with the users'
experience of using the device.
4-Examine on the graphic screen.
The device gives a sound everywhere, does not stop?
If the device continuously emits long and continuous sound and then the probability
of mineral or ground change is high. Refresh the ground balance.
Doesn't give a distinction number?The discrimination value is not given in weak
signals. If you wait a little above the target you find, it will be more easily valued. It
will help you to know the sound presentations in Auto3 well.
The parting number is very confusing?If the target signal gives the given value 40
and sometimes jumps to 80, then this is probably a worthless metal. Precious and
heavy metals do not deviate beyond the range of 10.15 at most. For example, it will
give in limited intervals such as 85,99,85,92,99.

GoldStar 19
AVERAGE Depth Chart:
These depths may increase or decrease depending on the soil conditions, type of metal
and duration of stay in the soil. The large diameter of the metal and its long stay under the
ground enables it to detect better.
Delay3/AUTO3/SNS5/TRS7 Coils
Metal Object 90cm coil 1,5x1,5 2x2
10x10 Copper
100 cm.
130 CM.
130 CM
10x10 Metal
100 CM.
110 CM.
120 CM
30X30 Steel metal
200 CM.
240 CM.
300 CM
50X50 METAL
250 CM.
350 CM
400 CM
………………………………………………………………………………………………….
GR1/GROUND
GR1 AUTO3/sns5/fil3/trs7
Coils
Metal Object 38 cm. 45 cm. 90cm coil
7grm.Gold(22MM)
27CM.
27cm
X
Coin27 MM
33
CM.
33cm
X
10X10 Copper
80
cm.
90 cm.
110 CM
10x10 Coins
75CM.
80 CM.
90 CM
30X30 Steel METAL
150
CM.
160 CM.
190 CM
50X50 METAL
190CM.
200 CM.
225 CM
Not:In GR Program, under soil test are deeper than air tests.
Large coils like 1.5X1.5 ve 2x2 is used in delay mode.38 and 45cm coils are used in gr1
program, and 90 cm coils can be used in both programs.

GoldStar 20
Excavation Technique:
1)While scanning with big coils, first the suspicous place is scanned. The
detected areas is indicated.
2)After this step, use the smaller coil, and change the mode to GR Program and
set the soil setting, and hold the coil over the indicated area. If you receive a
signal, take out the metal.
3)If you cant receive signal with small coils, it is probably in deeper. In this
case, excavate the area deeper. After excavating at least 50x50 average 30 cm,
hold the coil again. (In this step, you must use GR Program, we do not
recommend DLY program with small coils.)
4)If you cannot receive any signal with small coils, you should confirm by using
big coils. If the signal is not received, it could be mineral or brick pile.
If you receive stronger signals, repeat the steps above. You will get comfortable
with this as you use the device.
Charging the battery:
Gold technology takes care to use the best selection for battery and its adapter,
because battery and charger the causes that effect the performance. It is good to
use the adaptor of recommended company
The battery 12 voltage 7 Ah.
Remove the battery cable from the device and plug it into the outlet of the
charger. Make sure that the connector pins are correctly fitted. Let it charge until
the LED light turns green.
This may take 1-2 hours on average.
Charger 12 voltage battery
Table of contents
Other Goldstar Test Equipment manuals