Gotie GSJ-600 User manual

USER MANUAL
SLOW JUICER
GSJ-600 GSJ-610 GSJ-620

SPECIFICATION
– power: 200W
– nominal voltage: 230V ~ 0 Hz
– max continuous operating time: 20 minutes
– rotation speed: 4 - RPM
– BPA free
PRODUCTS FEATURES
1. Non-grinding j icing method feat red by slow sq eezing is
adopted for the product, so the natural flavor and nutrient elements of
fruits and vegetables are well retained. The product has multiple
functions, including making vegetable juice and fruit juice, etc.
2. The squeezing cup may be separated with the mainframe, and it is
convenient to clean.
3. Dual-switch design makes the product safer (make the squeezing cup
installed onto the mainframe; apply the front cover of squeezing body,
and then turn on the switch to make the juicer run).
SAFETY NOTES
Please caref lly read the man al before se the j icer, and
please se
the machine according to the instruction book. Be sure not to use the
product for other purposes.
1. Please do not make the machine share the same power supply with
other high-power electric appliances, and the product shall be used with
30A leakage circuit breaker installed.
2. To prevent electric leakage and other hazards, please use the machine
according to the instruction book.
3. It is forbidden to make the machine power line and plug immersed into
water or other liquids.
4. Be careful to watch it during operation of the machine.
5. If the parts or product structure is found to be damaged (particularly,
the safetyprotection device and power line are damaged), please do not
use the machine. Do not attempt to repair it by yourself, and it shall be
1
Warning: The prod ct is applicable to family se, and it is
inapplicable to commercial se, otherwise its service life may
be shortened. Don't se the nit if the filter damaged.

repaired by professionals.
6. Do not let children or the disabled operate the machine under the
condition that they have not received any guidance or supervision.
7. Please do not make the product used on or beside high-temperature
gas or electric stove.
8. It is forbidden to use finger, spoon or chopstick to push
fruits/vegetables into the feed inlet of the machine.
9. Please do not touch or move any moving part during operation of the
machine.
10. Please do not make metal sheet or other conducting material inserted
into the juicer, so as to prevent fire or short circuit.
11. Before the machine is cleaned, moved or it is not used, please pull
out the plug.
12. Be sure not to put the machine near inflammable goods.
13. If the supply cord is damaged, it must be replaced by the
manufacturer, its service agent or similarly qualified persons inorder to
avoid accident.
14. Be sure to hold the plug with hands when the plug is pulled out, and
it is forbidden to pull the power line or touch the wire with wet hands.
15. Please be sure that the juicer is put on a firm plane before it is used.
16. Please be sure to pull out the power plug after the use.
17. Switch off the appliance and disconnect from supply before changing
accessories or approaching parts that move in use.
18. Always disconnect the appliance from the supply if it is left
unattended and before assembling, disassembling or cleaning.
19. This appliance shall not be used by children. Keep the appliance and
its cord out of reach of children.
20. Appliances can be used by persons with reduced physical, sensory or
mental capabilities or lack of experience and knowledge if they have been
given supervision or instruction concerning use of the appliance in a safe
way and if they understand the hazards involved.
21. Children shall not play with the appliance.
22. This appliance can be used by children and persons with reduced
physical, sensory or mental capabilities or lack of experience and
knowledge if they have been given supervision or instruction concerning
use of the appliance in a safe way and understand the hazards involved.
Children shall not play with the appliance. Cleaning and user maintenance
shall not be made by children without supervision.
2

ELEMENTS
Pict res are for reference only
3

RUBBER PAD INSTALLATION
1. Before the juice cup is installed, please confirm whether the rubber pad
of the marcoutlet at the bottom of the juice cup is properly installed.
Make the rubber pad of marc outlet inserted into the rectangular slot.
Make the rubber pad of marc outlet properly inserted.
Notes: The r bber pad m st be properly installed, otherwise
leakage phenomenonmay occ r.
2. Installation juice outlet stopper
The stopper is separately packed during the packaging process. use, make
the bayonet juice outlet align with the fixed column on juice outlet and
inserted. Before use make the bayonet juice outlet stopper align with the
fixed column on juice outlet and inserted.
3. Installation of marc outlet stopper
The stopper is separately packed during the packaging process. Before
use, make the aligning column on the fixing piece marc outlet stopper
align with the fixing groove on the outlet and inserted.
4

ASSEMBLY OF COMPLETE MACHINE
Step 6
Make the juice cup and marc cup
respectively installed to the juice
outlet of juice cup and the position
that is under the marc outlet.
Step
Make the feeding tube installedto the
squeezing cup.
See the figure, make the mark “^”
on the cover of squeezing cup and the
mark “^”on the squeezing cup
aligned and perform installation
downwards, and then rotate it at
clockwise direction.
Step 4
Make the filter installed into the
squeezing cup. See the figure. Make
the mark “^” on the juicing filter and
the mark “^” on the squeezing cup
aligned and perform installation
downwards.
Step 3
Make the auger installed
into the filter.
Make the hexagonal axis in the auger
align with the outer-hexagonal axis of
motor and perform installation
downwards, and then rotate it at clock
wise direction.
Step 2
Make the filter installed into the
washing rack.
Step 1
Make the squeezing cup installed
onto the main body. See the figure.
Make the trim strip on the squeezing
cup align with the trim strip on the
main bodyand perform installation
downwards, and then rotate it at
clockwise direction.

FUNCTION DESCRIPTION
No. Program Food recommendation
1 Hard 1. Suit hard vegetable and fruit, Carrot, Beet etc;
2. Cut fruit into 1. -2cm block or Length;
3. Put fruit to juicer slowly and ensure marc can go out smoothly ;
4.Touch button “ R” if unit is blocked during working;
2 Medium 1. Suit for not too hard fruit, such as Apple, Pear etc ;
3 Soft 1. Suit for soft fruit, such as Watermelon, grapes etc;
2. Put fruit to juicer slowly and ensure marc can go out smoothly ;
3. For soft fruit, they can not be squeezeed fully and marc will remain little juice;
4 Mixed Juice 1. It is better for soft fruit mix some hard fruit on this program;
2. During working, Juicer will stop seconds for the second fruit;
Vegetable 1. The program suit for vegatable juice;
2. Please use some hard and less fiber vegetable for juice;
3. For celery and other much fiber vegetable, please cut it about 2cm length;
4. Put vegetable to juicer slowly and ensure marc can go out smoothly;
6 Jam 1. This program suit for soft fruit such as: tomato, Strawberry;
2. Stem the Juice outlet by stopper;
3. Put fruit to juicer and squeez it about 3 mins, ensure juice less than
squeezing cup max scale mark;
4. Add some yogurt or honey according to taste, Clean juicer;
5. Jam f nction is only available in models GSJ-600 and GSJ-610;
7 Nuts milk 1. Nuts such as Soybean/ Peanut /almond must be soaked 8-12 hours;
2. Put soaked nuts and water to squeeze together;
3. Fully cook the juice and add milk or sugar according to taste;
8 Salad 1. This function is option, suit for carrot, cucumber, onion etc;
2. Need one set special accessories for Salad function;
3. The salad function can cut vegetable to strip or piece by 2 different knives;
4. Make salad according to need;
5. Salad f nction is only sef l in models GSJ-610 and GSJ-620 with
incl ded accesory. For model GSJ-600 salad accesorry is available
separately;
9 Washing 1. Before using this Slow Juicer, close the juice and Marc outlet stopper;
2. Pour some clean water to squeezing cup and touch “washing” button;
3. Open juice and marc outlet stopper and pour out water, continue making juice;
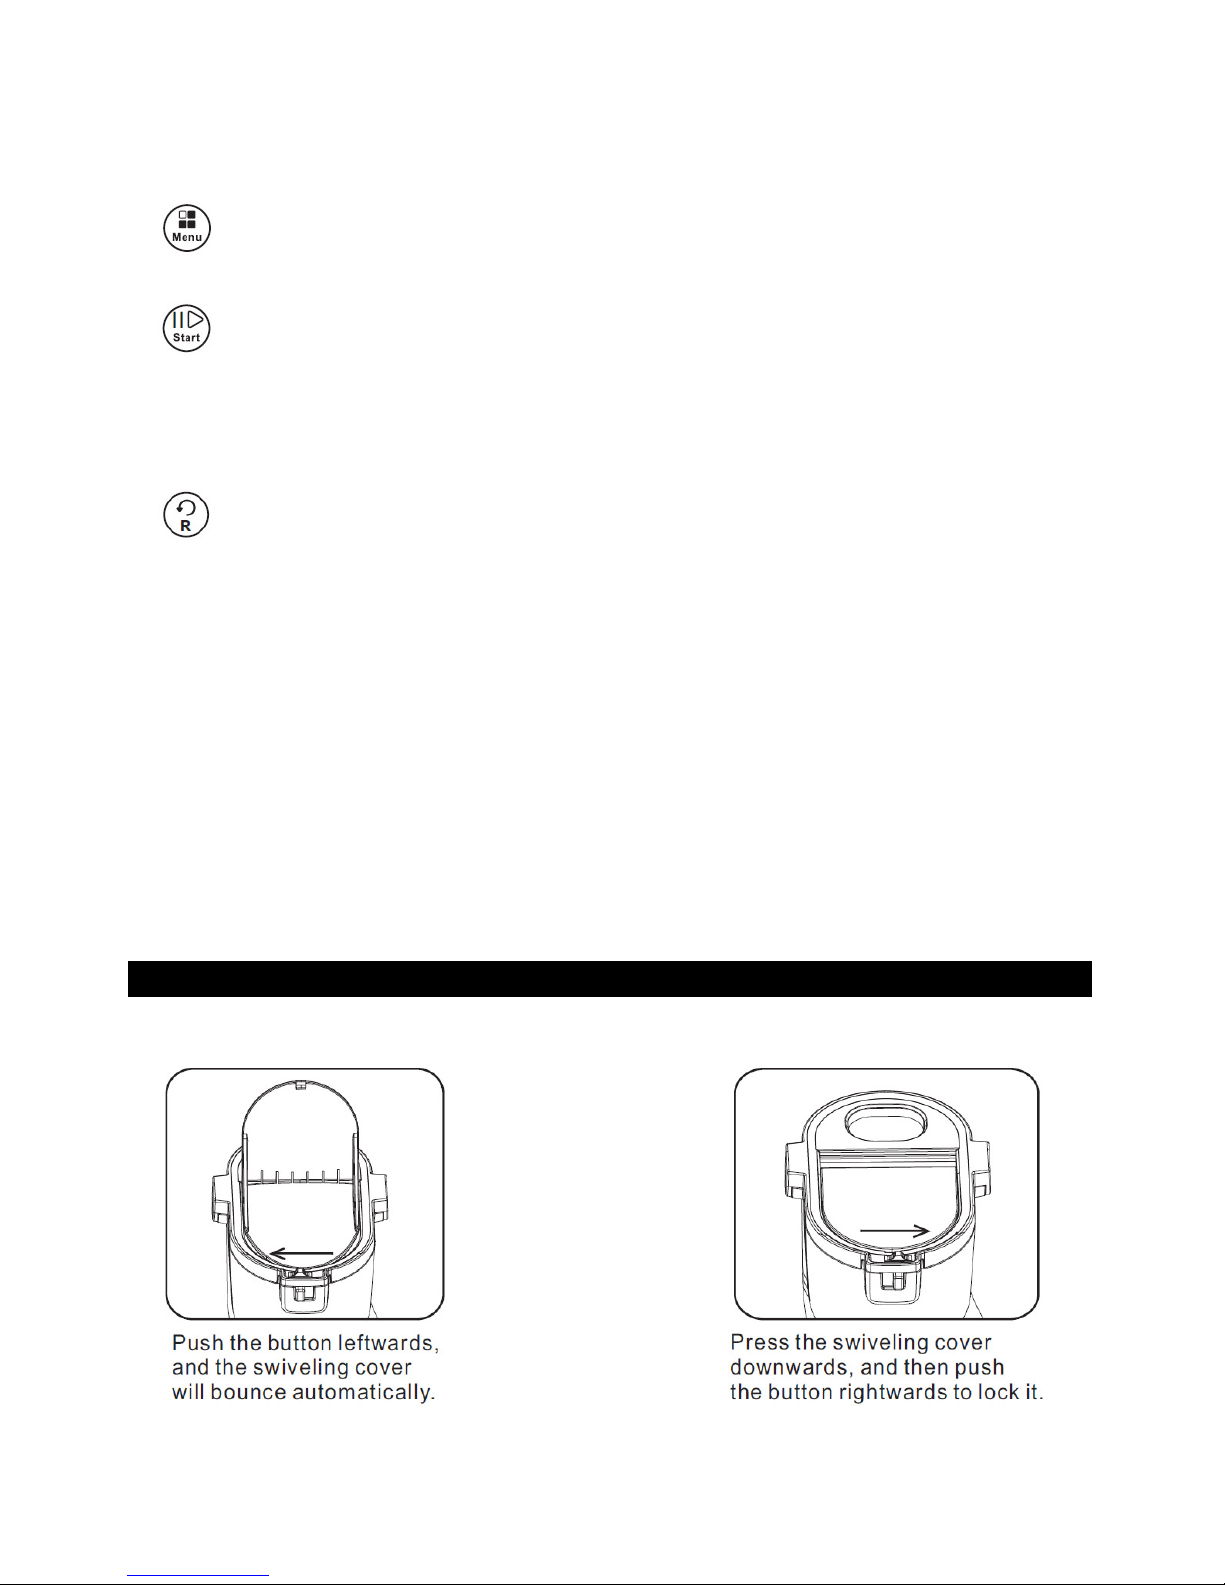
1. key: It is Power and stop key, After the power is pl gged in and the cover of j ice
1. key: It is power and stop key. After the power is plugged in and
the cover of juice cup is applied, the buzzer will beep and the power lamp
will flash to enter into standby status; click the 『power 』key for power on
6

and the power lamp will be normally on. At this time, the default menu is
『hard 』vegetable and fruit. when all lights are on and press the 『power 』
key, the machine will power off after seconds' reversal operation.
2. key: Click the 『menu 』key for switchover in circulation (from left to
right, from up to down).
3. key: Click the 『start 』key, and the selected menu operation will
start. The machine will pause if the 『start 』key is clicked at squeezing
status; and the machine will continue the work after the 『start 』key is
clicked again.
4. key: Click the 『R 』key, the machine works in backward rotary, and
the machine will pause after 10 seconds' reversal operation. (The 『R 』key
may be used at both pause or squeezing status).
Notes: If switch over to other men options nder sq eezing
stat s, please click the 『power』key firstly, and then click the
『men 』key. If all the display lamps flash and the b zzer beeps,
the machine will pa se and enter into protection stat s. The
machine will recover to the defa lt stat s by clicking any key.
The machine will stop a tomatically after r nning for 20min at
sq eezing stat s, Cool machine abo t 20 min tes and restart it
again if need.
USE METHOD
1. Use method of cover:
7

2. Juicing method:
(1) Use method of big- caliber feed port:
1. Push the cover-opening button leftwards
and the swiveling cover will bounce
automatically, and the feed port will appear.
2. At this time, the whole apple may be put
into the feed port, rotate and press the
swiveling cover until the apple enters into
the squeezing chamber.
3. The pushing rod may be used for
assistance during the squeezing process.
Notes:
1. The fr its and vegetables with the diameter of over 75 mm or
irreg lar shapes shall be p t into the machine after being c t
into small size, so as to prevent nsmooth feeding.
2. M ch fiber vegetable sho ld be c t to 2cm length.
(2) Use method of small feed port:
1. Make the swiveling cover rotated to
be horizontal, and then push the
cover-opening button rightwards to
lock the swiveling cover.
2. Make clean fruits and vegetables
(big-sized fruits and vegetables shall
be cut into proper size) put into the
feed port, and push them inwards by
using the pushing rod.
NOTES FOR USE
* Please read the following contents before use.
1 .The materials shall be put into the machine slowly one by one, and
new materials shall be put into it after the previous materials have
beensqueezed.
2. The materials with large fiber content (such as celery) shall be put into
the machine after being cut into the blocks with appropriate size (10-
20mm). (The materials with particularly strong fiber shall be put into
themachine slowly after being cut into the blocks of about 20mm).
8

3. When the carrot that have been stored at low temperature for over 1
week is used for squeezing, it is better to make it squeezed together with
the materials with large water content (such as pear or orange), because
that such carrot has small water content.
The juice amount will be larger if new materials are put into the machine
after the previous materials have been squeezed (the juice amount will
vary with thewater content of materials).
4. The juice amount will be small if the materials are not fresh. When dry
materials stored in refrigerator are used for squeezing, the materialsshall
be squeezed after being immersed in clear water for sufficient water
absorption, so that the effect will be better.
5. Hard materials are not applicable to make juice (such as kudzu, suga-
rcane, etc).
6. There will be certain friction noise when carrot (hard flesh) or
apple(hard peel) is used for squeezing, but this has no impact on the
product.
7. Juice will be splash from the feed inlet when such materials as cherries
tomatoes and grapes are used for squeezing.
DISASSEMBLY METHOD
1. Stop the machine and pull out the plug.
2. Grip the feeding tube by hands, and rotate the feeding tube - see
figure (1) clockwise direction to the position indicated on figure (2) and
then take out the feeding tube upwards.
9

3. Grip the juice outlet on the squeezing cup, and left it upwards for
separation - see figure (3)
4. Take out the filter from the squeezing cup + auger+ washing rack - see
figure (4)
5. Respectively disassemble auger, filter and washing rack - see figure ( )
CLEANING
1. Cleaning before se
1. After the complete machine is assembled, make the juice outlet stopper
and the marc outlet stopper respectively installed to the juice outlet and
marc outlet of the juice cup, and it shall be at closed status.
2. Connect the power. Add 00 ml water into the juice cup from the feed
port; start the cleaning function in menu option, and the machine will
perform cleaning automatically.
3. The machine will stop automatically after the cleaning is completed.
10

2. Cleaning after se
Clean the disassembled parts with clear water, and please clean them with
brush if meshes are blocked up by marc.
Note : Please do not se iron wire br sh, abradant or sharp
cleaning tool for the cleaning.
3. After cleaning
Please dry the cleaned parts and store them in a clean and ventilating
place.
Notes:
1.Please wash the machine in time after se, otherwise the dreg
will attach to the container, which will affect the assembly and
cleaning, and even res lt in perfor-mance red ction.
2. The r bber pad at the bottom of the sq eezing c p may be
washed. Please refer to the contents in page 4.
11

SALAD MAKER ACCESSORIES INSTALLATION
1. Install Salad maker parts
First, Install Rod to unit the Motor axis;
Second, Install all other parts according to follows picture
2. Install salad maker knife to knife holder
Insert The knife one side to the Holder and
push down Knife another side as follows picture
12

TROUBLESHOOTING
Phenomenon Cause Troubleshooting method
The running machine
stops suddenly
1. Whether the power plug is
inserted properly.
2.The quantity of materials put
into the machine is too much
3. Hard fruits and vegetables
are not cut.
4.Continoues working time more
than 20 Mins.
1. Make the plug inserted into the
socket.
2. First, press “R” for 2-3s to make
the materials return upwards; then
choose function button and start
again(repeat
the process for about 3 times).
If the machine still does not run
please clean the machine and then
use it.
3. Hard fruits and vegetables (such
as carrot) shall be squeezed after
being cut into
strips.
4. Cool the machine about 20 Mins
and restart it if need.
The juice amount is
small
Materials stored in refrigerator
too long before squeezing.
1. The juice amount will be
increased if the materials are
squeezed after being immersed
in clear water for sufficient water
absorption.
2. Use fresh fruit.
Juice flows out of the
mainframe
The rubber pad at the bottom
of squeezing cup is not
installed properly.
Please reinstall the squeezing rubber
pad by
referring to the installation method.
There is abnormal
noise
1. Accessories are not properly
installed.
2. The machine is put on
oblique
ground.
3. Parts cause extrusion sound
during squeezing.
1. lnspect whether the accessories
are properly installed after the
machinestops.
2. Please put the machine on a
plane.
3. The sound caused by extrusion of
fruits and vegetables, and please do
not worry about it.
The container and
accessories are dyed
after use
1. Dreg attaches to the
container
2. The container and
accessories are liable to be dyed
when materials with pigment
(such as carrot, spinach, etc.)
are used for
squeezing.
1. Clean the machine in time after
use
2. Clean the machine with detergent
after use.
13

JUICE RECIPES
Carrot-Celery J ice
Mix two parts carrot juice to one part celery juice. Add a few drops of lemon juice for
added flavor.
Carrot-Celery-Apple J ice
Mix equal amounts of carrot, celery and apple juice.
Carrot-Cabbage J ice
Mix three parts carrot juice to one part cabbage juice.
Carrot-C c mber-Beet J ice
Combine five ounces carrot juice, two ounces cucumber juice, and one-ounce beet
juice. Or, one cucumber peeled, one red beet and the remainder carrot.
Carrot-Celery-Parsley J ice
Combine four ounces carrot juice, three ounces of celery juice and one ounce of
parsley juice. IMPORTANT: One ounce of any leafy green vegetable can be substituted
for the parsley juice.
Carrot-Parsley J ice
Combine seven ounces of carrot juice to one ounce of parsley juice.
Apple-Carrot-Beet J ice
Add juice from one beet to equal parts of apple and carrot juice.
Carrot-C c mber J ice
Combine four parts carrot juice to one part cucumber juice.
Apple-Beet J ice
Combine five parts apple juice to one part beet juice.
Apple Grape J ice
Combine equal parts apple juice and grape juice. Juice grapes first, then apples.
Apple Lemonade
Very small wedge of lemon with peel and about four apples (mixed variety).
Pear Lemonade
Small wedge of lemon with peel. Any type of pear.
Orange-Grapefr it-Lemon J ice
Combine four ounces orange juice, four ounces grapefruit juice and one ounce lemon
juice.
Apple-Orange J ice
Combine equal parts of apple juice and orange juice.
Cantalo pe and Honeydew
Combine equal parts. Peel these, as the outside is difficult to clean.
Carrot-Apple-Spinach J ice
Combine eight ounces carrot juice, six ounces apple juice and two ounces of spinach
juice.
Carrot-Lett ce-Celery J ice
Combine equal parts of carrot, lettuce and celery juice.
Carrot-Beet-Spinach J ice
Combine ten ounces carrot juice, three ounces of spinach juice and three ounces of
beet juice.
14

1
This manual suits for next models
2
Table of contents
Other Gotie Juicer manuals