Grace Digital GDI-USBM10 User manual

Business Audio System:
Music & Messaging MP3 Player
by Grace Digital Audio
User Guide Model No. GDI-USBM10
___________________________________________________________________

1
User Guide Contents
Introduction 2
Safety & General Use Information 2
________________________________________________
Features 3
Set Up & Operation 5
Functions & Controls 6
Accessories 7
________________________________________________
Customer Support & Warranty 8
________________________________________________
Appendix 8
-Grace Music Master Recording Software CD & Use 8
-Free Personalized Audio Greeting & Registration 9

2
INTRODUCTION
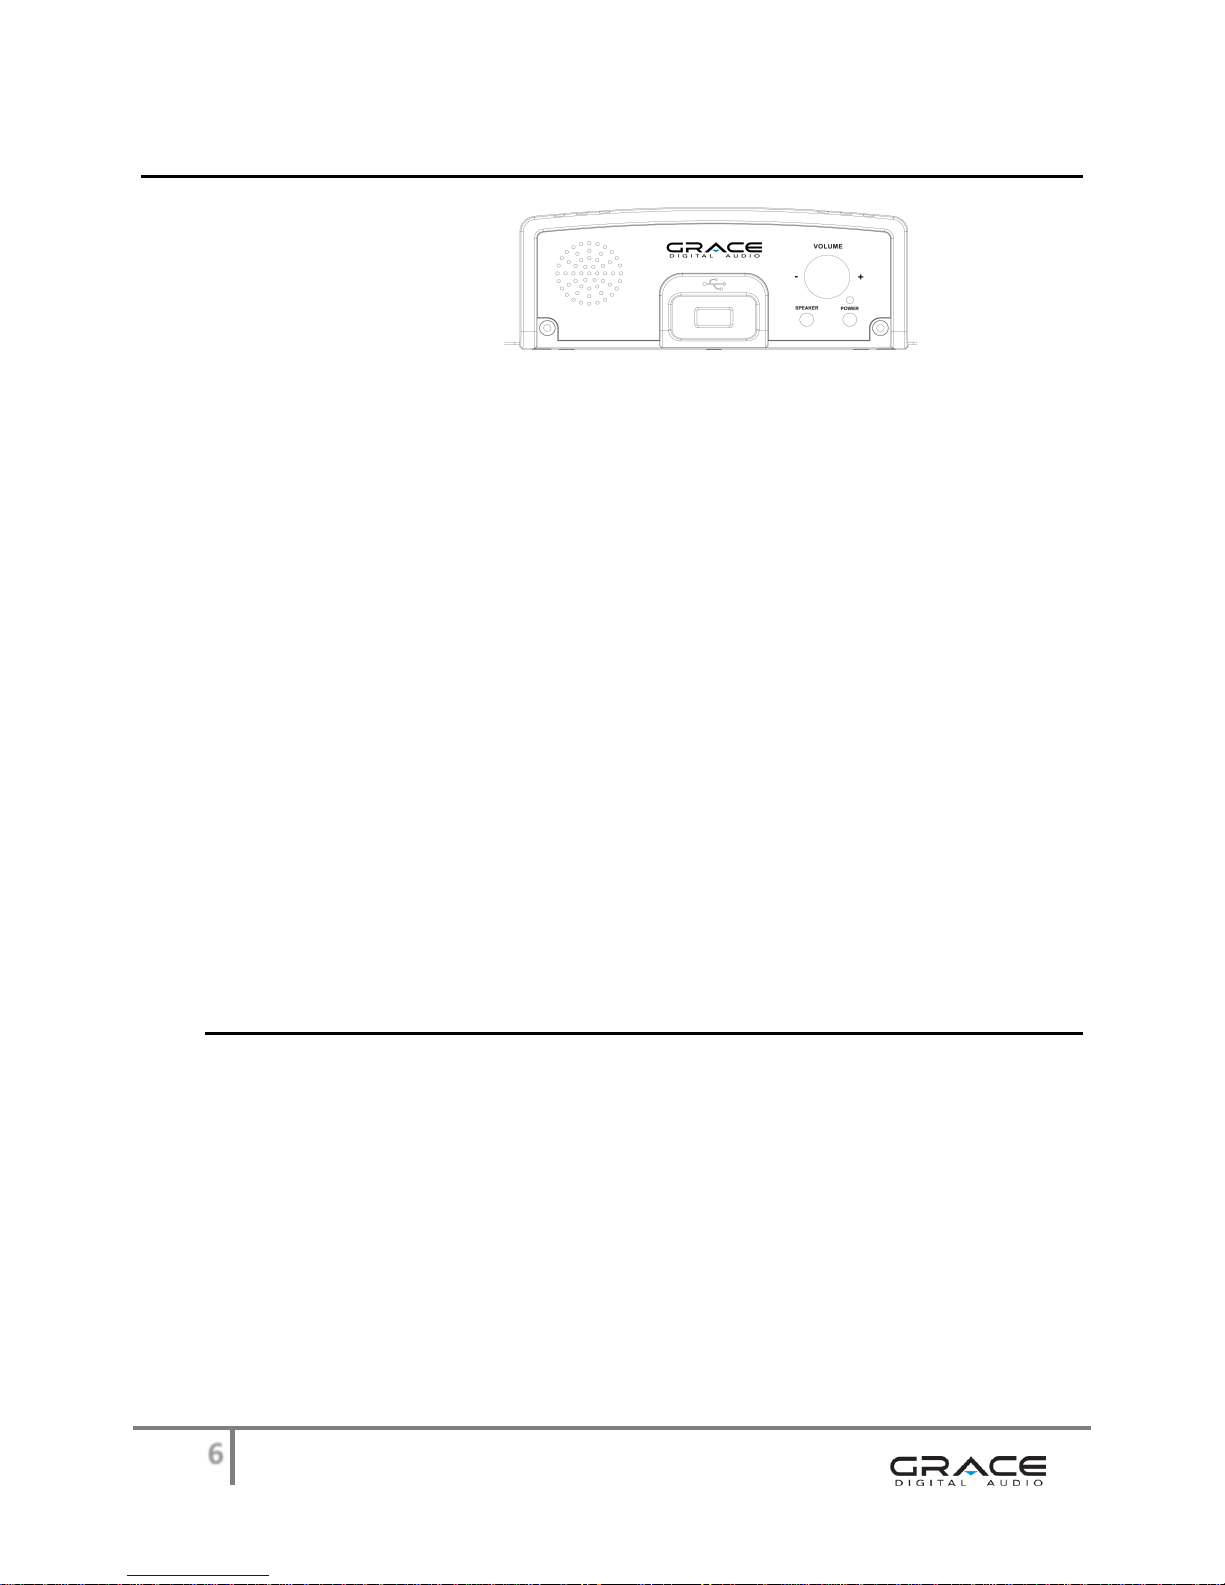
The Business Audio System (GDI-USBM10) is an on hold audio system for use with a PBX or a
Key Phone system. The system is designed for ease of use by simply plugging the unit into your
existing phone system with a single audio cord connection. Play from audio tracks made
available on the USB flash drive.
You may use the pre-recorded audio on the USB drive or you may record your own audio tracks
on your PC computer using the Grace Music Master Recording Software included with you unit.
Once completed and saved to your computer, download the desired recordings to the USB
drive for use on your Business Audio System.
WARNING: Please carefully read the User Guide for operational & safety instructions now.
Keep the User’s Guide in a secure place for future reference.
SAFETY & GENERAL USE INFORMATION
ADVISORY: This product is intended for North American markets. The unit is in compliance
with the essential requirements and other relevant provisions of Directive 199/5/EC
FCC INFORMATION Pursuant to Part 15 of the FCC Rules, this equipment has been tested and
found to comply with the limits for a Class B digital device. These limits are designed to
produce reasonable protection against harmful interference in a residential installation. This
equipment generates, uses and can radiate radio frequency energy and, if not installed and
used in accordance with the instruction, may cause harmful interference to radio
communications. However, there is no guarantee that interference will not occur in a particular
installation. The unit may malfunction when there is radio interference on the power line/signal
line. The unit will revert to normal operation when the interference stops. If this equipment
does cause harmful interference to radio or television reception, which can be determined by
turning the equipment on and off, the user is encouraged to try to correct the interference by
one or more of the following measures:
Reorient or relocate the receiving antenna
Increase the separation between the equipment and receiver
Connect the equipment in to an outlet on a circuit different from that to which the
receiver is connected
Consult the dealer or an experienced radio/TV/electronics technician for assistance.
CAUTION: To comply with the limits, Federal Communication Commission (FCC) warns any
changes or modification not expressly approved by the party responsible for compliance may
void the user’s authority to use and/or operate this equipment. Any modification or improper
use of the unit may void the limited manufacturer’s warranty.

3
WARNING: This product may contain chemicals listed in Proposition 65
http://www.oehha.ca.gov/prop65/prop65_list/Newlist.html that may be known to cause
cancer, birth defects or other reproductive harm
INSTALLATION
oNever install the unit where the unit may be subject to heat, water, dust, mechanical
vibration, mechanical shock, electromagnetic radiation sources including and not limited
to:
Direct sunlight
Air ducts or radiators
Environments with dirt or dust
Environments with moisture or rain
Environments with mechanical vibration or shock
Environments with electromagnetic radiation
OPERATIONAL USE
oPower the unit with the power adapter included.
oDo NOT cover the unit in any material such as cloth or plastic. IF the unit is covered in
this manner the temperature inside the unit and outside the unit may rise substantially.
Substantial temperature increase may result in a malfunction, product damage or
personal injury
oFor best performance, the unit should be used in an ambient temperatures between
41F (5C) and 95F (35C). Avoid use in temperatures below 41F (5C) or above 95F (35C).
oTo avoid fire or shock hazard, do not expose the unit to any water source including
moisture or rain. To prevent electrical shock, do NOT open the cabinet. Refer inspections
and servicing to qualified personnel only
CARE & MAINTENANCE
oCLEANING
Do NOT use volatile cleaners, chemicals or solvents on this unit.
Clean with a soft cloth & wipe lightly
oRESET & Electrostatic Discharge
In the instance the unit is subject to electrostatic discharge, the unit may
malfunction. Should a malfunction occur, reset may be required to address the
issue. To reset the unit: turn the power OFF, unplug the unit, allow the unit to sit
unplugged for at least 60 seconds, plug-in the unit, turn the power ON again.
FEATURES
oUSB FLASH DRIVE & AUDIO CONTENT
512 MB USB Flash Drive included
NOTE: unit may be used with alternative standard USB Flash Drives sold separately
Play standard MP3 files using the USB Flash Drive connection on the front panel

4
USB Flash Drive includes 5 ½ hours of pre-installed audio on 7 music tracks
Update content on the Flash Drive as desired using your PC
Insert the USB Flash Drive to a PC and transfer MP3 files to the USB Flash Drive
NOTE: for use with PC only, not for use with a Mac OS
oUSB FLASH DRIVE DIGITAL MEMORY
USB Flash Drive protects music/message content during power loss
Following a power loss, the volume settings are saved and the unit returns to
playback mode automatically
oCD AUDIO QUALITY
Unit supports high quality CD audio playback up to 44kHz sampling rate at 192KBPS
bit rate
oMONITOR SPEAKER & SPEAKER BUTTON
Built-in Monitor Speaker allows the user to monitor audio
FRONT PANEL VIEW:
Monitor Speaker Button allows the user to turn the Speaker ON/OFF as desired
Volume knob allows the user to increase and decrease the Monitor Speaker volume
oTRIGGER SWITCH & AUDIO PLAYBACK
Use the Trigger Switch to activate audio playback by connecting the switch jack
connection with a 2.5mm jack. When the switch is activated playback begins
BACK PANEL VIEW:
oRACK & WALL MOUNTS
The unit can be installed on a table, rack or wall
TOP PANEL VIEW:
Use the side rack and wall mounts to secure the unit in place on a rack or hang on a
wall, respectively

5
SET UP & OPERATION
oSET UP CONNECTION to a PBX or KEY PHONE SYSTEM
BACK PANEL VIEW:
STEP 1 Plug Power Adapter into a wall power outlet
STEP 2 Plug the Power Adapter into the jack marked “DC 5V”
STEP 3 Plug the Connector Cable to the “AUDIO OUT“ Jack
NOTE: Most phone systems have an RCA connection on the PBX or Key System unit.
Some systems may have a 3.5mm mini connection.
RCA-to-RCA & RCA-to-3.5mm mini connector cables are included.
STEP 4 Plug the other end of the cable into the Phone System’s On-Hold Input Jack.
NOTE: IF the jack cannot be located for the system, contact the vendor for the phone
system to assist to identify the location on the phone system you are using.
oOPERATION
FRONT PANEL VIEW:
STEP 1 Insert the USB Flash Drive into the USB connection slot on the front of the unit
STEP 2 Press the Power Button on the front of the unit to power on the device
STEP 3 Turn the Volume Control Knob on the front of the unit to set the outgoing
volume level to be heard by the caller on hold
NOTES:
Volume Knob controls the built-in Speaker and controls the volume level to
the PBX system / KEY phone system
Continuous playback will begin automatically
Press the Speaker Button to turn the monitor Speaker ON and monitor the
audio output to your system, or turn the monitor Speaker OFF and not
monitor the audio

6
FUNCTIONS & CONTROLS
FRONT PANEL VIEW:
1. POWER & POWER BUTTON
Power is provided from the power adapter connection & turned ON/OFF using the Power
Button. Turn the unit ON by pressing in the Power Button on the front of the unit. Turn
the unit OFF by pressing in the Power Button a second time.
2. USB FLASH DRIVE & USB CONNECTION
The USB connection on the front of the unit is used with a USB Flash Drive. To use the
USB Flash Drive included with this unit simply insert the USB drive into the connection.
The recorded audio will play automatically. You may monitor the audio or not monitor
the audio using the Volume Knob & Speaker Button as described below.
3. VOLUME & VOLUME KNOB
Turn the Volume Knob clockwise on the front of the unit to increase the output volume
and volume to the monitor speaker. The Volume Knob controls the output level to the
“AUDIO OUT” jack connection to your PBX / Key phone system.
4. SPEAKER & SPEAKER BUTTON
The Speaker Button on the front of the unit turns the Monitor Speaker ON and OFF. To
listen to the program playing from the USB Flash Drive press the Speaker Button. To turn
the Monitor Speaker OFF, press the Speaker Button a second time. The “AUDIO OUT”
playback is NOT affected by the Monitor Speaker being ON nor OFF.

7
BACK PANEL VIEW:
5. AUDIO OUT & RCA JACK CONNECTION
Use the RCA connection on the back of the unit to connect the unit to your PBX or Key
phone system. Most PBX and Key systems will be equipped to accept an RCA jack
connection. Some systems may require a 3.5mm mini connection.
Cables for both RCA-to-RCA and RCA-to-3.5mm are included with the GDI-USBM10.
6. IMPEDENCE SWITCH
The impedance Switch on the back of the unit has selections for 8 ohm and 600 ohm
output setting. 8 ohm is the default for most PBX and Key Phone systems. IP based
phone systems may require a 600 ohm setting.
7. TRIGGER JACK
The 2.5mm Trigger Jack connection on the back of the unit is designed for use with a
momentary switch enabled device. When the jack is activated by the momentary switch,
audio should start from the beginning of the program.
8. POWER ADAPTER CONNECTION
Power to the unit is provided by a wired power connection. Connect the pronged end of
the 5V power adapter to a power outlet and connect the other end to the power adapter
connection on the back of the unit. Once connected, turn the power ON by pressing the
Power Button on the front of the unit.
ACCESSORIES in the box
oACCESSORIES included with the GDI-USBM10:
USB 512MB Flash Drive with pre-recorded Music Audio Tracks
Grace Music Master Recording Software CD (for use with Windows 7, Vista & XP)
1 Personalized on-hold greeting with registration
Connector Cables: RCA-to-RCA Cable (mono)
RCA-to-3.5mm Mini Cable (mono)
Power Adapter
100/220 VAC-5V DC 700mA
User Guide

8
CUSTOMER SUPPORT & WARRANTY
oCUSTOMER SUPPORT
For Customer support you may contact your dealer, your original place of purchase
or Grace Digital Audio at: www.gracesupport.com
oWARRANTY
This unit is guaranteed by a 3 year limited manufacturer’s warranty from the date of
purchase. This guarantee covers repair or replacement as may be required due to
manufacturing defect or failure under normal use. No liability can be accepted for
faults arising from accident or misuse.
Any shipping charges that may be required to send a unit to the manufacturer for
any reason are the responsibility of the Customer.
For issues related to warranty repair and/or exchange you may contact your dealer
directly or Grace Digital by email at www.gracesupport.com
NOTE: Terms and Conditions of this warranty and/or any other program may be
modified without notice. All terms and conditions outlined at the time of registration
shall not be subject to change for Customers participating in the extended warranty
program.
APPENDIX
oGRACE MUSIC MASTER RECORDING SOFTWARE CD & USE
Software for use with PC systems Windows 7, Vista, XP (not for use with Mac OS)
Insert disc to install the Grace Music Master recording software on your computer &
the Grace Music Master shortcut icon on your computer’s desktop.
Once installed, to open the software window, click on the Grace Music Master icon
shortcut on your desktop.
Grace Music Master Recording Software Window
For instructions how to record your own audio files using the software click on Help
at the top of the Grace Music Master window. Then click on Content Help to access
instruction files explaining how to use the features of the software.

9
oFREE PERSONALIZED AUDIO GREETING & REGISTRATION
Each GDI-USBM10 purchase is entitled to receive a FREE personalized on-hold audio
greeting.
To receive the FREE personalized on-hold audio greeting, simply register your
product with Grace Digital at http://www.gracedigitalaudio.com/register
Once registered provide the required* details and we will incorporate your company
name into a “Thank you for calling” greeting. Your greeting will be repeated once
per minute and played over a bed of quality licensed background music.
NOTE: one personalized greeting per purchase
EXAMPLE of a Personalized Greeting:
“Thank you for calling (your company name here), your patience is appreciated.
Please remain on the line and we'll return to assist you in just a moment.”
Required* DETAILS:
* Company Name: ________________ Please provide the NAME as you want the message to
read. Please provide the PHONETIC PRONUNCIATION
* First Name: ________________
* Last Name: ________________
* Address 1: ________________
Address 2: ________________
* City: ________________
* State: ________________
* ZIP / Postal Code: ________________
* Phone / Cell Number: ________________
* E-Mail: ________________
Website: ________________
*Unit Model Number: ________________
*Unit Serial Number: ________________
COMMENTS:
________________________________________________________________________

10
San Diego, California
Other manuals for GDI-USBM10
1
Table of contents
Other Grace Digital MP3 Player manuals