manuals.online logo
Brands
  1. Home
  2. •
  3. Brands
  4. •
  5. Grace
  6. •
  7. Sewing Machine Accessories
  8. •
  9. Grace GMQ King Extension User manual

Grace GMQ King Extension User manual

- 1 -
1-Table King Extension
GMQ King Extension
Parts List
1-Middle
Leg 1-Opposing
Middle Leg
2-Middle Leg
Brace King Size
2-Brace Extension Part A
2-Brace Extension Part B
6-1/4 X 45mm
Connector Bolt 16-5/16 X 1 1/2
Hex Bolt 12-5/16
Washer
6-Threaded
Rectangle Nut
4-24" Plastic Tubing - Pr-einstalled in Rail
1-138" .25 Track
1-130" .25 Track
4-24" Rail & Coupler
King Extension Assembly Kit
**You will use some hardware from your current assembly in addition to what is provided in this kit.
Step 1: Brace Extension A
Parts Neede ssembly
d: e Extension Part A
hole with T-Nut in the second part, as pictured. . R
Step 2: King Leg Assembly
2 –Brac
2 –Brace Extension Part B
4 –5/16 x 1 ½ hex bolt
4 –5/16 flatwasher
Brace extension
Part A
Brace extension
Part B
5/16 X 1 1/2
hex bolt
5/16 washer
¾Pair part “A” and “B” Brace Extension together as pictured. As you connect them, be
sure the sides with the “A” and “B” are facing away from each other.
¾Place the hex bolts through a washer and through the hole of the first part and into the
epeat this process for both sets.
Middle Leg
Part B
Middle Leg
Part A
King Extension
Middle Leg Brace
rectangle nut
45mm
connector
bolt
arts Needed:
on Middle Leg Brace
Bolts
¾actly as pictured
for proper assembly (lettered sides facing
n).
¾h the holes in the legs and into the
lot ough
P1 –Middle Leg
1 –Opposing Middle Leg
1 –King Extensi
2 –1/4 x 45mm Connector
2 –Rectangle Nuts
Position the parts ex
i
Put the 45mm connector bolts
throug
s of the leg brace, threading it thr
the rectangle nut. Tighten the connector
bolts completely.
- 2 -
- 3 -
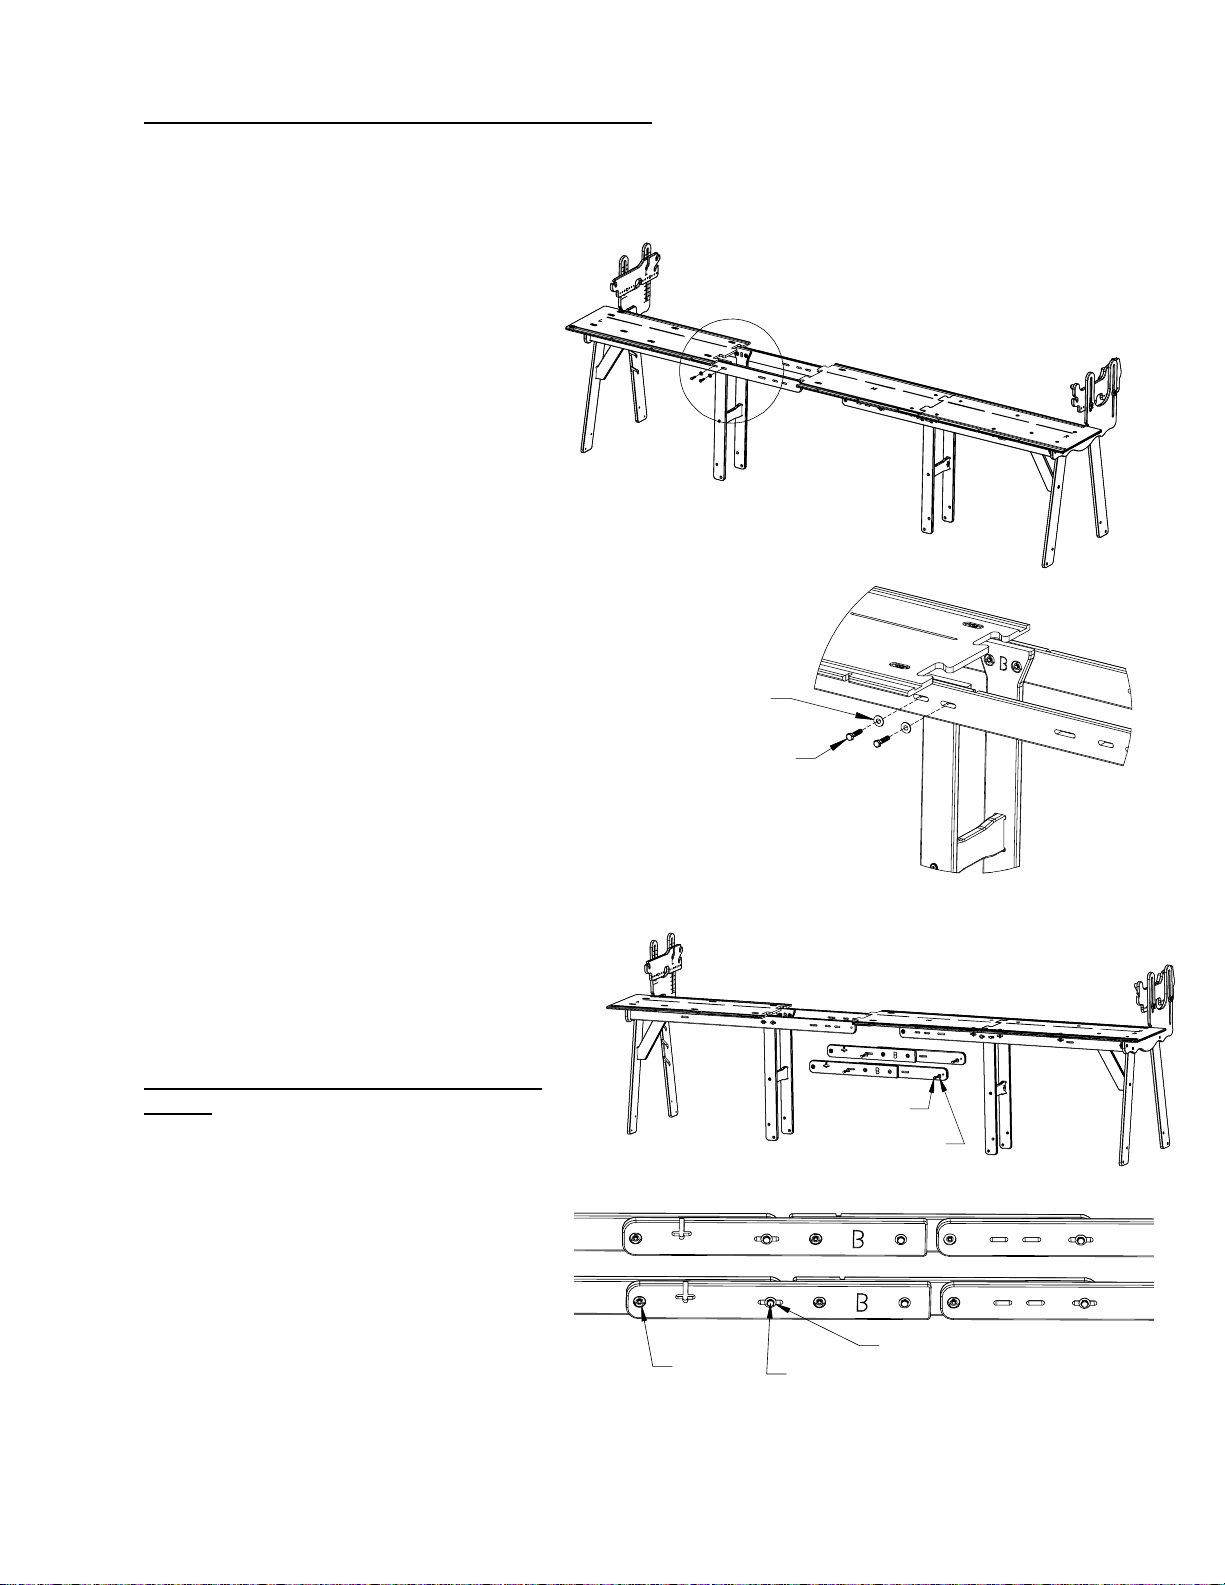
tep 3: King Leg to Grace Machine Quilter Assembly
S
arts Needed:
x ½ Hex Bolt
s on the
cent your
g
¾th king size mi
assemblies to the braces. These will insta
slots s or
¾Machine
Quilter assembly instructions for details on re-
attac
¾1 ½ bolts at this time. Leave loose to
allo
Step 4: Brace Extension to Grace Machine
P
1 –King Size Middle Leg Brace
8 –5/16
8 –5/16 Flatwasher
¾Disconnect the brace
Grace Machine Quilter in the
er. Remove the Middle Leg
Assembly already installed on
frame, as well as the middle table
top (if your machine was in queen
size). The middle legs must then
be disconnected from each other
and you must insert the longer kin
size middle leg brace. Reconnect
the leg assembly.
Now install bo ddle leg
ll into the
A
5/16" X 1 1/2"
Hex Bolt
1/4" Flat
Washer
A
located almost directly under the edge
seams of the Left and Right table tops
See section one, Step 4 of the Grace
hing the leg assembly to the braces, ignoring
their position on the braces in the pictures.
Substitute the 2” hex bolts used in the old
configuration for 1 ½” hex bolts provided.
NOTE! Do not completely tighten
5/16 X 1 1/2
hex bolt 5/16
washer
w for final frame adjustments after
the rails are installed!
Quilter
sembly
x 1 ½ Hex Bolt
extension brace
assemblies to the ends of the Grace
Mac
¾ing
outside and away from the frame, and
that bolts go into and through the slots, s
Parts Needed:
2 –Brace As
8 –5/16
8 –5/16 x Flatwasher
¾Connect the two King
hine Quilter braces as pictured.
Make sure the T-Nuts are fac
and then into the T-Nuts from behind, a before.
T-nut 5/16 X 1 1/2
hex bolt
5/16 washer
- 4 -
NO me. Leave loose to allow for final frame
tep 5: Table Top and Track Assembly
TE! Do not completely tighten 1 ½ bolts at this ti
adjustments after the rails are installed!
S
0” .25 Track
sion Bolt
aces connected, you are ready to put your king size table top into place. Do so with
the “
¾nuts. Secure
the m
¾e to allow for final
fram
¾pictured.
tep 6: King Rail Assembly
Parts Needed
1 – 13
1 – 138” .25 Track
1 –Table King Exten
6 –1/4 x 45mm Connector
6 –Rectangle Nut
¾With your br
K” right side up facing the same direction as the “M” on the adjacent table top.
Secure the king size table top using four ¼ x 45mm connector bolts and rectangle
iddle table top using two ¼ x 45 mm connector bolts and rectangle nuts.
NOTE! Do not completely tighten 1 ½ bolts at this time. Leave loos
e adjustments after the rails are installed!
Place the 130” and 138” tracking into place as
130
”
Track
138
”
Track
S
xtensions
With each rail, place the 24” rail
with
¾e on the
fram e
You will now push in on the frame from both sides, being sure to eliminate any space
betw
Having done this adjustment, you are now ready to tighten all bolts and the braces and
tabl
OU HAVE NOW COMPLETED YOUR KING SIZE EXTENSION ASSEMBLY!
Parts Needed: 4 – 24” Rail E
4 – 24” Dowels
¾
24" Rail
34" Rail 70" Rail
King Extension Rail Assembly
coupler in between the 70” rail
and 34” rail as pictured.
Put your rails in plac
e, noting any gaps between th
rail ends and Pole Mount Ends.
¾
een all three the rail ends and Pole Mound Ends.
¾
e tops.
Y

Other Grace Sewing Machine Accessories manuals

Grace Q-Zone Hoop-Frame PRO User manual

Grace

Grace Q-Zone Hoop-Frame PRO User manual

Grace Continuum II Quick setup guide

Grace

Grace Continuum II Quick setup guide

Grace SMP-03-12171 User manual

Grace

Grace SMP-03-12171 User manual

Grace Cutie Quick setup guide

Grace

Grace Cutie Quick setup guide

Grace SureStitch User manual

Grace

Grace SureStitch User manual

Popular Sewing Machine Accessories manuals by other brands

Brother PR-600/600C user guide

Brother

Brother PR-600/600C user guide

Brother SA179 manual

Brother

Brother SA179 manual

DIVERSIFIED WOODCRAFTS SMT-7242 Assembly instruction

DIVERSIFIED WOODCRAFTS

DIVERSIFIED WOODCRAFTS SMT-7242 Assembly instruction

Jack 6040-D operation instruction

Jack

Jack 6040-D operation instruction

IMB MB2003B instruction manual

IMB

IMB MB2003B instruction manual

Singer DF250 instruction manual

Singer

Singer DF250 instruction manual

ELNA 200-314-028 quick start guide

ELNA

ELNA 200-314-028 quick start guide

JUKI IP-200 Setup manual

JUKI

JUKI IP-200 Setup manual

Racing MDK 60 Series Instructions and parts manual

Racing

Racing MDK 60 Series Instructions and parts manual

JUKI IP-410 instruction manual

JUKI

JUKI IP-410 instruction manual

ZOJE 1900D user manual

ZOJE

ZOJE 1900D user manual

Brother PRCL1 user guide

Brother

Brother PRCL1 user guide

VERITAS 4C-316B manual

VERITAS

VERITAS 4C-316B manual

JUKI SC-510 Safety information

JUKI

JUKI SC-510 Safety information

Pegasus MD Series instructions

Pegasus

Pegasus MD Series instructions

Arrow NORMA JEAN 350 owner's manual

Arrow

Arrow NORMA JEAN 350 owner's manual

ELNA 202-255-004 manual

ELNA

ELNA 202-255-004 manual

Brother PRSCLPM1 installation manual

Brother

Brother PRSCLPM1 installation manual

manuals.online logo
manuals.online logoBrands
  • About & Mission
  • Contact us
  • Privacy Policy
  • Terms and Conditions

Copyright 2025 Manuals.Online. All Rights Reserved.