9
225-7-99 IS3861 10 11 12
To Adjust Recline
(on certain models)
DO NOT adjust
recline with your child in the
highchair.
Flip up the red lock under the
seat. Li t the seat slightly, and
recline it to one o the three
settings.
Be sure that lock is flipped
back down after changing
recline. It is recommended
that the highchair be used in
the upright position only by
children capable of sitting
upright unassisted.
Do not use large tray when
seat is in a recline position.
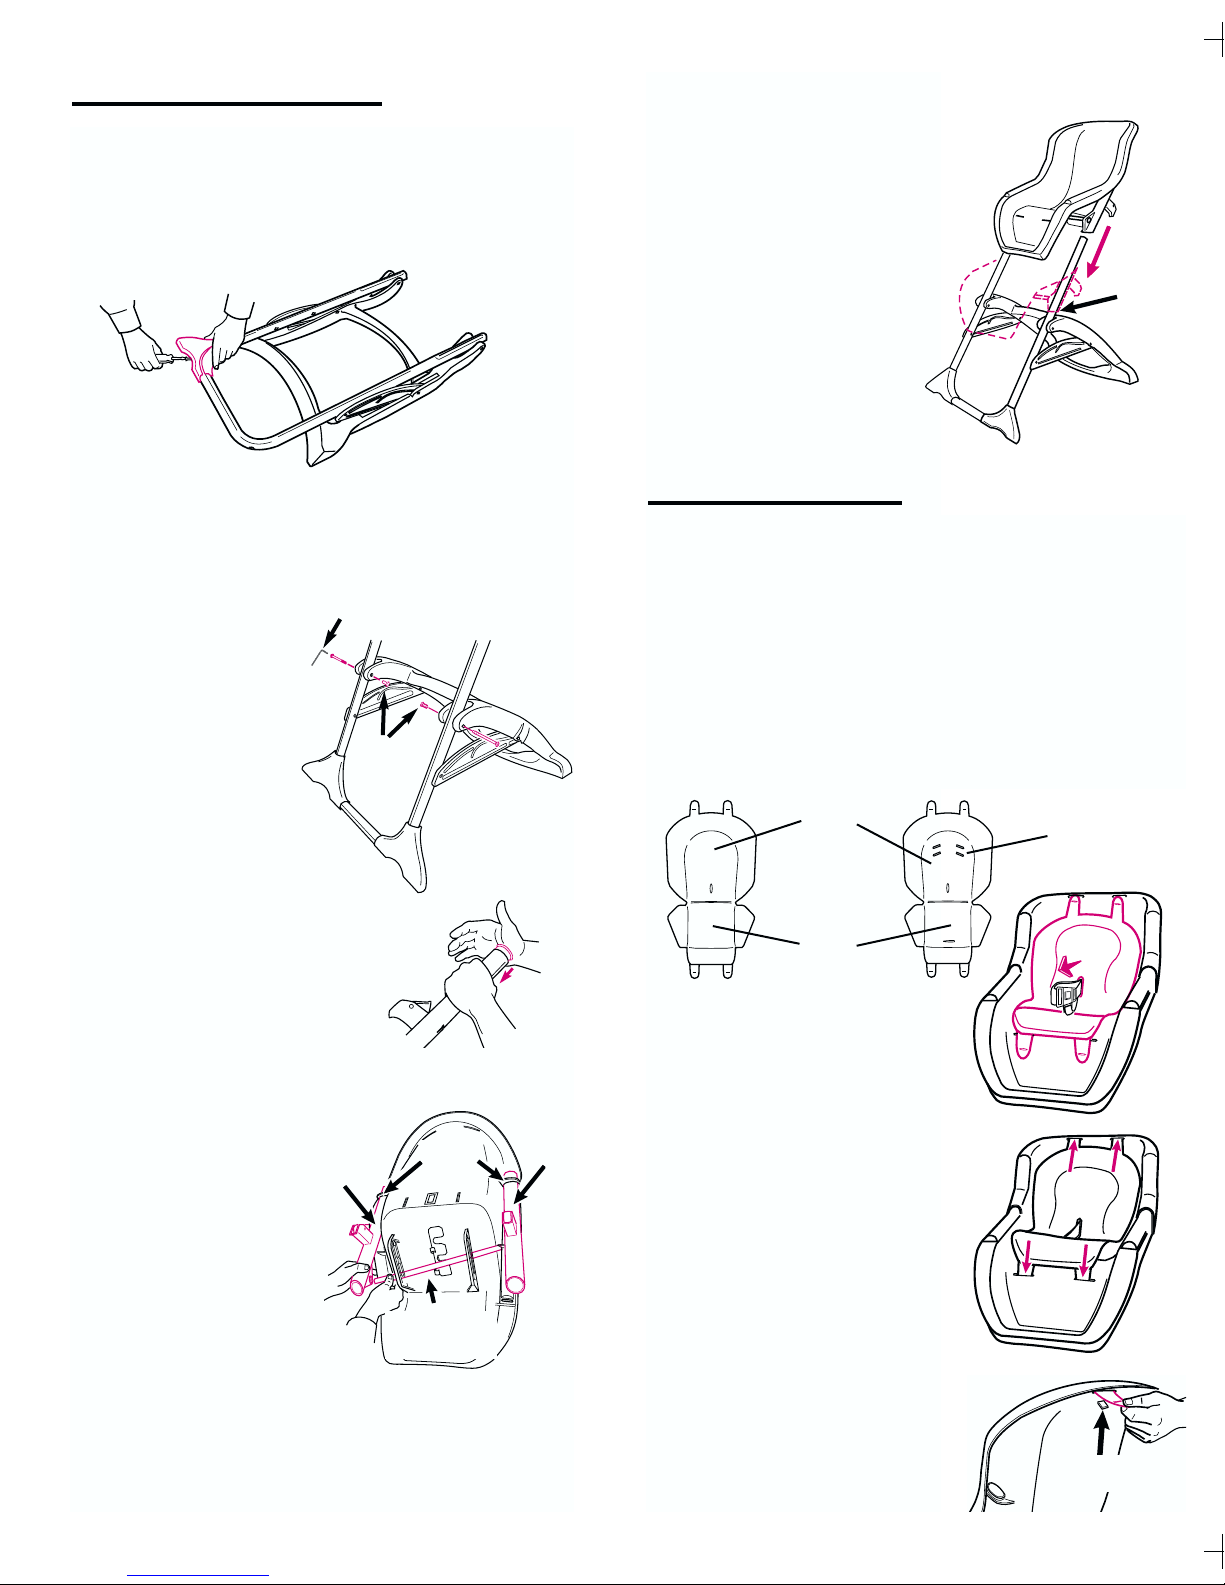
To Fold Highchair
Lay the highchair on the
loor as shown. Press in
the tabs on both leg
crossbraces as shown.
Then push the rear legs
down to old the highchair.
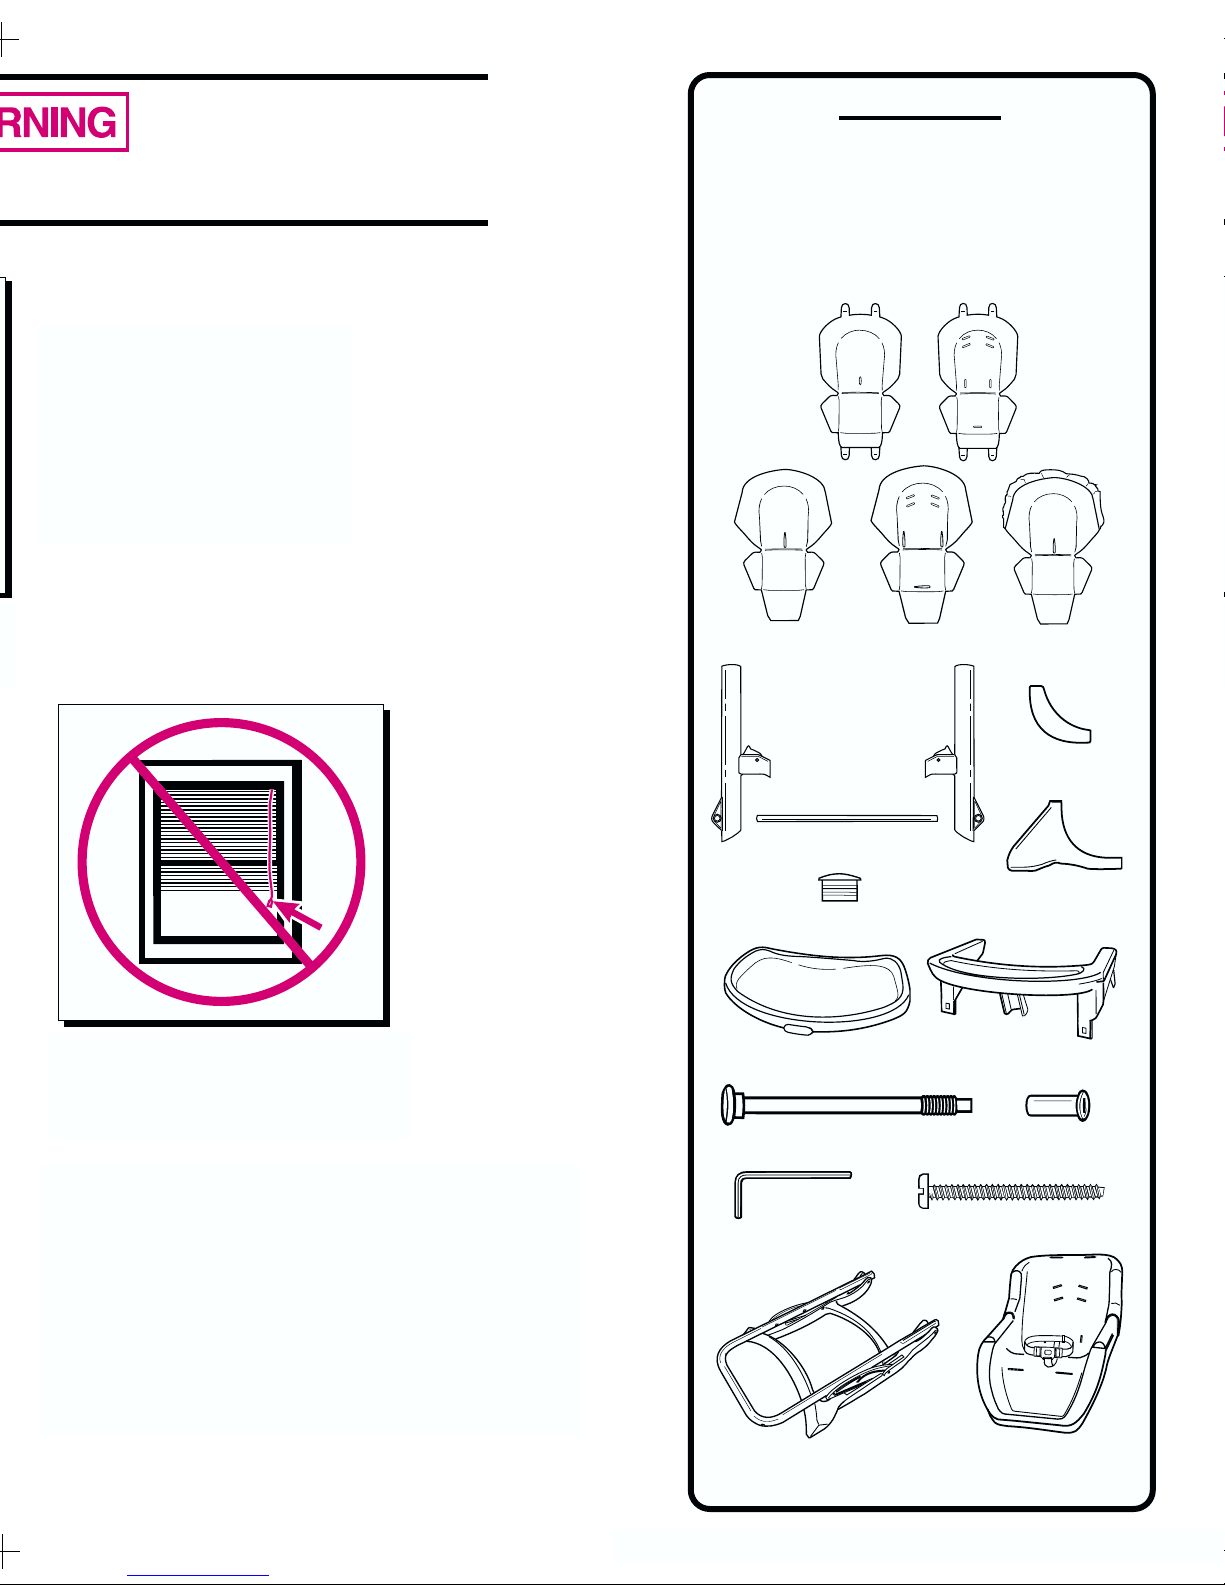
Replacement arts
Instructions for ordering highchair parts:
Complete orm below. Your highchair model number
MUST be included on the orm to ensure proper
replacement parts. Your model number can be found
on a sticker on the back of the footrest. ayment
must accompany your order.
Model Number
(Must be illed in)
SHI TO:
Name
Address
City, State, Zip
( )
Telephone
arts List:
Large tray .....................................
Small tray .....................................
Seat ..............................................
Vinyl seat pad with tabs* ..............
Vinyl seat pad with pocket* ..........
Cloth seat pad (not reversible)* ...
Cloth seat pad (reversible)* .........
Plastic tube (L or R) .....................
Crossbrace tube ...........................
Foot top ........................................
Foot bottom ..................................
Seat belt .......................................
5-Point harness...............................
Hardware ......................................
* Only on certain models.
rice:**
$18.00
$14.00
$22.00
$12.00
$15.00
$18.00
$22.00
$ 8.00 (each)
$ 7.00
$ 5.00 (each)
$ 5.00 (each)
$ 5.00
$ 7.00
$ 5.00
** Prices subject to change without
notice.
Check enclosed
(payable to Graco Childrens
Products Inc.)
Charge to credit card:
Visa
MasterCard
Discover
Account #:
Expiration date:
Signature:
Large tray
Small tray
Seat
Vinyl pad with tabs
Vinyl pad with pocket
Cloth pad (not reversible)
Cloth pad (reversible)
Plastic tube (L or R)
Crossbrace tube
Foot top
Foot bottom
Seat belt
5-Point harness
Hardware
Push
tabs in
Push
rear
legs
down
To Adjust Height
DO NOT adjust
the highchair with your child
in it.
Place oot on base o rear legs.
Li t seat slightly by the handles
at rear o chair and press both
red latches. Slide the seat up or
down until it latches.
There are six possible height
settings. The highchair can be
used as a toddler chair by
adjusting to the lowest height
setting (which does NOT rest
on top o legs).
CHECK that both sides of
chair are latched at the same
height setting.
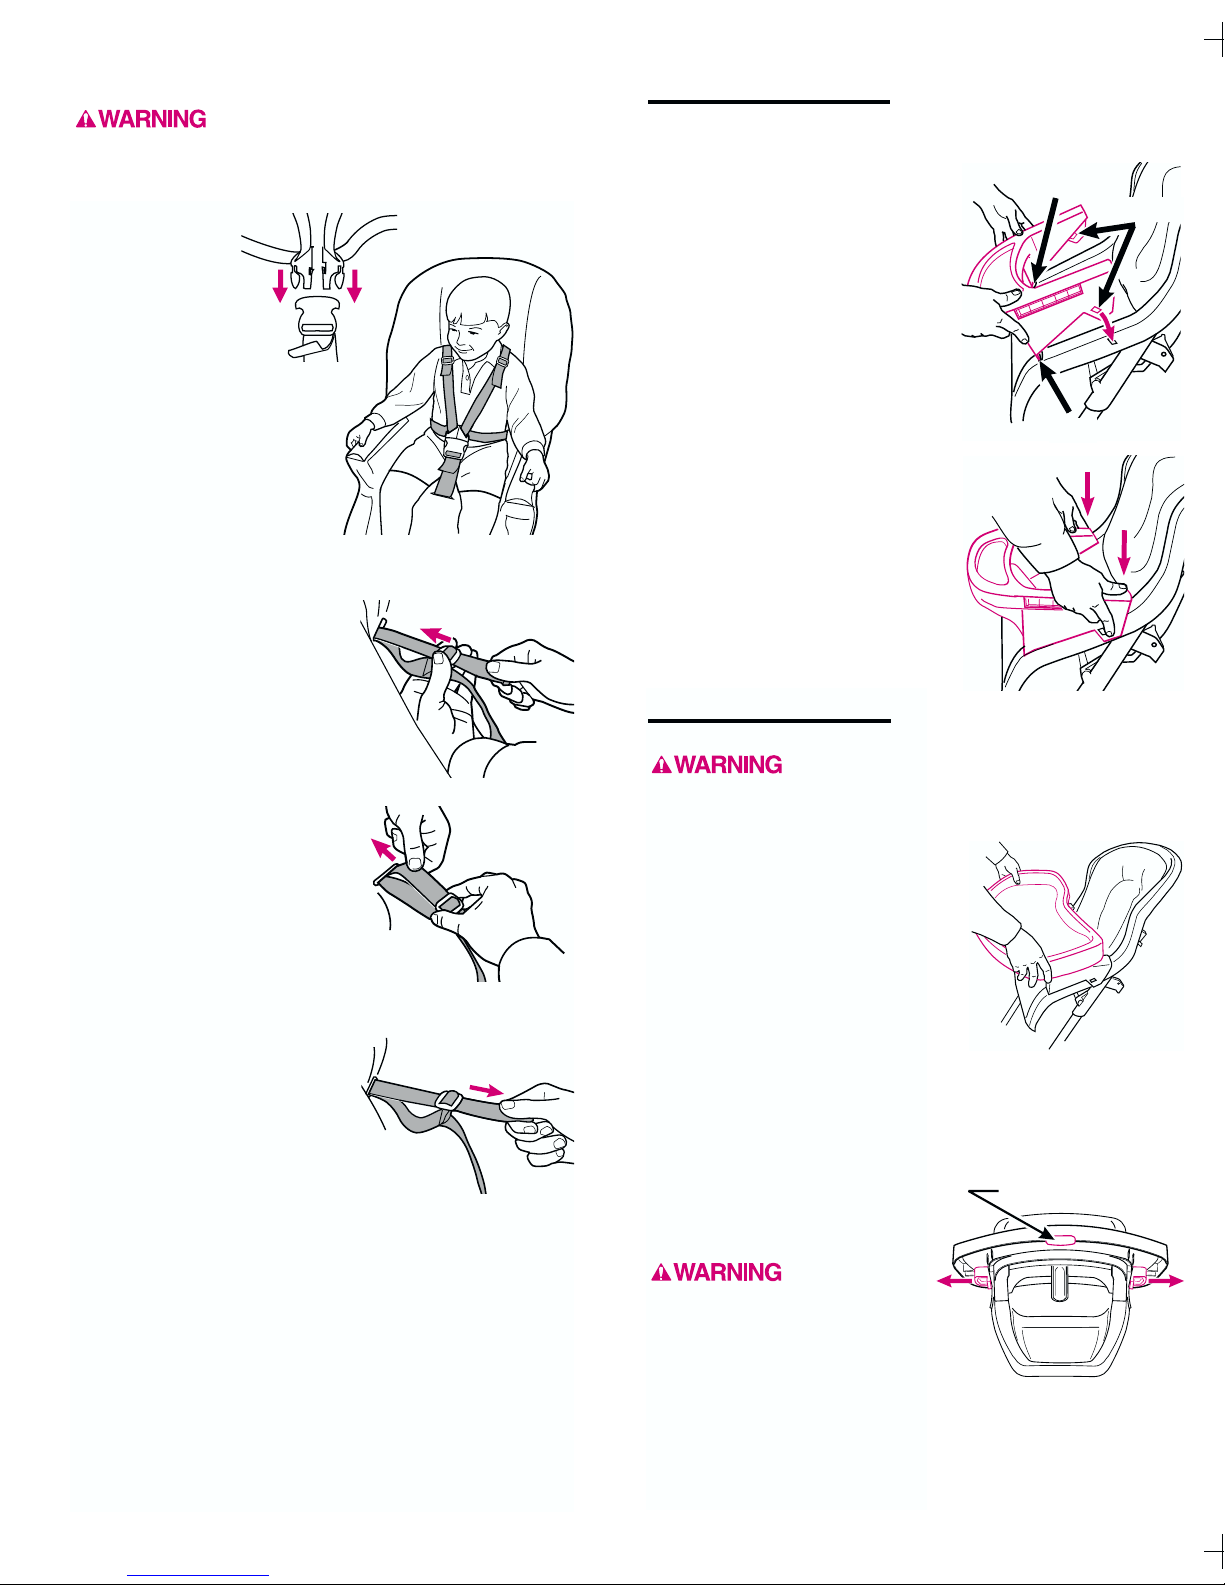
To Use Large Tray
Small tray
must be attached securely
to highchair before using
the large tray.
Place the large tray on the
armrests o the small tray.
Pull out the side handles
under the large tray. Put
the tray in one o the ive
adjustment positions, and
release the side handles.
CHECK that tray is securely
attached by pulling forward
on the tray.
Use either the side handles
or the ront button to adjust
the position o the large tray.
DO NOT
force the tray against
your child. Keep your
childs hands and fingers
away from the tray when
adjusting the tray.
Tray may be removed rom
highchair by using the side
handles.
Push on
ront button
To Use Small Tray
Highchair can be used with
small tray alone, or with large
tray attached on top o small
tray.
Insert the tabs on the small tray
into the slots at the ront o the
armrests. Push down on the
rear o the tray until both latches
at the sides snap onto seat.
CHECK that small tray is
securely attached by pulling
up on the tray.
Tray may be removed rom
highchair by pulling out the
side latches and li ting o tray.
Ta b
Ta b Latches
Total:
Shipping
& handling: $5.00
6% sales tax
(PA only):
Total amount
due:
Return the orm below with payment to:
GRACO CHILDRENS RODUCTS INC.
CUSTOMER SERVICE DE ARTMENT
.O. BOX 100, MAIN STREET
ELVERSON, A 19520
IF YOU NEED HEL
I you have any questions or i you need any part
not listed, please call toll- ree:
1-800-345-4109
or visit our Internet website, www.gracobaby.com.
Step 1.
Place your childs arms
through the loops created
by the shoulder/waist
straps and insert the
harness buckles into the
center buckle housing.
Step 2.
Adjust the shoulder and crotch
strap lengths as needed to get
a snug it around your child:
!To tighten shoulder straps,
hold ree end o strap and
slide adjuster away rom the
ree end.
!To loosen shoulder straps,
hold adjuster and pull strap
back through the adjuster.
Step 3.
Finish by giving a quick tug on
the ree end until shoulder straps
are tight.
Check behind and in front of
seat to see that belt is tightly
threaded through retainers
and straps are tight.
The position o the shoulder straps can be adjusted or
the size o your child. Locate the two plastic retainers
behind the seat back, push them through to the ront
and move them to the higher or lower position as
desired.
I it becomes necessary to remove the harness, irst
remove seat pad. Then ollow the directions given
under To Attach Seat Pad to remove harness straps
rom seat.
USING THE 5- OINT HARNESS:
revent serious injury or death from
falls or sliding out. Always secure your child in the
restraint. Do not depend on the tray alone to hold
your child.