GrainPro MA4040RAD0914-10 User manual

GRAINPRO® SOLAR BUBBLE DRYER™50
INSTRUCTION MANUAL
MA4040RAD0914-10

GrainPro® Solar Bubble Dryer™50 Instruction Manual
MA4040RAD0914-9
GrainPro Inc.
4410A Connecticut Avenue. NW, #163, Washington, DC 20008
Tel : +1 202-921-6700
Email : sales@grainpro.com
GrainPro® Philippines, Inc.
Lot 46 Efficiency Avenue, Subic Bay Gateway Park I, Subic Bay Freeport Zone 2222 Philippines
Phone: +63 47 252 7884 Fax: +63 47 252 7885 Website: www.grainpro.com
Email: salesasia@grainpro.com
GrainPro Kenya
Space Apartments, GF Shio A2 Maimahui Rd. Nairobi West, Kenya
Tel: +254 737 177 767
Fax: +254 710 933 717
GrainPro Mexico, S de RL de CV
Ctoo. Garona No. 903, Sección Tres, Col. Amberes, 37237,
León, Gto. Mexico
Mobile: +52 1 (477) 392 0851
Email: guillermo@grainpro.com
GrainPro Costa Rica S.R.L.
Residencial Valle del Sol, Calle Lajas, Casa #27 Alto de las Palomas,
Santa Ana, San José, Costa Rica
Tel: +506 2282 9129
Email: infogpcr@grainpro.com
GrainPro India Post-Harvest Technology Pvt. Ltd.
Office Number 18A109, WeWork Berger Tower 18th Floor,
C-001/A2, Sector 16-B, Noida, INDIA – 201301
Landline: +91 120 515 0017
Customer Service: +91 960 292 0202
Email: praveen.gupta@grainpro.com
GrainPro®Inc., 1401 K Street NW, Suite 502, Washington D.C. 20005 USA
Copyright 2019 GrainPro®, Inc.
2/37

GrainPro® Solar Bubble Dryer™50 Instruction Manual
MA4040RAD0914-9
TABLE OF CONTENTS
1.
INTRODUCTION ........................................................................................................................................ 4
2.
CHECKLIST................................................................................................................................................. 5
3.
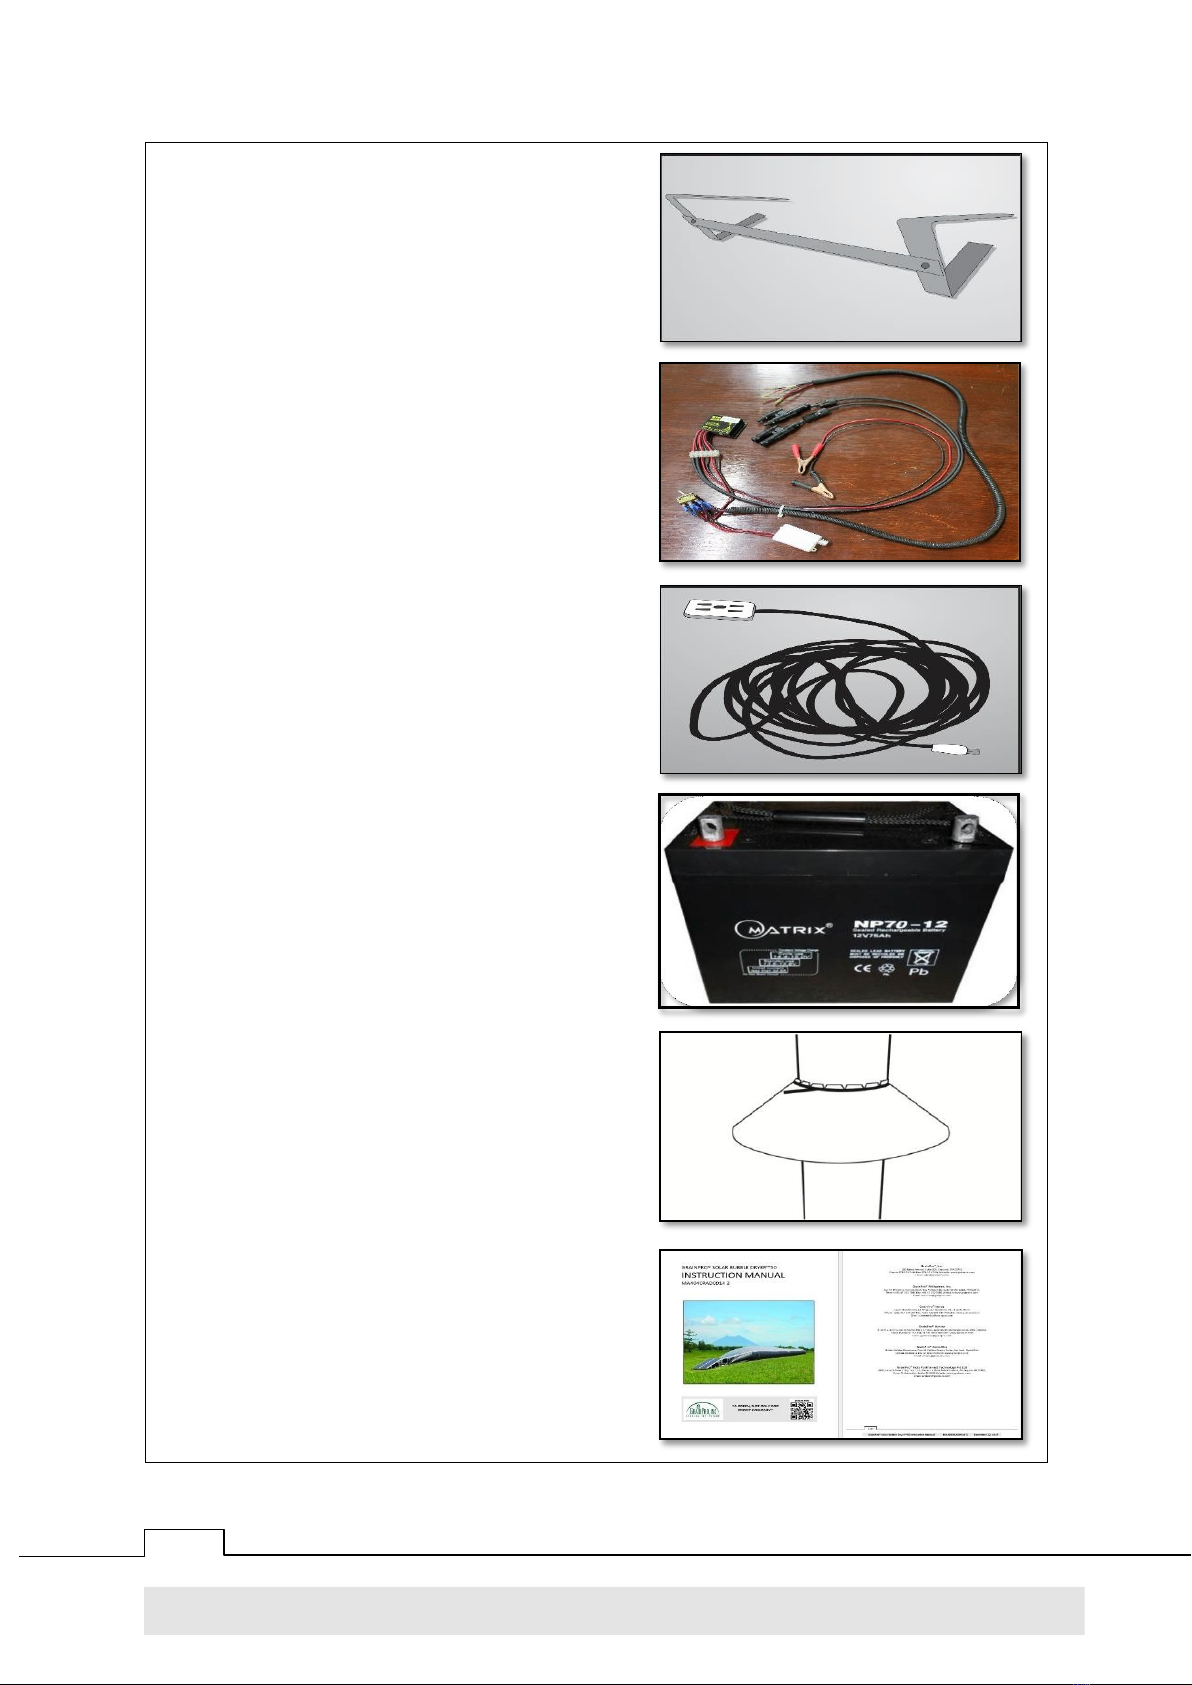
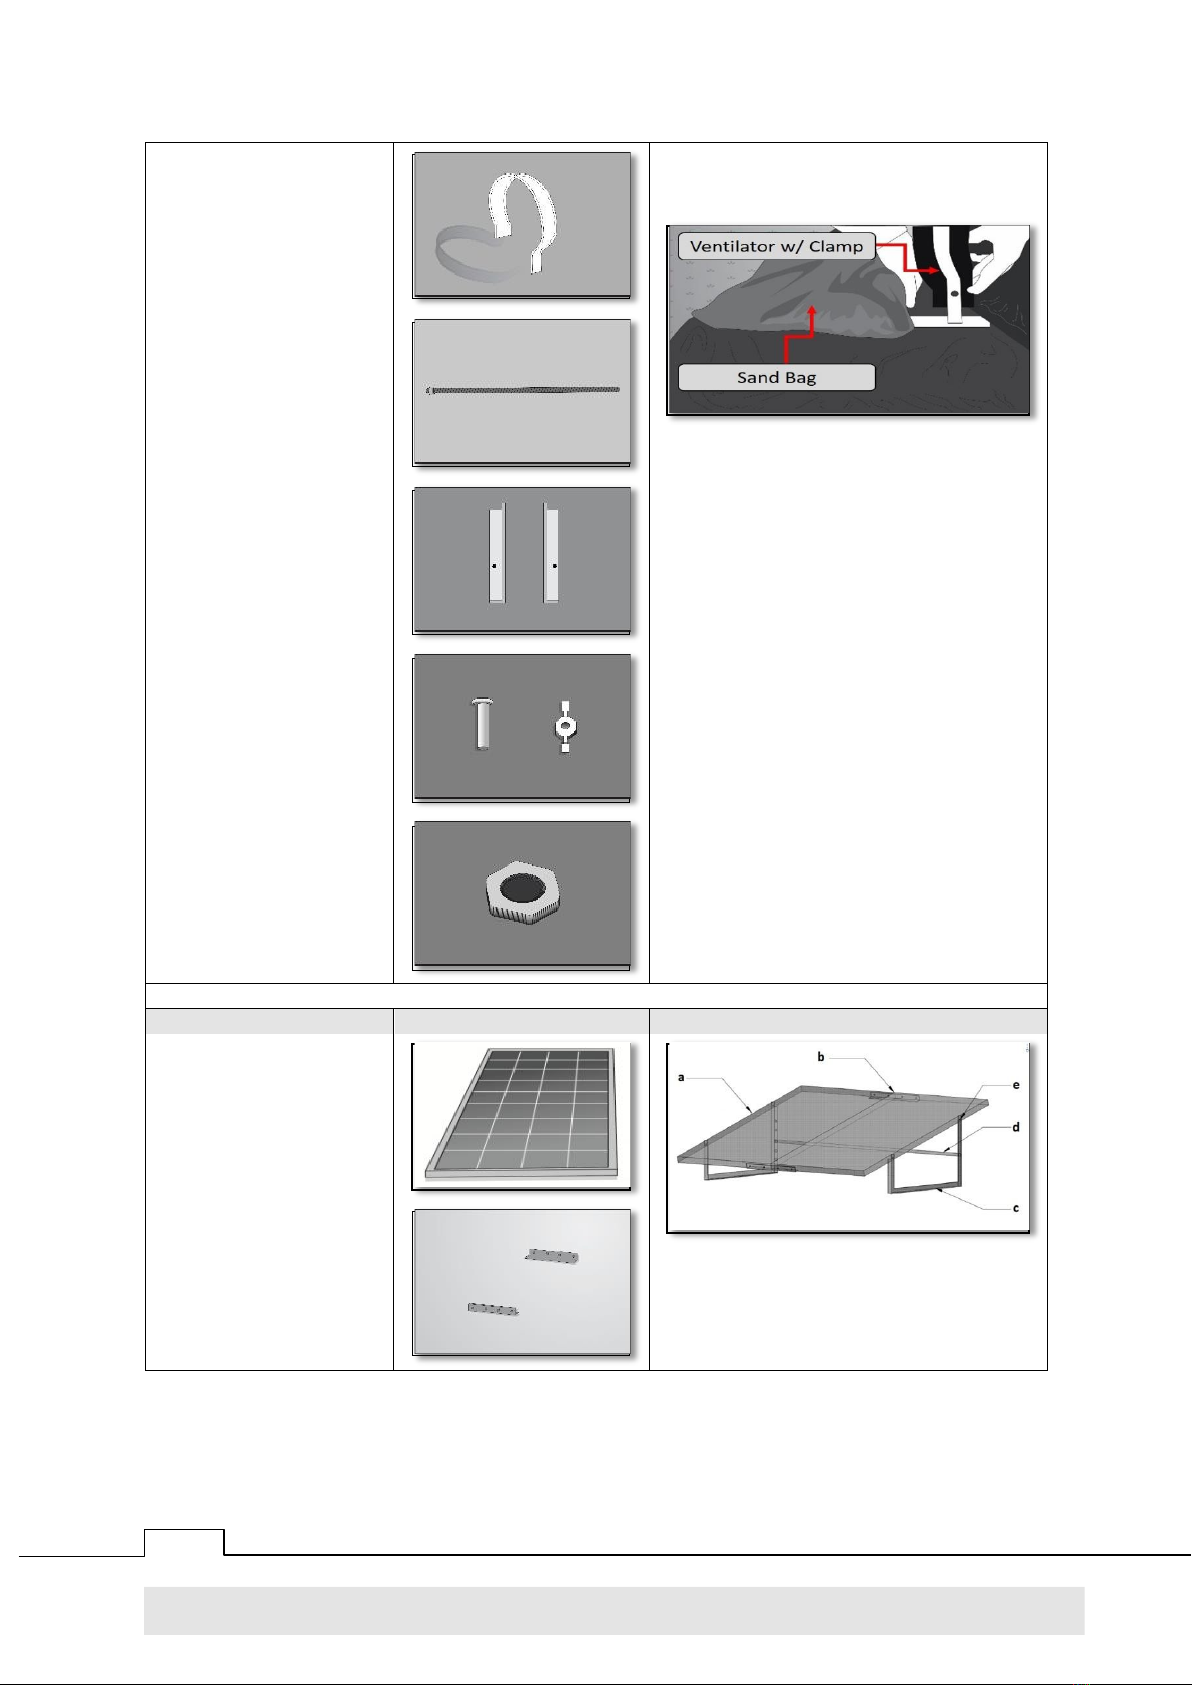
COMPONENTS .......................................................................................................................................... 8
4.
SPECIFICATIONS........................................................................................................................................ 8
5.
ASSEMBLY AND OPERATING PROCEDURES.............................................................................................. 9
Site selection....................................................................................................................................... 9
Installation.......................................................................................................................................... 9
Wiring connection and electrical safety for SBD50-Solar................................................................. 13
Wiring connection and electrical safety for SBD50-Electric ............................................................. 18
Loading ............................................................................................................................................. 18
Closing .............................................................................................................................................. 19
Fixing wall with support loops.......................................................................................................... 19
Ventilator management ................................................................................................................... 19
Mixing ............................................................................................................................................... 20
Unloading ......................................................................................................................................... 21
6.
MAINTENANCE AND CARE...................................................................................................................... 21
Repairing punctures and other damages ......................................................................................... 21
Cleaning the top cover and bottom section ..................................................................................... 22
Body folding instruction ................................................................................................................... 22
Battery charging, maintenance and storage..................................................................................... 23
Safekeeping ...................................................................................................................................... 24
Recycling........................................................................................................................................... 24
Platform installation of Rodent Guard ............................................................................................. 24
7.
TROUBLE SHOOTING: SBD-SOLAR WIRING HARNESS............................................................................. 25
Case 1: Battery indicator status is “steady off” ................................................................................ 25
Case 2: Battery indicator status is “slow flashing” ........................................................................... 26
Case 3: Battery indicator status is “quick flashing” .......................................................................... 27
Case 4: Solar Panel/Charge indicator is “steady off” ........................................................................ 28
Case 5: Solar Panel/Charge indicator is “quick flashing” (system over voltage)............................... 29
Case 6: Load indicator is “steady on but there is no output” ........................................................... 30
Case 7: Load indicator is “steady off” ............................................................................................... 31
Case 8: Load indicator is “slowly flashing and there is no output”................................................... 32
Case 9: Load indicator is “quick flashing and there is no output” .................................................... 33
Case 10: Solar charge controller is not working properly................................................................. 34
8.
FREQUENTLY ASKED QUESTIONS AND ANSWERS.................................................................................. 35
9.
WARRANTY CLAUSE................................................................................................................................ 37
3/37

GrainPro® Solar Bubble Dryer™50 Instruction Manual
MA4040RAD0914-9
The GrainPro® Solar Bubble Dryer™ 50 (SBD50) is a collapsible, tunnel-type dryer with 1.0 metric ton
(1,000kg) drying capacity designed to protect the agricultural commodity from intermittent/sudden rains
during drying, and to prevent spillage and contamination. Drying performance is dependent on the solar
radiation, relative humidity of the ambient air, and moisture content of concerned agricultural
commodity. The SBD50 consist of a transparent cover made of UV-resistant polyethylene film connected
to the black reinforced PVC drying floor by a heavy-duty zipper. Through the transparent top cover, solar
radiation enters the drying chamber and heats up the agricultural commodity being dried. Moisture
content is then vaporized and pushed by the ventilators out from the drying chamber.
The SBD50 technology makes drying possible even during unpredictable weather conditions. It can dry
grains and seeds at an average drying rate of 0.5% per hour based on paddy and corn. However, during
full sunny conditions drying time is about 6 to 8 hours on a moisture content of 22% to 14%. It is a multi-
crop dryer that can be used to dry paddy, corn, coffee, and others.
There are two GrainPro SBD50 commercial models, namely: SBD50-Solar which operates purely on solar
energy to dry the commodity and run the ventilators. While the SBD50-Electric uses electric power from
the grid to run the ventilators and solar energy to dry the commodity. There is a rake mixer that can be
used in all terrain and a tube mixer (optional mixing device) which provides undulating motion during
mixing operation.
1.1.
FEATURES:
1.1.1.
Collapsible dryer can be installed on any flat surface, a multi-commodity dryer.
1.1.2.
Protects the commodity being dried from sudden rains, spillage, and contamination.
1.1.3.
Protects the commodity from fowls, birds, and other animals.
1.1.4.
Protects the commodity from unhealthy and hazardous contaminants.
1.1.5.
Designed to address the effect of climate change.
1.1.6.
The SBD50-Solar doesn’t use fossil fuel that contributes to greenhouse gases.
1.2.
PRODUCT GUARANTEE:
1.2.1.
In accordance with the terms and conditions herewith, GrainPro, Inc. fully guarantees the quality of this
product provided it is used according to the instructions in this manual.
1.2.2.
Please read and understand the manual thoroughly before using the Solar Bubble Dryer50.
1.3.
COMMENTS, COMPLAINTS, AND/OR CLARIFICATIONS:
1.3.1.
Please contactcustomerc[email protected].
1.3.2.
We shall be glad to answer any of your questions.
4/37
1. INTRODUCTION

GrainPro® Solar Bubble Dryer™50 Instruction Manual
MA4040RAD0914-9
2. CHECKLIST
Please inspect your GrainProSBD50 package to ensure it includes the following items:
PART NAME DESCRIPTION IMAGE
2.1.
CARRY BAG 2.1.1. Contents:
a.
SBD50 (Drying
floor and Top
cover)
b.
Ventilator cover
2.2.
SBD50-SOLAR OR 2.2.1. UV-resistant water
SBD50-ELECTRIC proof and transparent
top cover (UV-LDPE).
2.2.2. Drying floor made of
black reinforced PVC
(610gsm).
2.3.
REPAIR TAPE 2.3.1. PE repair tape, UV
resistant and
transparent- for
repair/ patching of the
top cover.
2.3.2.
PVC duct tape, Grey-
for the drying floor.
2.4.
SMALL PARTS 2.4.1. Cable ties.
2.4.2.
Screw driver.
2.4.3.
Bolts and winged nuts.
2.4.4.
LDPE Rodent Guard.
2.5.
RAKE MIXER 2.5.1. Consists of the handle
[designed in three (3)
pieces joined by
couplers], and the rake
head with teeth.
One (1) unit
2.6.
TUBE MIXER 2.6.1. Disassembled mixing
(OPTIONAL) device, consists of
three (3) parts,
One (1) unit
5/37

GrainPro® Solar Bubble Dryer™50 Instruction Manual
MA4040RAD0914-9
2.6.2. Offset Box Wrench,
Two (2) pieces
2.7.
AC VENTILATOR 2.7.1. 220V AC ventilators.
Two (2) units for
SBD50-Electric
2.8.
DC VENTILATOR 2.8.1. 12V DC ventilators.
Two (2) units for
SBD50-Solar
2.9.
VENTILATOR 2.9.1. Supporting aluminum
FRAME clamp to hold the
ventilator.
Two (2) sets
2.10.
SOLAR PANELS 2.10.1. Used to convert light
into electricity, 12V.
Two (2) units
2.11.
SOLAR PANEL
2.11.1. Supporting aluminum
SUPPORT FRAME structure for the solar
panels.
2.11.2.
Two (2) legs
2.11.3.
Two (2) brackets
2.11.4.
One (1) horizontal
brace
6/37

GrainPro® Solar Bubble Dryer™50 Instruction Manual
MA4040RAD0914-9
2.12.
EXHAUST
2.12.1. Supporting aluminum
SUPPORT FRAME structure for the SBD
exhaust port.
One (1) assembly
2.13.
WIRING HARNESS 2.13.1.Electrical components
of SBD50-Solar with
solar charge
controller, PWM DC
motor speed
controller and toggle
switch.
One (1) assembly
2.14.
EXTENSION CORD 2.14.1.Extension wire for
SBD50-Electric.
Ten (10) meter
2.15.
AGM BATTERY
2.15.1. Used to store energy
(OPTIONAL) to run the ventilator of
SBD50-Solar
70 Ampere-hour
One (1) unit
2.16.
RODENT GUARD
2.16.1. For platform post to
prevent rodent access
when storing the
empty SBD.
Four (4) pieces per
pack
2.17.
INSTRUCTION 2.17.1. Installation
MANUAL instructions.
2.17.2.
Maintenance
instructions.
2.17.3.
Frequently asked
questions and
answers.
2.17.4.
Warranty clause.
7/37

GrainPro® Solar Bubble Dryer™50 Instruction Manual
MA4040RAD0914-9
3. COMPONENTS
4. SPECIFICATIONS
PARAMETERS
SBD50
SOLAR
ELECTRIC
Top Cover
UV-LDPE, Transparent
Drying Floor
Reinforced PVC, black
Zipper
Heavy duty zipper
Rake Mixer
Plastic rake with wooden handle, 2.2m length
Tube/Roller Mixer**
G.I. Pipe, 2” Ø w/ 2 pcs. Offset box wrench, 17 x19mm
Frames
Ventilator frame
Aluminum bars
Exhaust Support Frame
Aluminum bars
Solar panel frame
Aluminum profiles
N/A
Ventilator
12V DC Ventilator, 2 units
220V AC Ventilator, 2units
Solar Panel
100W, 2 units
N/A
Wiring Harness
Auto wire, SCC, PWM, Switch,
Extension Wire, 10m
Connectors/ Terminals
Alligator Clip
N/A
Battery**
AGM (Absorbed Glass Mat)
Battery
N/A
Transformer*
N/A
Step up transformer
Dimension, m (ft) (L x W)
26.0x2.0 (85.3x6.56)
Drying Area, m2(ft2)
50.0 (538.2)
Capacity (based on Paddy), kg (lbs)
1,000 (2,204.62)
* Included for the countries with 110V electric energy supply
** Optional purchase
8/37

GrainPro® Solar Bubble Dryer™50 Instruction Manual
MA4040RAD0914-9
5. ASSEMBLY AND OPERATING PROCEDURES
5.1. SITE SELECTION
5.1.1.
In selecting the site, look for:
a.
A level ground away from standing or
running water.
b.
Open area for maximum absorption of
solar radiation.
5.1.2.
Preparing the selected site (about 4m x 30m) by:
a.
Clear away all sharp and/or pointed objects (stones, broken glass, nail, etc.) which might puncture
the SBD50 drying floor. In addition, refrain from smoking while working because hot ashes may
damage the SBD50 materials.
b.
Make sure there is sufficient space around the SBD50 for pulling the “Tube Mixer”on both sides of
the dryer.
c.
The positioning of the SBD50 and solar panel should be on a location where maximum exposure to
solar radiation can be obtained.
5.2. INSTALLATION
5.2.1.
Set-up/installation:
a.
Unfold the SBD50. Take note of the folding
pattern while it is being unfolded. This
unfolding sequence should be followed in
reverse when preparing for proper
storage.
b.
Pull the other end to get rid of the folds
before laying to the ground. Make sure
that the drying floor is properly stretched
at two meters wide (for the drying area)
along the full length of the SBD50. This will
ensure that the drying floor will stay flat
when using the “Tube mixer”.
5.2.2. Ventilator and supporting structures:
COMPONENT
IMAGE
SEQUENCE OF ASSEMBLY
a.
Ventilator,
Two (2) units
b.
Ventilator cover,
Two (2) pieces
1)
Loosen the horizontal brace (d) of the
frame.
2)
Insert the ventilator cover (b) at the upper
portion of the ventilator (a).
9/37

GrainPro® Solar Bubble Dryer™50 Instruction Manual
MA4040RAD0914-9
c.
Ventilator
support clamp,
Two (2) pieces
d.
Horizontal brace,
Two (2) pieces
e.
Ventilator
support legs,
Four (4) pieces
f.
Bolts and winged
nuts,
Four (4) sets
g.
Hex nuts,
Four (4) pieces
3)
Assemble the ventilator support legs (e)
using bolts and winged nuts (f) using the
screw driver provided.
4)
Position the ventilator support legs under
the sand bags (fill in the provided sand bag
first and fold the other part under it). Sand
bag is located along the heating area
extension of the drying floor.
5)
Connect the ventilator to the SBD50 body.
Make sure that the direction of airflow is
correct (see the arrow printed on the
ventilator).
5.2.3. SBD Solar panel and support assembly:
COMPONENT
IMAGE
SEQUENCE OF ASSEMBLY
a.
Solar panel,
Two (2) units
b.
Bracket,
Two (2) pieces
1) Assemble the brackets at the top and
bottom side attaching the two (2) solar
panels.
10/37

GrainPro® Solar Bubble Dryer™50 Instruction Manual
MA4040RAD0914-9
c.
Legs,
Two (2) pieces
d.
Horizontal brace,
One (1) piece
e.
Bolts and winged
nuts,
Sixteen (16) pairs
2)
Connect the legs on both sides and fix the
horizontal brace supporting the two (2)
legs.
3)
Make sure that the longer legs are located
on the solar panel circuitry. Use bolts and
winged nuts as fastener and the provided
screw driver to tighten.
5.2.4. Exhaust support assembly:
COMPONENT
IMAGE
SEQUENCE OF ASSEMBLY
a.
Support legs,
Two (2) pieces
b.
Horizontal brace,
One (1) piece
c.
Bolts and winged
nuts,
Two (2) sets
b a
c
1)
Assemble the exhaust support frame using
bolts and winged nuts.
2)
Connect to exhaust port of SBD50 with the
pockets provided.
11/37

GrainPro® Solar Bubble Dryer™50 Instruction Manual
MA4040RAD0914-9
5.2.5. Rake mixer assembly:
COMPONENT
IMAGE
SEQUENCE OF ASSEMBLY
a.
Rake head,
One (1) piece
b.
Rake handle,
Three (3) pieces
c.
Iron connector
d.
Bolt and hex nut,
One (1) set
5.2.6. Tube mixer assembly:
COMPONENT
IMAGE
SEQUENCE OF ASSEMBLY
a. Disassembled
tube mixer,
One (1) unit
1)
Connect the three (3) parts of the tube
mixer and insert the bolts and hex nut
including the lock washer.
2)
Tighten the bolts and hex nut using the box
wrench.
b. Internal coupler,
Two (2) pieces
c. Box wrench,
Two (2) pieces
12/37

GrainPro® Solar Bubble Dryer™50 Instruction Manual
MA4040RAD0914-9
5.3. WIRING CONNECTION AND ELECTRICAL SAFETY FOR SBD50-SOLAR
5.3.1.
Battery Setup
Battery setup, such as charging, safety, etc., is needed before proceeding to wiring installation. The required
battery will be a AGM Battery type (12V, 70 Ampere-hour)
5.3.1.1.
Battery Safety
a.
Keep batteries in a place where children cannot reach.
b.
Red color stands for positive, black for negative. Please connect the pole of the batteries
correctly.
c.
Do not attempt to disassemble or modify by yourself, otherwise the sulfuric acid and lead
inside the battery will cause damage to the human body and the environment.
d.
Avoid the batteries from being continual undercharging and overcharging. Continual
undercharging and overcharging will reduce the battery capacity and shorten the battery
life span.
e.
Do not short circuit the positive and negative terminal, otherwise it will easily cause electric
shock, fire or breakdown.
f.
Please always disconnect the main power supply upon installation.
g.
Please do not use the battery as AC power. Converter like UPS is essential for AC purpose.
h.
Do not charge the battery in a sealed container or in upside down position. It is
recommended to charge the battery in a well-ventilated place.
i.
Do not charge the battery near a heater, or place where heat accumulation may occur. Do
not charge the battery in direct sunlight.
j.
Do not dispose the battery in water, fire, and don not heat the batteries.
k.
Do not put your face near the top of the batteries. Wear gloves, eye protection when you
measure or repair the battery.
5.3.1.2.
Pre-Battery Installation and Charging
a) Place the battery in a level surface.
(WARNING: Keep battery away from spark and flame)
13/37

GrainPro® Solar Bubble Dryer™50 Instruction Manual
MA4040RAD0914-9
Note:
-
If terminal voltage is higher or equal to 12.40V, may proceed to installation.
-
If terminal voltage is lower than 12.40V, boostcharge battery before installation.
5.3.2.
Solar Wiring Schematic Diagram (for SBD50-Solar)
5.3.3.
Battery Connection
WARNING: *DO NOT REMOVE SOLAR PANEL COVER UNTIL ALL STEPS AND/OR CONNECTIONS ARE
EXECUTED
Note:
- In case of absence of cover, flatten the solar panel carton box and cover the front of the solar
panel.
14/37

GrainPro® Solar Bubble Dryer™50 Instruction Manual
MA4040RAD0914-9
a.
When installing the Wiring Harness, connect first to the battery. Connect the red alligator clip to the
positive “+” battery terminal, and the black alligator clip to the negative “-” battery terminal. Refer to
image below.
Negative Positive
b.
The controller starts operation after automatically recognizing the battery voltage. For a 12V system, the
mode indicator displays Zero dot [0.] initially and then displaysseven dot [7.]. The battery indicator also
lights up; otherwise, check whether the connection is right.
Battery
Indicator
5.3.4.
Solar Panel Connection
a.
Connect the T-branch MC4 connectors of the wiring harness to the MC4 connectors on the solar
panels. Positive “+” and negative “-” connections are not interchangeable.
15/37
LED lamp Indications Status Functions Action
Battery
Steady on
Normal battery
function
Proceed to 5.3.4
Steady off
Battery not
connected
Refer to Troubleshooting
Case1
Slow flashing
Battery under
voltage
Refer to Troubleshooting
Case2
Quick flashing
Battery over
discharged
Refer to Troubleshooting
Case3

GrainPro® Solar Bubble Dryer™50 Instruction Manual
MA4040RAD0914-9
b. Due to the solar panels being covered, solar panel/charge indicator shall not light up. When all
connections are done, the cover shall be removed and if sunlight is present, the solar panel/charge
indicator lights up; otherwise, check whether the connection is correct.
Charge
Indicator
5.3.5.
Ventilator Connection
a.
Check wires with snap in/ bullet connectors. Connect the longer red wire and longer black wire to 1
ventilator and shorter red wire and shorter black wire to other ventilator.
Note: Shorter wires control the speed of the ventilator.
16/37
LED lamp Indications Status Functions Action
Charging
Steady on
Solar panel with
voltage
Wait for slow flashing and
Proceed to 5.3.5
Steady off
Solar panel with
no voltage
Refer to Troubleshooting
Case 4
Slow flashing
Charging in
process
Proceed to 5.3.5
Quick flashing
System over
voltage
Refer to Troubleshooting
Case 5

GrainPro® Solar Bubble Dryer™50 Instruction Manual
MA4040RAD0914-9
b.
Connect the snap in/ bullet connectors of the wiring harness to the snap in/ bullet connector of the
ventilator. Positive “+” / red together with negative “-” / black connections are not interchangeable.
c.
Load indicator automatically lights up. Turn on the ventilator from the toggle switch. Upwards for
daytime operations and downwards for night-time operations. (Turn off the ventilator before
loading of commodities).
Load
Indicator
5.3.6.
Grounding Connection
a.
Connect the grounding connector (green/ yellow green wire) to the two ventilator frames.
17/37
LED lamp Indications Status Functions Action
Load
Steady on
Load turned
on
If ventilator is running, wiring
system is working accordingly.
If ventilator is not running Refer to
Troubleshooting Case 6
Steady off
Load turned
off
Refer to Troubleshooting Case 7
Slow flashing
Overload
protection
Refer to Troubleshooting Case 8
Quick flashing
Short-circuit
protection
Refer to Troubleshooting Case 9

GrainPro® Solar Bubble Dryer™50 Instruction Manual
MA4040RAD0914-9
b.
Connect the grounding wire (green/ yellow green) with ring terminal to the ventilator frame and fix
the other end with peg to the ground.
c.
If the area is cemented, lay the peg on the cement and put a heavy object over it, like stone, to
have SBD50 grounded.
GROUNDING CONNECTION DIAGRAM
5.4. WIRING CONNECTION AND ELECTRICAL SAFETY FOR SBD50-ELECTRIC
5.4.1.
Ventilator Connection
Every AC ventilator has its own plug. To run the ventilator, just connect them to a 220V electrical
outlet. If the outlet is rated 110V, use the ‘step-up transformer’ to convert 110V to 220V. A 10-meter
extension cord is provided with the SBD50-Electric. Use a longer extension cord if needed. Be careful
to avoid possible grounding.
5.4.2.
Grounding Connection
Make sure to connect the grounding wires (green/ yellow green) from the ventilator to the ground by
pushing the peg into the soil. If the area is cemented, lay the peg on the cement and put a heavy object
over it, like stone, to have SBD50 grounded.
5.5. LOADING
5.5.1.
Unzip and open one side of the dryer before
loading the agricultural commodity.
NOTE:
Loading requires at least two persons.
5.5.2.
Place the bagged commodity onto the drying
floor and spread evenly on the designated
drying area (2m wide).
NOTES:
The SBD is not designed for drying of
"dripping wet" commodities. In those
cases, commodity needs to be sundried
and final drying (<30% MC) can be (dried)
performed in the SBD.
18/37

GrainPro® Solar Bubble Dryer™50 Instruction Manual
MA4040RAD0914-9
Do not load the commodity to the pre-heating area within 1.5m from the ventilator.
Leave space of about 30cm on both sides of the drying floor that will serve as the side wall of the
SBD50.
5.5.3.
Use the rake mixer to spread the commodity
evenly on the drying floor.
NOTE:
Make sure the tool for spreading the
commodity does not have sharp edges
which may damage the drying floor.
5.6. CLOSING
5.6.1.
After spreading the commodity evenly close
the drying area by completely zipping the
heavy-duty zipper around to connect the top
cover and the drying floor.
NOTE:
Opening is done in the opposite manner.
5.7. FIXING WALL WITH SUPPORT LOOPS
5.7.1.
There are six (6) support loops which are
located at the SBD50 wall:
a.
Near the heating area
b.
At halfway length of the drying floor
c.
Near the exhaust port).
NOTE:
The use of the middle wall support loop
can be optional especially if the “Tube
mixer” will be used.
5.7.2.
Support the SBD50 by using a rope to tie the loops and peg it to the ground.
5.7.3.
This will prevent the SBD50 from being blown by sudden strong winds.
5.7.4.
On concrete pavement, it can be tied to a sandbag or any heavy stone or other heavy objects.
5.8. VENTILATOR MANAGEMENT (SBD50-SOLAR AND SBD50-ELECTRIC)
5.8.1. DAYTIME OPERATIONS (Ventilator running at
normal speed)- switch the toggle switch
upwards On.
5.8.2. NIGHTTIME OPERATIONS (Ventilator running
at controlled speed using PWM)- switch the
toggle switch downwards On.
19/37

GrainPro® Solar Bubble Dryer™50 Instruction Manual
MA4040RAD0914-9
5.8.3.
If the ventilator shuts down, press the button on the Solar Charge Controller. The ventilator will run
automatically in about 5 seconds if there is enough energy stored in the battery. Otherwise wait till
the battery is recharged via the solar panel.
NOTES:
For SBD50- Electric: connect the 220V ventilators to the grid. If the outlet is 110V use the ‘step-up
transformer’ to convert the 110V to 220V required by the 220V AC ventilator.
For SBD50-Solar: connect the ventilators to the solar power system. Be careful to avoid possible
electric shock. OBSERVE SAFETY FIRST.
5.9. MIXING
5.9.1.
Rake mixer:
a.
Insert the rake mixer along the partly
opened zipper liner.
b.
Close both zippers up to the rake handle.
c.
Mixing is done like a normal rake mixing in
sun drying method. As the rake handle is
moved along the zipper line, ensure that
you close the zipper slider around the rake
handle.
5.9.2.
Tube Mixer (Optional component):
a.
Designed to provide vertical oscillating
motion to mix the commodity inside the
bubble.
b.
Two persons are needed to pull the tube
mixer under the drying floor. They must
pull the tube mixer at the same speed
while maintaining the same direction and
the same motion.
NOTES:
Untie the rope at the middle of SBD50 wall before the operation of tube mixer.
For best mixing results, the tube mixer must be pulled as fast as possible.
It is recommended to bring the tube mixer to the other end within 12 to 15 seconds.
20/37
This manual suits for next models
1
Table of contents
Other GrainPro Greenhouse Kit manuals
Popular Greenhouse Kit manuals by other brands

Palram
Palram CANOPIA MARTINIQUE 10x14/3x4.3 How to assemble

Palram
Palram Americana 12'x12' Hybrid Glazing Assembly instructions

AeroGarden
AeroGarden 100340 quick start guide

JUNGLE ROOM
JUNGLE ROOM JR-220120200 Assembly instructions

EzyFast
EzyFast 20JSEF00522 instruction manual

Botanica
Botanica Spira Mur manual

Vitavia
Vitavia VA0030-V 2500 Assembly instructions

Palram
Palram CANOPIA BALANCE 8x8 / 2.4x2.4 How to assemble

Dancover
Dancover TITAN Arch+ 320 manual

ACF Greenhouses
ACF Greenhouses Grow More Shade Net Kit 6.5' Assembly instructions

GrowSpan
GrowSpan 500 Cold Frame 30' Wide Series Assembly instructions

Dancover
Dancover GH152190 manual