Gram KS 390-01 Instruction manual

KS 290-01
KS 360-01
KS 390-01
M60 Series Manual

CONGRATULATIONS ON YOUR NEW GRAM
REFRIGERATOR.
Congratulations on your new refrigerator. The refrigerator was
developed taking the different storage requirements of food items
into consideration. Some must be stored cold - others require a
little higher temperature. A few must be stored separately so as
not to impart flavour and odour to other items of food. Most items
of food require high air humidity in order to stay fresh.
To ensure that you get as much joy out of your new refrigerator as
possible, it is important that you become familiar with the
refrigerator functions and know how to use the accessories. Please
read this manual carefully before setting up and using your
refrigerator.
As these instructions apply to several refrigerator models, the
equipment may vary from model to model.
Before using the refrigerator
On receipt, check to ensure that the refrigerator has not become
damaged during transportation. Transport damage should be
reported to the local supplier before the refrigerator is put to use.
It is also highly recommended that your refrigerator is left in it’s
final position in the kitchen for a minimum of 2 hours prior to
turning on. This allows the oil to settle in the compressor, which is
caused by movement during transportation.
Before filling the refrigerator with items of food, the refrigerator
interior should be cleaned with lukewarm water containing a mild
detergent. Use a soft cloth. If the refrigerator has been stored in
cold surroundings (colder than +5ºC), it must be allowed to
stabilise for at least 2 hours before being switched on.
Read more about setting up and installation on pages 8 through to
13.
2

CONTENTS
ImportantInformation 5
Transporting and moving the refrigerator 5
If the refrigerator is not to be used for some time 6
Warning 6
Disposal 6
ProductDescription 7
Setting Up And Installation 8
Where to place the refrigerator 8
Building into a kitchen cabinet 9
Building into a refrigerator cabinet 9
Installation and ventilation diagrams 10
Electricalconnection 11
Changing the door hinge over to the opposite side 12
UsingTheRefrigerator 14
Electronic control diagram 14
Electroniccontrol 15
Operating the refrigerator 15
Replacingthebulb 16
Temperatureregulation 17
Temperature inside the refrigerator 17
Brief temperature variations 17
Super refrigerating function 18
Function with a ventilator 18
Display brightness adjustment 19
Alarms 20
Alarmcodes 20
Interrupting an alarm 20
Using The Refrigerator’s Accessories 21
Glassshelves 21
Bottleshelf 21
Vegetabledrawers 21
Multi-boxes 21
Storage shelves in the door 21
3

DefrostingAndCleaning 22
Automatic defrosting of the refrigerator 22
Cleaning 23
Cleaning of doors in stainless steel or aluminium 23
GRAM Customer Care And Servicing 24
Checklist 24
ContactDetails 25
SpareParts 25
Your appliance details and specifications 26
4

IMPORTANT INFORMATION
The refrigerator contains the environment-friendly, non-ozone
depleting refrigerant R600a. As R600a is a flammable gas, it is
important to avoid damage to the refrigeration circuit during
transport and installation. If the refrigeration circuit is damaged,
avoid using naked flame in the vicinity of the refrigerator and
connecting power to refrigerator. Also make sure that there is
good ventilation in the room. If you are in doubt, please contact
your supplier.
This appliance is not intended for use by persons (including
children) with reduced physical, sensory or mental capabilities, or
lack of experience and knowledge, unless they have been given
supervision or instruction concerning use of the appliance by a
person responsible for their safety.
Children should be supervised to ensure that they do not play with
the appliance.
WARNING: Keep ventilation openings, in the appliance enclosure
or in the built-in structure, clear of obstruction.
WARNING: Do not use mechanical devices or other means to
accelerate the defrosting process, other than those recommended
by the manufacturer.
WARNING: Do not damage the refrigerant circuit.
WARNING: Do not use electrical appliances inside the food storage
compartments of the appliance, unless they are recommended by
the manufacturer.
Transporting and moving the refrigerator
The refrigerator must always be moved in the vertical position. The
cabinet must not be tilted more than approx 40º. If the refrigerator
has been tilted more than 40º, the power supply must not be
connected until the appliance has stood upright for at least 2
hours.
5

If the refrigerator is not to be used for some time
If the refrigerator is to remain unused for a time, switch it off by
pressing button O(2), (diagram on page 14). Then disconnect the
power supply to the refrigerator and if possible, pull the plug out
of the wall socket.
Empty, defrost and clean the refrigerator. Leave the refrigerator
door slightly ajar. This will prevent bad smells in the refrigerator.
Warning
Old refrigerators and freezers are often fitted with complicated
latches that can only be opened from the outside. If you have an
old unit like this stored away somewhere, or if you scrap it,
remember to destroy the latch to prevent children from being
exposed to danger by getting locked inside the unit.
Note! Please also observe the environmental rules on disposal.
Disposal
If a refrigerator/freezer is to be disposed of, this must be done in an
environmentally correct way, in accordance with current rules of
disposal.
Please observe the environmental rules on disposal. There might
be special requirements/conditions to be observed. Information on
disposal can be obtained from:
- Gram A/S
- Your white-goods supplier
- Authorities (your local council, Ministry of the Environment, etc.)
6

7
PRODUCT DESCRIPTION
The refrigerator is intended for use in a normal household. It is
designed for temperature class SN-T in accordance with European
standard EN 153. This means that the refrigerator will run best at a
room temperature of +10ºC to +43ºC.
Control Panel
Halogen Lamp
Internal Circulating Fan
Glass Shelves
Bottle Shelf
Multi-Boxes
Storage Shelves
Halogen Lamp
Rubber Sealing Strip
Condenser
Storage Bins
Nameplate
Evaporation Tray
Vegetable Drawers
Compressor
Compressor Compartment
Door Handle
Adjustable Feet

8
SETTING UP AND INSTALLATION
Where to place the refrigerator
For safety reasons the refrigerator must not be installed outdoors; it
must be placed in a dry room. Never place the appliance close to
sources of heat such as cookers or radiators, and avoid placing it in
direct sunlight. The surface on which the appliance is placed must
be level and sturdy. The small wheels mounted at the rear of the
refrigerator make it easy to place it in the required position.
Important Note: The use of other gas appliances inside the
building, such as cook tops, ovens and heaters may create extra
moisture in the air, along with places that experience general high
humidity. This may cause the refrigerator/freezer to build up an
excess of ice on the evaporator plate causing the drip tray at the
back to overflow with water during the defrost process. To help
eliminate excess moisture, a dehumidifier or ventilation unit is
recommended.
The refrigerator can be set up free-standing against a wall or built
into a kitchen cabinet.
It is important that the appliance stands completely level and that
there is good air circulation over, under and around it. The
refrigerator can be adjusted by turning the two adjusting screws
on the plinth. After adjustment, the feet and the two rear wheels
must be in contact with the surface on which the appliance stands.
It is extremely important that the refrigerators adjustable feet are
set correctly to avoid movement or future distortion of the cabinet
(2 optional rear feet are supplied in the parts kit).
It is also advantageous, but not necessary, that the refrigerator is
tilted slightly towards the rear to allow the door to close on it’s
own.
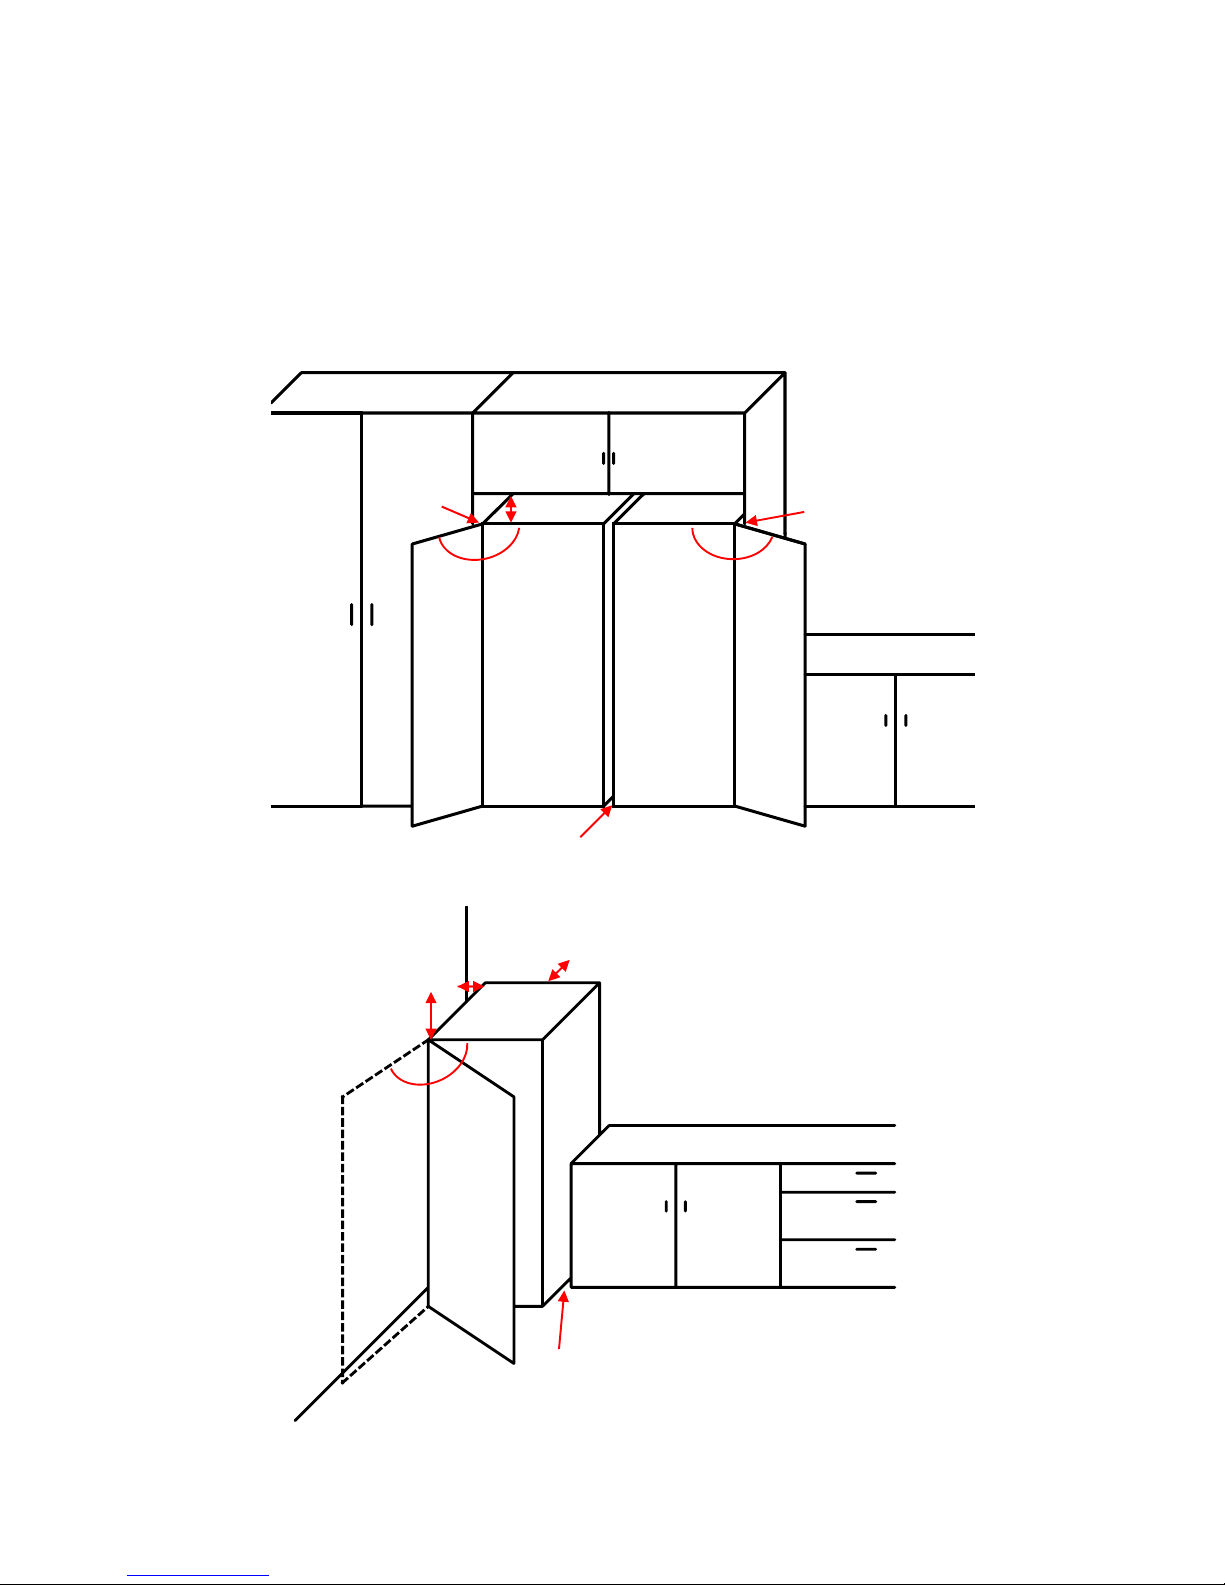
The illustrations on the following pages (9 & 10), show how to
create sufficient air circulation around the cabinet. The dimensions
give the actual size of openings. The circulation area must be at
least 200 cm².

9
Building into a kitchen cabinet
Building into a kitchen cabinet with sufficient ventilation
around the refrigerator to dissipate heat from the compressor.
The appliance can stand direct on the floor or on its plinth. (12)
Building into a refrigerator cabinet
Building into a refrigerator cabinet follows the same principal
as shown in illustration 12. (13)
12
13

Installation And Ventilation Diagrams
The measurements below is a guideline only. The degree of the
door opening shows the minimum requirement to easily access the
storage bins. (14 & 15)
10
5mm+
110º110º
10mm+ 10mm+
35-50mm+
110º
10mm+
35-50mm+
1mm+
40-60mm+
14
15

11
Electrical connection
The appliance is intended for connection to alternating current.
The connection values for voltage (V) and frequency (Hz) are given
on the nameplate inside the cabinet.
Power must be connected via a wall socket with switch. The wall
socket should be easily accessible.
It is recommended, as with any high tech appliance, that a power
surge protection device be used.
All earthing requirements stipulated by the local electricity
authority must be observed. The cabinet plug and wall socket
should then give correct earthing. If in doubt, contact your local
supplier or an authorised electrician.
WARNING - This appliance must be earthed. The flexible cord
(mains lead) fitted to this appliance has three cores for use with a
3-pin 10 amp plug.
IMPORTANT
The cores in this mains lead are coloured in accordance with the
following code:
GREEN AND YELLOW - EARTH
BLUE - NEUTRAL
BROWN - LIVE
These colours might not correspond with the colour markings
identifying the terminals in your plug.
Proceed as follows:
Connect the GREEN AND YELLOW core to the plug terminal
marked “E” or by an earth symbol, or coloured GREEN or GREEN
AND YELLOW. Connect the BLUE core to the plug terminal
marked “N” or coloured BLACK.
Connect the BROWN core to the plug terminal marked “L” or
coloured RED.

12
Changing the door hinge over to the opposite side
Illustrations 16-21 over the page, show how easy it is to change the
doors from right-hinged to left-hinged, or vice versa. (Changing
the door from left to right is done in the same way, but opposite).
Top and bottom left hand hinges and accessories are supplied in
the parts kit.
*The refrigerator must be switched off and emptied completely.
- Remove the 2 screws in the hinge top on the right-hand side of
the cabinet. (16)
- Lift the refrigerator door slightly and take the door and upper
hinge off by pulling the door towards you.
- Remove the dummy hinge from the opposite side by unscrewing
the 2 screws. (17)
- Reverse the dummy hinge and refit it on the opposite side of the
cabinet using 2 screws.
- Tilt the refrigerator to an angle of max. 45ºand unscrew the
bottom hinge. This is done by removing the 2 screws holding the
bottom hinge on the cabinet underside. (18)
- Remove the lower dummy hinge in the opposite side in the same
way as the upper dummy hinge was removed. (19)
- Reverse the dummy hinge and refit it on the opposite side of the
cabinet.
- Reverse the upper right-hand hinge and refit it in the lower
left-hand corner of the cabinet.
- Place the cabinet in the correct position again.
- Remove the door handle by removing the screws. (20)
- Reverse the lower right-hand hinge and refit it on the top part of
the door in the left side of the cabinet. Push the door into position
and slide the upper hinge into the upper left-hand hinge casing.
Tighten the 2 screws. Remember to adjust the hinges.
- Remove the screws on the right-hand side of the door and screw
them onto the left side of the door. Use the screws from the left
side to attach the handle to the right-hand edge of the door. (21)

13
21
17
20
1918
16

14
USING THE REFRIGERATOR
1 Refrigerator’s ON switching button.
2 Refrigerator’s OFF switching button.
3 Green light-emitting LED signalling that refrigerator’s
chamber has been switched on.
4 “COOL” button.
5 Display showing the set temperature, and alarm status
codes.
6, 7 Button for displaying the real temperature inside the
refrigerator’s chamber.
8 Blue light-emitting LED signalling that the super refrigerating
function has been switched on.
9 The control light (yellow) signals the initiation of the vent
function.
10 The button turning the vent on and off.
11 Function button for quick refrigerating and adjustment of
display light.

15
Electronic Control
The refrigerator is equipped with electronic control. The control
panel is concealed behind the refrigerator door. The refrigerator
has been factory set to operate at optimum temperature, i.e. +5ºC.
If you wish to change the preset temperature, the new setting will
be stored in the electronic control. In case of power failure, the
control will remember the latest setting when the power to the
cabinet is restored.
The electronic control has the following functions:
- On/Off switch function.
- Display of the real temperature inside the refrigerator’s chamber.
- Setting the temperatures in the refrigerator’s chamber.
- Automatic defrosting of the refrigerator’s chamber.
- Quick refrigerating.
- Vent function inside the refrigerator’s chamber.
- Adjustment of the display contrast.
- Acoustic and visual signalling of alarms.
- Visual signalling with use of LED’s of switched on functions.
Operating the refrigerator
Start the refrigerator by plugging it into a wall socket.
If the mains lead has been damaged, it must be replaced with a
corresponding type supplied by an electrical service centre and
installed by a qualified electrician.
The refrigerator incorporates a “stand-by function” and in the
display two horizontal lines indicate that the power supply has
been connected.
- Start the refrigerator by pressing the start button I(1). After
approx. 5 seconds, the green light emitting LED (3) lights up to
indicate that the refrigerator is switched on. The actual
temperature inside the refrigerator’s compartment is shown on the
display (5).
- To turn the refrigerator off, press and hold the off button O(2)
for 5 seconds.

16
Replacing the bulb
Switch off the refrigerator by pressing button O(2) and unplug
the mains lead from the wall socket.
Remove the cover. Replace the bulb with a new one (max. 10watt,
12Volt, halogen base G4). Refit the cover, re-connect the power
supply and restart the refrigerator by pressing button I (1). (22)
22

17
Temperature regulation
The temperature in the refrigerator’s chamber can be set within
the temperature range from +2ºC up to +9ºC. When pressing and
holding the “COOL” button (4), the set temperature will be shown
on the display. When pressing the button (6) or button (7) it
is possible to modify the setting of the temperature inside the
refrigerator. Every pressing of the button shall activate a brief
acoustic signal. In case of the power supply failure or
disconnection of the power supply to the refrigerator, the control
will keep in the memory the latest settings after the power supply
has been restored.
Temperature inside the refrigerator
The temperature settings and temperature values shown on the
display are average temperatures of the refrigerator. Do not
change the temperature setting simply because it is warmer in
summer. The increase of the room temperature will be detected by
the sensor and the compressor will automatically run for a longer
time to maintain the set temperature.
Brief temperature variations
Brief temperature variations are normal and may occur when the
refrigerator is going through it’s automatic defrost cycle, when
fresh food has just been placed inside or when the door is open for
a longer time. These variations will not affect the food products
and the temperature will quickly return to the set-point level.
The interior light switches on when the door of the refrigerator’s
chamber has been opened. When the door remains open, the
interior light switches off after approximately 3 minutes. The
display will show E4 alarm and the acoustic alarm will be activated.
Please refer to page 20 to remedy.

18
Super refrigerating function
- The first pressing of the buttons (11) + (4) switches on the blue
light-emitting LED (8) and activates quick cooling down of the re-
frigerator’s chamber to the temperature of approximately 1ºC (the
continuous operation of the compressor), after the temperature of
1ºC has been reached the function automatically disables and the
equipment switches into a normal cyclic operation restoring the lat-
est temperature set for the refrigerator.
- During the super refrigerating function operation, the display
shows “Sc” indication.
- The second pressing of the buttons (11) + (4), (during operation
of the quick refrigerating function), disables the function and
switches off the blue light-emitting LED (8).
It is recommended to switch on the quick refrigerating function
“Sc” before loading the refrigerator’s chamber with a large quantity
of fresh food products.
Function with a ventilator
The ventilator, remains inactive until the cabinet has reached the
set operating temperature. It is turned on and off by button (10).
The yellow LED light (9) turns on when the ventilator is turned on.
The ventilator allows it to maintain the same temperature on all
levels of the refrigerator chamber.
After being turned on, the ventilator works in a cycle function
except when the refrigerator door is opened.

19
Display brightness adjustment
By pressing and holding the pushbutton (11) and:
- pressing at the same time the pushbutton (6), the display
brightness increases.
- pressing at the same time the pushbutton (7), the display
brightness decreases.
When adjusting the display brightness, the display shows the
following indications:
1.8 - minimum brightness
2.8 - medium brightness
3.8 - maximum brightness (manufacturer’s setting)

20
ALARMS
Normal use of the refrigerator may cause different situations
leading to interruption of various functions and unstable operation
of the entire equipment as a consequence. These interruptions are
shown on the display as the alarm code (an “E” followed by a
number) and signalled by the acoustic alarm. In case of several
faults, the alarm codes will be displayed in turn.
Alarm codes
E1 - temperature sensor fault in the refrigerator’s chamber
A temperature sensor has been damaged. Call your supplier. A
built in emergency program attempts to maintain an acceptable
temperature until the fault is corrected.
E4 - door is open
The door of the refrigerator’s chamber has been opened for more
than 3 minutes. The alarm code disappears when the door is
closed.
E5 - temperature too high
E6 - temperature too high at power failure
There has been a power failure, the power to the refrigerator has
been disconnected or the temperature in the refrigerator has been
higher than the set temperature for more than 2 hours after power
failure.
Interrupting an alarm
The acoustic alarm can always be interrupted by opening the door
and pressing any button. The alarm code will remain displayed
until the alarm has been cancelled. A 2 hour silence will follow.
The alarm codes E4, E5, E6 can be cancelled by pressing for 7-8
seconds simultaneously, the buttons (6) and (7).
The exception: in case of the alarm E1 it is possible to cancel the
alarm only after replacing damaged sensors.
In such cases please contact your supplier.
Table of contents
Other Gram Refrigerator manuals

Gram
Gram M56 User manual

Gram
Gram KF 3336-90 User manual

Gram
Gram KS 5406-90F User manual

Gram
Gram KFI 3285-90 N User manual

Gram
Gram KF 411862 N/1 User manual

Gram
Gram KF 3296-90 User manual

Gram
Gram KF 2330-00 N User manual

Gram
Gram KSI 3315-94/1 User manual

Gram
Gram KS 3315-93 X/1 User manual

Gram
Gram KS models User manual

Gram
Gram COMPACT 220 Series User manual

Gram
Gram KS 3215-93 X/1 User manual

Gram
Gram KFI 301252/1 User manual

Gram
Gram KF 6376-90 FN User manual

Gram
Gram JK 1125-20/1 User manual

Gram
Gram KF 3205-90 User manual

Gram
Gram KS 4456-90 F/2 User manual

Gram
Gram BAKER SF 550 Service manual

Gram
Gram KFI 120 User manual

Gram
Gram KS290 User manual