manuals.online logo
Brands
  1. Home
  2. •
  3. Brands
  4. •
  5. Grandstream Networks
  6. •
  7. Switch
  8. •
  9. Grandstream Networks GWN7706 User manual

Grandstream Networks GWN7706 User manual

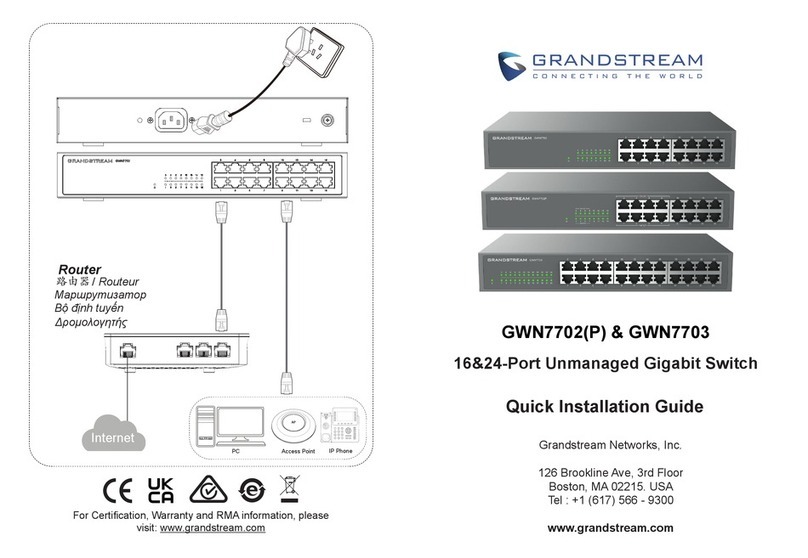
Grandstream Networks, Inc.
126 Brookline Ave, 3rd Floor
Boston, MA 02215. USA
Tel : +1 (617) 566 - 9300
www.grandstream.com
For Certication, Warranty and RMA information, please
visit: www.grandstream.com
GWN7706
48 Unmanaged Gigabit Port
and 2 SFP Port Switch
Quick Installation Guide
AP
Internet
路由器
Router
Routeur
Маршрутизатор
/
Bộ định tuyến
Δρομολογητής
IP Phone
Access Point
PC
SFP
module
Fiber
Operating Temperature: 0 to 45 °C (32 to
113 °F)
Storage Temperature: -30 to 70 °C (-30 to
158 °F)
Operating Humidity: 10% to 90% Non-
condensing
Storage Humidity: 10% to 90% Non-
condensing
Ethernet Port: 10/100/1000 Mbps RJ-45 port
SFP Port
操作温度: 0至45°C(32至113°F)
存储温度: -30至70°C(-30至158°F)
工作湿度: 10% ~ 90%不凝结
存储湿度: 10% ~ 90%不凝结
以太网端口:10/100/1000 Mbps RJ-45
SFP 端口
Temperatura (funcionamiento): 0 a 45 °C
(32 a 113 °F)
Temperatura (almacenamiento): -30 a 70 °C
(-30 a 158 °F)
Humedad de funcionamiento: 10% a 90%
sin condensación
Humedad de almacenamiento: 10% a 90 %
sin condensación
Puerto Ethernet: puerto RJ-45 de
10/100/1000Mbps
Puerto SFP+
Température (Fonctionnement): 0 à 45 °C
(32 à 113 °F).
Température (Stockage): -30 à 70 °C (-30 à
158 °F).
Humidité (Fonctionnement): 10 % à 90 %
sans condensation.
Humidité (Stockage): 10 % à 90 % sans
condensation.
Port Ethernet: port RJ45 10/100/1000 Mbps.
Port SFP
Рабочая температура: от 0 до 45 °C (от 32
до 113 °F)
Температура хранения: от -30 до 70 °C (от
-30 до 158 °F)
Рабочая влажность: от 10% до 90% без
конденсации
Влажность хранения: от 10% до 90% без
конденсации
Порт Ethernet: RJ-45 10/100/1000Мбит/с
Порт SFP
Temperatura di esercizio: da 0 a 45 °C (da
32 a 113 °F)
Temperatura di stoccaggio: da -30 a 70 °C
(da -30 a 158 °F)
Umidità di esercizio: da 10% a 90% senza
condensa
Umidità di stoccaggio: da 10% a 90% senza
condensa
Porta Ethernet: RJ-45 10/100/1000Mbps
Porta SFP
EN
Nhiệt độ hoạt động: 0 đến 45 °C (32 đến 113
°F)
Nhiệt độ bảo quản: -30 đến 70 °C (-30 đến
158 °F)
Độ ẩm hoạt động: 10% đến 90% Không
ngưng tụ
Độ ẩm bảo quản: 10% đến 90% Không
ngưng tụ
Cổng mạng RJ-45: 10/100/1000Mbps.
Cổng mạng SFP
Επίπεδα θερμοκρασίας κατά τη λειτουργία:
0 έως 45 °C (32 έως 113 °F)
Επίπεδα θερμοκρασίας κατά τη
αποθήκευση: -30 έως 70 °C (-30 έως 158 °F)
Επίπεδα υγρασίας κατα τη λειτουργία: 10%
έως 90% Μη συμπυκνωμένη
Επίπεδα υγρασίας κατα τη αποθήκευση:
10% έως 90% Μη συμπυκνωμένη
Θύρα Ethernet: Θύρα RJ-45
10/100/1000Mbps
Θύρα SFP
Betriebstemperatur: 0°C bis 45°C
Lagertemperatur: -30°C bis 70°C
Luftfeuchte Betrieb: 10% bis 90% nicht-
kondensierend
Luftfeuchte Lagerung: 10% bis 90% nicht-
kondensierend
Ethernet-Port: 10/100/1000 Mbps RJ-45 port
SFP Port
Temperatura (operação): 0 a 45 °C (32 a
113 °F)
Temperatura (armazenamento): -30 a 70 °C
(-30 a 158 °F)
Umidade operacional: 10% a 90% Sem
condensação
Umidade de armazenamento: 10% a 90%
sem condensação
Porta Ethernet: porta RJ-45 de
10/100/1000Mbps
Porta SFP
ZH
ES
FR
DE
IT
PT
RU
VI
EL
INSTALLATION
Install on the Desktop
Circular groove
Rubber
footpads
1. Place the bottom of switch on a su󰀩ciently large and stable
table.
2. Peel o󰀨 the rubber protective paper of the four footpads one
by one, and stick them in the corresponding circular grooves at
the four corners of the bottom of the case.
3. Flip the switch over and place it smoothly on the table.
Install on a 19” Standard Rack
1. Check the grounding and stability of the
rack.
2. Install the two L-shaped rack-mounting in
the accessories on both sides of switch, and
x them with the screws provided (KM 3*6).
3. Place the switch in a proper position in the
rack and support it by the bracket.
4. Fix the L-shaped rack-mounting to the
guide grooves at both ends of the rack with
screws (prepared by yourself) to ensure that
the switch is stable and horizontally installed
on the rack.
EN
设备安装
安装到桌面
1. 将交换机底部朝上放置于足够大且稳定的桌面上。
2. 逐个揭去4个脚垫的胶面保护纸,分别黏贴在机壳
底部四角对应的圆形凹槽中。
3. 将交换机翻转过来,平稳地放在桌面上。
安装到19英寸标准机架上
1. 检查机架的接地与稳定性。
2. 将配件中的两个L型挂耳支架分别安
装在交换机面板的两侧,并用配 件
中提供的螺丝(KM 3*6)固定。
3. 将交换机安放在机架内适当位置,
由托架支撑。
4. 用螺钉(请自备)将L型挂耳支架固定
在机架两端的导槽上,确保交换机
稳定、水平地安装在机架上。
圆形凹槽
脚垫
ZH
INSTALACIÓN
Instalación en Escritorio
1. Coloque la parte inferior del Switch sobre una mesa lo
sucientemente grande y estable.
2. Despegue el papel protector de goma de las cuatro almohadillas,
una por una, y péguelas en las ranuras circulares correspondientes
en las cuatro esquinas de la parte inferior de la caja.
3. Voltee el Switch y colóquelo suavemente sobre la mesathe table
Instalación en un rack estándar de 19”
1. Compruebe la puesta a tierra y la estabilidad
del bastidor.
2. Instale los dos montajes en rack en forma de L
incluidos a ambos lados del Switch y fíjelos con
los tornillos proporcionados (KM 3*6).
3. Coloque el Switch en la posición adecuada en
el bastidor y apóyelo en el soporte.
4. Fije el montaje en rack en forma de L a las
ranuras de guía en ambos extremos del rack
con tornillos (preparados por usted mismo)
para asegurarse de que el Switch esté
instalado de manera estable y horizontal en el
rack
INSTALLATION
Installer sur le bureau
1. Placez le bas du switch sur une table su󰀩samment grande et
stable.
2. Décollez un par un le papier de protection en caoutchouc
des quatre patins et collez-les dans les rainures circulaires
correspondantes aux quatre coins du bas du boîtier.
3. Retournez le switch et placez-le doucement sur la table.
Installer sur un rack standard 19”
1. Vériez la mise à la terre et la stabilité du rack.
2. Installez les deux montages en rack en forme
de L dans les accessoires des deux côtés du
switch et xez-les avec les vis fournies (KM
3*6).
3. Placez le switch dans une position appropriée
dans le rack et soutenez-le par le support.
4. Fixez le montage en rack en forme de L aux
rainures de guidage aux deux extrémités du
rack avec des vis (préparées par vous-même)
pour vous assurer que le switch est installé de
manière stable et horizontale sur le rack.
ES
FR
INSTALLATION
Installation am Desktop
1. Stellen Sie den Switch auf einen ausreichend großen und stabilen
Tisch.
2. Ziehen Sie das Schutzpapier der vier Gummifüsse ab und kleben
Sie diese in die entsprechenden kreisförmigen Rillen an den vier
Ecken der Unterseite des Gehäuses.
3. Drehen Sie den Switch um und legen Sie ihn auf den Tisch.
Im 19” Schrank installieren
INSTALLAZIONE
Installare sul piano di un tavolo
1. Posizionare la parte inferiore dello switch su un tavolo
su󰀩cientemente grande e stabile.
2. Staccare la carta protettiva in gomma dei quattro cuscinetti
per i piedi uno per uno e inserirli nelle scanalature circolari
corrispondenti ai quattro angoli della parte inferiore della custodia.
3. Capovolgere lo switch e posizionarlo sul tavolo evitando movimenti
bruschi.
Installazione su un rack standard da 19”
1. Vericare la messa a terra e la stabilità del rack.
2. IInstallare i due supporti a L per il montaggio
a rack negli accessori su entrambi i lati dello
switch e ssarli con le viti in dotazione (KM 3x6).
3. Collocare lo switch in una posizione corretta nel
rack e sostenerlo con la sta󰀨a.
4. Fissare il montaggio a rack a L alle scanalature
di guida su entrambe le estremità del rack con
le viti (non incluse) per assicurarsi che lo switch
sia installato in modo stabile e orizzontale sul
rack.
1. Stellen Sie sicher, dass der Geräteschrank
sicher steht
2. Installieren Sie die beiden L-förmigen
Gereätehalterungen im Zubehör auf beiden
Seiten des Switches und befestigen Sie diese
mit den mitgelieferten Schrauben (M 3x6).
3. Befestigen Sie den Switch an der gewünschten
Stelle des Schrankes, nutzen Sie dazu die
Montagewinkel.
4. Befestigen Sie die L-förmige Rack-Montage mit
Schrauben (nicht im Lieferumfang enthalten)
an den Führungsnuten an beiden Enden des
Racks, um sicherzustellen, dass der Switch
stabil und horizontal im Rack installiert ist.
DE
IT
Ranura circular
Almohadillas
de Goma
Rainure circulaire
Repose-pieds
en caoutchouc
Umlaufende Nut
Scanalatura
circolare
Pedane in
gomma
Gummiunterlagen
INSTALAÇÃO
Instalação no Escritório
1. Coloque a parte inferior do interruptor em uma mesa
sucientemente grande e estável.
2. Retire o papel protetor de borracha dos quatro pés, um por um,
e cole-os nas ranhuras circulares correspondentes nos quatro
cantos da parte inferior do dispositivo.
3. Vire o switch e coloque-o suavemente sobre a mesa.
Instalação em um rack padrão de 19”
1. Verique o aterramento e a estabilidade do
rack.
2. Instale os dois suportes de rack em forma de L
nos acessórios em ambos os lados do switch e
xe-os com os parafusos fornecidos (KM 3*6).
3. Coloque o switch em uma posição adequada
no rack e apoie-o pelo suporte.
4. Fixe a montagem do rack em forma de L nas
ranhuras guia em ambas as extremidades do
rack com parafusos (preparados por você)
para garantir que o switch esteja instalado de
forma estável e horizontal no rack.
МОНТАЖ
Установка на рабочем столе
1. Поместите нижнюю часть коммутатора на достаточно
большой и устойчивый стол
2. Снимите защитную бумагу с четырех подножек одну за
другой и приклейте их в соответствующие круглые канавки
в четырех углах нижней части корпуса.
3. Переверните коммутатор и плавно положите его на стол.
Установка в стандартную 19-дюймовую стойку
1. Проверьте заземление и устойчивость
стойки.
2. Установите две L-образные стойки с обеих
сторон коммутатора и закрепите их с
помощью прилагаемых винтов (KM 3*6)
3. Поместите коммутатор в правильное
положение в стойку и поддержите его
скобой
4. Закрепите L-образное крепление стойки
к направляющим пазам на обоих концах
стойки с помощью винтов (покупаются
отдельно), чтобы обеспечить устойчивую
и горизонтальную установку коммутатора
на стойке.
PT
RU
ΕΓΚΑΤΑΣΤΑΣΗ
Επιτραπέζια εγκατάσταση
1. Τοποθετήστε το switch με την πλάτη προς τα επάνω σε μία
μεγάλη και σταθερή επιφάνεια.
2. Αφαιρέστε το προστατευτικό από τα τέσσερα στηρίγματα
από καουτσούκ και τοποθετήστε τα στις αντίστοιχες κυκλικές
εγκοπές στη πλάτη του switch.
3. Γυρίστε το switch ανάποδα και τοποθετήστε το προσεκτικά.
Εγκατάσταση σε Rack 19’’
1. Επιβεβαιώστε τη σταθερότητα του rack.
2. Βιδώστε σε κάθε πλευρά του switch τα
συνοδευτικά εξαρτήματα σχήματος Γ.
Χρησιμοποιήστε τις βίδες που περιέχονται
στη συσκευασία (KM 3*6).
3. Τοποθετήστε το switch σε μία κατάλληλη
θέση στο rack σας.
4. Ευθυγραμμίστε τις εγκοπές των
εξαρτημάτων σχήματος Γ στους οδηγούς
των εγκοπών στις δύο πλευρές του rack
(οι βίδες αυτές δε περιλαμβάνονται).
Βεβαιωθείτε ότι το switch είναι σταθερό και
σε οριζόντια θέση.
Cài đặt
Cài đặt để trên bàn
1. Đặt thiết bị lên bàn
2. Lần lượt bóc lớp giấy bảo vệ cao su của bốn miếng lót chân
và dán chúng vào các rãnh tròn tương ứng ở bốn góc của đáy
hộp.
3. Lật switch lên và để trên bàn
Cài đặt trên giá tiêu chuẩn 19”
1. Kiểm tra tiếp đất và độ ổn định của giá đỡ.
2. Lắp hai giá đỡ hình chữ L vào các phụ kiện
ở cả hai bên và cố định chúng bằng các vít
đi kèm (KM 3*6).
3. Lắp đặt thiết bị vào vị trí thích hợp trong tủ
rack
4. Cố định giá treo hình chữ L vào các rãnh
dẫn hướng ở hai đầu giá đỡ bằng vít (bạn
tự chuẩn bị) để đảm bảo thiết bị được lắp
đặt ổn định và nằm ngang trên giá đỡ.”
EL
VI
Ranhura circular
Almofadas
de borracha
Круглая канавка
резиновые
подножки
Κυκλική εγκοπή
Στηρίγματα
από
καουτσούκ
Rãnh tròn
Chân đế
cao su

Other Grandstream Networks Switch manuals

Grandstream Networks GWN7702 User manual

Grandstream Networks

Grandstream Networks GWN7702 User manual

Grandstream Networks GWN7800 Series User manual

Grandstream Networks

Grandstream Networks GWN7800 Series User manual

Grandstream Networks GWN7701PA User manual

Grandstream Networks

Grandstream Networks GWN7701PA User manual

Grandstream Networks HA100 User manual

Grandstream Networks

Grandstream Networks HA100 User manual

Grandstream Networks GWN7816 User manual

Grandstream Networks

Grandstream Networks GWN7816 User manual

Grandstream Networks GWN7701PA User manual

Grandstream Networks

Grandstream Networks GWN7701PA User manual

Grandstream Networks GWN7806 User manual

Grandstream Networks

Grandstream Networks GWN7806 User manual

Grandstream Networks GWN7816 User manual

Grandstream Networks

Grandstream Networks GWN7816 User manual

Grandstream Networks GWN7832 User manual

Grandstream Networks

Grandstream Networks GWN7832 User manual

Grandstream Networks GWN780 Series User manual

Grandstream Networks

Grandstream Networks GWN780 Series User manual

Grandstream Networks UCM6102 User manual

Grandstream Networks

Grandstream Networks UCM6102 User manual

Grandstream Networks GWN7811 User manual

Grandstream Networks

Grandstream Networks GWN7811 User manual

Grandstream Networks GWN7800 Series User manual

Grandstream Networks

Grandstream Networks GWN7800 Series User manual

Popular Switch manuals by other brands

SHENZHEN GUIYUAN INDUSTRY DEVELOPMENT 0030067 quick start guide

SHENZHEN GUIYUAN INDUSTRY DEVELOPMENT

SHENZHEN GUIYUAN INDUSTRY DEVELOPMENT 0030067 quick start guide

Wyrestorm SW-540-TX-W user manual

Wyrestorm

Wyrestorm SW-540-TX-W user manual

Black Box ServSwitch II ACS250A Specifications

Black Box

Black Box ServSwitch II ACS250A Specifications

Wyrestorm SW-0401-HDBT manual

Wyrestorm

Wyrestorm SW-0401-HDBT manual

Domintell Dimmax 420SLR user manual

Domintell

Domintell Dimmax 420SLR user manual

Renkforce RF-4842435 operating instructions

Renkforce

Renkforce RF-4842435 operating instructions

ORiNG Transporter Series Quick installation guide

ORiNG

ORiNG Transporter Series Quick installation guide

G&D miniMUX4 Installation and operation

G&D

G&D miniMUX4 Installation and operation

Avaya 3500 series Getting started

Avaya

Avaya 3500 series Getting started

D-Link DGS-3620-28PC-SI product manual

D-Link

D-Link DGS-3620-28PC-SI product manual

Hirschmann GREYHOUND GMM42 user manual

Hirschmann

Hirschmann GREYHOUND GMM42 user manual

Freedom9 KVM-08H user manual

Freedom9

Freedom9 KVM-08H user manual

Crestron DigitalMedia DM-MD64X64 Getting started

Crestron

Crestron DigitalMedia DM-MD64X64 Getting started

Raritan SwitchMan USB-Combo SW2 brochure

Raritan

Raritan SwitchMan USB-Combo SW2 brochure

Cabletron Systems DLEHF-MA user guide

Cabletron Systems

Cabletron Systems DLEHF-MA user guide

Panduit ATLONA AT-HDR-SW-51 manual

Panduit

Panduit ATLONA AT-HDR-SW-51 manual

TP-Link TL-SG3210 user guide

TP-Link

TP-Link TL-SG3210 user guide

KROHNE OPTISWITCH 4000 C Handbook

KROHNE

KROHNE OPTISWITCH 4000 C Handbook

manuals.online logo
manuals.online logoBrands
  • About & Mission
  • Contact us
  • Privacy Policy
  • Terms and Conditions

Copyright 2025 Manuals.Online. All Rights Reserved.