Graphic Whizard PT 330 Mini User manual

1
10/14/2020
Table of Contents
Introduction ...........................................................................................................................................................2
Specifications .........................................................................................................................................................2
Safety Precautions .................................................................................................................................................3
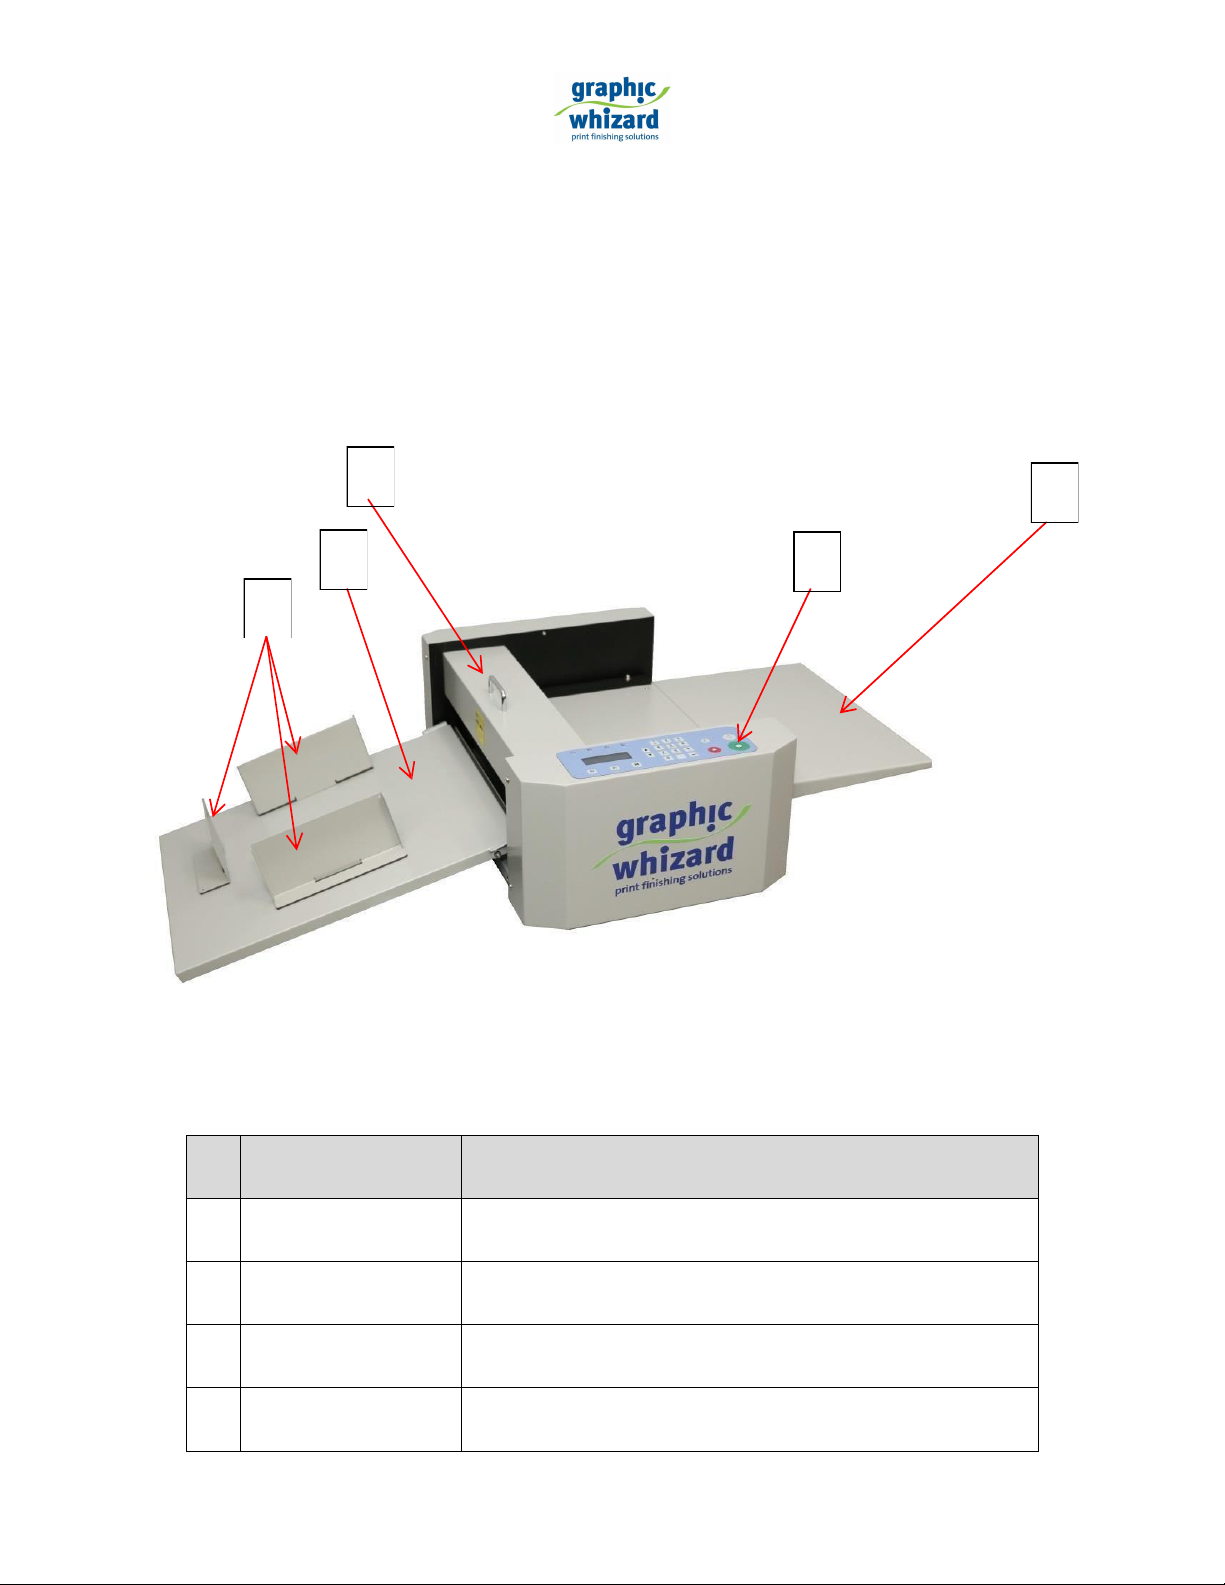
Main Parts and Assemblies....................................................................................................................................4
Outfeed Tray......................................................................................................................................................5
Outfeed Assembly .............................................................................................................................................5
Additional Parts .................................................................................................................................................6
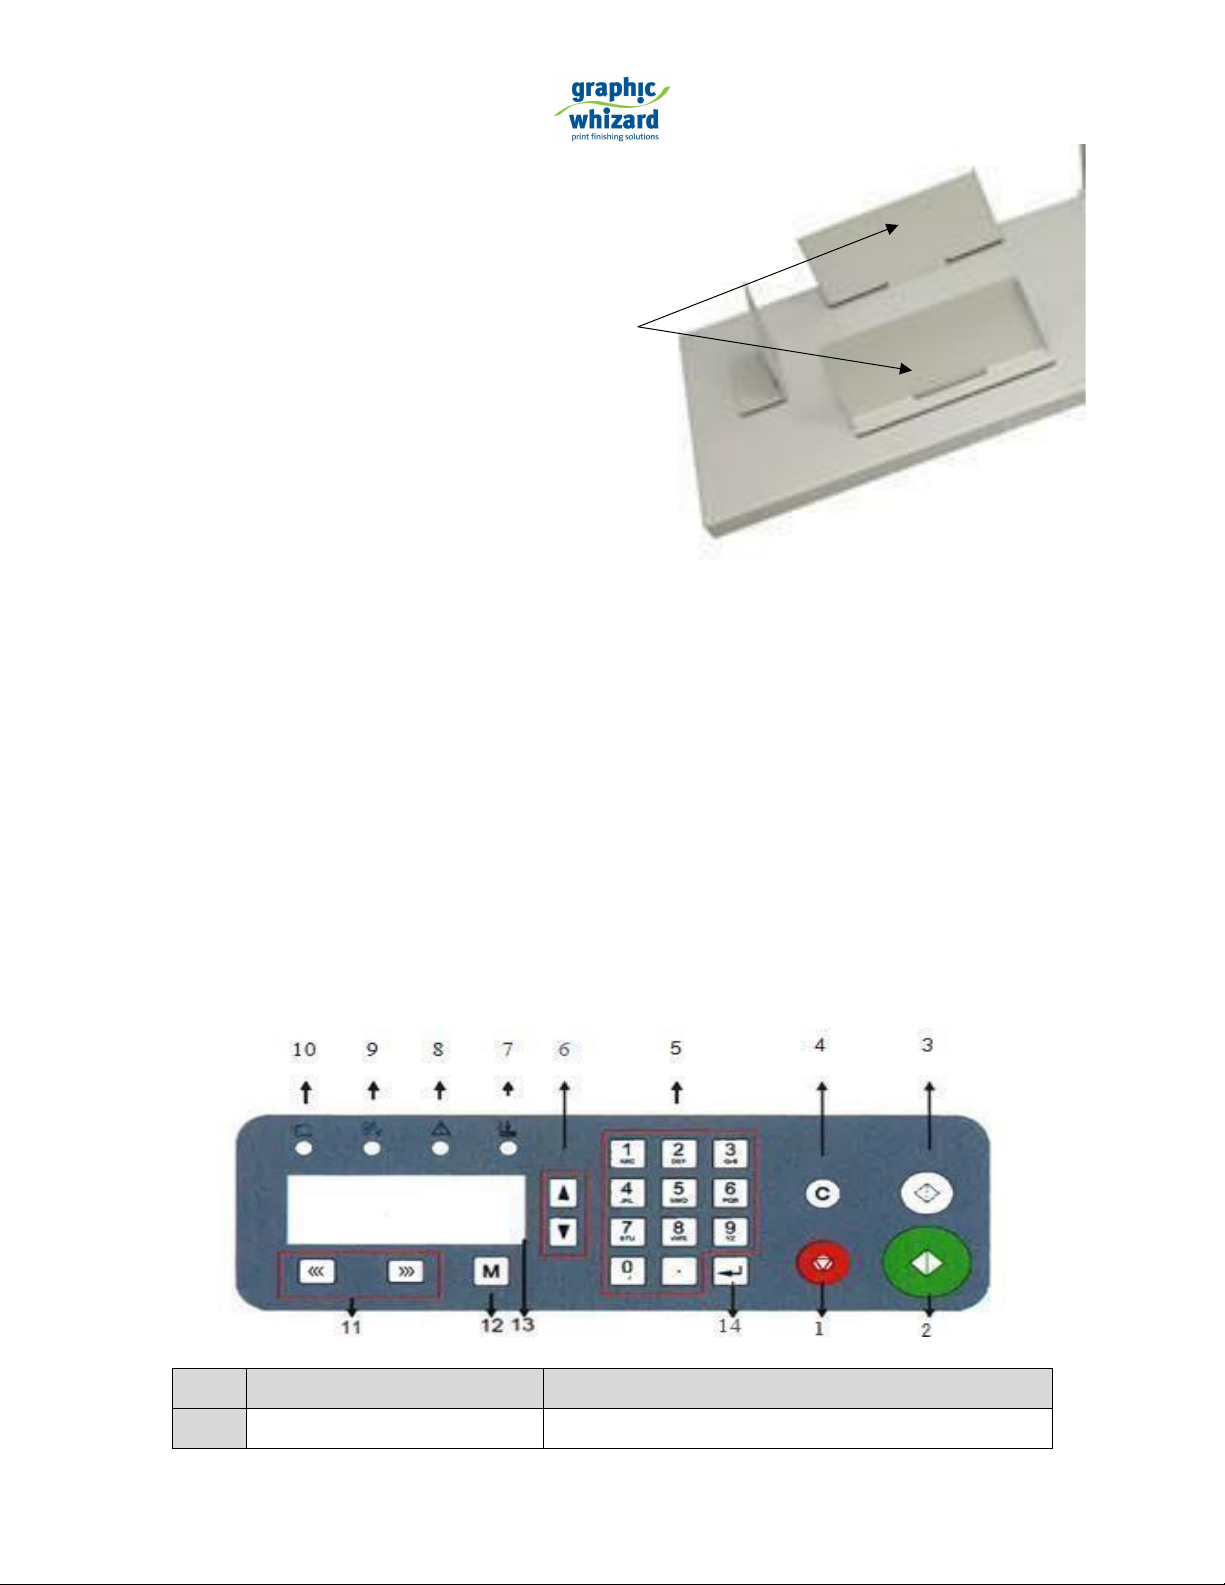
Display and Keypad................................................................................................................................................7
Operation...............................................................................................................................................................8
Main Screen.......................................................................................................................................................9
Input Crease Data..............................................................................................................................................9
Recall Job .........................................................................................................................................................10
Save Job ...........................................................................................................................................................10
Speed ...............................................................................................................................................................10
Troubleshooting...................................................................................................................................................10
Skew Adjustment.............................................................................................................................................11
Crease Depth Adjustment ...............................................................................................................................12
Maintenance........................................................................................................................................................12

2
Introduction
The PT 330 Mini entry level creaser is an economic solution for printers facing the issue of digital toner
cracking. Keypad programming for simple operation makes for an efficient option to move away from
rotary scoring and into a true die crease with minimal effort. The PT 330 Mini can be placed on an optional
stand or used as a tabletop machine with removable trays to minimize the footprint.
Specifications
Item
Specification
Paper
Paper Thickness
100-300 GSM (0.1-0.3mm)
Max Paper Size (L X W)
330 x 650mm (12.99”x 25.59”)
Min Paper Size (L X W)
50 x 90mm (1.96”x 3.54”)
Laminated Paper
Yes
UV Coated Paper
Yes
Creaser
Crease Qty In One Pass
0-6
Min Gap from Leading Edge to First
Crease
10mm (0.39”)
Min Gap from Tail to Last Crease
5mm (0.19”)
Min Gap Between Two Creases
0.1mm
Crease Die
1.0mm
Accuracy
±0.3mm
Crease Depth Adjustment
Standard
Crease Counting
Reversible Counter
Total Counter
Crease qty and paper qty
Skew Adjustment
Standard
Feeding Extension Table
Standard
Output Tray
Standard
Language
English/Chinese
Stand
Optional
Dimension (L X W X H)
960 x 506 x 221mm (37.79” x 19.92” x 8.7”)
Package Dimension (L X W X H)
610 x 437 x 310mm (24.01” x 17.2” x 12.2”)
Power
110 V AC / 150W / 50/60Hz
Fuse
3.5 A
Net Weight
20.5 kg (46 lbs.)
NOTE: It is the responsibility of the customer to supply power to the machine in accordance with all
applicable electrical and safety codes and standards.

3
Safety Precautions
Please read this entire manual before attempting to operate the PT 330 Mini creaser.
•DO NOT operate the machine when any covers are removed, or safety switches disabled. The
machine should be serviced only by qualified personnel. Obey all safety instructions and warning
labels. Graphic Whizard Inc. cannot anticipate every possible situation that might involve a
potential hazard.
•The instructions in this manual and the warning labels on this machine are not all inclusive.
•Please read and understand all safety instructions which include the terms WARNING or CAUTION.
•Understand that if the safety instructions are ignored, personal injury or
damage to the machine may occur.
•The term WARNING indicates a potentially hazardous situation which, if not
avoided, could result in injury.
•The term CAUTION indicates a potential hazardous situation which could result in damage to the
machine or personal injury. It also may indicate procedures to follow to avoid unsafe practices.
•Ensure all parts are in good working order prior to starting the machine each day. Replace worn
parts immediately and do not operate the machine until you have done so.
•All electrical & mechanical service/repair is to be performed by qualified and approved personnel
only.
•NEVER insert a hand or fingers into the machine while it is running.
•DO NOT wear loose fitting clothing when working with the machine. Tie
back long hair.
•Make sure that the machine stands on a level position and is well ventilated.
•Ensure that the power cord has been unplugged prior to performing service on the machine.

4
Main Parts and Assemblies
No.
Part
Description
1
Outfeed Tray Guides
Are set to control finished projects that exit the machine.
2
Outfeed Tray
An area that contains the finished project.
3
Top Cover
Protects outfeed assembly.
4
Keypad
Input and display creasing data.
3
5
2
4
1

5
5
Feed Tray
Increases the area for larger stocks to be used.
Outfeed Tray
The outfeed tray latches onto screw shafts mounted on the PT 330 Mini chassis.
Outfeed Assembly
The outfeed assembly is equipped with a roller that helps move stock through the machine and out onto
the exit tray.

6
Additional Parts
To hold the stock in place, the PT 330 Mini is equipped with
two different feed guides. The guide indicated with the
arrow should be placed tight against the paper and is held
in position by a magnetic strip on the bottom of the guide.
The non-op side guide is fixed to the table. See the
troubleshooting section for skew adjustment.

7
The outfeed tray guides have a magnetic base and can
be placed anywhere on the outfeed tray. These
guides are used to trap finish projects and pile them
up to increase productivity.
Display and Keypad
No.
Name
Description
1
Stop Button
Stop the machine.

8
2
Run Button
Start the machine.
3
Test Button
Creaser runs one sheet then stops.
4
Clear Button
Clears data and error notifications.
5
Number Pad
Used to input data.
6
Scroll Button
Scroll up and down when there are
multiple pages.
7
No Paper Signal
(C-3 Error)
Lights up when detects no paper or paper
jammed at feeding table. Error code C-3
shows on screen.
8
Error Signal
(E-1 Error)
Lights up when crease motor jammed.
Error code E-1 shows on screen.
9
Jam Signal
(C-2 Error)
Lights up when jam occurs. Error code C-2
shows on screen.
10
Safety Cover Signal
(C-1 Error)
Lights up when the safety cover is open.
Error code C-1 shows on screen.
11
Jam Clear Buttons
Used to move the paper forward or
backward to clear jams.
12
Mode Button
Press to switch between: Program Job,
Recall Job, Save Job and Speed Setting
13
Screen
Displays information.
14
Enter Button
Press to confirm setting or data input.
Operation
Upon initial power on, “Welcome”will appear on the display. The crease motor will cycle once then the
creaser will display the “Ready”screen. The PT 330 Mini is now ready for use. The PT 330 Mini creaser has
five modes. To scroll through the mode options, press M. In each MODE, there may be more than one
page to display different information. To scroll through the information, press the Down ↓or Up ↑arrow.

9
Main Screen
Ready for data input. 0/0 indicates 0 of 0 sheets have been run. Use the
keypad to enter the number of sheets required for the selected job. The
machine will run until the input number of sheets has been completed.
If no number has been input, the machine will run continuously until
the stop button is pressed.
The feed motor will continue to run until the job number is complete.
The other two numbers: 1) and 2) indicate the first and second
programmed crease. If only one crease was programmed, 2) would
display 0.0.
The PT 330 Mini creaser can be programmed for a total of 6 auto
creases. From the main screen, press Down ↓ to see the rest of the
programmed creases. You can only view the programmed creases and
cannot make changes.
Input Crease Data
Press the Mode button once to view this screen. From here, you can
program your creases. Enter the value in Position 1) for the first crease.
Press Enter. Position 2) will flash, indicating it has focus. Continue in this

10
manner until all creases have been programmed. The crease values
must go up (larger than the last).
If you are programming less than six creases, enter the desired creases
then hit enter at the 0 value after the last programmed crease. This will
return you to the ready screen.
Recall Job
Allows you to recall a saved job. Press the Mode button until the display
shows Recall Job. Type the number of the job you wish to recall, and
press enter.
The screen will display “Ready”with the recalled job loaded. The PT 330
Mini creaser can store a total of 30 jobs.
Save Job
Allows the user to save a job. After a job has been successfully
programmed, press Mthree times to get to the “Save Job”screen. Enter
the number under which you would like to save the job and press Enter.
The PT 330 Mini creaser can only save jobs as a number and not as a
name.
Speed
The PT 330 Mini has two speed settings: 1= Low and 2= High. The
asterisk * indicates the current selection.
To change, key in the number of the desired speed on the keypad (1 for
Low, 2 for High) and press Enter.
Troubleshooting

11
The PT 330 Mini is an entry-level creasing machine. From time to time, adjustments and troubleshooting
may be required. See below for a list of common adjustments that will help ensure the best crease
outcome.
Skew Adjustment
Skew adjustment is maintained through the placement of the feed table side guides. The non-operator
side guide is secured with screws but can be adjusted. If the sheets fed are continually coming out skewed,
check the following:
1. Start with a clean stack of evenly cut sheets. 11” x 8.5”is a good test size.
2. Feed the sheets portrait with a crease at 5.5”. This will place a crease in the middle of the sheet.
3. Run a test sheet and check the fold.
4. If the test sheet is skewed, adjust the operator side guide, and run another sheet. Do this several
times. If all sheets fail to come out square, the non-op side guide may require adjustment.
5. Loosen, but do not remove the four screws securing the non-operator side guide to the feed table.
The screws should be loose enough to move the guide by hand but tight enough that test sheets
will not move the guide.
6. Run a test sheet, keeping the operator side guide tight.
7. Continue testing until the sheets come out square.
8. Tighten the non-operator side guide.
Note: The non-operator side guide is set during the Graphic Whizard Quality Check process. This guide
should only be adjusted if the skew is out and the operator side guide placement does not fix the skew.
Please do not test the skew with out of square paper.

12
Crease Depth Adjustment
Adjusting the crease depth too deep will cause crease jams and crease motor lock issues. To adjust the
crease depth, complete the following:
1. Lift the crease cover
2. Locate the two crease adjustment knobs (circled in red).
3. Loosen the 1.5mm set screws below the knobs (smaller red circle).
4. Rotate the knob counterclockwise to increase the crease pressure. Rotate the knob clockwise to
decrease the pressure.
5. Test after each adjustment.
6. When the pressure is even across the sheet, tighten the set screws with a 1.5mm hex tool.
Maintenance
Proper maintenance will prolong the life and functionality of the PT 330 Mini. These maintenance
procedures are recommended with the assumption that the customer is completing daily and weekly
cleaning. To ensure your machine is running at its best, please regularly perform the following:
•Using the GW Roller Cleaner, clean ink/toner dirt and debris from rollers. This should be done
regularly to prevent build-up and protect the integrity of the rollers.
•Follow the rejuvenator cleaning with a wash of water and Simple Green: 1-part Simple Green to
30 parts water. Too much Simple Green will leave a soap residue.
•Lubricate the roller bushings with a 3 in 1 oil. This lubrication will ensure the paper is feeding
properly and prevent the rollers from slowing or sticking.
•Clear paper dust from all sensors with compressed air.
•Clean all surfaces with a water-soluble cleaner.

13
Table of contents
Other Graphic Whizard Binding Machine manuals