Green Power IET FORMULA GOBLIN G2 User manual

1
Global Partner
Education
National PartnerNational Partner
®
Official Tools Provider Global Technology Partner Legal PartnerNational Partner

TOOLS REQUIRED FOR THE BUILD
• Metric Spanners (selecon including 8,10,13, 17 and 19mm)
• Metric Allen Keys (selecon)
• Hammer
• Safety Equipment
• Tyre Pump with Pressure Gauge
• Electrical Screwdriver
• Wiring Crimp Tool
• Further tools may be required
CONTENTS
Introducon To Your Goblin G2 Kit Car
Important Health & Safety Notes
Chassis Assembly
Chassis Assembly
Steering Column Assembly
Front Axle Assembly
Rear Axle Assembly
Rear Axle Assembly
Brake and Throle
Motor Cage and Electrics
Motor Assembly
Baery Tray Assembly
Fing Motor Cage to Chassis
Fing Baeries
Seat Assembly
Fing Seat
Fing Roll Bar
Harness Assembly
Wiring Installaon
G2 Wiring Diagram
Baery Charging
Rebuilds & Spare Parts
Test Driving & Driver Training
Final Pre-Race Checks
2
3
4
5
6
7
8
9
10
11
12
13
14
15
16
17
18
19
20
21
22
23
24
25
26

INTRODUCTION TO YOUR GOBLIN G2 KIT CAR
3
• Welcome to your Goblin G2. We hope you enjoy the Greenpower experience!
• ThekeyobjecveofbuildingaGoblinistoencourageanappreciaonandunderstandingof
engineeringandtechnologybythepupilsinvolved.Werecommendyouinvolvealocalengineer
duringthebuildtoadviseontechnicalmaersandtoactasateammentor.
• Ifyouhavealargenumberofpupilsinvolved,wesuggestyoudividethemintoanumberofteams
toworkondierentareasofthebuildsuchasChassisTeam,FrontAxleTeam,SteeringTeam,Rear
AxleTeam,WiringTeamandBodyworkTeam.Eachteamcanthenoperateseparatelyfromthe
otherscomingtogetherforthenalassembly.
• Themethodofassemblyisbasicallycleanandhencetheprojectcansafelytakeplaceina
classroom.Beawarethatsomepartsmaybecoveredinalightlmofoiltopreventcorrosion.Itis
advisabletousegloveswhenhandlingtheseparts.
• Rememberthatthecompletedcarwillneedtobestoredsomewheredryandbaeries,aeruse,
shouldberechargedandstoredfullychargedtomaintainperformance.
• Pleaseensurethatpupilsarecarefullyintroducedtothetoolsusedandthattheyusethecorrect
toolsforthevariousjobs.
• BeforeanydrivingtakesplacepleasereadtheTestDrivingandDriverTrainingpageofthismanual.
Ifyourequireanyhelpwhatsoever,pleasedocontactGreenpower–Weareheretohelp.
E: info@greenpower.co.uk T: 01243 552305

IMPORTANT HEALTH & SAFETY NOTES
4
• Although Goblin kits are designed to be built by 9-11 year olds there are sll some potenal risks
when working with tools and electricity.
Baeries
• Thebaeriesareabsorbedglassmat(AGM)typebaeries,socannotleakorspillmakingthemsafer
thanotherleadacidtypebaeries.
• Cauonmustbetakenwhenthebaeriesareoutoftheirpackingboxesastheterminalsare
exposed.Werecommendthatbaeriesarestoredintheirpackingboxeswhennotinuseinthecar.
Anyshorngbetweenbaeryterminalscanbedangerousanddamagethebaery.
• Beforerstchargingbaeriescheckyourchargervoltage.A12vchargerwillchargeasingle
baeryatame.A24vchargermustonlybeusedtochargeapairofbaerieslinkedinseries.
Incorrectchargingmaydamagebaeriesandbedangerous.
• Baeriesshouldbestoredfullychargedandneverbeledischargedasthismayresultindamage.
Oncechargingiscompleteremovefromchargeandstorethebaeriessafelytopreventanychance
ofashortcircuit.
Tyres
• Thereisariskoftyresbursngifoverinated.Pleasenotethemaximumpressuremarkedonthe
tyresanddonotexceedthis.
• Donotstoretyresindirectsunlightasoverheangcanresultinincreasedpressureandtheriskof
thembursng.

FRONT
FRONT
GP1334
GP1334
GP1233
GP1230
GP1227
GP1332
GP1335
GP1333
CHASSIS ASSEMBLY
5
Tools Tip: Ordinaryspanners
aregoodbut,youcansave
mebyusingaspanner
ononeendofanutand
boltandasocket&ratchet
handleontheother.See
FingerTightnote.
Finger Tight:Whenyourst
xnuts&bolts,don’tfully
ghtenthem.Dothemupjust
withngersto“ngerght”.
Onceasetofpartshavebeen
assembledandalignedthen
goroundandfullyghten
them.
Nyloc Nuts:ManynutssuchasGP1227usedontheGoblin
areNylocnuts.Thesehaveaplascringinsertedinoneend
whichpreventsthenvibrangundone.Theymustbeed
withtheplascinsertfacingawayfromtheheadofthebolt.

FRONT
FRONT
GP1233
GP1230
GP1233
GP1230
GP1230
GP1227
GP1391
GP1362
GP1338
GP1336R
GP1436
GP1230
GP1233
GP1336L
GP1436
GP1230
GP1233
GP1363
GP1216
GP1337
GP1339
GP1362
GP1212
GP1233
GP1230
CHASSIS ASSEMBLY
6
Small Parts: Whenyouhaveasetof
smallpartssuchasnuts&boltsto
workwithplacetheminaplasctray
beforeuse.Thiswayyoushouldavoid
losingthem.Makesureyouknow
whichpartiswhichthough.

FRONT
FRONT
GP1392
GP1216
GP1158
GP1354
GP1236
GP1269
GP1230
GP1216
GP1158
GP1356
GP1215
GP1231
GP1393
GP1230
GP1236
GP1231
GP1227
GP1230
GP1269
GP1157
GP1157
GP1237
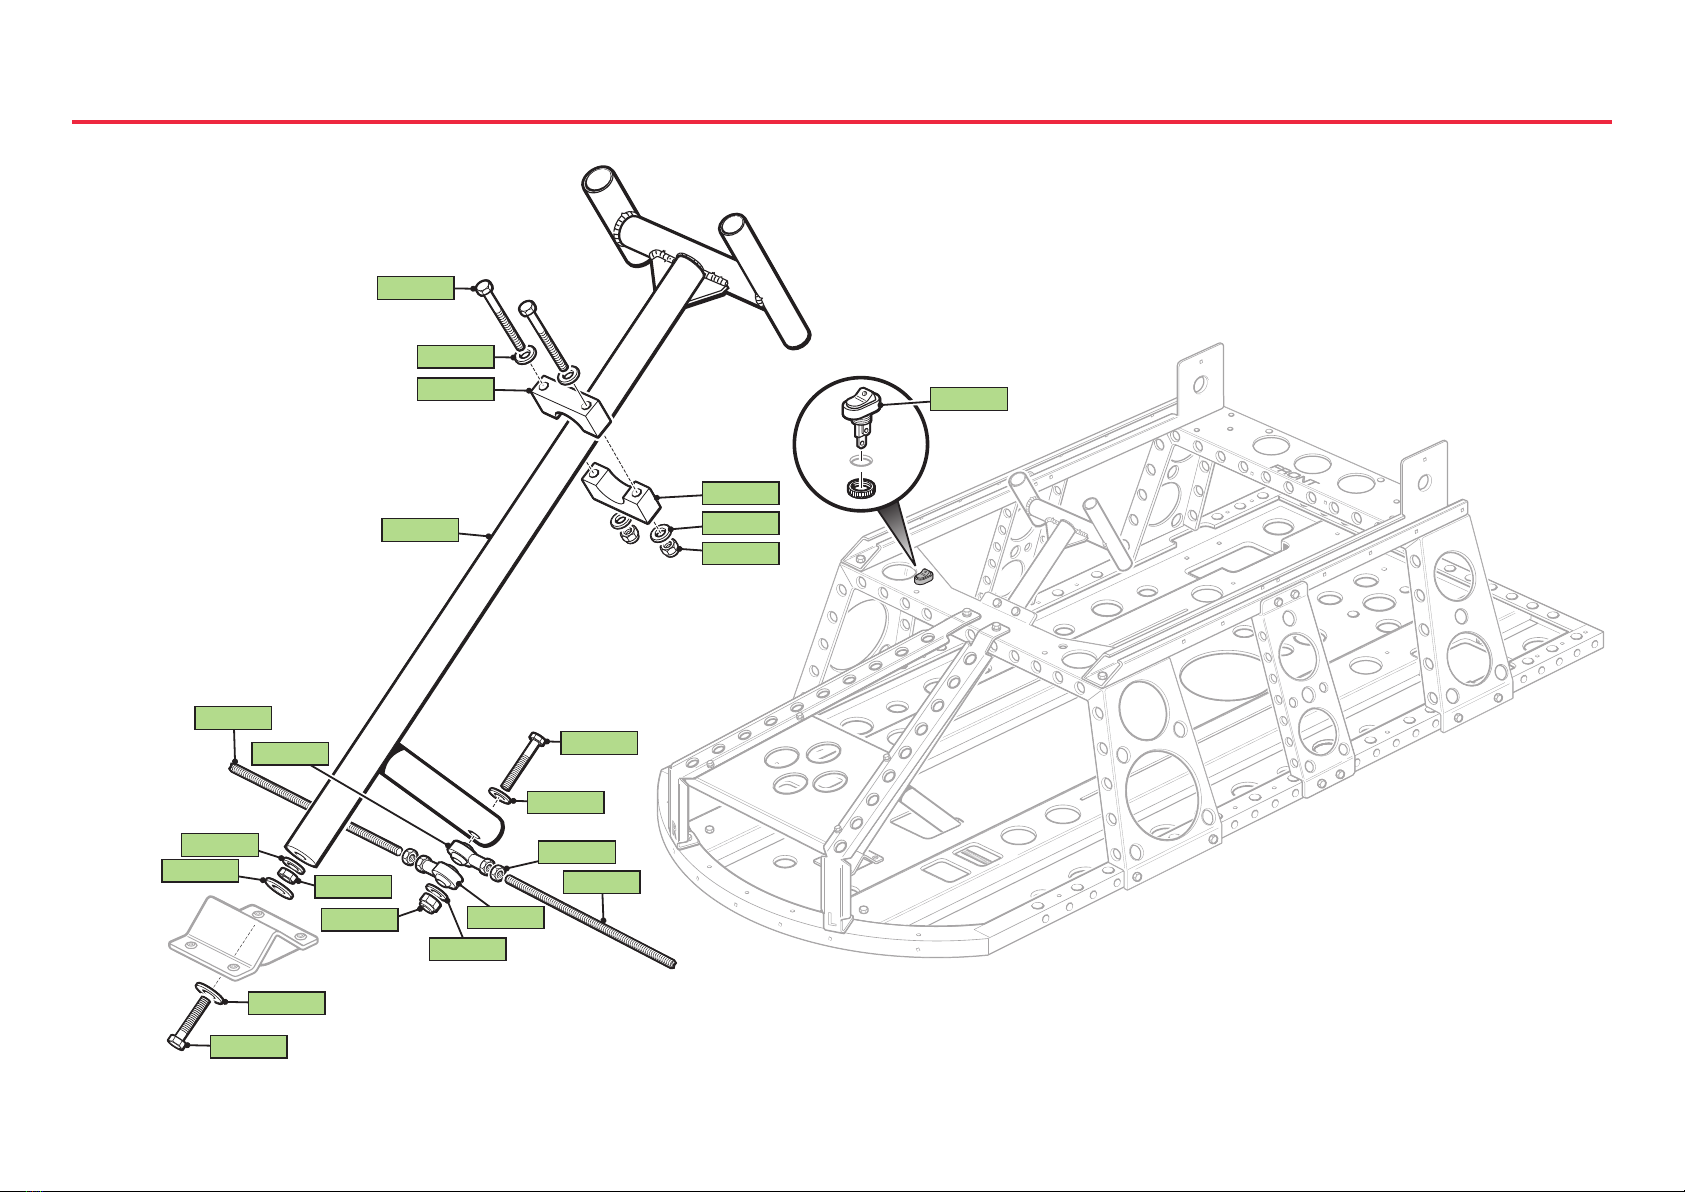
STEERING COLUMN ASSEMBLY
7
Safety Note: Aminimumof10mmofGP1237shouldbescrewedintoGP1354.GP1231
shouldbeghteneduptoGP1354tolockGP1237inplace.
Smooth Steering:Oncecompletethesteeringshouldturnfreelywithnofreeplayinit.
Tighteningorlooseningtheboltsonthesupportblocksandattheboomcanalterthe
resistance.Asmalldropofoilorlubricantbetweenthecolumnandsupportblockscan
help.
Steering Column:Looselyassemble
thesteeringcolumn&support
blocks(GP1158)tothechassis.
Thenconnecttheboomsecon
tothechassisusingGP1237,2x
GP1236,GP1231andGP1230.
GP1237shouldbedoneupunlit
stopsthesteeringfromturningand
thenbackedojustenoughtoallow
freemovement.GP1231shouldthen
beghteneduptotheboomofthe
columntolocktheboltinplace.
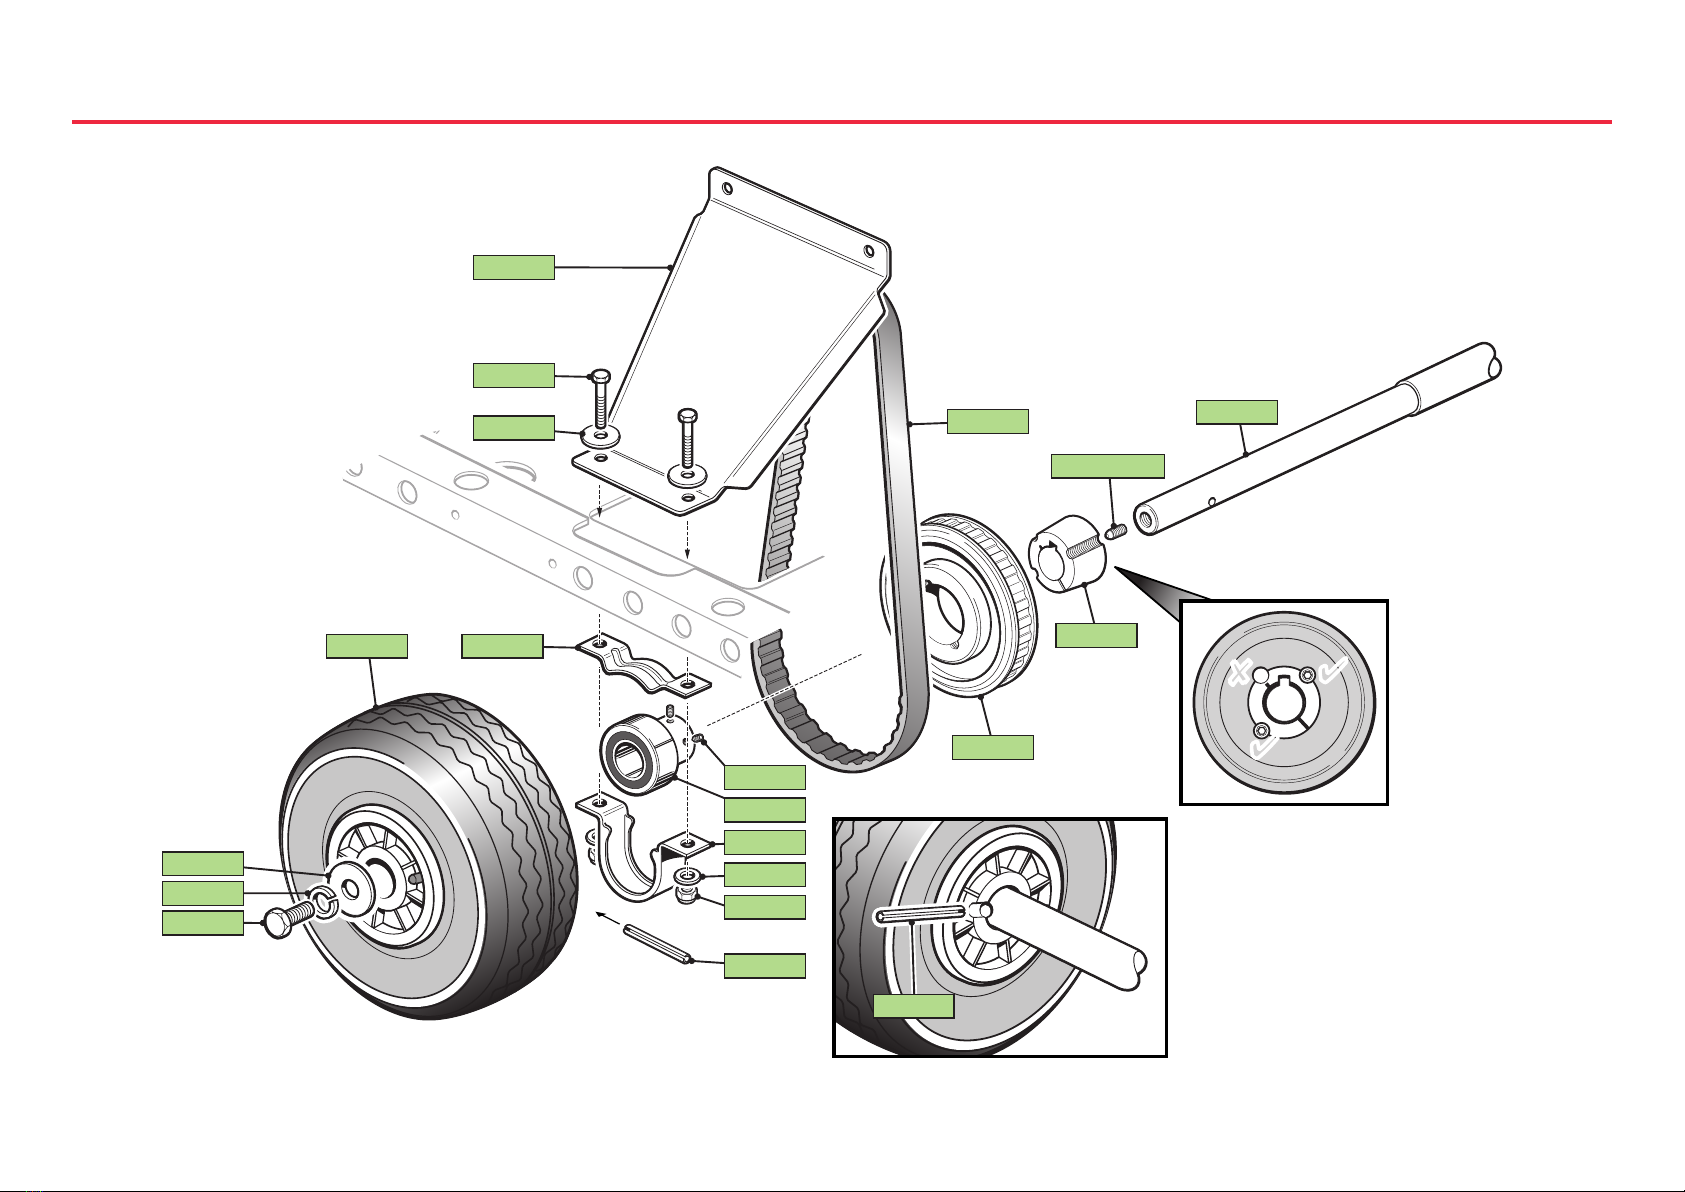
Steering Alignment: Oncethewheelsare
edmakesurethatwhenthesteering
iscenteredbothwheelsareparalleland
poinngstraightahead.Adjustmentisdone
bywindingthesteeringarms(GP1157)in
oroutoftherodends(GP1269).However,
forsafetyensureatleast10mmofthearms
areinsideeachrodend.

GP1190
GP1001
GP1127
GP1312 - Right
GP1311 - Left
GP1157
GP1204
GP1202
GP1230
GP1227
GP1269
GP1231
GP1230
GP1216
GP1201
GP1204
GP1207
GP1360
GP1216
GP1358
GP1142
GP1215
GP1237
FRONT AXLE ASSEMBLY
8
Steering Arms: Fitthe
steeringarmGP1157aer
thestubaxleandensure
aminimumof10mmis
threadedintoGP1269
thenlockedinplacewith
GP1231.
Safe Steering: Tightenthe
largenut&bolts(GP1202/
GP1207)unlthereisno
movementup/downbutit
cansllturnfromsideto
sideeasily,Somelubricaon
isusefulhere.
Cauon: Thebearingsinside
thewheelswillbegreasy.This
lubricaonreducesfriconhelping
speedupyourGoblin.Besureto
usethecorrectwheel.Theone
withoutbearingsshouldbeedto
thelerear.
Linch Pins: Becareful
whenngthelinchpins
(GP1190)astheywillspring
shut.Mindngers!
Go Faster: To
reducefricon
applyalilegrease
toeachsideof
washersGP1001
andinatetyres
tothemaximum
pressureindicated
onthesidewalls.
Thishelpsreduce
friconandrolling
resistanceand
makesyourGoblin
gofaster!Donot
over-inatetyres
astheymayburst.

✘✔
✘✔
✔
✔
GP1341
GP1365
GP1128GP1138
2 x GP1005
GP1161
GP1139
GP1150
GP1205
GP1203
GP1206
GP1002
GP1128
GP1128
GP1291
GP1364
GP1192
GP1004
GP1004
GP1364
REAR AXLE ASSEMBLY LEFT
9
Note: Grubscrews,
GP1005,packagedinside
GP1161,mustbefully
ghtenedtoclampbush
toaxle.ThirdholeisNOT
used.Seediagram,le.
Keep it Tight: Where
Nylocnutsarenotused,
forexampleGP1002and
GP1005alilemedium
strengthliquidthreadlock
canbeused.Thisstops
thingsvibrangloose.
SearchYouTubefortutorials.
Drive Wheel: YourGoblin
usesjustonedrivewheel
onthelerearofthecar.
Powerfromthemotoris
transferredtothewheelvia
therollpin,GP1004.Sois
brakingforce-toomuch
hardbrakingriskswearing
out the tyre.
Roll Pin: Hammertherollpin,GP1004,through
theaxlebeforengthewheel.Itneedstobe
insertedunlequalamountsshowoneachside
oftheaxle.ADULTS: Thiscantakesignicant
forceandcareneedstobetakennottodamage
theaxleorcauseinjury.Theaxleshouldbewell
supported.

GP1365
GP1364
GP1342
GP1001
GP1294
GP1150
GP1381
GP1128
GP1128
GP1004
GP1128
GP1364
GP1192
GP1004
GP1006
GP1127
GP1206
GP1205
GP1203
REAR AXLE ASSEMBLY RIGHT
10
1, 2, 3... Followthenotesin
numberedorder.Rollpins
shouldbeinsertedunl
equallengthsshoweach
sideoftheaxle.
1. Fitthedischub,GP1381,
overtheaxleandsecurein
placewitharollpinthrough
theholenearestthecentre
oftheaxle.
2. Fitthebrakedisc,nongthe
correctrotaonarrow,tothe
hubusing6xGP1006with
alilethreadlock(seeKeep
itTightnoteon“REARAXLE
ASSEMBLY-LEFT”page.
3. Slidethecentrepartof
thebearing,GP1128,onto
theaxle.Donotghtenthe
grubscrewsunltheaxleis
alignedonthecar-butdon’t
forgettodoso.
4. Insertthenalrollpin
oncethehub,discand
bearinghavebeened.
Remembertosupportthe
axleandtakegreatcare
whenhammeringthisin.

GP1131
GP1040
GP1295
GP1040
GP1217
GP1216
GP1261
GP1355
BRAKE AND THROTTLE ASSEMBLY
11
Fricon: Ifyourbrakepadsanddiscarerubbingwithoutthebrakelever
beingpulledthiswillslowyoudown.
Brake Disc: Thebrakecaliperstraddlesthedisc.Havingletheaxlebearing
grubscrewslooseoncethecaliperhasbeenedandalignedthesecanbe
ghtened.Furthercaliperalignmentcanbeachievedbyslightlyloosening
theblackcaliperbracketbolts,thenwhilstapplyingthebrake,re-
ghteningthem.Aimtobeabletospinthewheelswithout
thediscrubbingonthebrakepadsinthecaliper.

FF
N
GP1215
GP1343
GP1034 GP1034
GP1216
GP1212
GP1054
GP1219
GP1264
GP1216
GP1215
GP1214
GP1123
GP1383
GP1140
GP1264
GP1215
GP1219
GP1216
GP1216
GP1219GP1216
GP1216
MOTOR CAGE AND ELECTRICS
12
Note:FitGP1034and
associatedcablesbefore
ngGP1343tochassis.
Ensurecorrectorientaon
sotheredkeyalignswith
theo/onmarkings.
Safety Note:Theredisolatorswitchkeyshouldbeoutof
theswitchexceptwhenabouttodrive.Thisimmobilises
theGoblinbyturningoallpower.Itshouldonlybe
insertedandswitchtotheonposionimmediatelybefore
drivingwiththedriverinthecar.

FF
N
GP1230
GP1291
GP1211
GP1137
GP1230
GP1237
GP1230
GP1344
GP1227
GP1227
GP1248
MOTOR ASSEMBLY
13
Motor Pulley:Thepulley,GP1137,shouldbeslid
ontothemotorsha.Movingitinoroutalongwith
adjustmentoftheaxlepulley,GP1139(see“REAR
AXLEASSEMBLYLEFT”page),allowsthetwopulleysto
bealigned.Ifthemotorpulleyisaghttuseasoer
materialsuchasapieceofwoodorrubbermallettotap
it on.
Tightening:Oncethemotorandaxlepulleyshavebeen
alignedonthecarthegrubscrew,GP1211,canbe
ghtened.Alilethreadlockonthisscrewwillprevent
itcomingundone.
Belt Tension:Correctdrivebelttensionisimportantto
aidaquickstartandpreventexcessbeltwear.Loosen
the4boltsGP1237andnutsGP1227,slidethemotor
mounngplate,GP1344,towardsthebackofthecar
totensionthebeltthenre-ghtenthenuts&bolts.
Ifwhenstarngtodrivethecaragraunchingsounds
occursthenthebeltistooloose.Asageneralguidea
correctlytensionedbeltwhentwistedbyhandshould
rotatebetween45°and90°.

FF
N
GP1233
GP1230
GP1345
GP1233
GP1230
BATTERY TRAY ASSEMBLY
14

FRONT
FRONT
FF
N
GP1363
GP1343
GP1230
GP1227
GP1363
GP1216
GP1230
GP1216
GP1219 GP1227
GP1216
GP1233
GP1230
FITTING MOTOR CAGE TO CHASSIS
15
Note: RemembertotGP1343
MotorCagefrontxings,not
shown.Usethesamexingsas
attherear.

FRONT
FRONT
FF
N
GP1363
GP1216
GP1363
GP1216
GP1346
FITTING BATTERIES
Safety Note:Onlytand
connectbaeriesonceall
wiringisinstalledandhas
beendoublechecked.
16
Baery Connecons:Takecare
nottoover-ghtenthebaery
terminalbolts.

GP1391
GP1362
GP1212
GP1347
GP1349
GP1350
GP1348
GP1351
SEAT ASSEMBLY
17

FRONT
FRONT
GP1360
GP1215
GP1442
GP1360
FITTING SEAT
18

FRONT
FRONT
FF
N
GP1352
GP1230
GP1397
GP1436
GP1227
GP1436
GP1233
GP1230
GP1233
GP1230
GP1233
GP1230
GP1233
GP1230
FITTING ROLL BAR
19

FRONT
FRONT
FRONT
FRONT
FF
N
GP1365
GP1364
GP1364
GP1192
GP1365
GP1364
GP1364
GP1192
GP1120
HARNESS ASSEMBLY
20
Note:Thesafetyharnessmustbe
adjustedtosecurelyrestrainthe
driver.Alooseharnesswillmean
driverswillnotbepermiedtostart
anevent.Itistheresponsibilityof
teamstoensuresuitableadjustments
aremade.
Safety Harness: Wheninstallingthesafety
harnesskeepthebuckledoneuptohelpprevent
twisngduringng.
Table of contents
Popular Science Education Product manuals by other brands

Gaumard
Gaumard NOELLE S554.100 user guide

Evil Mad Scientist
Evil Mad Scientist AxiDraw MiniKit 2 Assembly guide

Reality Works
Reality Works Hearing Impairment Simulator quick start guide

Educational Insights
Educational Insights GeoSafari Motorised Solar System Guide

ScienceSeeds
ScienceSeeds DIY LAMP instructions

LearnOBots
LearnOBots CODI BOT manual