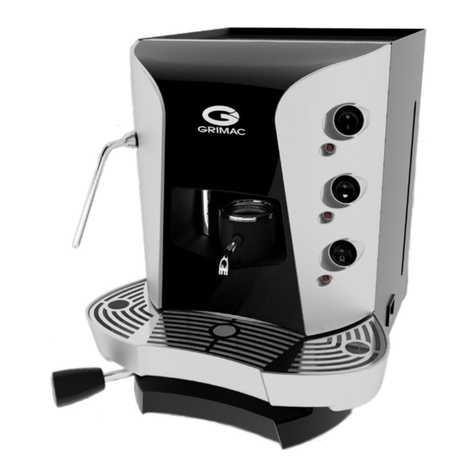
Grimac Espressione BABY GRACE PG User manual

BY
OPERATING INSTRUCTIONS
BABY GRACE PG

IMPORTANT SAFEGUARDS
When using electrical appliances, basic safety precautions should always be observed, including the
following:
• Read all instructions carefully.
• Do not touch hot surfaces. Use handles or knobs.
• To protect against risk of fire, electric shock, and injury to persons do not immerse cord or
plug or appliance in water or any other liquid.
• Close supervision is necessary when any appliance is used by or near children.
• Unplug from outlet when not in use and before cleaning. Allow to cool before putting on or
taking off parts, and before cleaning the appliance.
• Do not operate any appliance with a damaged cord or plug, or after the appliance
malfunctions, or if it is dropped or damaged in any manner. Return appliance to the nearest
authorized Service Center for examination, repair or electrical or mechanical adjustment.
• The use of accessory attachments not recommended or sold by the appliance manufacturer
may result in fire, electric shock or injury.
• Do not use outdoors.
• Do not let cord hang over edge of table or counter, or touch hot surfaces.
• Do not place on or near a hot gas or electric burner, or in a heated oven.
• Always attach plug to appliance first, then plug cord into the wall outlet. To disconnect, turn
any control to “OFF”, then remove plug from wall outlet.
• Do not use appliance for other than intended use. The manufacturer cannot be considered
responsible for any damage caused by improper, incorrect or unreasonable use.
CAUTION
This appliance is for household use. An authorized service representative should
perform any servicing other than cleaning and user maintenance.
Authorized service personnel only should do repair.
•x Check voltage to be sure that the voltage indicated on the nameplate agrees with your voltage.
•x After removing appliance from the package, check it for the damage. If in doubt, do not use the
appliance and contact an authorized service center.
•x The appliance dispenses hot water and steam and temperatures are therefore high. Keep your
hands away from hot parts of the appliance during operation.
•x Never clean with scouring powders or hard implements.
•x Never remove the filter holder when the appliance is pressurized or is dispensing coffee.
•x Never leave the water inside the appliance at temperatures of 0°C or below.
•x Before carrying out any maintenance or cleaning operations, make sure that the appliance has been
disconnected from the electrical mains by removing the plug from the power supply socket.
•x Do not unplug the unit by pulling on the cord.
•x To reduce the risk of injury, do not drape cord over the counter top or table top were it can be pulled
on by children or tripped over unintentionally.
•x Never operate the appliance without water; it would be damaged beyond repair.
•x The appliance is intended for household use.
SAVE THESE INSTRUCTIONS

3 - 16
Index
Page
Introduction ............................................................................................................................................... 4
Guide to the instructions ....................................................................................................................... 4
Symbols ................................................................................................................................................ 4
Warranty conditions ................................................................................................................................. 4
General warnings ...................................................................................................................................... 4
Technical specifications ........................................................................................................................... 5
Technical data ....................................................................................................................................... 5
Description ............................................................................................................................................ 6
Priming ....................................................................................................................................................... 7
Filling the water tank ............................................................................................................................. 7
Turning on the machine ........................................................................................................................ 7
Loading the circuit ................................................................................................................................ 8
Machine operation .................................................................................................................................... 8
Pre-heating ........................................................................................................................................... 8
Coffee dispensing (with single serving pod) ......................................................................................... 9
Coffee dispensing (with filter holder for one or two cups, with universal pressurised filter) ................ 10
Hot water dispensing (preparation of hot beverages) ......................................................................... 10
Steam dispensing (preparation of cappuccino) ................................................................................... 11
Maintenance ............................................................................................................................................ 12
Cleaning instructions .......................................................................................................................... 12
Brew head and filter holder support .............................................................................................12
Drip tray ........................................................................................................................................ 12
Filter holder and filter ................................................................................................................... 12
Steam tube ................................................................................................................................... 12
"Pannarello" advanced frothing wand .................................................................................... 12
Water filter .................................................................................................................................... 13
Water tank .................................................................................................................................... 13
Decalcification .................................................................................................................................... 13
Disposal ................................................................................................................................................... 13
Problems, possible causes, solutions .................................................................................................. 14

4 - 16
This symbol indicates more specific informa-
tion on a point already stated. No hazard is present,
however observance of this information is intended
to result in a proper use of the machine.
Warranty conditions
ESPRESSIONE appliances are warranted for a
period of 12 months (Twelve) from the date of
purchase.
The warranty is considered valid when filled out,
stamped by the dealer and attached with proof of
purchase. The warranty will be considered invalid
should non-original spare parts be used or if repair
is performed by a technical service center not au-
thorized by Espressione.
The warranty does not cover damage due to normal
wear, improper use, intentional damage or acciden-
tal damage from external causes.
General warnings
•Before using the ESPRESSIONE coffee machine,
read these operating instructions carefully.
The appliance must be connected to a grounded
wall socket. Make sure that the voltage matches
that on the rating plate.
• Before turning on the appliance, make sure that
the steam outlet knob is closed and that the steam
tube is directed towards the grid.
• Keep the appliance out of the reach of children.
• Place the appliance on a flat and stable surface.
Do not place it on a hot surface or near heat
sources.
• Position the power cord so that it is out of the way
and no one can trip over it. Keep children and pets
at an appropriate distance.
• Do not use the appliance in the presence of ex-
plosive substances. In case of fire, use fire extin-
guishers containing carbon dioxide (CO2). Do not
use water or other types of extinguishers.
Introduction
Guide to the instructions
This manual is organized into chapters that provide
necessary information on the proper use of the ma-
chine. Each chapter is divided into paragraphs out-
lining essential points, and each paragraph may have
subheadings containing additional information.
Symbols
Symbols indicate important information on safety or
the proper use of the machine.
This symbol indicates important warnings. Failure
to heed these warnings could result in damage to
the machine or injury to the user.
This symbol indicates burning precautions.
This symbol indicates precautions intended to pre-
vent electrical shock.
Dear Customer,
Thank you for selecting one of our products.
This ESPRESSIONE coffee machine by Grimac will
allow you to enjoy a delicious cup of espresso
coffee or cappuccino right in your own home.
In the standard version, the BABY GRACE coffee
machine makes espresso coffee with ready-to-use
single serving "pods." Each pod contains an exact
amount of selected coffee, ground and pressed
between two filters. This method is designed to
simplify preparation, make dosing and pressing
unnecessary, as well as facilitate cleaning.
Before use, read this manual carefully and become
familiar with the different parts of the machine.
5 - 16
Technical specifications
Technical data
Voltage see rating plate on machine
Casing Metal/ABS
Boiler Aluminum
Filter holder ring Chrome-plated brass
Water pump pressure (bar) 13-15
Absorbed power (W) 1050
Weight (pounds ) 18.74
Cup grid Yes
Brass filter holder for pod Yes
Kit for ground coffee Yes
Hot water/ steam device Ye s
Size
width x height x depth in inches:11,57 x12,58 x13,75
Color Soft blue
Warranty period 1
Conformity
Machine conforms to European Directive 89/336/
ECC (legislative decree 476 dated 04/12/92) re-
lating to the elimination of radio-tv interference.
• Do not expose the appliance to outside weather
conditions (rain, snow, frost) and keep it away from
moisture.
•
Never immerse the appliance in water.
• Use the machine exclusively for the purpose for
which it was designed (the preparation of es-
presso, cappuccino and hot beverages).
• Do not use the appliance without water in the tank;
check the water level and refill as necessary.
•
Do not use the appliance in case of malfunctioning
or if the power cord is damaged.
• Never attempt to repair or open the machine. Have
any maintenance or servicing carried out by a
Grimac authorized service center, which will serv-
ice the machine using original spare parts only.
• Do not unplug the machine by jerking on the power
cord.
• Before cleaning, turn switches off and unplug the
machine from the wall socket.
• Before the coffee flows out, make sure that the
filter holder is in a locked position as indicated in
these instructions.
• During operation of the ESPRESSIONE coffee
machine, some parts will become very hot. To
prevent burning, do not touch the hottest parts of
the machine (filter holder, steam nozzle); do not
point the jet of steam or boiling water onto parts
of the body, and never open the filter holder when
the machine is in operation.
• Remember to switch off the machine after use.
• Save the original packing, which was designed to
protect the machine during eventual transport.
Grimac will not be held responsible for dam-
age to persons or property due to the non-observ-
ance of these warnings.

6 - 16
Description
1Main switch
2Machine indicator on light
3Coffee switch
4Heating light (temperature)
5Steam switch
6Steam light on
7Steam/hot water knob
8Water tank lid
8bis Upper surface for cups
9Water tank
10 Filter holder and filter for single serving pod
10a Filter holder
10b Filter
11 Power cord and plug
12 Lower cup grid
13 Drip tray
14 Steam tube
15"Pannarello" a dvanced frothing wand
16 Filter holder ring
17 Loose coffee filter holder kit
17a Filter holder for one or two cups
17b Coffee tamper
17c Measurer
17d Universal pressurised cup filter,for one or
two cups (with a special valve to increase
the "crema")
2 4 6
1 3 5
17a
17b
17c
17d
10a
10b
850005 - 850006 - 850003 - 850001
8
7
9
11
16
14
12
15
Upon receiving the product, check that all the
above parts are included. Advise the dealer im-
mediately if any problems are noted.
10
17
8 bis

7 - 16
860008 - 850012 - 860009 - 860005 - 850001
• Rinse the tank with water (do not use cleansing
products).
• Fill the tank with fresh water and fit it back into its
housing.
• Close the lid.
• Replace the tubes in the tank.
Warning!
Fill the tank with cold drinking water only. Never
use milk, carbonated water or other liquids.
Never fill the tank when the machine is on, as
accidental spilling could prevent the machine
from operating correctly.
• Take out the tubes Cfrom the tank.
Priming
Before using the machine for the first time, remove
the protective film on upper surface 8bis and on the
cup grid 12.
Filling the water tank
• Open the water tank lid.
2
Turning on the machine
Press the main switch to turn on the machine and
the red light 2will go on.
C
• Remove the tank from its housing.

8 - 16 850011 - 850001 - 860006 - 860004 - 860002
• Turn the hot water/steam knob counter-clockwise
and press the coffee switch.
• Turn on the machine (as described in the para-
graph above) and wait until the heating-tempera-
ture light 4goes off (about two minutes).
(It is normal if some water drips out of the filter
holder)
4
Loading the circuit
After the machine is turned on, proceed as follows:
• Point the steam tube towards the cup grid and
place an empty cup under the hot water/steam
nozzle.
• Wait for the water to flow out, then press the cof-
fee button again; turn the hot water/steam knob
clockwise to stop the flow.
Important!
Load the circuit in the following cases:
- the first time it is used, with the machine cold
- after the machine has been unused for a long
period of time.
- after the water in the tank has been used up.
- after making steam.
Machine operation
Pre-heating
For best results, pre-heat the accessories by mak-
ing the water flow through the filter holder without a
pod inserted.
• Make sure that there is a sufficient amount of water
in the tank and refill if necessary.
• Insert the empty filter holder in position.
To position the filter holder correctly, insert it from
underneath into the filter holder support and turn it
to the right until it is locked into position.

9 - 16
850009 - 860004 - 850008 - 860004
Coffee dispensing
(with single-serving pod)
After turning on and pre-heating the machine, pro-
ceed as follows:
• Insert the pod in the filter holder.
• Reposition the filter holder as indicated in the pre-
heating phase.
• Place the warmed cup on the grid under the filter
holder and press the coffee switch.
• When the cup is full of hot water, press the coffee
switch again. The machine is now ready for nor-
mal use.
• Place a cup under the filter holder and press the
coffee switch.
• Wait for the quantity of coffee to be sufficient and
repress the coffee switch.
• Take out the filter holder and throw away the re-
sidual coffee.
• Clean the residue underneath the filter holder sup-
port.
Note
For a real hot cup of coffee, we advise using pre-
heated cups.

10 - 16
Coffee dispensing
(with filter holder)
After turning on and pre-heating the machine, pro-
ceed as follows:
• Insert the universal cup filter 17d in the filter holder
17a and fill it with a level measure of ground coffee
blend using the meas-urer 17c, press down
with the tamper 17b.
17a
17b
17c
17d
• Remove any excess coffee around the filter.
• Reposition the filter holder as indicated in the pre-
heating phase.
• Place one or two cups on the grid underneath the
filter holder and press the coffee switch.
• Wait until the quantity of coffee is sufficient and
press the coffee switch again.
• Take out the filter holder and throw away the re-
sidual coffee.
Hot water dispensing
(preparation of hot beverages)
After turning on and pre-heating the machine, pro-
ceed as follows:
• Position the steam tube with nozzle turned towards
the grid.
• Place a cup under the steam tube.
• Turn the steam knob counter-clockwise and press
the coffee switch to start the flow of hot water.
• After obtaining the desired amount of hot water,
press the coffee switch again and turn the steam
knob clockwise.
850005 - 850010 - 860004 - 850009 - 860006 - 860004

11 - 16
860003 - 850001 - 860006 - 860010
Steam dispensing
(preparation of cappuccino)
After turning on and pre-heating the machine, pro-
ceed as follows:
• Position the steam tube with the nozzle turned
toward the grid.
• Pour approx. 3,52 ounces of cold milk in a cup.
• Press the steam switch and the red light 7will go
on.
• Wait for the temperature light 4to go off.
4 7
• Turn the hot water/steam knob. After any residual
water flows out, the steam will start.
• Immerse the tube into the cup, taking care not to
clog the hole on the pannarello (advanced frothing
wand). Move the cup in a circular motion to heat
it up evenly.
For a correct use of the advanced frothing wend ,
immerse it only 0,786 inch
• To shut off the steam, turn the hot water/steam
knob and press the steam button again.
Warning: Burning hazard!
The steam tube can get very hot so do not touch
it with bare hands.
Note
To prepare the coffee after dispensing, you must load
the circuit (see "loading the circuit" above).

12 - 16
•Filter holder and filter: use a moistened cloth
and rinse the filter holder with filter inserted with
hot water after each use. Once a month take out
the filter from the filter holder (with the help of a
spoon handle) and rinse it with hot water.
•Steam tube: clean the tube and the steam noz-
zle with a moistened cloth after each use.
•Pannarello : slip out the “pannarello” and rinse it
with hot water after each use.
850004 - 860012 - 860011 - 860007 - 860001
Maintenance
Maintenance and cleaning operations should be
performed when the machine is cold and discon-
nected from the wall socket.
To clean the machine, use a soft cloth dampened
with water. Do not use sharp objects or cleansing
products.
•Drip tray: clean the cup grid after every use.
Once a month remove the grid and take out the
drip tray, then clean both using a moistened cloth.
Cleaning instructions
Clean the components of the machine regularly:
•Brew head and filter holder support: remove
the brew head by unscrewing screw Aand clean
it with a soft cloth. We advise cleaning once month.
After every use, clean the filter holder support with
a soft cloth.
A

13 - 16
850012 - 860009
• Water filter: clean filter Bevery three months.
B
Decalcification
Decalcify the machine every three months using
Grimac product or equivilent descaling agent for
espresso machines.
• Mix the descaling agent with water according to
the instructions on the package and pour the
mixture inside the tank. One liter of the mixture is
usually sufficient.
• After removing the filter holder, dispense 1 cup at
a time the entire contents of the water tank by
pressing the coffee switch and turning the steam
knob. Wait 15 minutes between each dispensing
operation to allow the product to work.
• Rinse the water tank and fill it with fresh water.
• Turn the hot water/steam knob and press the cof-
fee switch to allow the tank to empty out com-
pletely, then press the coffee switch again to stop
the flow.
Disposal
When the machine is no longer serviceable, take it
to a qualified service center and dispose according
to the rules in force in the applicable country.
C
•Water tank: clean tank Cevery day and fill it with
fresh drinking water.

14 - 16
Remedy
• Connect the machine to the
power supply.
• Contact an authorized
service center for repair.
• Preheat the accessories and
the cups.
(see paragraph on "Preheating")
• Refill the tank with water.
• Insert the rubber tube into the
tank.
• Clean the filter.
• Change the type of coffee.
• Clean the filter.
• Clean the filter holder support
grid.
• Perform decalcification.
• Refill the tank with water.
• Contact an authorized
service center for repair.
• Insert the filter holder correctly.
• Change the type of coffee.
• Add coffee.
• Clean the edge of the filter
holder.
• Clean the seal and if neces-
sary, contact a Grimac service
center for replacement.
• Replace the blend with fresher
coffee.
• Replace the pod.
• Clean the “pannarello”.
• Use a different type of milk.
• Use cold milk.
• See paragraph on "Steam dis-
pensing".
Fault
The machine does not turn on.
The coffee isn't hot enough.
The coffee does not flow or else
only drips.
The pump is too noisy.
The coffee flow is too fast.
The coffee leaks from the filter
holder edges.
The espresso is not creamy.
The milk does not froth up.
Possible cause
• The machine is not connected
to the power supply.
• The power cord is faulty or a
fault exists inside the power
circuit.
• Either the accessories or cup
are cold.
• No water is in tank.
• The rubber water suction tube
is not inserted into the tank.
• The water filter is clogged.
• Coffee is too finely ground.
• Coffee filter is clogged.
• Filter holder support grid is
clogged.
• Appliance is encrusted with
lime deposits.
• No water is in tank.
• Pump is defective.
•
Not enough coffee in filter holder.
• Coffee blend is unsuitable.
• Filter holder incorrectly posi-
tioned in support.
• Top edge of the filter holder is
dirty.
• Filter holder support seal is
dirty or worn.
• Coffee blend is moist or too
old.
• Pod is old or moist.
•
“Pannarello” accessory is clogged.
• Milk is unsuitable.
• Milk is lukewarm.
• Pannarello is used incorrectly.
Problems, possible causes and solutions

15 - 16
Notes

Grimac s.r.l.
Via Morazzo, 2 (corner via Rigosa) - 40069 - Zola Predosa (BO) Italy
Tel. +39 051 755668 8 linee r.a. - Fax +39 051 755948 / 750789
E-mail: info@grimac.net - Web site: http://www.grimac.it
Cod. MG 686 Rev. 01 del 25-11-03
Table of contents
Other Grimac Coffee Maker manuals

Grimac
Grimac Minigrimac User manual

Grimac
Grimac G 11 User manual

Grimac
Grimac G 11 User manual

Grimac
Grimac OPALE User manual

Grimac
Grimac TERRY OPALE Capsule User manual

Grimac
Grimac DADA VAPOR DOPPIA User manual

Grimac
Grimac TWENTY Series PUL 2 Manual

Grimac
Grimac Ambra User manual

Grimac
Grimac TWENTY Manual

Grimac
Grimac TERRY TECH User manual