Gripnail 7250 User manual

Model 7250 Power Pinner Bench Hand Welder
1
POWER PINNER
BENCH
HAND WELDER
7250
OPERATOR’S MANUAL
Copyright: Novem er 20, 2018 Revised:
Serial No.
Gripnail Corpora ion An Employee Owned Company________________________
97 Dexter Road East Providence, Rhode Island 02914-2045 Tel: (401) 216-7900 Fax: (401) 438-8520
E-mail: gripnail@gripnail.com We site: www.gripnail.com

Model 7250 Power Pinner Bench Hand Welder
2
TABLE OF CONTENTS
OPERATOR SAFETY……...….……………………..…………………………...3
DESCRIPTION………………………………………..…………………………..4
SPECIFICATIONS…………………………………….…………………………..4
INSTALLATION………………………………………….……………………….5
SETUP and OPERATION……………………………………….………………...6
MAINTENANCE……………………………………………….………………….6
INTERNAL PART IDENTIFICATION………………………..…………………..7
EXTERNAL PART IDENTIFICATION……….…….…….………………………8
HAND GUN PART IDENTIFICATION…………………………………………..9
WIRING DIAGRAM………………………………………………..………........10
SERVICE POLICY……………………………………………..…………………11
.
WARRANTY…………………………………………..………………………….12

Model 7250 Power Pinner Bench Hand Welder
3
OPERATOR SAFETY
Our first concern at Gripnail is the safety of the operators using our equipment. As with most
types of welding equipment, there is always a potential for serious injury if the equipment is mis-
used. Please familiarize yourself with the equipment efore operating. Below is a list of a few
safety precautions that should e o served.
1. READ this manual efore you egin using the equipment.
2. DO NOT OPERATE this welder in or near water or damp areas.
3. DO NOT LOOK directly at the weld pin while welding. Arcing produced y the
welding process could cause flash urns to your eyes and could cause lindness.
4. WEAR protective clothing to prevent skin urns from weld slag.
5. DO NOT TOUCH the weld pin or adjacent area after welding until sufficient time is al-
lowed for cooling. Otherwise, serious urns may result.
6. DO NOT OPERATE the welder unless all covers are in place.
7. DO NOT PULL or move the welder y the attached ca les or damage to the ca les
will result.
8. CONTACT the Gripnail Service Department for assistance with replacement parts,
repairs, questions or diagnosing a pro lem with the welder.
Gripnail Corpora ion
An Employee Owned Company
97 Dexter Road
East Providence, Rhode Island 02914
Phone: (401) 216-7900
Fax: (401) 438-8520
Email: [email protected]
We site: www.gripnail.com

Model 7250 Power Pinner Bench Hand Welder
4
DESCRIPTION
The Model 7250 Power Pinner Bench Hand Welder is a solid state resistance welder designed
for welding Power Point Resistance Weld Pins to galvanized sheet metal ductwork. Exception-
ally strong welds will e o tained with 16 gage or lighter sheet metal. However, tests should e
performed to determine the correct weld time settings and if the weld is accepta le per individual
requirements.
The normal, continuous weld rate is 15-20 welds per minute. It is capa le of welding at faster
rates, ut for short durations only. Care should e exercised not to exceed the continuous rate for
long periods, otherwise component overheating and damage may occur.
The weld gun has a pistol grip style handle with a trigger switch and extra long ca les. Welding
current is not availa le at the gun until the weld pin contacts the sheet metal. The weld relay and
weld timer operations may e tested y activating the trigger without the pin touching the sheet
metal. The “WELD ON” light will turn ON, as well as the weld transformer, for
up to 1 second, or equal to the weld time control setting.
SPECIFICATIONS
Input voltage — 190-240 volts AC, 50/60 Hz, 1 Phase, 35 Amps
(Recommend using a 50 Amp (minimum), slow low Disconnect)
Electrical connection —10 ft, 8/3 power cord.
Ground ca le — 5 feet, # 4/0 weld ca le, with a spring loaded, copper alloy clamp
Weld gun ca le — 15 feet, # 4/0 weld ca le and # 16/3 control ca le
Dimensions — 14” L x 18” W x 46” H (including handle)
Weld rate — 15-20 welds per minute (depending on weld time settings).
Gun type — pistol grip
Shipping weight—140 l s., oxed

Model 7250 Power Pinner Bench Hand Welder
5
INSTALLATION
The Power Pinner Bench Hand Welder is designed to e used in a stationary location. If alter-
nate locations are desired, the Power Pinner Bench Hand Welder may e moved. It is suggested
that at least 3 people carry the Power Pinner Bench Hand Welder to its new location. Two peo-
ple to carry the main enclosure and one to carry the ca les. The unit weighs approximately 130
l s. Be sure the platform where the Power Pinner Bench Hand Welder is placed is capa le of
supporting its weight.
The Power Pinner Bench Hand Welder is designed to operate from 190 to 240 volts, 50/60 cy-
cles, single phase AC. An appropriate male plug, to match the female receptacle to e used, will
need to e installed to the electrical supply cord: or wire the electrical supply cord to an appro-
priate disconnect.
This machine is a welder and is supplied with 35 amp dual-element, time delay (200kA inrush)
main fuses. Select the size and style plug, receptacle and ranch circuit protection accordingly.
Set the jumper on the terminal strip (190, 208 or 230) to match the incoming voltage. With the
power disconnected and or locked out, remove the cover to expose the transformer tap terminal
strip. Move the tap wire to the proper terminal position. Replace the cover securely efore re-
powering. (See Figure 1)
Figure 1

Model 7250 Power Pinner Bench Hand Welder
6
SETUP and OPERATION
1. Attach the spring loaded ground clamp to the work ta le or directly to the duct. Insure the
connection is clean and free of foreign material or weld quality will e compromised.
2. Plug the welder into a proper electrical outlet and adjust the “Weld Time”. (Shorter pins
and thin gauge require a lower setting than long pins and thicker gauge.)
3. Use duct liner and a piece of scrap metal of the same gage for the following test.
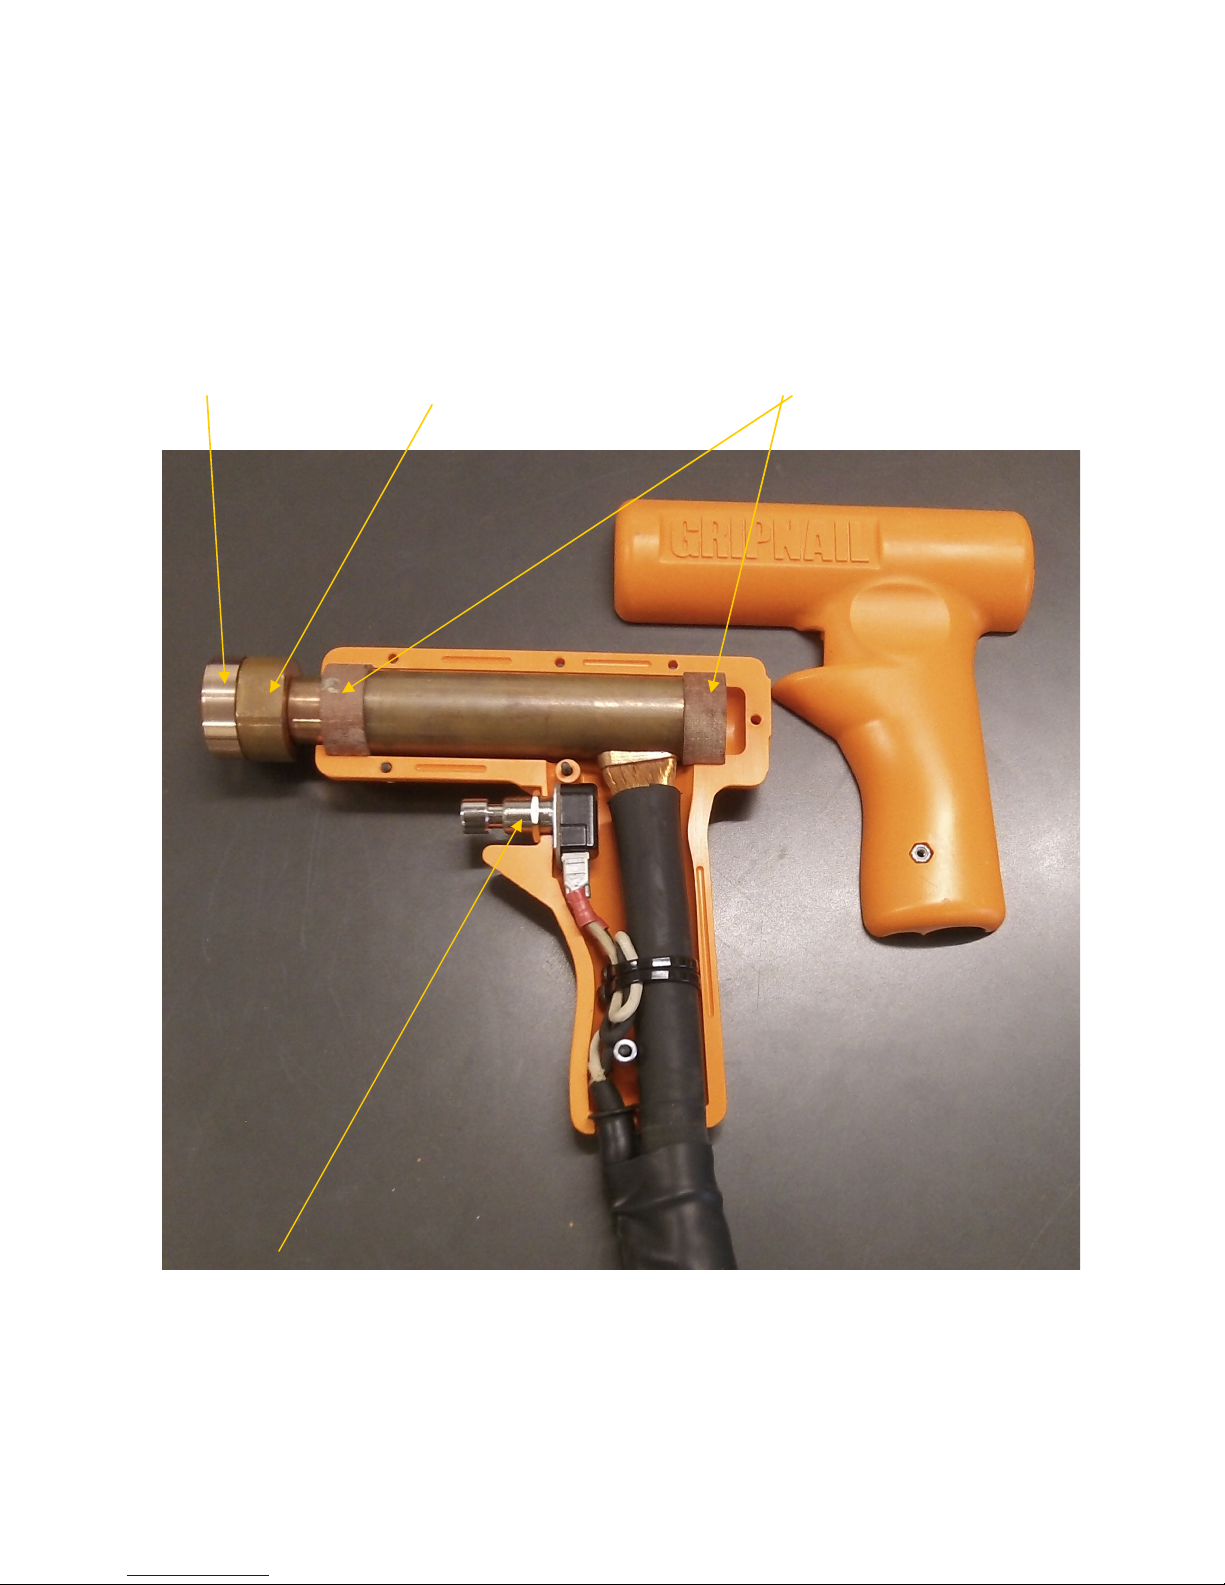
4. Place a weld pin on the gun’s magnetic weld tip.
5. Press the pin into the liner, making contact with the metal using a twisting motion, then
apply moderate pressure prior to activating and throughout the weld cycle.
6. Pull and hold the trigger to start and continue the weld cycle. The green “WELD ON”
light will turn ON during the weld cycle and will automatically go OFF.
7. Release the trigger, lift the gun from the metal, then repeat the process with a new pin.
8. Test weld several pins in this manner and adjust the “Weld Time” to the lowest setting
required to give good weld results.
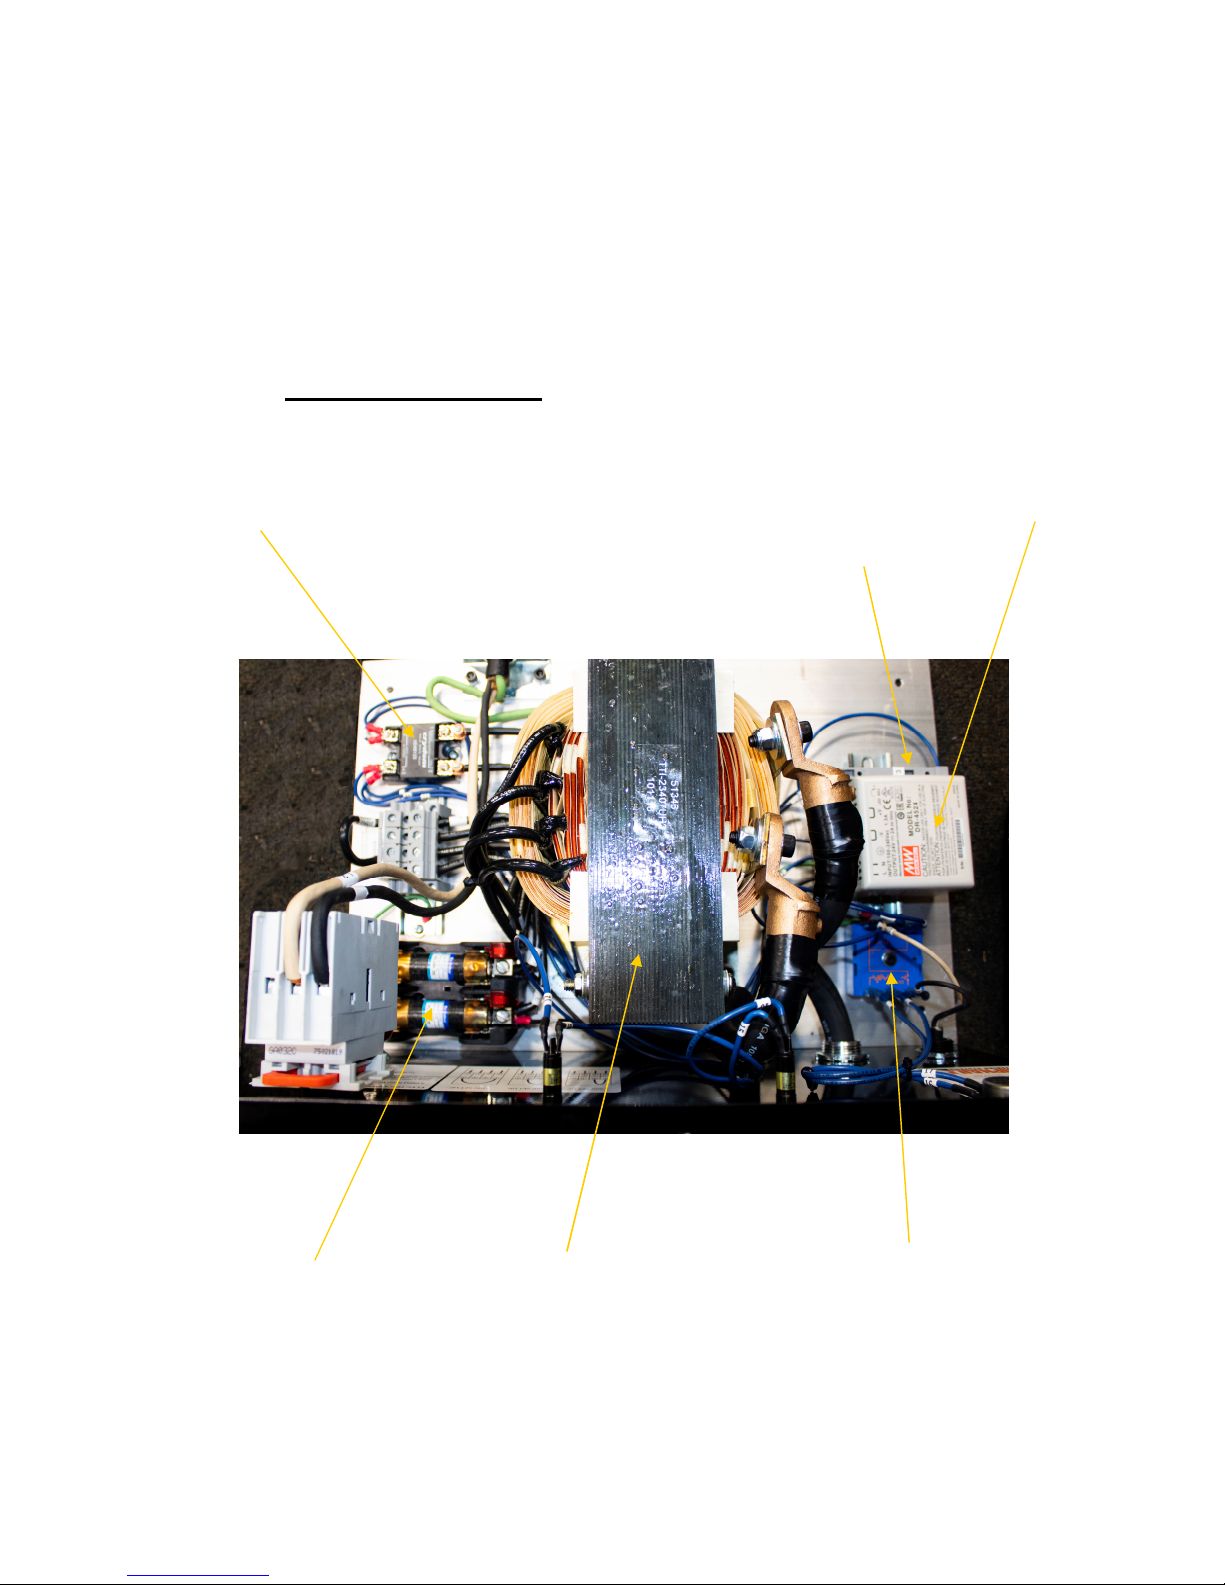
MAINTENANCE
The Model 7250 Power Pinner Bench Hand Welder requires very little maintenance due to
it’s solid state circuitry and design. We do, however, recommend the following procedures
periodically.
CAUTION: Turn welder OFF and disconnec from elec rical supply before
any main enance or service is performed.
1. Remove all accumulated insulation dust and foreign de ris from inside the welder.
2. Tighten all mounting hardware on solid state circuit components, transformers, ca le con-
nections to weld transformer, ground clamp, weld gun and control ca le.
3. Using a steel wire rush, clean the contact surfaces of the spring loaded ground clamp.
4. Clean and inspect the magnetic weld tip. Replace if adly urned, deeply pitted or if the
magnetism is too weak to properly hold a weld pin.
Carefully inspect and tighten all ca le strain reliefs.

Model 7250 Power Pinner Bench Hand Welder
7
INTERNAL PART INDENTIFICATION
WARNING
The inside view of the welder is shown elow for parts identification
purposes only.
DO NOT OPERATE the welder with the cover removed.
Possi le injury or accidental electrical shock may result.
51350 WELD TIMER
51301 WELD RELAY
51346 WELD TRANSFORMER
51272 POWER SUPPLY
51274 3A FUSE
51299 35A FUSE

Model 7250 Power Pinner Bench Hand Welder
8
51297 DISCONNECT SWITCH 51263 POTENTIOMETER
51351 WELD ON LIGHT 51352 POWER ON LIGHT
EXTERNAL PART INDENTIFICATION

Model 7250 Power Pinner Bench Hand Welder
9
HAND GUN PART INDENTIFICATION
51308 TRIGGER SWITCH
31011 WELD TIP 20507 WELD TIP HOLDER 31499 INSULATOR
The magnetic tip must e kept tight to the Weld Tip Holder, and clean during use or weld qual-
ity will e compromised. Check the tip condition often for wear and clean with a steel wire
rush to remove glue uildup and urning as necessary. Replace when it ecomes adly pitted
or the magnets fail to hold a pin.
COMPLETE ASSEMBLY
20516

Model 7250 Power Pinner Bench Hand Welder
10
WIRING DIAGRAM

Model 7250 Power Pinner Bench Hand Welder
11
SERVICE POLICY
Proper operation of your machine is a top priority with the Gripnail Corporation. We will as-
sist you to the est of our a ilities to see it is kept in peak operating condition.
In many cases, service needs can e made simply y calling Gripnail Customer Service De-
partment. If it ecomes necessary for a service technician to visit your plant, we can make the
arrangements.
All Gripnail machines are covered under a one year New Machine Warranty (see Warranty
next page). Replacement parts covered y the warranty are supplied free of charge, provided
the original parts are returned to Gripnail and do not shown signs of a use.
All warranties on Gripnail machines are good only if Gripnail fasteners are used. If it is de-
termined that fasteners other than those manufactured y Gripnail have een used, the war-
ranty is voided. At Gripnail, we elieve in servicing what we sell for the lifetime of the
equipment. If you are having difficulty with your machine or if you have any questions re-
garding service and warranty policy, please call, fax, or write:
Gripnail Cus omer Service Depar men
Gripnail Corpora ion
97 Dexter Road
East Providence, Rhode Island 02914
Phone: (401) 216-7900
Fax (401) 438-8520
Email: [email protected]
We site: www.gripnail.com

Model 7250 Power Pinner Bench Hand Welder
12
WARRANTY
All Gripnail Fastening Equipment is thoroughly inspected and tested efore leaving the factory.
Gripnail Corporation warranties its equipment to e free from defects in workmanship and mate-
rials under normal and proper use for a period of one (1) year from date of sale to original end
purchaser.
The warranty does not apply when repairs or attempted repairs have een made y persons other
than Gripnail Corporation’s authorized service personnel, or where it is determined y our ser-
vice personnel that the equipment has een su jected to misuse, negligence or accident. If it is
determined that any fasteners other than those manufactured y Gripnail have een used in this
machine or tool, the warranty is terminated.
This warranty is not effective unless equipment is properly registered with the factory through
the use of warranty information card prior to use. Gripnail Corporation shall not e lia le for
contingent damages or delays caused y defective materials or any other means eyond our con-
trol.
Gripnail Cus omer Service Depar men
Gripnail Corpora ion
97 Dexter Road
East Providence, Rhode Island 02914
Phone: (401) 216-7900
Fax: (401) 438-8520
Email: [email protected]
We site: www.gripnail.com
Table of contents
Other Gripnail Welding System manuals
Popular Welding System manuals by other brands

Century
Century 12745 Operator's manual

Hwayuan Electric
Hwayuan Electric ZDE7-1200 Manual instruction

Pertici
Pertici WM1L/S instruction manual

Würth
Würth MIG 350 SYN Translation of the original operating instructions

Miller
Miller Thunderbolt 225 owner's manual

Victor
Victor Auto-Cut 200 XT operating manual

Sealey
Sealey SUPERMIG275.V2 manual

Miller
Miller Trailblazer 302 Diesel owner's manual

ESAB
ESAB A6 Mastertrac instruction manual

Lincoln Electric
Lincoln Electric SQUARE WAVE TIG 255 IM520-B Operator's manual

Scheppach
Scheppach PLC40 Translation of original instruction manual

Miller
Miller Millermatic 140 owner's manual