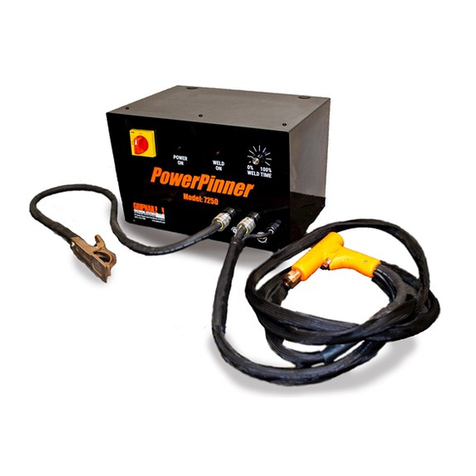
Gripnail POWER PINNER 7300 User manual

Model 7300 Power Pinner CD Hand Welder
1
POWER PINNER
CD HAND WELDER
7300
OPERATOR’S MANUAL
Copyright: April 7, 2014 Re ised: October 18, 2016
Gripnail Corporation
An Employee Owned Company________________________
97 Dexter Road East Pro idence, Rhode Island 02914-2045 Tel: (800) 474-7624 Fax: (401) 438-8520
E-mail: grip[email protected]om Website: www.gripnail.com

Model 7300 Power Pinner CD Hand Welder
2
TABLE O CONTENTS
OPERATOR SAFETY
ELECTRICAL AND PERSONAL SAFETY………………………….…………... ..3
FIRE………………………………………………………………………………….4
MAINTENANCE…………………………………………………………………….4
TRAINING…………………………………………………………………………...4
INSTALLATION………………………………………………………………….. ..4
DISPOSAL…………………………………………………………………………...5
PRODUCT FEATURES
FEATURES…………………………………………………………………………..5
PRODUCT SPECIFICATIONS
OPERATIONAL AND SAFETY FEATURES……………………………………...6
EXTERNAL FEATURES
FRONT PANEL……………………………………………………………………...6
TOP OPEN VIEW……………………………………………………………………7
SIDE VIEW…………………………………………………………………………..7
SET-UP AND WELDING
CONNECTING GROUND CLAMP………………………………………………...8
READY FOR WELDING……………………………………………………………8
VOLTAGE SELECTION……………………………………………………………9
INSPECTING THE WELD………………………………………………………….9
TESTING WELD SETTINGS
TESTING YOUR SETTINGS……………………………………………………….10
GUN COMPONENTS…………………..…………………………………………………...11
SERVICE POLICY………………………………………………………………….……….12
WARRANTY…………………………………………………………………………………13

Model 7300 Power Pinner CD Hand Welder
3
OPERATOR SA ETY
ELECTRICAL AND PERSONAL SAFETY
Our first concern at Gripnail is the safety of the operators using our equipment. As with most
types of welding equipment, there is always a potential for serious injury if the equipment is mis-
used. Please familiarize yourself with the equipment before operating. Below is a list of a few
safety precautions that should be obser ed.
1. READ this manual before you begin using the equipment.
2. DO NOT OPERATE this welder in or near water or damp areas.
3. DO NOT LOOK directly at the weld pin while welding. Arcing produced by the
welding process could cause flash burns to your eyes and could cause blindness.
4. WEAR protecti e clothing to pre ent skin burns from weld slag.
5. DO NOT TOUCH the weld pin or adjacent area after welding until sufficient time is al-
lowed for cooling. Otherwise, serious burns may result.
6. DO NOT OPERATE the welder unless all co ers are in place.
7. DO NOT PULL or mo e the welder by the attached cables or damage to the cables will
result.
8. CONTACT the Gripnail Ser ice Department for assistance with replacement parts,
repairs, questions or diagnosing a problem with the welder.
9. THIS EQUIPMENT CONTAINS a transformer power supply system, which energized by
AC current and transforms the AC to DC current. Due to potential dangerous electrical input
and output, the equipment must be disconnected from all incoming power when ser icing.
10. CAPACITORS STORE ELECTRICAL ENERGY. Check for residual charge before per-
forming any maintenance.
11. DO NOT USE LUIDS to clean electrical components as these may penetrate the electrical
system and cause shorts.
12. LOUD NOISES from welding can damage hearing. Wear earplugs or other protecti e gear,
if applicable.
13. UMES AND GASES expelled during welding can be hazardous to your health. Make sure
welding is done in a well- entilated area.
Connection of the unit into ser ice must be in accordance with the setup procedures as detailed
in this manual. Operation of this equipment must be in accordance with all local, regional, and
national safety codes.

Model 7300 Power Pinner CD Hand Welder
4
FIRE
During welding, small particles of hot metal can be expelled. Ensure that no combustible mate-
rials are near the welding area.
MAINTENANCE
All cables must be inspected regularly to ensure that no danger exists from worn or damaged
insulation or unsafe electrical connections. Take special note to the cables near the gun – this is
where maximum wear occurs.
Worn cables not only produce inconsistent welds, but can o erheat or spark.
TRAINING
Use of this equipment must be limited to authorize personnel only. They must be adequately
trained, and ha e read and understood e erything in this manual. The manual must be a ailable
to operators at all times.
INSTALLATION
Select a site for the equipment which is capable of supporting the weight of the equipment,
which is clear from traffic routes where people may trip o er cables, or they may be damaged
by other equipment or ehicles.
Do not hang connecting cables o er sharp edges or ha e near heat sources.

Model 7300 Power Pinner CD Hand Welder
5
DISPOSAL
The equipment, in its entirety or as components/parts may be disposed of as general industrial
waste or scrap. None of the components used in the manufacturing of the CD Welder are toxic,
carcinogenic, or otherwise harmful to your health.
PRODUCT EATURES
The 7300 incorporates the latest solid state technology into a compact and rugged, portable CD
Pin Welder. This system has the capacity to weld pins (including cupped head pins) up to 10
gauge.
FEATURES
-Digital DC oltage readout.
-Allows for more accurate and repeatable weld settings.
-Cooling fan for increased efficiency.
-Dial-down DC oltage setting.
-No need to turn off the unit when resetting to a lower oltage.
-Only 15 amp circuit requirement.
-Unit fused at 15 amps.
-Power output at lower DC oltage requirements.
-Terminal connections on the capacitor are o er
5
/
8
inches in diameter for a good seat on the
terminal buss bars to increase reliability.
-The terminal connections on the capacitor ha e
1
/
4
- 28 socket set screws inserted in to each
one. The socket set screw is used to make the connection to the buss bar. This eliminates
damaging the threads in the aluminum connectors of the capacitor, ensuring a solid con-
nection.
-Rigid internal construction connecting the entire internal unit to the front and rear panels
minimizes the opportunity of the components coming loose during handling or opera-
tions.
-The 7300 Pin Welder is mounted in a rugged outer case for greater durability, texture, and
appearance.
-The 7300 Pin Welder weighs in at about 12.5 pounds for ease of carrying.
-Comfortable shoulder strap is optional with the unit.

Model 7300 Power Pinner CD Hand Welder
6
PRODUCT SPECI ICATIONS
SIZE 12.5”X10.1”X6.0”
WEIGHT Approx. 12.5 lbs
WELD RANGE Weld Pins—Up to 10 gauge
DUTY CYCLE 16-20 Pins Per Minute
POWER 120 VAC 50/60 HZ 15 Amps OR
230 VAC 50/60 HZ 7.5 Amps
CHARGE VOLTAGE 35-110 VDC
OPERATIONAL AND SAFETY FEATURES
-LED Voltage Meter
-Safety Shutdown
-Cooling Fan
-Front-Panel Informational LED’s
-Dial-Down Weld Voltage Control
-Approximately 9’ Long Gun Cable
-Approximately 9’ Long Ground Cable
*Specifications are subject to change without prior notification
EXTERNAL EATURES
FRONT PANEL
LED Display Voltage Selector Indicator Lights

Model 7300 Power Pinner CD Hand Welder
7
TOP OPEN VIEW
SIDE VIEW
ON/OFF
Switch 15A Circuit
Breaker
Gun Cable GND Cable

Model 7300 Power Pinner CD Hand Welder
8
SET-UP AND WELDING
CONNECTING THE GROUND CLAMP
Attach the clamp of the welding ground lead to the work piece. Prior to securing the clamp,
make certain that the contact area is free of rust, paint, grease, or any other impurities to ensure
a good ground connection.
READY FOR WELDING
When you ha e completed all of the pre ious steps to prepare for welding, attach the ground
cable to the work area, setting up, you can now power on the welder. The controller ON/Off
switch is located on the side of the unit in the upper right hand corner. Next to this switch is the
15 amp circuit breaker for the system.

Model 7300 Power Pinner CD Hand Welder
9
VOLTAGE SELECTION
-Selecting the required weld oltage is achie ed by turning the selector knob. The oltage
range is from 35VDC to 100VDC.
-The oltage is determined by the diameter of the stud and the base material. The unit is la-
beled with recommended oltage settings for arious applications.
-Fine tuning the oltage to meet your requirement for the specific application is recom-
mended.
INSPECT THE WELD
Visually inspect the weld. A good weld will result in an all-around weld, with a small isible
amount of weld surrounding base of the weld pin. Too much splatter and the weld is too hot,
lower the oltage. No splatter and the weld is too cold, increase the oltage.
If you get weld flash to one side of the weld pin as opposed to an e en amount around the base,
this is called “arc blow”, and can be sol ed by repositioning the ground clamp or using a dual
ground clamp.
Proper welding can be tested by either torquing or bending the weld pin. The welded pin should
stay in place using either method. If the base material is ery thin, the diameter of the weld pin
will pull from the base metal for a properly welded pin.
Voltage Selector
LED Display

Model 7300 Power Pinner CD Hand Welder
10
TESTING WELD SETTINGS
When you ha e performed all of the presets as discussed in the manual, it is recommended that
you perform se eral test welds with the same diameter weld pin and base material that you will
be using. This will erify that all of the settings are correct to the results you desire. Welding is
done by placing the weld pin on the magnetic tip, and pressing the gun to the work piece, com-
pressing the spring
Holding the gun perpendicular to the work piece, and aligning the weld pin to the desired posi-
tion on the work piece, press down (spring compressed), and depress the trigger

Model 7300 Power Pinner CD Hand Welder
11
51308 Trigger Switch 42602 Gun RH
42603 Gun LH 31600 Spring Back 64105 Spring 31603 Electrode 31602 Slide
31601 Grommet 50033 Slee e
GUN COMPONENTS
20519 Tip
Without
Guide
20518 Tip
With Guide

Model 7300 Power Pinner CD Hand Welder
12
SERVICE POLICY
Proper operation of your machine is a top priority with the Gripnail Corporation. We will as-
sist you to the best of our abilities to see it is kept in peak operating condition.
In many cases, ser ice needs can be made simply by calling Gripnail Customer Ser ice De-
partment. If it becomes necessary for a ser ice technician to isit your plant, we can make the
arrangements.
All Gripnail machines are co ered under a one year New Machine Warranty (see Warranty
next page). Replacement parts co ered by the warranty are supplied free of charge, pro ided
the original parts are returned to Gripnail and do not shown signs of abuse.
All warranties on Gripnail machines are good only if Gripnail fasteners are used. If it is de-
termined that fasteners other than those manufactured by Gripnail ha e been used, the war-
ranty is oided. At Gripnail, we belie e in ser icing what we sell for the lifetime of the
equipment. If you are ha ing difficulty with your machine or if you ha e any questions re-
garding ser ice and warranty policy, please call, fax, or write:
Gripnail Customer Service Department
Gripnail Corporation
97 Dexter Road
East Pro idence, Rhode Island 02914
Phone: (800) 474-7624
(401) 431-1791
Fax (401) 438-8520
Email: gripnail@gripnail.com
Website: www.gripnail.com

Model 7300 Power Pinner CD Hand Welder
13
WARRANTY
All Gripnail Fastening Equipment is thoroughly inspected and tested before lea ing the factory.
Gripnail Corporation warranties its equipment to be free from defects in workmanship and mate-
rials under normal and proper use for a period of one (1) year from date of sale to original end
purchaser.
The warranty does not apply when repairs or attempted repairs ha e been made by persons other
than Gripnail Corporation’s authorized ser ice personnel, or where it is determined by our ser-
ice personnel that the equipment has been subjected to misuse, negligence or accident. If it is
determined that any fasteners other than those manufactured by Gripnail ha e been used in this
machine or tool, the warranty is terminated.
This warranty is not effecti e unless equipment is properly registered with the factory through
the use of warranty information card prior to use. Gripnail Corporation shall not be liable for
contingent damages or delays caused by defecti e materials or any other means beyond our con-
trol.
Gripnail Customer Service Department
Gripnail Corporation
97 Dexter Road
East Pro idence, Rhode Island 02914
Phone: (800) 474-7624
(401) 431-1791
Fax: (401) 438-8520
Email: gripnail@gripnail.com
Website: www.gripnail.com
Table of contents
Other Gripnail Welding System manuals